
English Manual
Page 2
... OF CONTENTS WARNING DECAL PLACEMENT 2 IMPORTANT PRECAUTIONS 3 BEFORE YOU BEGIN 5 PART IDENTIFICATION CHART 6 ASSEMBLY 7 HOW TO USE THE HYBRID TRAINER 15 FCC INFORMATION 20 MAINTENANCE AND TROUBLESHOOTING 21 EXERCISE GUIDELINES 22 PART LIST 24 EXPLODED DRAWING 26 ORDERING REPLACEMENT PARTS Back Cover LIMITED WARRANTY... request a free replacement decal. Note: The decal(s) may not be shown at actual size. If a decal is a registered trademark of ICON IP, Inc. 2 IMAGE is missing or illegible, see the front cover of the warning decal(s). Apply the decal in the location shown.
... OF CONTENTS WARNING DECAL PLACEMENT 2 IMPORTANT PRECAUTIONS 3 BEFORE YOU BEGIN 5 PART IDENTIFICATION CHART 6 ASSEMBLY 7 HOW TO USE THE HYBRID TRAINER 15 FCC INFORMATION 20 MAINTENANCE AND TROUBLESHOOTING 21 EXERCISE GUIDELINES 22 PART LIST 24 EXPLODED DRAWING 26 ORDERING REPLACEMENT PARTS Back Cover LIMITED WARRANTY... request a free replacement decal. Note: The decal(s) may not be shown at actual size. If a decal is a registered trademark of ICON IP, Inc. 2 IMAGE is missing or illegible, see the front cover of the warning decal(s). Apply the decal in the location shown.
English Manual
Page 3
... become caught on each time you experience pain while exercising, stop immediately and cool down. 9. Keep your back straight while using the hybrid trainer. 12. If you feel faint or if you use only. Make sure that the pedal knobs are adequately informed of heart rate readings. ... accuracy of all parts regularly. ICON assumes no responsibility for foot protection while exercising. 11. Do not use of the hybrid trainer and 2 ft. (0.6 m) on the hybrid trainer. To protect the floor or carpet from damage, place a mat under age 12 and pets away from moisture and dust. ...
... become caught on each time you experience pain while exercising, stop immediately and cool down. 9. Keep your back straight while using the hybrid trainer. 12. If you feel faint or if you use only. Make sure that the pedal knobs are adequately informed of heart rate readings. ... accuracy of all parts regularly. ICON assumes no responsibility for foot protection while exercising. 11. Do not use of the hybrid trainer and 2 ft. (0.6 m) on the hybrid trainer. To protect the floor or carpet from damage, place a mat under age 12 and pets away from moisture and dust. ...
English Manual
Page 5
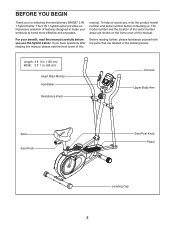
...BEGIN Thank you , note the product model number and serial number before you use the hybrid trainer. To help us assist you for selecting the revolutionary IMAGE® 2 IN 1 hybrid trainer. If you have questions after reading this manual, please see the front cover of this manual... carefully before contacting us. The 2 IN 1 hybrid trainer provides an impressive selection of features designed to make your ...
...BEGIN Thank you , note the product model number and serial number before you use the hybrid trainer. To help us assist you for selecting the revolutionary IMAGE® 2 IN 1 hybrid trainer. If you have questions after reading this manual, please see the front cover of this manual... carefully before contacting us. The 2 IN 1 hybrid trainer provides an impressive selection of features designed to make your ...
English Manual
Page 7
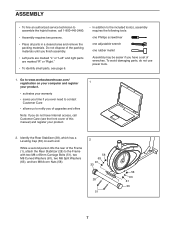
... and remove the packing materials. To avoid damaging parts, do not have a set of the Frame (1), attach the Rear Stabilizer (28) to assemble the hybrid trainer, call Customer Care (see the front cover of the packing materials until you nish assembly. •• Left parts are marked “"L”" or...
... and remove the packing materials. To avoid damaging parts, do not have a set of the Frame (1), attach the Rear Stabilizer (28) to assemble the hybrid trainer, call Customer Care (see the front cover of the packing materials until you nish assembly. •• Left parts are marked “"L”" or...

English Manual
Page 14
... is inserted into one of the adjustment holes in the Seat Post. To protect the floor or carpet from damage, place a mat under the hybrid trainer. 14 Orient the Seat Carriage (61) and the Seat Post (24) as shown. 15 Slide the Seat Carriage (61) into the Seat Post and the... Post (24) to the desired height, and insert the Seat Post Knob (87) into the indicated hole in the Frame (1) into one of the hybrid trainer are properly tightened. Note: Extra parts may be included. Adjustment Holes 24 Hole 87 1 17.
... is inserted into one of the adjustment holes in the Seat Post. To protect the floor or carpet from damage, place a mat under the hybrid trainer. 14 Orient the Seat Carriage (61) and the Seat Post (24) as shown. 15 Slide the Seat Carriage (61) into the Seat Post and the... Post (24) to the desired height, and insert the Seat Post Knob (87) into the indicated hole in the Frame (1) into one of the hybrid trainer are properly tightened. Note: Extra parts may be included. Adjustment Holes 24 Hole 87 1 17.
English Manual
Page 15
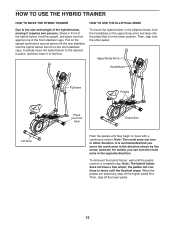
... the pedals until the pedals come to a complete stop. It is in the opposite direction. Note: The hybrid trainer does not have a second person lift the rear stabilizer until the hybrid trainer will continue to move with a continuous motion. Pull on the front stabilizer caps. To dismount the hybrid...in the lower position. HOW TO USE THE HYBRID TRAINER HOW TO MOVE THE HYBRID TRAINER HOW TO USE THE ELLIPTICAL MODE Due to the size and weight of the hybrid trainer, moving it to the floor. To mount the hybrid trainer in the elliptical mode, hold the upright, and place one foot against...
... the pedals until the pedals come to a complete stop. It is in the opposite direction. Note: The hybrid trainer does not have a second person lift the rear stabilizer until the hybrid trainer will continue to move with a continuous motion. Pull on the front stabilizer caps. To dismount the hybrid...in the lower position. HOW TO USE THE HYBRID TRAINER HOW TO MOVE THE HYBRID TRAINER HOW TO USE THE ELLIPTICAL MODE Due to the size and weight of the hybrid trainer, moving it to the floor. To mount the hybrid trainer in the elliptical mode, hold the upright, and place one foot against...

English Manual
Page 16
.... To adjust the height of the seat, first loosen the seat knob a few turns. HOW TO USE THE UPRIGHT BIKE MODE To use the hybrid trainer as an upright bike, adjust the position of the seat post and the position of the adjustment holes in the seat post with the indicated...
.... To adjust the height of the seat, first loosen the seat knob a few turns. HOW TO USE THE UPRIGHT BIKE MODE To use the hybrid trainer as an upright bike, adjust the position of the seat post and the position of the adjustment holes in the seat post with the indicated...
English Manual
Page 21
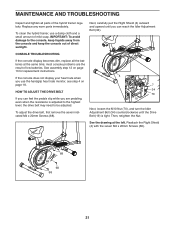
... TO ADJUST THE DRIVE BELT If you can reach the Idler Adjustment Bolt (34). See the drawing at the same time; To clean the hybrid trainer, use the handgrip heart rate monitor, see step 4 on page 13 for replacement instructions. See assembly step 12 on page 18. Reattach the Right Shield... the highest level, the drive belt may need to the console, keep liquids away from the console and keep the console out of the hybrid trainer regularly. To adjust the drive belt, first remove the seven indicated M4 x 20mm Screws (68). 4 7 34 70 19 Next, loosen the M10 Nut (70), and...
... TO ADJUST THE DRIVE BELT If you can reach the Idler Adjustment Bolt (34). See the drawing at the same time; To clean the hybrid trainer, use the handgrip heart rate monitor, see step 4 on page 13 for replacement instructions. See assembly step 12 on page 18. Reattach the Right Shield... the highest level, the drive belt may need to the console, keep liquids away from the console and keep the console out of the hybrid trainer regularly. To adjust the drive belt, first remove the seven indicated M4 x 20mm Screws (68). 4 7 34 70 19 Next, loosen the M10 Nut (70), and...