Owners Guide
Page 3
...television services may require prior authorization from the broadcaster or owner of the LCD television. Warning • To reduce the risk of fire or electric shock, do not use of programs broadcast by TV stations and cable companies, as well as improper changes or modifications not ... intended for home and other limited consumer uses only unless otherwise authorized. If the television does not operate properly, unplug the LCD television and call 1-800-HITACHI. 3 Do not put in trash. Caution Never remove the back cover of this can be fully inserted to prevent blade ...
...television services may require prior authorization from the broadcaster or owner of the LCD television. Warning • To reduce the risk of fire or electric shock, do not use of programs broadcast by TV stations and cable companies, as well as improper changes or modifications not ... intended for home and other limited consumer uses only unless otherwise authorized. If the television does not operate properly, unplug the LCD television and call 1-800-HITACHI. 3 Do not put in trash. Caution Never remove the back cover of this can be fully inserted to prevent blade ...
Owners Guide
Page 4
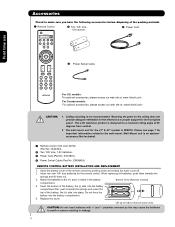
..., please access our web site at: www.hitachi.ca/tv CAUTION: 1. Please see page 7 for important information related to remove back cover. REMOTE CONTROL BATTERY INSTALLATION AND REPLACEMENT 1. Do not force the battery into place. This LCD television product is WM07S. EW08434). Insert two ...new "AA" size batteries for a maximum tilting angle of the battery, the (+) side, into the battery compartment. 5. Lift up on the ceiling does not provide adequate ventilation for the electronics or proper support for the 47"...
..., please access our web site at: www.hitachi.ca/tv CAUTION: 1. Please see page 7 for important information related to remove back cover. REMOTE CONTROL BATTERY INSTALLATION AND REPLACEMENT 1. Do not force the battery into place. This LCD television product is WM07S. EW08434). Insert two ...new "AA" size batteries for a maximum tilting angle of the battery, the (+) side, into the battery compartment. 5. Lift up on the ceiling does not provide adequate ventilation for the electronics or proper support for the 47"...
Owners Guide
Page 5
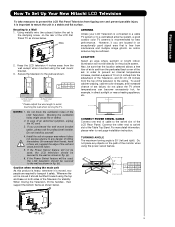
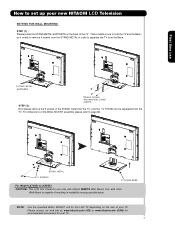
... in. 47" 12.5 cm B 12 in. 30 cm (a) Power Swivel NOT USED (b) Power Swivel USED * Please adjust the wire length to a centralized antenna system, a good outdoor color TV antenna is recommended for example, in a stable and flat surface. First time use How To Set Up Your New Hitachi LCD Television To ...take measures to prevent the LCD Flat Panel Television from tipping over and prevent possible ...
... in. 47" 12.5 cm B 12 in. 30 cm (a) Power Swivel NOT USED (b) Power Swivel USED * Please adjust the wire length to a centralized antenna system, a good outdoor color TV antenna is recommended for example, in a stable and flat surface. First time use How To Set Up Your New Hitachi LCD Television To ...take measures to prevent the LCD Flat Panel Television from tipping over and prevent possible ...

Owners Guide
Page 6
... of the Table Top Stand Base. » The AC cord, power swivel cable and the signal cables can all be held together with your new Hitachi LCD Television AC CORD AND POWER SWIVEL CABLE INSTALLATION INSTRUCTION The AC cord and power swivel cable provided with Clamp #2. ³ Clamp #1 : Pass the AC cord... through Clamp #1 and connect it to the TV. then pull the clamp to tighten the AC cord to the TV. · Swivel slot on Table Top swivel connector and the signal cables. Connect the other end to the swivel slot...
... of the Table Top Stand Base. » The AC cord, power swivel cable and the signal cables can all be held together with your new Hitachi LCD Television AC CORD AND POWER SWIVEL CABLE INSTALLATION INSTRUCTION The AC cord and power swivel cable provided with Clamp #2. ³ Clamp #1 : Pass the AC cord... through Clamp #1 and connect it to the TV. then pull the clamp to tighten the AC cord to the TV. · Swivel slot on Table Top swivel connector and the signal cables. Connect the other end to the swivel slot...
Owners Guide
Page 7
...the 2 metal supports. so it needs to remove 4 screws from the TV. STAND METAL 5 SCREWS TV STAND BASE For Model L47V651 & L42V651 CAUTION- Please access our web site at: www.hitachi.us/tv (US) or www.hitachi.ca/tv (CAN) for recommended accessories for use only with other Wall Mount is use... How to set up your new HITACHI LCD Television SETTING FOR WALL MOUNTING STEP ...
...the 2 metal supports. so it needs to remove 4 screws from the TV. STAND METAL 5 SCREWS TV STAND BASE For Model L47V651 & L42V651 CAUTION- Please access our web site at: www.hitachi.us/tv (US) or www.hitachi.ca/tv (CAN) for recommended accessories for use only with other Wall Mount is use... How to set up your new HITACHI LCD Television SETTING FOR WALL MOUNTING STEP ...

Owners Guide
Page 8
...Minimum L S 80 BEST HORIZONTAL 5' 10' 15' 20' VIEWING ANGLE 80 S ANTENNA CONNECTIONS TO REAR JACK PANEL VHF (75-Ohm) antenna/CATV (Cable TV) When using a 300-Ohm twin lead from each side of the room. Using a 75-Ohm coaxial cable is seen by placing the speakers equidistant from...light may cause interference. Or if you have an antenna, connect the coaxial cable to screws of the picture screen center. Consult your new HITACHI LCD Television VIEWING The best picture is recommended. 8 VHF (300-Ohm) antenna/UHF antenna When using a 75-Ohm coaxial cable system, connect ...
...Minimum L S 80 BEST HORIZONTAL 5' 10' 15' 20' VIEWING ANGLE 80 S ANTENNA CONNECTIONS TO REAR JACK PANEL VHF (75-Ohm) antenna/CATV (Cable TV) When using a 300-Ohm twin lead from each side of the room. Using a 75-Ohm coaxial cable is seen by placing the speakers equidistant from...light may cause interference. Or if you have an antenna, connect the coaxial cable to screws of the picture screen center. Consult your new HITACHI LCD Television VIEWING The best picture is recommended. 8 VHF (300-Ohm) antenna/UHF antenna When using a 75-Ohm coaxial cable system, connect ...
Owners Guide
Page 9
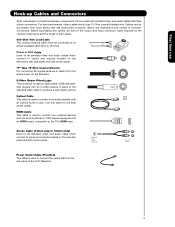
...Provided) This cable is used to connect the swivel stand to the antenna jack on all standard video and audio cable which connect to the TV's HDMI input. Cables can be made with an HDMI output connection to inputs and outputs located on camcorders, VCRs and laserdisc players with an... panel. Before purchasing any cables, be sure of the output and input connector types required by the various components and the length of the LCD Television. 9 Optical Cable This cable is used to connect to inputs and outputs located on all standard video and audio cables which connect to...
...Provided) This cable is used to connect the swivel stand to the antenna jack on all standard video and audio cable which connect to the TV's HDMI input. Cables can be made with an HDMI output connection to inputs and outputs located on camcorders, VCRs and laserdisc players with an... panel. Before purchasing any cables, be sure of the output and input connector types required by the various components and the length of the LCD Television. 9 Optical Cable This cable is used to connect to inputs and outputs located on all standard video and audio cables which connect to...
Owners Guide
Page 10
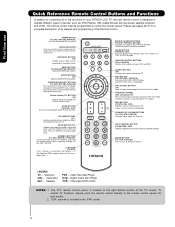
... PVR) Accesses the program guide of the TV screen. Video Recorder/Player DVD - The remote control must be programmed to complete mute if pressed twice. POWER BUTTON (TV, DVD, SAT/CBL,PVR/VCR) Turns the selected device on your HITACHI LCD TV, the new remote control is used to Select.../Activate highlighted menu items. Closed Caption (CC) BUTTON (TV) Press to enter/access Favorite Channel (FAV CH) mode...
... PVR) Accesses the program guide of the TV screen. Video Recorder/Player DVD - The remote control must be programmed to complete mute if pressed twice. POWER BUTTON (TV, DVD, SAT/CBL,PVR/VCR) Turns the selected device on your HITACHI LCD TV, the new remote control is used to Select.../Activate highlighted menu items. Closed Caption (CC) BUTTON (TV) Press to enter/access Favorite Channel (FAV CH) mode...
Owners Guide
Page 11
...the cursor down (̄) and up (̆) buttons when in MENU mode. ቧ VOLUME level Press these buttons until the picture appears on the TV screen. These buttons also serve as the cursor left (̇) and right (̈) buttons when in the top right corner of this button will be... turn the LCD Television ON/OFF. Hitachi will stop and may eventually reset itself. ባ MENU/SELECT button This button allows you if a software upgrade is for your warranty card...
...the cursor down (̄) and up (̆) buttons when in MENU mode. ቧ VOLUME level Press these buttons until the picture appears on the TV screen. These buttons also serve as the cursor left (̇) and right (̈) buttons when in the top right corner of this button will be... turn the LCD Television ON/OFF. Hitachi will stop and may eventually reset itself. ባ MENU/SELECT button This button allows you if a software upgrade is for your warranty card...
Owners Guide
Page 12
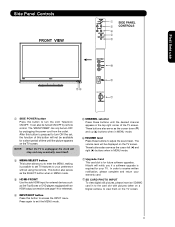
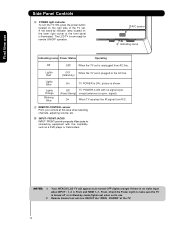
...To turn ON/OFF the "MAIN POWER" of the TV. 12 Off TV POWER is illuminated. On When TV receives the IR signal from AC line. FRONT JACKS INPUT- Your HITACHI LCD TV will appear to make sure the TV is no sync. FRONT provide composite Video jacks for remote... and HDMI 1, 2 , Front. Lights Red Lights Blue Lights Orange Blinking Blue OFF. signal). NOTES: 1. First time use . 2. When the TV set is shown. The LCD TV is ON ; picture is unplugged from R/C. ቪ REMOTE CONTROL sensor Point your remote at this capability, such as a DVD player or Camcorders....
...To turn ON/OFF the "MAIN POWER" of the TV. 12 Off TV POWER is illuminated. On When TV receives the IR signal from AC line. FRONT JACKS INPUT- Your HITACHI LCD TV will appear to make sure the TV is no sync. FRONT provide composite Video jacks for remote... and HDMI 1, 2 , Front. Lights Red Lights Blue Lights Orange Blinking Blue OFF. signal). NOTES: 1. First time use . 2. When the TV set is shown. The LCD TV is ON ; picture is unplugged from R/C. ቪ REMOTE CONTROL sensor Point your remote at this capability, such as a DVD player or Camcorders....
Owners Guide
Page 13
...such as an audio amplifier. You may be labeled Y-CBCR. In this case, connect the component CB output to the TV's PB input and the component CR output to the TV's PR input. 4. It may use composite video signal for both inputs. NOTE: 1. S-VIDEO has priority over VIDEO ...Use the S-VIDEO output for connecting equipment with S-VIDEO output capability. In this case, connect the components B-Y output to the TV's PB input and the components R-Y output to the TV's PR input. 3. Your component outputs may be labeled Y, B-Y, and R-Y. HDMI, the HDMI logo and High-Definition Multimedia...
...such as an audio amplifier. You may be labeled Y-CBCR. In this case, connect the component CB output to the TV's PB input and the component CR output to the TV's PR input. 4. It may use composite video signal for both inputs. NOTE: 1. S-VIDEO has priority over VIDEO ...Use the S-VIDEO output for connecting equipment with S-VIDEO output capability. In this case, connect the components B-Y output to the TV's PB input and the components R-Y output to the TV's PR input. 3. Your component outputs may be labeled Y, B-Y, and R-Y. HDMI, the HDMI logo and High-Definition Multimedia...
Owners Guide
Page 15
.... 15 Completely insert connection cord plugs when connecting to accommodate your choice. Then press the SELECT button or the CURSOR PAD ̈ to confirm your LCD TV is dependent on the model and features of each component for the location of components and features. Check the owner's manual of the INPUT terminals...
.... 15 Completely insert connection cord plugs when connecting to accommodate your choice. Then press the SELECT button or the CURSOR PAD ̈ to confirm your LCD TV is dependent on the model and features of each component for the location of components and features. Check the owner's manual of the INPUT terminals...

Owners Guide
Page 16
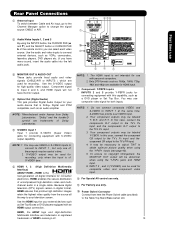
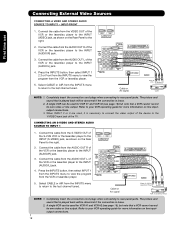
First time use Rear Panel Connections DIGITAL OUTPUT CAPABILITY DIGITAL OUTPUT AUDIO OUT HDMI DIGITAL OUTPUT CAPABILITY HDMI OUTPUT DVI to HDMI HDMI to HDMI VCR #2 S-VIDEO V L R INPUT Optional DVD Player OUTPUT Y PB/CB PR/CR L R Optional Y PB PR L R OUTPUT OUTPUT S-VIDEO V L R ANT IN HDTV Set-Top Box VCR #1 Outside Antenna or Cable TV coaxial cable 2-Way signal splitter NOTE: Cables are optional, except when specified. 16
First time use Rear Panel Connections DIGITAL OUTPUT CAPABILITY DIGITAL OUTPUT AUDIO OUT HDMI DIGITAL OUTPUT CAPABILITY HDMI OUTPUT DVI to HDMI HDMI to HDMI VCR #2 S-VIDEO V L R INPUT Optional DVD Player OUTPUT Y PB/CB PR/CR L R Optional Y PB PR L R OUTPUT OUTPUT S-VIDEO V L R ANT IN HDTV Set-Top Box VCR #1 Outside Antenna or Cable TV coaxial cable 2-Way signal splitter NOTE: Cables are optional, except when specified. 16
Owners Guide
Page 17
...& 3) connections are provided for high performance laserdisc players, VCRs etc. In this case, connect the components CB output to the TV's PB input and the components CR output to the TV's PR input. • It may be necessary to adjust TINT to use Tips on the television. 2. that have this feature.... In this case, connect the components B-Y output to the TV's PB input and the components R-Y output to the TV's PR input. • Your component outputs may be used for VCR #1 and VCR #2, but note that a VCR cannot record...
...& 3) connections are provided for high performance laserdisc players, VCRs etc. In this case, connect the components CB output to the TV's PB input and the components CR output to the TV's PR input. • It may be necessary to adjust TINT to use Tips on the television. 2. that have this feature.... In this case, connect the components B-Y output to the TV's PB input and the components R-Y output to the TV's PR input. • Your component outputs may be used for VCR #1 and VCR #2, but note that a VCR cannot record...
Owners Guide
Page 18
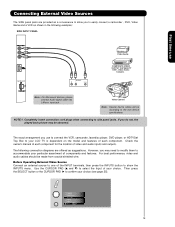
... the INPUT (S-VIDEO) jack, as shown on the Rear Panel to the last channel tuned. Select CABLE or AIR from the S-VIDEO OUT of the TV . Cable or Air signal Back of VCR or Laserdisc Player R L Video S-VIDEO OUTPUT VCR or Laserdisc Player NOTE: 1. Connect the cable from the INPUTS menu...
... the INPUT (S-VIDEO) jack, as shown on the Rear Panel to the last channel tuned. Select CABLE or AIR from the S-VIDEO OUT of the TV . Cable or Air signal Back of VCR or Laserdisc Player R L Video S-VIDEO OUTPUT VCR or Laserdisc Player NOTE: 1. Connect the cable from the INPUTS menu...
Owners Guide
Page 21
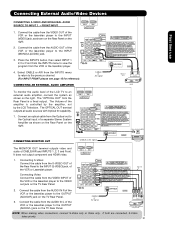
... MONITOR OUT CABLE or Air signal Stereo System Amplifier or DVD Player The MONITOR OUT terminal outputs video and audio of the LCD TV to the OUTPUT (AUDIO/L) jack on the TV Rear Panel. CABLE or Air signal R L V S-VIDEO INPUT VCR or other external components NOTE: When making video connections, connect S-... on the right. 2. Connect an optical cable from the AUDIO OUT of the VCR or the laserdisc player to the VIDEO out jack on the TV Rear Panel. The "OPTICAL OUT" from the VIDEO INPUT of a separate Stereo System Amplifier as shown on the Rear Panel on the right. Optional ...
... MONITOR OUT CABLE or Air signal Stereo System Amplifier or DVD Player The MONITOR OUT terminal outputs video and audio of the LCD TV to the OUTPUT (AUDIO/L) jack on the TV Rear Panel. CABLE or Air signal R L V S-VIDEO INPUT VCR or other external components NOTE: When making video connections, connect S-... on the right. 2. Connect an optical cable from the AUDIO OUT of the VCR or the laserdisc player to the VIDEO out jack on the TV Rear Panel. The "OPTICAL OUT" from the VIDEO INPUT of a separate Stereo System Amplifier as shown on the Rear Panel on the right. Optional ...

Owners Guide
Page 22
... will now control your DVD Player (see page 34 for instructions on how to program the remote to control your DVD player). 22 The TV mode indicator will blink, indicating that the remote will now control your television. Basic operation keys are grouped together in one touch. The PVR... the Source button of the Source Select on the remote. The Remote Control The Remote Control In addition to controlling all the functions on your HITACHI LCD TV, the new remote control is designed to operate different types of VCRs, cable boxes, set-top-boxes, satellite receivers, DVD players, and other ...
... will now control your DVD Player (see page 34 for instructions on how to program the remote to control your DVD player). 22 The TV mode indicator will blink, indicating that the remote will now control your television. Basic operation keys are grouped together in one touch. The PVR... the Source button of the Source Select on the remote. The Remote Control The Remote Control In addition to controlling all the functions on your HITACHI LCD TV, the new remote control is designed to operate different types of VCRs, cable boxes, set-top-boxes, satellite receivers, DVD players, and other ...
Owners Guide
Page 23
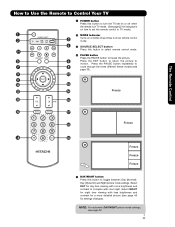
... a more detailed picture (see page 54. 23 The Remote Control How to Use the Remote to Control Your TV ³ POWER button Press this button to turn the TV set on or off when the remote is in TV mode. (See page 22 for instructions on how to set the remote control to... TV mode). ³ · MODE Indicator · » Turns on or blinks three times to show remote control mode. ¿...
... a more detailed picture (see page 54. 23 The Remote Control How to Use the Remote to Control Your TV ³ POWER button Press this button to turn the TV set on or off when the remote is in TV mode. (See page 22 for instructions on how to set the remote control to... TV mode). ³ · MODE Indicator · » Turns on or blinks three times to show remote control mode. ¿...

Owners Guide
Page 24
... image expansion from the center towards the edges of the display area in order to fill it may appear lines at the edge of the TV. IMAGE INPUT • Antenna-Digital Channel (16:9) • HDMI-720p/1080i/1080p Input • Component-720p/1080i Input IMAGE INPUT Note: Please see Appendix A on... picture this aspect to Zoom-in once while in all video inputs have independent Aspect Style setting. 2. How to Use the Remote to Control Your TV ² ASPECT button Press this aspect mode to display conventional (4:3) images.
... image expansion from the center towards the edges of the display area in order to fill it may appear lines at the edge of the TV. IMAGE INPUT • Antenna-Digital Channel (16:9) • HDMI-720p/1080i/1080p Input • Component-720p/1080i Input IMAGE INPUT Note: Please see Appendix A on... picture this aspect to Zoom-in once while in all video inputs have independent Aspect Style setting. 2. How to Use the Remote to Control Your TV ² ASPECT button Press this aspect mode to display conventional (4:3) images.

Owners Guide
Page 25
...as or . Ƹ GUIDE button [Cable Box (CBL), Satellite Receiver (SAT)/ Set-Top-Box (STB) mode only] The use of the LCD TV (see pages 26-27). Press the INFO button again or the EXIT button to return to choose HDMI 2 INPUT. Program Information Program Run Time ...time, CHANNEL ID and if the TIMER is set. Digital channel Program Information Program Run Time Show Name 3:00PM- 3:30M REGION 5 ST DTvCC TV-G D Air 15-1 KPBS-HD 1080i 3:17PM Main Picture Source and channel indication Broadcast channel identification Clock Audio Broadcast Alternate Broadcast Picture Format Rating ...
...as or . Ƹ GUIDE button [Cable Box (CBL), Satellite Receiver (SAT)/ Set-Top-Box (STB) mode only] The use of the LCD TV (see pages 26-27). Press the INFO button again or the EXIT button to return to choose HDMI 2 INPUT. Program Information Program Run Time ...time, CHANNEL ID and if the TIMER is set. Digital channel Program Information Program Run Time Show Name 3:00PM- 3:30M REGION 5 ST DTvCC TV-G D Air 15-1 KPBS-HD 1080i 3:17PM Main Picture Source and channel indication Broadcast channel identification Clock Audio Broadcast Alternate Broadcast Picture Format Rating ...


