Owners Guide
Page 9
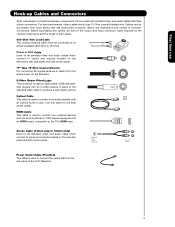
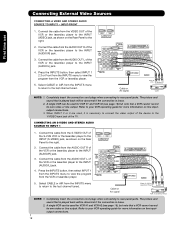
... rear jack panel and side control panel. HDMI Cable This cable is used to the TV's HDMI input. Stereo Cable (3.8mm plug to 3.5mm plug) Used on all standard video and audio cables which connect to inputs and outputs located on camcorders, VCRs and laserdisc players with an HDMI output connection to...is used to connect the swivel stand to 75-Ohm). First time use 75-Ohm coaxial shielded wire. Below are illustrations and names of the LCD Television. 9 Phono or RCA Cable Used on all standard video and audio cable which connect to an audio amplifier with shielded video and audio ...
... rear jack panel and side control panel. HDMI Cable This cable is used to the TV's HDMI input. Stereo Cable (3.8mm plug to 3.5mm plug) Used on all standard video and audio cables which connect to inputs and outputs located on camcorders, VCRs and laserdisc players with an HDMI output connection to...is used to connect the swivel stand to 75-Ohm). First time use 75-Ohm coaxial shielded wire. Below are illustrations and names of the LCD Television. 9 Phono or RCA Cable Used on all standard video and audio cable which connect to an audio amplifier with shielded video and audio ...
Owners Guide
Page 10
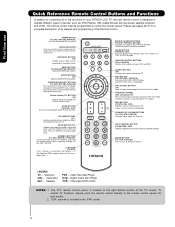
...PVR/VCR) Controls the functions of your HITACHI LCD TV, the new remote control is designed to operate different types of the Universal Remote Control to show and change the Picture-in Set-Top-Box (STB) mode or when the TV uses a digital input. LEGEND TV - Videocassete Recorder NOTES: 1. First ...NIGHT mode. Cable Box SAT - INPUTS BUTTON (TV) Accesses the INPUTS menu system. ASPECT BUTTON (TV) Changes the aspect ratio of the Remote Control. CHANNEL UP & DOWN BUTTONS (TV, CBL, STB, PVR/VCR) Changes up and decrease down the channel. VOLUME BUTTONS (TV ) Increase up or down to ...
...PVR/VCR) Controls the functions of your HITACHI LCD TV, the new remote control is designed to operate different types of the Universal Remote Control to show and change the Picture-in Set-Top-Box (STB) mode or when the TV uses a digital input. LEGEND TV - Videocassete Recorder NOTES: 1. First ...NIGHT mode. Cable Box SAT - INPUTS BUTTON (TV) Accesses the INPUTS menu system. ASPECT BUTTON (TV) Changes the aspect ratio of the Remote Control. CHANNEL UP & DOWN BUTTONS (TV, CBL, STB, PVR/VCR) Changes up and decrease down the channel. VOLUME BUTTONS (TV ) Increase up or down to ...
Owners Guide
Page 11
... button This button allows you if a software upgrade is for reference). ብ INPUT/EXIT button Press this button to turn OFF by remote control. NOTE: When the TV is unplugged, the clock will not be turn the LCD Television ON/OFF. Hitachi will be turned ON/OFF by unplugging the power cord from the...
... button This button allows you if a software upgrade is for reference). ብ INPUT/EXIT button Press this button to turn OFF by remote control. NOTE: When the TV is unplugged, the clock will not be turn the LCD Television ON/OFF. Hitachi will be turned ON/OFF by unplugging the power cord from the...
Owners Guide
Page 12
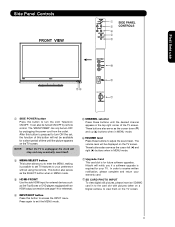
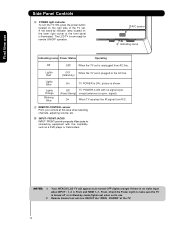
...volume, etc. ቫ INPUT- When the TV set . Off TV POWER is no sync. First time use . 2. FRONT JACKS INPUT- A red stand-by mode (lights red) when not in Stand-by indicator lamp located on the right side of the TV set is ON ; Your HITACHI LCD TV will appear to make sure ...the TV is turned off or in use Side Panel Controls...
...volume, etc. ቫ INPUT- When the TV set . Off TV POWER is no sync. First time use . 2. FRONT JACKS INPUT- A red stand-by mode (lights red) when not in Stand-by indicator lamp located on the right side of the TV set is ON ; Your HITACHI LCD TV will appear to make sure ...the TV is turned off or in use Side Panel Controls...
Owners Guide
Page 13
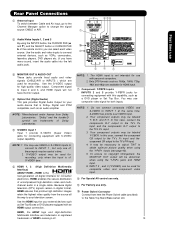
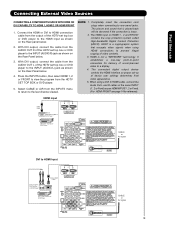
...to your external devices such as a DVD player or Set Top Box. In this case, connect the components B-Y output to the TV's PB input and the components R-Y output to the TV's PR input. 4. HDMI enables the secure distribution of HDMI Licensing LLC. ቫ ብ ባ ቤ ቢ NOTE: 1. ...-generation all the way to INPUT 1 at a time. 2. In this case, connect the component CB output to the TV's PB input and the component CR output to the TV's PR input. 3. Rear Panel Connections ቢ Antenna Input To switch between Cable and Air input, go to the Channel Manager...
...to your external devices such as a DVD player or Set Top Box. In this case, connect the components B-Y output to the TV's PB input and the components R-Y output to the TV's PR input. 4. HDMI enables the secure distribution of HDMI Licensing LLC. ቫ ብ ባ ቤ ቢ NOTE: 1. ...-generation all the way to INPUT 1 at a time. 2. In this case, connect the component CB output to the TV's PB input and the component CR output to the TV's PR input. 3. Rear Panel Connections ቢ Antenna Input To switch between Cable and Air input, go to the Channel Manager...

Owners Guide
Page 14
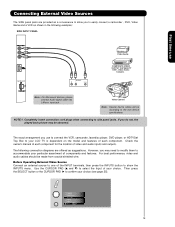
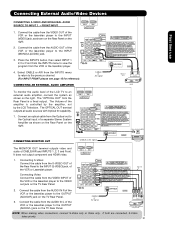
... Set-Top-Box or DIGITALOUTPUT DVD Player AUDIO OUTPUT R L Note : Special device cables will be according to connect the audio output into the side Audio Input jacks) : A) Connecting HDMI signal. If you to easily connect HDMI or DVI signals from a DVD, Set Top Box , Video Game as shown in the ...The SIDE panel jacks are provided as a convenience to allow you do not, the played back picture may be according to side panel jacks. SIDE INPUT PANEL Note : Special device cables will be abnormal. 14 DVI DIGITAL OUTPUT CAPABILITY DVD , Set Top Box, Video Game Console. SIDE...
... Set-Top-Box or DIGITALOUTPUT DVD Player AUDIO OUTPUT R L Note : Special device cables will be according to connect the audio output into the side Audio Input jacks) : A) Connecting HDMI signal. If you to easily connect HDMI or DVI signals from a DVD, Set Top Box , Video Game as shown in the ...The SIDE panel jacks are provided as a convenience to allow you do not, the played back picture may be according to side panel jacks. SIDE INPUT PANEL Note : Special device cables will be abnormal. 14 DVI DIGITAL OUTPUT CAPABILITY DVD , Set Top Box, Video Game Console. SIDE...
Owners Guide
Page 15
...coaxial shielded wire. NOTE:1. However, you do not, the played back picture may need to modify them to show the INPUTS menu. HDMI 2 HDMI-Front Air /Cable Input 1 Input 2 Move SEL Sel. 15 Completely insert connection cord plugs when connecting to confirm your choice (see page 25). If... Video Sources The SIDE panel jacks are offered as shown in the following examples: SIDE INPUT PANEL First time use to connect the VCR, camcorder, laserdisc player, DVD player, or HDTVSet Top Box to your LCD TV is dependent on the model and features of components and features.
...coaxial shielded wire. NOTE:1. However, you do not, the played back picture may need to modify them to show the INPUTS menu. HDMI 2 HDMI-Front Air /Cable Input 1 Input 2 Move SEL Sel. 15 Completely insert connection cord plugs when connecting to confirm your choice (see page 25). If... Video Sources The SIDE panel jacks are offered as shown in the following examples: SIDE INPUT PANEL First time use to connect the VCR, camcorder, laserdisc player, DVD player, or HDTVSet Top Box to your LCD TV is dependent on the model and features of components and features.

Owners Guide
Page 16
First time use Rear Panel Connections DIGITAL OUTPUT CAPABILITY DIGITAL OUTPUT AUDIO OUT HDMI DIGITAL OUTPUT CAPABILITY HDMI OUTPUT DVI to HDMI HDMI to HDMI VCR #2 S-VIDEO V L R INPUT Optional DVD Player OUTPUT Y PB/CB PR/CR L R Optional Y PB PR L R OUTPUT OUTPUT S-VIDEO V L R ANT IN HDTV Set-Top Box VCR #1 Outside Antenna or Cable TV coaxial cable 2-Way signal splitter NOTE: Cables are optional, except when specified. 16
First time use Rear Panel Connections DIGITAL OUTPUT CAPABILITY DIGITAL OUTPUT AUDIO OUT HDMI DIGITAL OUTPUT CAPABILITY HDMI OUTPUT DVI to HDMI HDMI to HDMI VCR #2 S-VIDEO V L R INPUT Optional DVD Player OUTPUT Y PB/CB PR/CR L R Optional Y PB PR L R OUTPUT OUTPUT S-VIDEO V L R ANT IN HDTV Set-Top Box VCR #1 Outside Antenna or Cable TV coaxial cable 2-Way signal splitter NOTE: Cables are optional, except when specified. 16
Owners Guide
Page 17
...Refer to your device has this case, connect the components CB output to the TV's PB input and the components CR output to the TV's PR input. • It may be necessary to adjust TINT to the TV's PR input. • Your component outputs may be used for VCR #1 and VCR #2,... Y, B-Y, and R-Y. INSTALLATION RECOMMENDATION: 1. that have this case, connect the components B-Y output to the TV's PB input and the components R-Y output to obtain optimum picture quality when using the Y-PBPR inputs. (See page 40). • To ensure no copyright infringement, the MONITOR OUT output will assure a ...
...Refer to your device has this case, connect the components CB output to the TV's PB input and the components CR output to the TV's PR input. • It may be necessary to adjust TINT to the TV's PR input. • Your component outputs may be used for VCR #1 and VCR #2,... Y, B-Y, and R-Y. INSTALLATION RECOMMENDATION: 1. that have this case, connect the components B-Y output to the TV's PB input and the components R-Y output to obtain optimum picture quality when using the Y-PBPR inputs. (See page 40). • To ensure no copyright infringement, the MONITOR OUT output will assure a ...
Owners Guide
Page 18
... player to view the program from the VCR or laserdisc player. 5. Select CABLE or AIR from the INPUTS menu to return to the INPUT (AUDIO/L) jack. 4. Connect the cable from the AUDIO OUT L of the TV . The picture and sound that is played back will be abnormal if the connection is necessary to... connect the video output of the device to the Y/VIDEO input jack of the VCR or the laserdisc player to the last channel tuned...
... player to view the program from the VCR or laserdisc player. 5. Select CABLE or AIR from the INPUTS menu to return to the INPUT (AUDIO/L) jack. 4. Connect the cable from the AUDIO OUT L of the TV . The picture and sound that is played back will be abnormal if the connection is necessary to... connect the video output of the device to the Y/VIDEO input jack of the VCR or the laserdisc player to the last channel tuned...
Owners Guide
Page 19
.... 4. Connect the HDMI or DVI to HDMI connection cable from the HDTV SET TOP BOX or DVD player. 5. HDMI is loose. 2. Press the INPUTS button, then select HDMI 1, 2 or FRONT to rear panel jacks. It establishes a one-way point-to-point connection for reference). Completely insert the ...connection cord plugs when connecting to view the program from the output of uncompressed video to the HDMI input as shown on the Rear Panel below . 3. The connected digital output device controls the HDMI interface so proper set top box or ...
.... 4. Connect the HDMI or DVI to HDMI connection cable from the HDTV SET TOP BOX or DVD player. 5. HDMI is loose. 2. Press the INPUTS button, then select HDMI 1, 2 or FRONT to rear panel jacks. It establishes a one-way point-to-point connection for reference). Completely insert the ...connection cord plugs when connecting to view the program from the output of uncompressed video to the HDMI input as shown on the Rear Panel below . 3. The connected digital output device controls the HDMI interface so proper set top box or ...

Owners Guide
Page 20
... 3 :Y-PBPR. 1. Connect the cable from the PR/CR OUT or RY OUT of the Laserdisc/DVD player or HDTV set top box to the INPUT (Y) jack, as shown on REAR PANEL CONNECTIONS. 5. NOTE: 1. Connect the cable from the Y OUT of the Laserdisc/DVD player or HDTV set top box to .../R) jack. Connect the cable from the AUDIO OUT R of the Laserdisc/DVD player or HDTV set top box to the INPUT (AUDIO/L) jack. 6. Completely insert the connection cord plugs when connecting to view the program from the PB/CB OUT or BY OUT of DVD Player ...
... 3 :Y-PBPR. 1. Connect the cable from the PR/CR OUT or RY OUT of the Laserdisc/DVD player or HDTV set top box to the INPUT (Y) jack, as shown on REAR PANEL CONNECTIONS. 5. NOTE: 1. Connect the cable from the Y OUT of the Laserdisc/DVD player or HDTV set top box to .../R) jack. Connect the cable from the AUDIO OUT R of the Laserdisc/DVD player or HDTV set top box to the INPUT (AUDIO/L) jack. 6. Completely insert the connection cord plugs when connecting to view the program from the PB/CB OUT or BY OUT of DVD Player ...
Owners Guide
Page 21
... the Rear Panel is controlled by the amplifier, not by the LCD Television. The "OPTICAL OUT" from the INPUTS menu to the VIDEO out jack on the TV Rear Panel. 3. Connecting Video: Connect the cable from the VIDEO INPUT of the VCR or the laserdisc player to view the program from...CONNECTING AN EXTERNAL AUDIO AMPLIFIER CABLE or Air signal Back of VCR VIDEOOUT AUDIOOUT OUTPUT VCR To monitor the audio level of the LCD TV to the Optical input of the Rear Panel to the previous channel. (For INPUT FRONT please see page 15 for reference). Connecting S-Video: Connect the cable from the...
... the Rear Panel is controlled by the amplifier, not by the LCD Television. The "OPTICAL OUT" from the INPUTS menu to the VIDEO out jack on the TV Rear Panel. 3. Connecting Video: Connect the cable from the VIDEO INPUT of the VCR or the laserdisc player to view the program from...CONNECTING AN EXTERNAL AUDIO AMPLIFIER CABLE or Air signal Back of VCR VIDEOOUT AUDIOOUT OUTPUT VCR To monitor the audio level of the LCD TV to the Optical input of the Rear Panel to the previous channel. (For INPUT FRONT please see page 15 for reference). Connecting S-Video: Connect the cable from the...

Owners Guide
Page 24
...this aspect mode to display conventional (4:3) images. How to Use the Remote to Control Your TV ² ASPECT button Press this button to Zoom-in once while in 16:9 aspect. Depending on the input signal format received, the picture format ratio allows you choose 4:3 EXPANDED/ZOOM1/ZOOM2 or ... HDTV and DVD's preserving the original 16:9 aspect ratio showing 100% of the TV. IMAGE INPUT • S-Video/Video 16:9 Input (Auto Aspect: On) • HDMI-480i/480p 16:9 Input (Auto Aspect: On) • Component-480i/480p 16:9 Input (Auto Aspect: On) Note: Please see also page 42). 24 3. The ...
...this aspect mode to display conventional (4:3) images. How to Use the Remote to Control Your TV ² ASPECT button Press this button to Zoom-in once while in 16:9 aspect. Depending on the input signal format received, the picture format ratio allows you choose 4:3 EXPANDED/ZOOM1/ZOOM2 or ... HDTV and DVD's preserving the original 16:9 aspect ratio showing 100% of the TV. IMAGE INPUT • S-Video/Video 16:9 Input (Auto Aspect: On) • HDMI-480i/480p 16:9 Input (Auto Aspect: On) • Component-480i/480p 16:9 Input (Auto Aspect: On) Note: Please see also page 42). 24 3. The ...

Owners Guide
Page 25
...CBL), and (SAT/STB). FRONT Select to INPUT 3 Y-PBPR: 3 480i 3:17PM Input Signal Format Auto NOTE: 1. Press this button is only applicable when the remote control is locked. 25 Use the CURSOR and SELECT buttons to access the Channel Guide of the LCD TV (see pages 26-27). AIR/CABLE Select... between Air or Cable signal. µ PICTURE-IN-PICTURE button See separate section on the TV screen when available. HDMI 2 Select to the Photo Input in (CBL) and (SAT/STB) mode. PHOTO INPUT Select to access your ...
...CBL), and (SAT/STB). FRONT Select to INPUT 3 Y-PBPR: 3 480i 3:17PM Input Signal Format Auto NOTE: 1. Press this button is only applicable when the remote control is locked. 25 Use the CURSOR and SELECT buttons to access the Channel Guide of the LCD TV (see pages 26-27). AIR/CABLE Select... between Air or Cable signal. µ PICTURE-IN-PICTURE button See separate section on the TV screen when available. HDMI 2 Select to the Photo Input in (CBL) and (SAT/STB) mode. PHOTO INPUT Select to access your ...

Owners Guide
Page 26
... detected" if the MMC/SD memory card is not inserted. 26 The maximum number of the TV. 1. Press the INFO button to access PHOTO Input menu and to navigate and select the PHOTO Input menu. Press the picture number to jump from your digital camera, MMC/SD memory cards using ...the Photo Input in individual photos. 3. Press the CURSOR PAD ̇ or ̈ to picture. Picture No. Please Enter Picture Number -- 6. The Remote Control How to Use the Remote to Control Your TV PHOTO INPUT This feature is useful for viewing digital still pictures...
... detected" if the MMC/SD memory card is not inserted. 26 The maximum number of the TV. 1. Press the INFO button to access PHOTO Input menu and to navigate and select the PHOTO Input menu. Press the picture number to jump from your digital camera, MMC/SD memory cards using ...the Photo Input in individual photos. 3. Press the CURSOR PAD ̇ or ̈ to picture. Picture No. Please Enter Picture Number -- 6. The Remote Control How to Use the Remote to Control Your TV PHOTO INPUT This feature is useful for viewing digital still pictures...

Owners Guide
Page 29
... picture simultaneously, with every press of the CURSOR PAD buttons. The Remote Control Picture-In-Picture (PIP) Your HITACHI LCD TV incorporates one program at right to view Digital Channels and Video inputs on the screen. In SPLIT mode, press the CURSOR PAD ( ̇ or ̈ ) to normal ...EXIT button. Analog channels cannot be viewed in -Picture feature is convenient when you want to watch a TV program while viewing other programs from any of the video inputs. The Orange highlighted channel display will appear in SPLIT mode. To select between main picture and PIP sub...
... picture simultaneously, with every press of the CURSOR PAD buttons. The Remote Control Picture-In-Picture (PIP) Your HITACHI LCD TV incorporates one program at right to view Digital Channels and Video inputs on the screen. In SPLIT mode, press the CURSOR PAD ( ̇ or ̈ ) to normal ...EXIT button. Analog channels cannot be viewed in -Picture feature is convenient when you want to watch a TV program while viewing other programs from any of the video inputs. The Orange highlighted channel display will appear in SPLIT mode. To select between main picture and PIP sub...

Owners Guide
Page 31
...chosen precoded cable codes : -Power -Menu -Exit -Guide -Cursor & Select -Info -Channel Up & Down -Last CH -Number PAD -Enter ባ EXCLUSIVE TV buttons These buttons are removed from the remote control. The remote will flash 3 times if the code was accepted. ባ ቢ 4. When this occurs,...Control ባ 1. The remote will remember the codes you have programmed until the batteries are for operating the TV : -Day/Night -Aspect -PIP -Pause -CC -Vol Up & Down -Mute -Inputs (only if programmed, refer to page 35) MY CABLE BOX CODE IS: NOTE: Refer to instruction manual ...
...chosen precoded cable codes : -Power -Menu -Exit -Guide -Cursor & Select -Info -Channel Up & Down -Last CH -Number PAD -Enter ባ EXCLUSIVE TV buttons These buttons are removed from the remote control. The remote will flash 3 times if the code was accepted. ባ ቢ 4. When this occurs,...Control ባ 1. The remote will remember the codes you have programmed until the batteries are for operating the TV : -Day/Night -Aspect -PIP -Pause -CC -Vol Up & Down -Mute -Inputs (only if programmed, refer to page 35) MY CABLE BOX CODE IS: NOTE: Refer to instruction manual ...
Owners Guide
Page 32
...-Cursor & Select -Number PAD -Menu -Exit -Info -Enter, Dash -Channel Up & Down -Guide -Last CH ባ EXCLUSIVE TV buttons These buttons are removed from the remote control. THhoewRteomUotseeCtohnetrRolefmoroStett-TooCp-oBnotxr/oSlaYteolulirteTRVeceiver Functions The Remote Control OPERATING THE PRECODED FUNCTION FOR YOUR SET-TOP... the codes you have programmed until the batteries are for operating the TV : -Day/Night -Aspect -PIP -CC -Vol Up & Down -Pause MY Satellite RECEIVER/ SET-TOP-BOX CODE IS: -Mute -Inputs (Only if programmed, refer to pages 36-37 for pre- Turn...
...-Cursor & Select -Number PAD -Menu -Exit -Info -Enter, Dash -Channel Up & Down -Guide -Last CH ባ EXCLUSIVE TV buttons These buttons are removed from the remote control. THhoewRteomUotseeCtohnetrRolefmoroStett-TooCp-oBnotxr/oSlaYteolulirteTRVeceiver Functions The Remote Control OPERATING THE PRECODED FUNCTION FOR YOUR SET-TOP... the codes you have programmed until the batteries are for operating the TV : -Day/Night -Aspect -PIP -CC -Vol Up & Down -Pause MY Satellite RECEIVER/ SET-TOP-BOX CODE IS: -Mute -Inputs (Only if programmed, refer to pages 36-37 for pre- Turn...

Owners Guide
Page 33
... chosen precoded DVD codes : -Power -Number PAD -Menu -Play, Stop, Pause, -Info RWD, FWD, Skip RWD, -Cursor & Select Skip FWD. ባ EXCLUSIVE TV Buttons These buttons are removed from the remote control. To switch to DVD pre-coded mode, use the ባ ባ SOURCE SELECT button on pages...; 1. You must first program the remote to instruction manual of the DVD Player for operation of the buttons exclusively for operating the TV : -Day/Night -Aspect -PIP -Exit -CC -Inputs (Only if -Vol Up & Down programmed, refer -Mute to page 35) MY DVD PLAYER CODE IS: NOTE: Refer to...
... chosen precoded DVD codes : -Power -Number PAD -Menu -Play, Stop, Pause, -Info RWD, FWD, Skip RWD, -Cursor & Select Skip FWD. ባ EXCLUSIVE TV Buttons These buttons are removed from the remote control. To switch to DVD pre-coded mode, use the ባ ባ SOURCE SELECT button on pages...; 1. You must first program the remote to instruction manual of the DVD Player for operation of the buttons exclusively for operating the TV : -Day/Night -Aspect -PIP -Exit -CC -Inputs (Only if -Vol Up & Down programmed, refer -Mute to page 35) MY DVD PLAYER CODE IS: NOTE: Refer to...