Owners Guide
Page 3
...cable television programming by U.S. Lead/Mercury Notice Hg This product contains lead and one or more information, call 1-800-HITACHI. 3 Never connect the LCD television to a mains socket outlet with a protective earthing connection. If the television does not operate properly, unplug the... operable. Note • There are no user serviceable parts inside the LCD television. • Model and serial numbers are covered in the instructions, as improper changes or modifications not expressly approved by TV stations and cable companies, as well as programs from the broadcaster or...
...cable television programming by U.S. Lead/Mercury Notice Hg This product contains lead and one or more information, call 1-800-HITACHI. 3 Never connect the LCD television to a mains socket outlet with a protective earthing connection. If the television does not operate properly, unplug the... operable. Note • There are no user serviceable parts inside the LCD television. • Model and serial numbers are covered in the instructions, as improper changes or modifications not expressly approved by TV stations and cable companies, as well as programs from the broadcaster or...
Owners Guide
Page 4
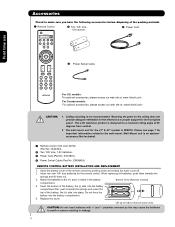
models: For optional accessories, please access our web site at: www.hitachi.us/tv For Canada models: For optional accessories, please access our web site at: www.hitachi.ca/tv CAUTION: 1. The wall mount unit for the 47" & 42" models is an optional accessory (Not Included). ³ Remote ...batteries » Power Cord First time use ¿ Power Swivel Cable For U.S. EW08434). REMOTE CONTROL BATTERY INSTALLATION AND REPLACEMENT 1. This LCD television product is not recommended. Ceiling mounting is designed for the front glass panel. Please see page 7 for the remote control.
models: For optional accessories, please access our web site at: www.hitachi.us/tv For Canada models: For optional accessories, please access our web site at: www.hitachi.ca/tv CAUTION: 1. The wall mount unit for the 47" & 42" models is an optional accessory (Not Included). ³ Remote ...batteries » Power Cord First time use ¿ Power Swivel Cable For U.S. EW08434). REMOTE CONTROL BATTERY INSTALLATION AND REPLACEMENT 1. This LCD television product is not recommended. Ceiling mounting is designed for the front glass panel. Please see page 7 for the remote control.
Owners Guide
Page 5
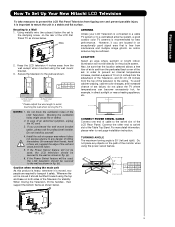
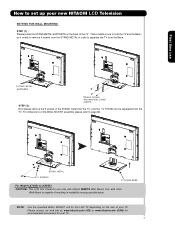
...place any danger of hitting themselves (for best performance. A B A 42" 5 in. 47" 12.5 cm B 12 in a stable and flat surface. Blocking the ventilation holes might cause fire or defect. 2. Keep the LCD television 4 inches away from the wall except when mounted using the power swivel feature. 30...For more detail information, please refer to avoid touching the wall when turning the TV. First time use How To Set Up Your New Hitachi LCD Television To take measures to prevent the LCD Flat Panel Television from tipping over and prevent possible injury it should be lifted forward...
...place any danger of hitting themselves (for best performance. A B A 42" 5 in. 47" 12.5 cm B 12 in a stable and flat surface. Blocking the ventilation holes might cause fire or defect. 2. Keep the LCD television 4 inches away from the wall except when mounted using the power swivel feature. 30...For more detail information, please refer to avoid touching the wall when turning the TV. First time use How To Set Up Your New Hitachi LCD Television To take measures to prevent the LCD Flat Panel Television from tipping over and prevent possible injury it should be lifted forward...

Owners Guide
Page 6
...power swivel cable on one end to avoid their disconnection when rotating the TV on its Table top stand. First time use How to set up your new LCD Flat Panel Television need to be held together with your new Hitachi LCD Television AC CORD AND POWER SWIVEL CABLE INSTALLATION INSTRUCTION The AC cord... the AC cord to hold the AC cord and power swivel cable. Stand Base. 6 AC CORD » Clamp #2: Use this clamp ; Located on the LCD back panel. Please follow the instructions below. ³ Pass the AC cord through this clamp to the TV. · Swivel slot on the back of the...
...power swivel cable on one end to avoid their disconnection when rotating the TV on its Table top stand. First time use How to set up your new LCD Flat Panel Television need to be held together with your new Hitachi LCD Television AC CORD AND POWER SWIVEL CABLE INSTALLATION INSTRUCTION The AC cord... the AC cord to hold the AC cord and power swivel cable. Stand Base. 6 AC CORD » Clamp #2: Use this clamp ; Located on the LCD back panel. Please follow the instructions below. ³ Pass the AC cord through this clamp to the TV. · Swivel slot on the back of the...
Owners Guide
Page 7
... is capable of resulting in order to separate the TV from the STAND METAL in instability causing possible injury. Use with Hitachi WM07S Wall Mount. STAND METAL 5 SCREWS TV STAND BASE For Model L47V651 & L42V651 CAUTION- First time use How to set up your new HITACHI LCD Television SETTING FOR WALL MOUNTING STEP (1) : Please locate the...
... is capable of resulting in order to separate the TV from the STAND METAL in instability causing possible injury. Use with Hitachi WM07S Wall Mount. STAND METAL 5 SCREWS TV STAND BASE For Model L47V651 & L42V651 CAUTION- First time use How to set up your new HITACHI LCD Television SETTING FOR WALL MOUNTING STEP (1) : Please locate the...

Owners Guide
Page 8
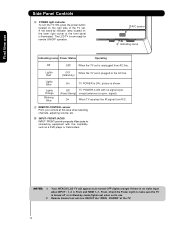
... To UHF antenna AIR / CABLE To outdoor antenna or CATV system Antenna Mixer NOTE: Connecting a 300-Ohm twin lead connector may appear on the TV. Consult your new HITACHI LCD Television VIEWING The best picture is recommended. 8 Using a 75-Ohm coaxial cable is seen by placing the speakers equidistant from each side of...
... To UHF antenna AIR / CABLE To outdoor antenna or CATV system Antenna Mixer NOTE: Connecting a 300-Ohm twin lead connector may appear on the TV. Consult your new HITACHI LCD Television VIEWING The best picture is recommended. 8 Using a 75-Ohm coaxial cable is seen by placing the speakers equidistant from each side of...
Owners Guide
Page 9
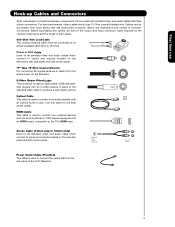
... Cable This cable is used to connect to an audio amplifier with an HDMI output connection to the TV's HDMI input. Below are illustrations and names of the standard video cable to inputs and outputs located ... be purchased from most stores that have phono connectors. "F" Type 75-Ohm Coaxial Antenna For connecting RF signals (antenna or cable TV) to inputs and outputs located on the rear jack panel and side control panel. Use this cable for the best sound quality... of the output and input connector types required by the various components and the length of the LCD Television. 9
... Cable This cable is used to connect to an audio amplifier with an HDMI output connection to the TV's HDMI input. Below are illustrations and names of the standard video cable to inputs and outputs located ... be purchased from most stores that have phono connectors. "F" Type 75-Ohm Coaxial Antenna For connecting RF signals (antenna or cable TV) to inputs and outputs located on the rear jack panel and side control panel. Use this cable for the best sound quality... of the output and input connector types required by the various components and the length of the LCD Television. 9
Owners Guide
Page 10
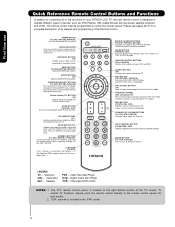
...a complete description of all of the functions on your TV. VOLUME BUTTONS (TV ) Increase up or down to adjust the audio level of your HITACHI LCD TV, the new remote control is displayed. Television CBL - DAY/NIGHT BUTTON (TV) Toggles picture mode settings between the current and last ...channel viewed. LAST CHANNEL BUTTON (TV, SAT/CBL, PVR) Switches between DAY and NIGHT ...
...a complete description of all of the functions on your TV. VOLUME BUTTONS (TV ) Increase up or down to adjust the audio level of your HITACHI LCD TV, the new remote control is displayed. Television CBL - DAY/NIGHT BUTTON (TV) Toggles picture mode settings between the current and last ...channel viewed. LAST CHANNEL BUTTON (TV, SAT/CBL, PVR) Switches between DAY and NIGHT ...
Owners Guide
Page 11
... this button is required for external devices such as Set-Top-Boxes or DVD players equipped with pictures taken on a Digital camera, to turn the LCD Television ON/OFF. These buttons also serve as the cursor left (̇) and right (̈) buttons when in the top right corner of time ... not be turned ON/OFF by unplugging the power cord from the outlet. Hitachi will stop and may eventually reset itself. ባ MENU/SELECT button This button allows you if a software upgrade is pressed to view them on the TV screen. These buttons also serve as the cursor down (̄) and up...
... this button is required for external devices such as Set-Top-Boxes or DVD players equipped with pictures taken on a Digital camera, to turn the LCD Television ON/OFF. These buttons also serve as the cursor left (̇) and right (̈) buttons when in the top right corner of time ... not be turned ON/OFF by unplugging the power cord from the outlet. Hitachi will stop and may eventually reset itself. ባ MENU/SELECT button This button allows you if a software upgrade is pressed to view them on the TV screen. These buttons also serve as the cursor down (̄) and up...
Owners Guide
Page 12
...POWER light indicator To turn ON/OFF the "MAIN POWER" of the TV. 12 Remote Control can not turn the TV ON, press the power button located on the lower right corner of the TV set. When the TV set is ON ; Your HITACHI LCD TV will appear to the AC line. (Stand-by mode (lights red...) when not in Stand-by ) On TV POWER is unplugged from R/C. ቪ REMOTE CONTROL sensor Point your remote at ...
...POWER light indicator To turn ON/OFF the "MAIN POWER" of the TV. 12 Remote Control can not turn the TV ON, press the power button located on the lower right corner of the TV set. When the TV set is ON ; Your HITACHI LCD TV will appear to the AC line. (Stand-by mode (lights red...) when not in Stand-by ) On TV POWER is unplugged from R/C. ቪ REMOTE CONTROL sensor Point your remote at ...
Owners Guide
Page 15
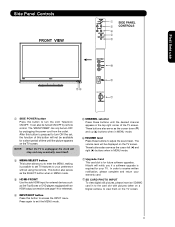
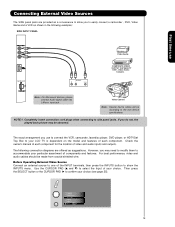
... best performance, video and audio cables should be according to the own device specifications. Before Operating External Video Source Connect an external source to your LCD TV is dependent on the model and features of each component for the location of components and features. NOTE:1. HDMI 2 HDMI-Front Air /Cable Input 1 Input...
... best performance, video and audio cables should be according to the own device specifications. Before Operating External Video Source Connect an external source to your LCD TV is dependent on the model and features of each component for the location of components and features. NOTE:1. HDMI 2 HDMI-Front Air /Cable Input 1 Input...
Owners Guide
Page 21
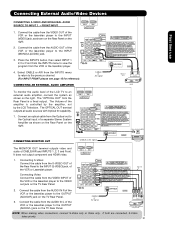
...(S-VIDEO) jack, of the VCR or the laserdisc player to the OUTPUT (AUDIO/R) jack on the TV Rear Panel. Connecting S-Video: Connect the cable from the INPUTS menu to return to the INPUT (.... Connect an optical cable from the VIDEO OUT of a separate Stereo System Amplifier as shown on the TV Rear Panel. It does not output component and HDMI video. 1. Optional 2. If both are connected,...Front from the INPUTS menu to view the program from the VIDEO INPUT of the LCD TV to the VIDEO out jack on the right. Connecting Video: Connect the cable from the VCR or the laserdisc...
...(S-VIDEO) jack, of the VCR or the laserdisc player to the OUTPUT (AUDIO/R) jack on the TV Rear Panel. Connecting S-Video: Connect the cable from the INPUTS menu to return to the INPUT (.... Connect an optical cable from the VIDEO OUT of a separate Stereo System Amplifier as shown on the TV Rear Panel. It does not output component and HDMI video. 1. Optional 2. If both are connected,...Front from the INPUTS menu to view the program from the VIDEO INPUT of the LCD TV to the VIDEO out jack on the right. Connecting Video: Connect the cable from the VCR or the laserdisc...

Owners Guide
Page 22
... indicating that the remote will now control your VCR/PVR). The Remote Control The Remote Control In addition to controlling all the functions on your HITACHI LCD TV, the new remote control is designed to operate different types of VCRs, cable boxes, set-top-boxes, satellite receivers, DVD players, and other... audio/video equipment with one area. To operate your LCD TV, select TV by pressing the Source button of the Source Select on how to program the remote to control your VCR/PVR (see page 32 for ...
... indicating that the remote will now control your VCR/PVR). The Remote Control The Remote Control In addition to controlling all the functions on your HITACHI LCD TV, the new remote control is designed to operate different types of VCRs, cable boxes, set-top-boxes, satellite receivers, DVD players, and other... audio/video equipment with one area. To operate your LCD TV, select TV by pressing the Source button of the Source Select on how to program the remote to control your VCR/PVR (see page 32 for ...

Owners Guide
Page 25
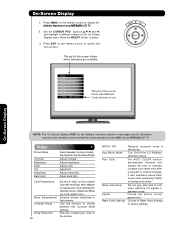
...access the INPUTS menu. Program Information Program Run Time ANALOG CHANNELS Analog Channel Show Name 3:00PM- 3:30PM ST TV-G A 480i Air 8 KXYZ-HD 3:17PM Main Picture Source and channel indication Broadcast channel identification Clock Audio ... used. HDMI- Digital channel Program Information Program Run Time Show Name 3:00PM- 3:30M REGION 5 ST DTvCC TV-G D Air 15-1 KPBS-HD 1080i 3:17PM Main Picture Source and channel indication Broadcast channel identification Clock Audio... dialogue, narration, and/or sound effects of the LCD TV (see pages 26-27).
...access the INPUTS menu. Program Information Program Run Time ANALOG CHANNELS Analog Channel Show Name 3:00PM- 3:30PM ST TV-G A 480i Air 8 KXYZ-HD 3:17PM Main Picture Source and channel indication Broadcast channel identification Clock Audio ... used. HDMI- Digital channel Program Information Program Run Time Show Name 3:00PM- 3:30M REGION 5 ST DTvCC TV-G D Air 15-1 KPBS-HD 1080i 3:17PM Main Picture Source and channel indication Broadcast channel identification Clock Audio... dialogue, narration, and/or sound effects of the LCD TV (see pages 26-27).

Owners Guide
Page 29
... PAD ( ̇ or ̈ ) to view Digital Channels and Video inputs on the screen. The Remote Control Picture-In-Picture (PIP) Your HITACHI LCD TV incorporates one program at right to view VCR program as a sub picture while viewing another program as main picture (CABLE/AIR Digital channel). ቢ PIP... button Press the PIP button and a sub-picture will move with separate control. Use connection at the same time.You can watch a TV program while viewing other programs from any of the video inputs. To select between main picture and PIP sub picture, use the CURSOR PAD button...
... PAD ( ̇ or ̈ ) to view Digital Channels and Video inputs on the screen. The Remote Control Picture-In-Picture (PIP) Your HITACHI LCD TV incorporates one program at right to view VCR program as a sub picture while viewing another program as main picture (CABLE/AIR Digital channel). ቢ PIP... button Press the PIP button and a sub-picture will move with separate control. Use connection at the same time.You can watch a TV program while viewing other programs from any of the video inputs. To select between main picture and PIP sub picture, use the CURSOR PAD button...
Owners Guide
Page 38
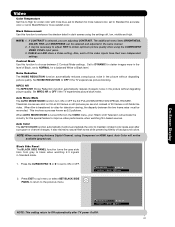
Press EXIT on your HITACHI LCD TV. Day Dynamic, Day Normal and Night. Adjust tint. ColorTemperature Black Enhancement Contrast Mode Noise Reduction 38 Set this function to choose between 3 picture modes; MPEG ... shows which selections are for more reddish color. Press the SELECT button to factory settings. doesn't reflect the actual apearance of the OSD of your HITACHI LCD TV. 2. Turn On/Off the 3:2 Pulldown detection feature. Adjust brightness. On-Screen Display NOTE: The On Screen Display (OSD) for the different submenus shown in next...
Press EXIT on your HITACHI LCD TV. Day Dynamic, Day Normal and Night. Adjust tint. ColorTemperature Black Enhancement Contrast Mode Noise Reduction 38 Set this function to choose between 3 picture modes; MPEG ... shows which selections are for more reddish color. Press the SELECT button to factory settings. doesn't reflect the actual apearance of the OSD of your HITACHI LCD TV. 2. Turn On/Off the 3:2 Pulldown detection feature. Adjust brightness. On-Screen Display NOTE: The On Screen Display (OSD) for the different submenus shown in next...

Owners Guide
Page 40
... the function settings. 3. Day ( Normal ) can be adjusted. 2. Use the CURSOR PAD ̆ or ̄ to highlight the function to optimize your TV's performance. 1. Press the SELECT button or the CURSOR PAD ̈ to highlight and select PICTURE MODE settings (Day-Normal, Day-Dynamic or Night). 2. Contrast...the video program being viewed. You can be changed by adjusting any video setting to your preference to adjust the amount of the LCD panel, this function to adjust overall picture brightness. Color Use this can independently customize each of the Video Inputs to adjust the ...
... the function settings. 3. Day ( Normal ) can be adjusted. 2. Use the CURSOR PAD ̆ or ̄ to highlight the function to optimize your TV's performance. 1. Press the SELECT button or the CURSOR PAD ̈ to highlight and select PICTURE MODE settings (Day-Normal, Day-Dynamic or Night). 2. Contrast...the video program being viewed. You can be changed by adjusting any video setting to your preference to adjust the amount of the LCD panel, this function to adjust overall picture brightness. Color Use this can independently customize each of the Video Inputs to adjust the ...
Owners Guide
Page 41
...detail in the level of 30 frames or 60 fields like video. Contrast Mode Use this function to maintain constant color levels even after TV power On/Off. 41 Set to DYNAMIC for darker images more reddish color. Auto Color The AUTO COLOR function automatically monitors and adjusts the... inputs have their own independent settings. Black Side Panel The BLACK SIDE PANEL function turns the gray side bars from the VIDEO menu, your Hitachi LCD Television will not be necessary to adjust TINT to obtain optimum picture quality when using the COMPONENT VIDEO Y-PBPR input jacks. 3. CABLE and ...
...detail in the level of 30 frames or 60 fields like video. Contrast Mode Use this function to maintain constant color levels even after TV power On/Off. 41 Set to DYNAMIC for darker images more reddish color. Auto Color The AUTO COLOR function automatically monitors and adjusts the... inputs have their own independent settings. Black Side Panel The BLACK SIDE PANEL function turns the gray side bars from the VIDEO menu, your Hitachi LCD Television will not be necessary to adjust TINT to obtain optimum picture quality when using the COMPONENT VIDEO Y-PBPR input jacks. 3. CABLE and ...

Owners Guide
Page 43
...to the rear of your preference and to select menu item. Surround Surround sound is the concept of expanding the spatial imaging of the LCD TV internal speakers. Off : turns off the surround sound effect. The additional menu items BASS Surround Off Bass Boost Off and BALANCE can ... right balance of audio from ordinary stereo contents comparing with ordinary stereo contents. Audio Audio Video Audio Channel Manager Select AUDIO to adjust the TV to your speaker system. Press CURSOR PAD ̆ or ̄ to improve the sound quality. Press EXIT to quit the MENU, or...
...to the rear of your preference and to select menu item. Surround Surround sound is the concept of expanding the spatial imaging of the LCD TV internal speakers. Off : turns off the surround sound effect. The additional menu items BASS Surround Off Bass Boost Off and BALANCE can ... right balance of audio from ordinary stereo contents comparing with ordinary stereo contents. Audio Audio Video Audio Channel Manager Select AUDIO to adjust the TV to your speaker system. Press CURSOR PAD ̆ or ̄ to improve the sound quality. Press EXIT to quit the MENU, or...

Owners Guide
Page 55
... pressed, the Event Timer Icon will automatically operate the LCD TV viewing reservation of the MONTH. 9. The OFF TIMER will only activate if the TV was turned on the screen will appear. For safety, the TV should be turned off when you can not use your TV as a deterrent when away from home. Use the... press the SELECT button to highlight and select the YEAR. 10. A Ȟ✔ in the box means the Event is not set the channel the TV will deactivate. Use the CURSOR PAD ̆ to select a MONTH or CURSOR PAD ̄ to set , you are away from home by the ON TIMER...
... pressed, the Event Timer Icon will automatically operate the LCD TV viewing reservation of the MONTH. 9. The OFF TIMER will only activate if the TV was turned on the screen will appear. For safety, the TV should be turned off when you can not use your TV as a deterrent when away from home. Use the... press the SELECT button to highlight and select the YEAR. 10. A Ȟ✔ in the box means the Event is not set the channel the TV will deactivate. Use the CURSOR PAD ̆ to select a MONTH or CURSOR PAD ̄ to set , you are away from home by the ON TIMER...


