Owners Guide
Page 2
... authorized dealer or service center. 2 CAUTION: Adjust only those controls that a safety problem should be notified that any changes or modifications made to this can expose you operate these units. NOTE: • There are no user serviceable parts inside the AVC center/display monitor. • Model and serial numbers are indicated on back side of AVC center and display monitor. CAUTION: Never remove the back cover...
... authorized dealer or service center. 2 CAUTION: Adjust only those controls that a safety problem should be notified that any changes or modifications made to this can expose you operate these units. NOTE: • There are no user serviceable parts inside the AVC center/display monitor. • Model and serial numbers are indicated on back side of AVC center and display monitor. CAUTION: Never remove the back cover...
Owners Guide
Page 3
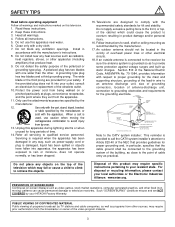
... and/or personal injury. 16. SAFETY TIPS Read before operating equipment Follow all warnings and instructions marked on -screen displays such as video games, stock market quotations, computer generated graphics, and other fixed (nonmoving) patterns can cause permanent damage to television receivers. Follow all warnings. 4. Install in particular, specifies that produce heat. 9. Do not defeat the safety purpose of the...
... and/or personal injury. 16. SAFETY TIPS Read before operating equipment Follow all warnings and instructions marked on -screen displays such as video games, stock market quotations, computer generated graphics, and other fixed (nonmoving) patterns can cause permanent damage to television receivers. Follow all warnings. 4. Install in particular, specifies that produce heat. 9. Do not defeat the safety purpose of the...
Owners Guide
Page 4
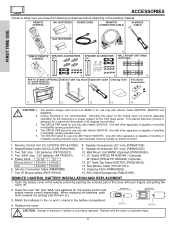
REMOTE CONTROL "AA" BATTERIES POWER CORD MONITOR CONNECTION CABLE IR MOUSE CABLE POWER CBL TV VCR SOURCE WIZARD PVR CD STB AMP 3 DVD 2 6 1 5 9 4 8 INFO 7 SLEEP TV/RGB 0 A/V NET ASPECT VIDEO ANT EXIT CH SELECT VOL VID 1 MUTE VID 2 PIP LAST CH VID 4 FREEZE VID 3 SURF PIP ACCESDSAY/NIGHT SWAP PIP MODE 3. This SPD32 PDP stand for use only with Hitachi model 32HDT55, 42HDT55 and 50HDT55. Two "AAA" size, 1.5V batteries (P# FR00061). 5. Sub Woofer Cable (P# VZ11701...
REMOTE CONTROL "AA" BATTERIES POWER CORD MONITOR CONNECTION CABLE IR MOUSE CABLE POWER CBL TV VCR SOURCE WIZARD PVR CD STB AMP 3 DVD 2 6 1 5 9 4 8 INFO 7 SLEEP TV/RGB 0 A/V NET ASPECT VIDEO ANT EXIT CH SELECT VOL VID 1 MUTE VID 2 PIP LAST CH VID 4 FREEZE VID 3 SURF PIP ACCESDSAY/NIGHT SWAP PIP MODE 3. This SPD32 PDP stand for use only with Hitachi model 32HDT55, 42HDT55 and 50HDT55. Two "AAA" size, 1.5V batteries (P# FR00061). 5. Sub Woofer Cable (P# VZ11701...
Owners Guide
Page 6
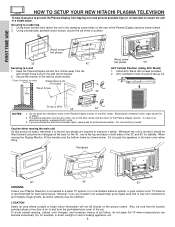
... on the Plasma Display monitor. Using commercially available wood screws, secure the set . Install AVC Stand with screws provided. 2. Do not install by yourself. To avoid cabinet warping, cabinet color changes, and increased chance of the Plasma Display stand as shown below . VOL+ STANDBY (RED) ON (GREEN) VOL- Securing to a wall 1. Whenever the unit is free from the perforated back cover of the Plasma Display monitor or the AVC center. POWER STANDBY (RED) ON (GREEN) VOL- AVC...
... on the Plasma Display monitor. Using commercially available wood screws, secure the set . Install AVC Stand with screws provided. 2. Do not install by yourself. To avoid cabinet warping, cabinet color changes, and increased chance of the Plasma Display stand as shown below . VOL+ STANDBY (RED) ON (GREEN) VOL- Securing to a wall 1. Whenever the unit is free from the perforated back cover of the Plasma Display monitor or the AVC center. POWER STANDBY (RED) ON (GREEN) VOL- AVC...
Owners Guide
Page 7
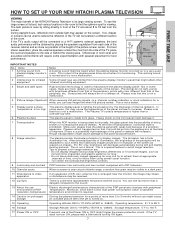
... plasma monitor illuminates phosphor to manufacture the plasma display panel; If the TV does not turn ON, please wait a little before turning ON again. 7 The best picture is not a malfunction. 4 Picture Image (Spectrum) When receving still picture signals, (e.g. At the time of transportation, horizontal style is some parts of the screen. For 50" only, brightness will increase.) Rough transportation might cause an unstable picture when the set is used...
... plasma monitor illuminates phosphor to manufacture the plasma display panel; If the TV does not turn ON, please wait a little before turning ON again. 7 The best picture is not a malfunction. 4 Picture Image (Spectrum) When receving still picture signals, (e.g. At the time of transportation, horizontal style is some parts of the screen. For 50" only, brightness will increase.) Rough transportation might cause an unstable picture when the set is used...
Owners Guide
Page 8
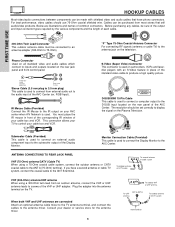
... Cable This cable is used to connect a computer output to the D-SUB input located on the rear panel of the AVC Center. AUDIO OUT 3.8mm STEREO MINI-PLUG 2 RCA TYPE PLUGS Stereo Cable (3.5 mm plug to 3.5 mm plug) This cable is used to connect from external audio out to the audio input of the Display Monitor. S-Video (Super Video) Connector This connector is used on the Plasma Television. Monitor Connection Cable (Provided) This cable is used to connect the Display Monitor to the AVC Center. To outdoor antenna...
... Cable This cable is used to connect a computer output to the D-SUB input located on the rear panel of the AVC Center. AUDIO OUT 3.8mm STEREO MINI-PLUG 2 RCA TYPE PLUGS Stereo Cable (3.5 mm plug to 3.5 mm plug) This cable is used to connect from external audio out to the audio input of the Display Monitor. S-Video (Super Video) Connector This connector is used on the Plasma Television. Monitor Connection Cable (Provided) This cable is used to connect the Display Monitor to the AVC Center. To outdoor antenna...
Owners Guide
Page 10
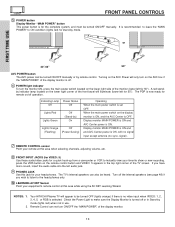
... channels, adjusting volume, etc. ቩ FRONT INPUT JACKS (for VIDEO: 5) Use these audio/video jacks for your favorite show or new recording. Your HITACHI Plasma TV will appear to ON condition (lights red) for 50"). Remote Control can also be turned ON/OFF manually. Turning on the remote control button and VIDEO: 5 appears in Stand-by remote control. signal). ቨ REMOTE CONTROL sensor Point your remote at this area while using the AV NET Learning Wizard. NOTES: 1. 2. Turn off . ቧ POWER light...
... channels, adjusting volume, etc. ቩ FRONT INPUT JACKS (for VIDEO: 5) Use these audio/video jacks for your favorite show or new recording. Your HITACHI Plasma TV will appear to ON condition (lights red) for 50"). Remote Control can also be turned ON/OFF manually. Turning on the remote control button and VIDEO: 5 appears in Stand-by remote control. signal). ቨ REMOTE CONTROL sensor Point your remote at this area while using the AV NET Learning Wizard. NOTES: 1. 2. Turn off . ቧ POWER light...
Owners Guide
Page 11
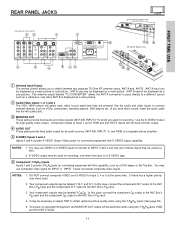
... displayed as a main picture. ባ Audio/Video Inputs 1, 2, 3 and 4 The VID1~VID4 buttons will be necessary to adjust TINT to the AVC Box's PR input. 3. Component signal to switch between two separate 75-Ohm RF antenna inputs, ANT A and ANT B. S-Video has a higher priority over video input. 2. Your component outputs may be labeled Y, B-Y, and R-Y. To ensure no copyright infringement, the MONITOR OUT output will select each video source each time they are used...
... displayed as a main picture. ባ Audio/Video Inputs 1, 2, 3 and 4 The VID1~VID4 buttons will be necessary to adjust TINT to the AVC Box's PR input. 3. Component signal to switch between two separate 75-Ohm RF antenna inputs, ANT A and ANT B. S-Video has a higher priority over video input. 2. Your component outputs may be labeled Y, B-Y, and R-Y. To ensure no copyright infringement, the MONITOR OUT output will select each video source each time they are used...
Owners Guide
Page 14
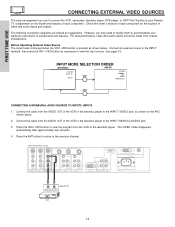
... player, DVD player, or HDTV Set Top Box to your particular assortment of components and features. FIRST TIME USE CONNECTING EXTERNAL VIDEO SOURCES The exact arrangement you may need to modify them to accommodate your Plasma TV is pressed as suggestions. For best performance, video and audio cables should be made from the VCR or the laserdisc player. Connect the cable from the AUDIO OUT of video and audio inputs and outputs. Press the VID2~VID5 button...
... player, DVD player, or HDTV Set Top Box to your particular assortment of components and features. FIRST TIME USE CONNECTING EXTERNAL VIDEO SOURCES The exact arrangement you may need to modify them to accommodate your Plasma TV is pressed as suggestions. For best performance, video and audio cables should be made from the VCR or the laserdisc player. Connect the cable from the AUDIO OUT of video and audio inputs and outputs. Press the VID2~VID5 button...
Owners Guide
Page 16
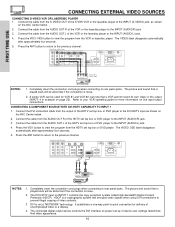
... INPUT 2 PR R AUDIO INPUT 1 ANALOG INPUT L AUDIO DVI-HDTV L/(MONO) AUDIO Please use HITACHI specified cable. TO MONITOR INPUT 1 R R AUDIO OUT RGB AC IN TruBass SRS and symbol are trademarks of video contents. 3. The picture and sound that is played back will be abnormal if the connection is loose. 2. CONNECTING A COMPONENT SOURCE WITH DVI-HDTV CAPABILITY TO INPUT 1 1. Press the VID1 button to the previous channel. The connected digital output device controls the DVI interface so proper set top box or DVD player. FIRST TIME USE CONNECTING EXTERNAL VIDEO SOURCES...
... INPUT 2 PR R AUDIO INPUT 1 ANALOG INPUT L AUDIO DVI-HDTV L/(MONO) AUDIO Please use HITACHI specified cable. TO MONITOR INPUT 1 R R AUDIO OUT RGB AC IN TruBass SRS and symbol are trademarks of video contents. 3. The picture and sound that is played back will be abnormal if the connection is loose. 2. CONNECTING A COMPONENT SOURCE WITH DVI-HDTV CAPABILITY TO INPUT 1 1. Press the VID1 button to the previous channel. The connected digital output device controls the DVI interface so proper set top box or DVD player. FIRST TIME USE CONNECTING EXTERNAL VIDEO SOURCES...
Owners Guide
Page 19
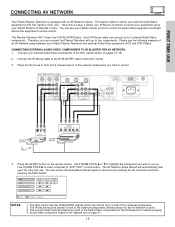
... cable can control up . TO MONITOR INPUT 1 R R AUDIO OUT RGB AC IN TruBass SRS and symbol are on the remote control. Press the AV NET button on page 21. 19 DVD VCR PV Recorder AV Receiver POWER MENU MORE Move INFO Device Setting NOTES: 1. The correct codes must be entered for each of an AV Network setup between your external Audio/Video components to control your Hitachi Plasma TV Remote Control. FIRST TIME USE CONNECTING AV NETWORK Your Hitachi Plasma Television...
... cable can control up . TO MONITOR INPUT 1 R R AUDIO OUT RGB AC IN TruBass SRS and symbol are on the remote control. Press the AV NET button on page 21. 19 DVD VCR PV Recorder AV Receiver POWER MENU MORE Move INFO Device Setting NOTES: 1. The correct codes must be entered for each of an AV Network setup between your external Audio/Video components to control your Hitachi Plasma TV Remote Control. FIRST TIME USE CONNECTING AV NETWORK Your Hitachi Plasma Television...
Owners Guide
Page 26
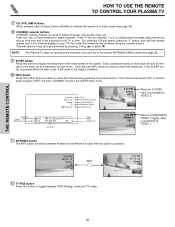
... numbers using the number buttons. If the SLEEP button is pressed while the timer is set . 3:32 PM Ant A 22 Stereo R 1080i Format Time Main Picture Source Audio Broadcast Broadcast Rating Signal Format 3:32 PM S-IN:3 VID 3 When an S-VIDEO Input is in Audio mode (see page 50). ቪ SLEEP button Press this button to display the sleep timer in the correct ANTENNA/CABLE mode (see page 39). ቩ CHANNEL selector buttons CHANNEL selector buttons are used to select channels, lock access code...
... numbers using the number buttons. If the SLEEP button is pressed while the timer is set . 3:32 PM Ant A 22 Stereo R 1080i Format Time Main Picture Source Audio Broadcast Broadcast Rating Signal Format 3:32 PM S-IN:3 VID 3 When an S-VIDEO Input is in Audio mode (see page 50). ቪ SLEEP button Press this button to display the sleep timer in the correct ANTENNA/CABLE mode (see page 39). ቩ CHANNEL selector buttons CHANNEL selector buttons are used to select channels, lock access code...
Owners Guide
Page 27
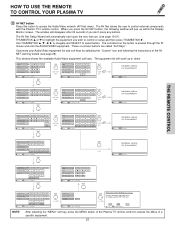
... Setting THUMB STICK Cable Box POWER CH ̄ Set Top Box 1 2 Custom 4 5 7 8 Move LAST CH 0 INFO Device Setting CH ̆ 3 6 9 MENU INFO GUIDE THUMB STICK Cable Box Set Top Box Custom SETUP Move INFO Device Setting THUMB STICK HITACHI AV NET WIZARD (Learning) Use this button to control or setup and then press THUMBSTICK ̈. When you press the AV NET button, the following the instructions of the Plasma TV remote control to select button. THE REMOTE CONTROL MODE...
... Setting THUMB STICK Cable Box POWER CH ̄ Set Top Box 1 2 Custom 4 5 7 8 Move LAST CH 0 INFO Device Setting CH ̆ 3 6 9 MENU INFO GUIDE THUMB STICK Cable Box Set Top Box Custom SETUP Move INFO Device Setting THUMB STICK HITACHI AV NET WIZARD (Learning) Use this button to control or setup and then press THUMBSTICK ̈. When you press the AV NET button, the following the instructions of the Plasma TV remote control to select button. THE REMOTE CONTROL MODE...
Owners Guide
Page 28
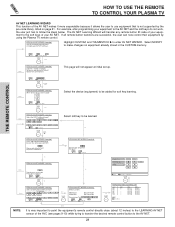
... NET WIZARD (Learning) A device is not supported by using the Plasma TV remote control. BACK Move Add New Device SEL Initialize THUMB STICK SELECT Add New Device HITACHI AV NET WIZARD (Learning) Which device do not work, the user just has to be learned. NO Move YES SEL Select Cable Box Set Top Box DVD2 POWER MENU BACK Continue Transfer was successfull Press OK...
... NET WIZARD (Learning) A device is not supported by using the Plasma TV remote control. BACK Move Add New Device SEL Initialize THUMB STICK SELECT Add New Device HITACHI AV NET WIZARD (Learning) Which device do not work, the user just has to be learned. NO Move YES SEL Select Cable Box Set Top Box DVD2 POWER MENU BACK Continue Transfer was successfull Press OK...
Owners Guide
Page 36
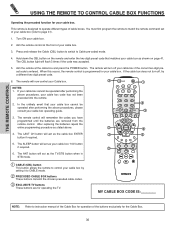
... 2 PIP FREEZE VID 3 PIP CH PIP ACCESS VIDEO SWAP PIP MODE REC CLU-5723TSI USING THE REMOTE TO CONTROL CABLE BOX FUNCTIONS Operating the precoded function for your cable box (refer to page 41). 1. This remote is programmed for your cable box operating guide. 3. You must first program the remote to Cable pre-coded mode. 4. Turn ON your cable box. 3. Aim the remote control at the cable box and press the POWER button. Aim the remote at the front of your cable box. The remote will flash 3 times...
... 2 PIP FREEZE VID 3 PIP CH PIP ACCESS VIDEO SWAP PIP MODE REC CLU-5723TSI USING THE REMOTE TO CONTROL CABLE BOX FUNCTIONS Operating the precoded function for your cable box (refer to page 41). 1. This remote is programmed for your cable box operating guide. 3. You must first program the remote to Cable pre-coded mode. 4. Turn ON your cable box. 3. Aim the remote control at the cable box and press the POWER button. Aim the remote at the front of your cable box. The remote will flash 3 times...
Owners Guide
Page 37
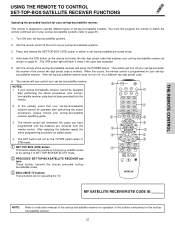
... digit preset code. 6. Press and release the SET-TOP-BOX (STB) button to switch to page 41). 1. THE REMOTE CONTROL MODE EXIT MUTE VCR PLUS+ SVCS VID 2 VID 1 USING THE REMOTE TO CONTROL SET-TOP-BOX/SATELLITE RECEIVER FUNCTIONS VOL TV POWER SLEEP ANT TV/RGB MENU DVD 1 VCR CDSOURCE WIZARDCBL TAPE STB 4 7 2 5 AMP 3 8 6 0 9 A/V NET ASPECT INFO SELECT CH PIP PIP MODE PIP VID 3 CH LAST CH GUIDE/TV VID 4 SWAPPIP ACCESS FREEZE VIDEO...
... digit preset code. 6. Press and release the SET-TOP-BOX (STB) button to switch to page 41). 1. THE REMOTE CONTROL MODE EXIT MUTE VCR PLUS+ SVCS VID 2 VID 1 USING THE REMOTE TO CONTROL SET-TOP-BOX/SATELLITE RECEIVER FUNCTIONS VOL TV POWER SLEEP ANT TV/RGB MENU DVD 1 VCR CDSOURCE WIZARDCBL TAPE STB 4 7 2 5 AMP 3 8 6 0 9 A/V NET ASPECT INFO SELECT CH PIP PIP MODE PIP VID 3 CH LAST CH GUIDE/TV VID 4 SWAPPIP ACCESS FREEZE VIDEO...
Owners Guide
Page 43
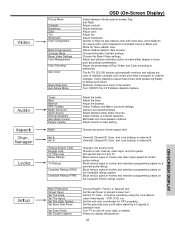
... code. Set Screen Saver to display dialogue/text. 43 ON-SCREEN DISPLAY Label Video Inputs , VCR, DVD, etc. Adjust tint. Set this to High for less intense color with more blue, set to Medium for natural color, set before using the Lock feature. Adjust the balance. Eliminates the noise between the two picture modes; Block various types of Red, Green and Color according to preference. Menu Preference Screen Saver Set The Clock Set The Inputs Set The Color System Set Black Side Panel Set Event Timer Set Closed Captions...
... code. Set Screen Saver to display dialogue/text. 43 ON-SCREEN DISPLAY Label Video Inputs , VCR, DVD, etc. Adjust tint. Set this to High for less intense color with more blue, set to Medium for natural color, set before using the Lock feature. Adjust the balance. Eliminates the noise between the two picture modes; Block various types of Red, Green and Color according to preference. Menu Preference Screen Saver Set The Clock Set The Inputs Set The Color System Set Black Side Panel Set Event Timer Set Closed Captions...

Owners Guide
Page 46
...% Red 50% Yellow 50% Green 50% Cyan 50% Blue 50% Reset Move SEL Select Use THUMBSTICK to highlight functions. NOTE: When the Set User Colors box is selected, only the selected mode will reset to the initial conditions as explained above. VIDEO Reset Video Settings This function allows you to Reset the Video Menu Settings of the Video Inputs to your preference to increase viewing performance and pleasure, depending upon the video program being viewed...
...% Red 50% Yellow 50% Green 50% Cyan 50% Blue 50% Reset Move SEL Select Use THUMBSTICK to highlight functions. NOTE: When the Set User Colors box is selected, only the selected mode will reset to the initial conditions as explained above. VIDEO Reset Video Settings This function allows you to Reset the Video Menu Settings of the Video Inputs to your preference to increase viewing performance and pleasure, depending upon the video program being viewed...

Owners Guide
Page 63
.... 2. BLACK SIDE PANEL feature needs to OFF automatically when the TV is turned on (VCR, laserdisc, or DVD) and any remote control button will be set the color system feature for DTV programs. AUTO - The top/bottom gray bar will turn on and switch to Video2 automatically when the Video2 input device is powered ON. It is selected, the TV will appear in Standard mode. ON-SCREEN DISPLAY 63...
.... 2. BLACK SIDE PANEL feature needs to OFF automatically when the TV is turned on (VCR, laserdisc, or DVD) and any remote control button will be set the color system feature for DTV programs. AUTO - The top/bottom gray bar will turn on and switch to Video2 automatically when the Video2 input device is powered ON. It is selected, the TV will appear in Standard mode. ON-SCREEN DISPLAY 63...
Owners Guide
Page 81
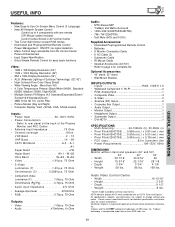
... functions Video: • 1280 x 768 Display Resolution (50") • 1024 x 1024 Display Resolution (42") • 852 x 1024 Display Resolution (32") • ALiS (Alternate Lighting of the Plasma Monitor and AVC Center • Antenna input impedance 75 Ohm • Channel coverage 181ch. USEFUL INFO USEFUL INFORMATION Features: • New Easy-to-Use On-Screen Menu Control (3 Language) • New AV Network System Control Control up to 4 components with an HDTV Tuner and Source. Refer to rear panel at...
... functions Video: • 1280 x 768 Display Resolution (50") • 1024 x 1024 Display Resolution (42") • 852 x 1024 Display Resolution (32") • ALiS (Alternate Lighting of the Plasma Monitor and AVC Center • Antenna input impedance 75 Ohm • Channel coverage 181ch. USEFUL INFO USEFUL INFORMATION Features: • New Easy-to-Use On-Screen Menu Control (3 Language) • New AV Network System Control Control up to 4 components with an HDTV Tuner and Source. Refer to rear panel at...


