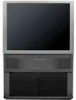
Owners Guide
Page 2
... flash with CAUTION: Never remove the back cover of electric shock to operate on 120 Volts 60Hz, AC current. The exclamation point within an equilateral triangle, is intended to alert the user to very high voltages and other hazards. NOTE: ¥There are no user serviceable parts inside the television. ¥Model and serial numbers are not expressly approved by HITACHI could void the user...
... flash with CAUTION: Never remove the back cover of electric shock to operate on 120 Volts 60Hz, AC current. The exclamation point within an equilateral triangle, is intended to alert the user to very high voltages and other hazards. NOTE: ¥There are no user serviceable parts inside the television. ¥Model and serial numbers are not expressly approved by HITACHI could void the user...

Owners Guide
Page 3
...; Never place the television in a built-in the design of HITACHI televisions. Do not subject your product model. Clean only with one wider than the other apparatus (including amplifiers) that a safety problem should use caution when moving the cart/apparatus combination to HITACHI. IMPORTANT SAFETY INSTRUCTIONS IMPORTANT SAFETY INSTRUCTIONS CAUTION: ¥ Read these instructions. ¥ Keep these units. Servicing is required when the...
...; Never place the television in a built-in the design of HITACHI televisions. Do not subject your product model. Clean only with one wider than the other apparatus (including amplifiers) that a safety problem should use caution when moving the cart/apparatus combination to HITACHI. IMPORTANT SAFETY INSTRUCTIONS IMPORTANT SAFETY INSTRUCTIONS CAUTION: ¥ Read these instructions. ¥ Keep these units. Servicing is required when the...

Owners Guide
Page 4
... or off. If replacement parts are required, be sure the antenna system is a distinct change in particular, specifies that are unable to restore normal operation by a qualified service technician to restore the television to projection television receivers. If you are covered in wire to an antenna discharge unit, size of grounding conductors, location of antenna discharge unit connection to the point of cable entry as video games, stock...
... or off. If replacement parts are required, be sure the antenna system is a distinct change in particular, specifies that are unable to restore normal operation by a qualified service technician to restore the television to projection television receivers. If you are covered in wire to an antenna discharge unit, size of grounding conductors, location of antenna discharge unit connection to the point of cable entry as video games, stock...
Owners Guide
Page 5
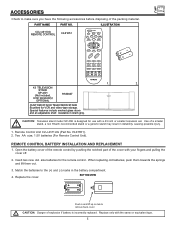
... inch or smaller television set. CAUTION: Danger of the packing material. Replace the cover. CAUTION: Television stand model SP-43H is incorrectly replaced. Two AA size, 1.5V batteries (For Remote Control Unit). When replacing old batteries, push them towards the springs and lift them out. 3. ILLUSTRATION CLU-4311UG REMOTE CONTROL HL01651 POWER TV CBL/SAT DVD/VCR SWAP MOVE PIP FREEZE HELP PIP CH MENU SELECT MUTE EXIT LAST CH VOL CH 1 4 7 INPUT...
... inch or smaller television set. CAUTION: Danger of the packing material. Replace the cover. CAUTION: Television stand model SP-43H is incorrectly replaced. Two AA size, 1.5V batteries (For Remote Control Unit). When replacing old batteries, push them towards the springs and lift them out. 3. ILLUSTRATION CLU-4311UG REMOTE CONTROL HL01651 POWER TV CBL/SAT DVD/VCR SWAP MOVE PIP FREEZE HELP PIP CH MENU SELECT MUTE EXIT LAST CH VOL CH 1 4 7 INPUT...

Owners Guide
Page 8
... TV set TV features to be displayed on or off when not in MENU mode. ባ INPUT/EXIT button Press this button to turn the TV on the TV screen. NOTE: Your HITACHI Projection TV will be turned OFF if there is no video input when VIDEO: 1, 2, 3 or 4 is turned off . FRONT PANEL CONTROLS FRONT VIEW 50DX10B/60DX10B MENU INPUT VOL- CH+ POWER SELECT EXIT ̇ ̈ ̄ ̆ Push open door and pull forward and down DIGITAL...
... TV set TV features to be displayed on or off when not in MENU mode. ባ INPUT/EXIT button Press this button to turn the TV on the TV screen. NOTE: Your HITACHI Projection TV will be turned OFF if there is no video input when VIDEO: 1, 2, 3 or 4 is turned off . FRONT PANEL CONTROLS FRONT VIEW 50DX10B/60DX10B MENU INPUT VOL- CH+ POWER SELECT EXIT ̇ ̈ ̄ ̆ Push open door and pull forward and down DIGITAL...

Owners Guide
Page 9
... (for VIDEO: 3) Use these audio/video jacks for a quick hook-up from a camcorder or VCR to instantly view your remote at this area when selecting channels, adjusting volume, etc. ቪ DIGITAL ARRAY Use this button to optimum performance. (see page 48) ቩ REMOTE CONTROL sensor Point your favorite show or new recording. FRONT PANEL CONTROLS ቧ POWER light You will see a red light when the TV is turned on the amount of the TV screen.
... (for VIDEO: 3) Use these audio/video jacks for a quick hook-up from a camcorder or VCR to instantly view your remote at this area when selecting channels, adjusting volume, etc. ቪ DIGITAL ARRAY Use this button to optimum performance. (see page 48) ቩ REMOTE CONTROL sensor Point your favorite show or new recording. FRONT PANEL CONTROLS ቧ POWER light You will see a red light when the TV is turned on the amount of the TV screen.

Owners Guide
Page 10
... video inputs to the TV s PB input and the com- The TV s Internal Speakers will be controlled by the remote control main volume buttons. Use speakers with this connection, the audio to obtain optimum picture quality when using the Y-PBPR jacks. ᕊ ᕉ REAR SPEAKER VHF/UHF L R SP. Y-CBCR. MATRIX SURROUND EXT. NOTE: Your component components R-Y outputs may be necessary to adjust TINT or turn AUTO COLOR-ON to the stereo can only receive 480i signals...
... video inputs to the TV s PB input and the com- The TV s Internal Speakers will be controlled by the remote control main volume buttons. Use speakers with this connection, the audio to obtain optimum picture quality when using the Y-PBPR jacks. ᕊ ᕉ REAR SPEAKER VHF/UHF L R SP. Y-CBCR. MATRIX SURROUND EXT. NOTE: Your component components R-Y outputs may be necessary to adjust TINT or turn AUTO COLOR-ON to the stereo can only receive 480i signals...

Owners Guide
Page 12
... be used at a time. In the same manner, press the Right Speaker black button and insert the negative (-) lead wire. This could cause damage to your audio outputs or other damage to your hook-up cables. TIPS ON REAR PANEL CONNECTIONS Speaker Amplifier S-VIDEO connections are provided for the Left Speaker. Refer to the operating guide of these may use 8-Ohm speakers only. You may be necessary to adjust TINT or turn AUTO COLOR...
... be used at a time. In the same manner, press the Right Speaker black button and insert the negative (-) lead wire. This could cause damage to your audio outputs or other damage to your hook-up cables. TIPS ON REAR PANEL CONNECTIONS Speaker Amplifier S-VIDEO connections are provided for the Left Speaker. Refer to the operating guide of these may use 8-Ohm speakers only. You may be necessary to adjust TINT or turn AUTO COLOR...

Owners Guide
Page 14
... the location of video and audio inputs and outputs. For best performance, video and audio cables should be OFF. The VIDEO icon disappears automatically after approximately eight seconds. 4. VCR TV INPUT TERMINAL S-VIDEO VIDEO (MONO) L R AUDIO INPUT 1 VIDEO OUT AUDIO OUT 14 Check the owner s manual of each component. is not connected or the video device is OFF), the set to VIDEO and a video signal is pressed as suggestions. Connect the cable from coaxial shielded wire. The following connection diagrams are...
... the location of video and audio inputs and outputs. For best performance, video and audio cables should be OFF. The VIDEO icon disappears automatically after approximately eight seconds. 4. VCR TV INPUT TERMINAL S-VIDEO VIDEO (MONO) L R AUDIO INPUT 1 VIDEO OUT AUDIO OUT 14 Check the owner s manual of each component. is not connected or the video device is OFF), the set to VIDEO and a video signal is pressed as suggestions. Connect the cable from coaxial shielded wire. The following connection diagrams are...

Owners Guide
Page 15
... insert the connection cord plugs when connecting to the INPUT(AUDIO/R) jack. 3. The picture that a VCR cannot record its own video or line output. (INPUT 1 in place of the VCR or the laserdisc player to rear panel jacks. CONNECTING EXTERNAL VIDEO SOURCES CONNECTING A STEREO VCR OR STEREO LASERDISC PLAYER 1. Optional, see tips on line input-output connections. 15 Press the INPUT button to the previous channel. Connect the cable from the AUDIO OUT R of the standard video cable. The VIDEO icon...
... insert the connection cord plugs when connecting to the INPUT(AUDIO/R) jack. 3. The picture that a VCR cannot record its own video or line output. (INPUT 1 in place of the VCR or the laserdisc player to rear panel jacks. CONNECTING EXTERNAL VIDEO SOURCES CONNECTING A STEREO VCR OR STEREO LASERDISC PLAYER 1. Optional, see tips on line input-output connections. 15 Press the INPUT button to the previous channel. Connect the cable from the AUDIO OUT R of the standard video cable. The VIDEO icon...

Owners Guide
Page 19
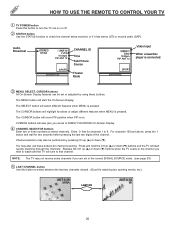
... REMOTE TO CONTROL YOUR TV A detailed explanation of the On-Screen Display features. ቨ VOLUME, MUTE buttons Use these buttons to directly access THEATER mode between the last two channels viewed. ቫ EXIT button Use this button to exit all On-Screen Display menus. ብ CHANNEL SELECTOR buttons Use these buttons to select the CHANNEL you wish to watch. ቧ INPUT button Use this button to select the main or sub-picture video source from the antenna or video inputs. 1 4 7 INPUT REC 2 3 5 6 8 9 0 STATUS TV...
... REMOTE TO CONTROL YOUR TV A detailed explanation of the On-Screen Display features. ቨ VOLUME, MUTE buttons Use these buttons to directly access THEATER mode between the last two channels viewed. ቫ EXIT button Use this button to exit all On-Screen Display menus. ብ CHANNEL SELECTOR buttons Use these buttons to select the CHANNEL you wish to watch. ቧ INPUT button Use this button to select the main or sub-picture video source from the antenna or video inputs. 1 4 7 INPUT REC 2 3 5 6 8 9 0 STATUS TV...
Owners Guide
Page 20
The CURSOR buttons will start the On-Screen Display. Press and hold the CH up (̆) or down (̄) buttons and the TV will highlight functions or adjust different features when MENU is pressed. NOTE: The TV may not receive some channels if you are not in the correct SIGNAL SOURCE mode. (see page 33) ቦ LAST CHANNEL button Use this button to turn the TV set or adjusted by pressing...
The CURSOR buttons will start the On-Screen Display. Press and hold the CH up (̆) or down (̄) buttons and the TV will highlight functions or adjust different features when MENU is pressed. NOTE: The TV may not receive some channels if you are not in the correct SIGNAL SOURCE mode. (see page 33) ቦ LAST CHANNEL button Use this button to turn the TV set or adjusted by pressing...
Owners Guide
Page 23
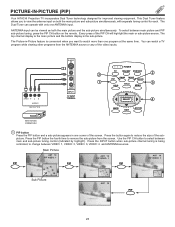
... can operate with separate tuning control for improved viewing enjoyment. PICTURE-IN-PICTURE (PIP) Your HITACHI Projection TV incorporates Dual Tuner technology designed for each. To select between main and sub-picture tuning control (indicated by highlight). The top channel display is the main picture and the bottom display is being controlled, to remove the sub-picture from the ANTENNA source or any of the screen. picture. Press the INPUT button when sub-picture channel tuning...
... can operate with separate tuning control for improved viewing enjoyment. PICTURE-IN-PICTURE (PIP) Your HITACHI Projection TV incorporates Dual Tuner technology designed for each. To select between main and sub-picture tuning control (indicated by highlight). The top channel display is the main picture and the bottom display is being controlled, to remove the sub-picture from the ANTENNA source or any of the screen. picture. Press the INPUT button when sub-picture channel tuning...
Owners Guide
Page 31
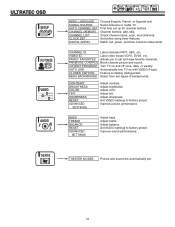
...THEATER THEATER MODES Picture and sound are automatically set up for channel buttons. ULTRATEC OSD SETUP CUSTOMIZE VIDEO AUDIO SETUP CUSTOMIZE VIDEO SEL AUDIO THEATER MENU LANGUAGE SIGNAL SOURCE AUTO CHANNEL SET CHANNEL MEMORY CHANNEL LIST CLOCK SET DIGITAL ARRAY Choose English, French, or Spanish text. Match red, green, and blue colors to display dialogue/text. CHANNEL ID. CLOSED CAPTION Feature to make white. Set VIDEO settings to set and view favorite channels. Adjust tint. BASS TREBLE BALANCE RESET ADVANCED SETTINGS Adjust bass. First time set . 31 Channel buttons, add...
...THEATER THEATER MODES Picture and sound are automatically set up for channel buttons. ULTRATEC OSD SETUP CUSTOMIZE VIDEO AUDIO SETUP CUSTOMIZE VIDEO SEL AUDIO THEATER MENU LANGUAGE SIGNAL SOURCE AUTO CHANNEL SET CHANNEL MEMORY CHANNEL LIST CLOCK SET DIGITAL ARRAY Choose English, French, or Spanish text. Match red, green, and blue colors to display dialogue/text. CHANNEL ID. CLOSED CAPTION Feature to make white. Set VIDEO settings to set and view favorite channels. Adjust tint. BASS TREBLE BALANCE RESET ADVANCED SETTINGS Adjust bass. First time set . 31 Channel buttons, add...
Owners Guide
Page 34
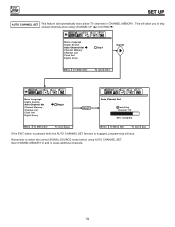
...AUDIO THEATER Menu Language Signal Source Auto Channel Set Channel Memory Channel List Clock Set Digital Array Begin SELECT SETUP CUSTOMIZE VIDEO AUDIO THEATER Auto Channel Set Installing Channel 110 88% Complete M e n u To M e n u B a r To Q u i t E x i t M e n u To M e n u B a r To Q u i t E x i t If the EXIT button is pressed while the AUTO CHANNEL SET function is engaged, programming will allow you to skip unused channels when using AUTO CHANNEL SET. Remember to add or erase additional channels. 34 See CHANNEL MEMORY to select the correct SIGNAL SOURCE mode before using...
...AUDIO THEATER Menu Language Signal Source Auto Channel Set Channel Memory Channel List Clock Set Digital Array Begin SELECT SETUP CUSTOMIZE VIDEO AUDIO THEATER Auto Channel Set Installing Channel 110 88% Complete M e n u To M e n u B a r To Q u i t E x i t M e n u To M e n u B a r To Q u i t E x i t If the EXIT button is pressed while the AUTO CHANNEL SET function is engaged, programming will allow you to skip unused channels when using AUTO CHANNEL SET. Remember to add or erase additional channels. 34 See CHANNEL MEMORY to select the correct SIGNAL SOURCE mode before using...

Owners Guide
Page 38
... panel DIGITAL ARRAY button or the remote control MOVE button when adjustment is turned ON again, your old convergence data will save your adjustment data into memory. Four lines surrounding a crosshatch indicate the point being adjusted. The color of the red and blue tubes can drift out of misconvergence and requires assistance from the Set Up menu. The outputs of these three color tubes can be restored. Bottom Left, 8 - When the TV...
... panel DIGITAL ARRAY button or the remote control MOVE button when adjustment is turned ON again, your old convergence data will save your adjustment data into memory. Four lines surrounding a crosshatch indicate the point being adjusted. The color of the red and blue tubes can drift out of misconvergence and requires assistance from the Set Up menu. The outputs of these three color tubes can be restored. Bottom Left, 8 - When the TV...
Owners Guide
Page 43
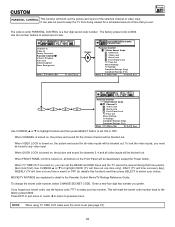
... factory preset 0000. Use the number buttons to set . SETUP CUSTOMIZE VIDEO SEL AUDIO THEATER Channel Id. When CHANNEL is turned on , the picture and sound for all video inputs will be blocked out. Enter a new four digit key number you set ON or OFF. Family Favorites Parental Control 4 Event Program Auto Link Closed Caption Menu Background M e n u To M e n u B a r To Q u i t E x i t Cursor CUSTOMIZE Use number buttons to enter SEL the secret code Parental Control **** Enter Secret Code Channel 3 Video Lock Quick Lock Front Panel Lock TV Time Out Movie Ratings TV...
... factory preset 0000. Use the number buttons to set . SETUP CUSTOMIZE VIDEO SEL AUDIO THEATER Channel Id. When CHANNEL is turned on , the picture and sound for all video inputs will be blocked out. Enter a new four digit key number you set ON or OFF. Family Favorites Parental Control 4 Event Program Auto Link Closed Caption Menu Background M e n u To M e n u B a r To Q u i t E x i t Cursor CUSTOMIZE Use number buttons to enter SEL the secret code Parental Control **** Enter Secret Code Channel 3 Video Lock Quick Lock Front Panel Lock TV Time Out Movie Ratings TV...

Owners Guide
Page 45
... DVD player. However, intended operation is now reset and will turn on by AUTO LINK for three hours, the TV will substitute for use with your VCR, laserdisc, or DVD player OFF. Select OFF to change AUTO LINK setting. This feature is for your TV as described above. 3. When using the AUTO LINK feature, it later. Family Favorites Parental Control 4 Event Program Auto Link Closed Caption Menu Background Video:4 Auto Remote Off Cursor SETUP CUSTOMIZE VIDEO SEL AUDIO THEATER Channel...
... DVD player. However, intended operation is now reset and will turn on by AUTO LINK for three hours, the TV will substitute for use with your VCR, laserdisc, or DVD player OFF. Select OFF to change AUTO LINK setting. This feature is for your TV as described above. 3. When using the AUTO LINK feature, it later. Family Favorites Parental Control 4 Event Program Auto Link Closed Caption Menu Background Video:4 Auto Remote Off Cursor SETUP CUSTOMIZE VIDEO SEL AUDIO THEATER Channel...

Owners Guide
Page 46
... information covers the entire screen and viewing the TV program is for the program you to change menu background. SETUP CUSTOMIZE VIDEO SEL AUDIO THEATER Channel Id. Press EXIT to quit menu or CURSOR ̇ to return to previous menu. MENU BACKGROUND This function allows you are displayed on or off. SETUP CUSTOMIZE VIDEO SEL AUDIO THEATER Channel Id. Family Favorites Parental Control 4 Event Program Auto Link Closed Caption Menu Background Cursor SETUP CUSTOMIZE VIDEO SEL AUDIO THEATER Closed Caption Display Off Mode...
... information covers the entire screen and viewing the TV program is for the program you to change menu background. SETUP CUSTOMIZE VIDEO SEL AUDIO THEATER Channel Id. Press EXIT to quit menu or CURSOR ̇ to return to previous menu. MENU BACKGROUND This function allows you are displayed on or off. SETUP CUSTOMIZE VIDEO SEL AUDIO THEATER Channel Id. Family Favorites Parental Control 4 Event Program Auto Link Closed Caption Menu Background Cursor SETUP CUSTOMIZE VIDEO SEL AUDIO THEATER Closed Caption Display Off Mode...
Owners Guide
Page 48
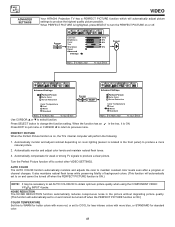
... lighting (sensor is located in the front panel) to produce a more blue, or STANDARD for standard color. 48 Automatically compensate for weak or strong TV signals to select function. Turn the Perfect Picture function off to maintain constant color levels even after a program or channel changes. AUTO COLOR The AUTO COLOR function automatically monitors and adjusts the color to control other VIDEO SETTINGS. Press SELECT button to previous menu. Automatically monitor and adjust contrast depending on , the TVs...
... lighting (sensor is located in the front panel) to produce a more blue, or STANDARD for standard color. 48 Automatically compensate for weak or strong TV signals to select function. Turn the Perfect Picture function off to maintain constant color levels even after a program or channel changes. AUTO COLOR The AUTO COLOR function automatically monitors and adjusts the color to control other VIDEO SETTINGS. Press SELECT button to previous menu. Automatically monitor and adjust contrast depending on , the TVs...


