Owners Guide
Page 2
...;There are no user serviceable parts inside the television. ¥Model and serial numbers are not expressly approved by HITACHI could void the user s warranty. CAUTION: Never remove the back cover of electric shock to very high voltages and other hazards. The lightning flash with paragraph 15.119 of the FCC rules. Insert power cord into a 120 Volt 60Hz outlet. NEVER CONNECT THE TELEVISION TO 50HZ, DIRECT...
...;There are no user serviceable parts inside the television. ¥Model and serial numbers are not expressly approved by HITACHI could void the user s warranty. CAUTION: Never remove the back cover of electric shock to very high voltages and other hazards. The lightning flash with paragraph 15.119 of the FCC rules. Insert power cord into a 120 Volt 60Hz outlet. NEVER CONNECT THE TELEVISION TO 50HZ, DIRECT...
Owners Guide
Page 3
... overload wall outlets and extension cords as power-supply cord or plug is damaged, liquid has been spilled or objects have fallen into the apparatus, the apparatus has been exposed to qualified service personnel. Do not attempt to service the television yourself as opening or removing covers may touch dangerous voltage points or short out parts that produce heat. ¥...
... overload wall outlets and extension cords as power-supply cord or plug is damaged, liquid has been spilled or objects have fallen into the apparatus, the apparatus has been exposed to qualified service personnel. Do not attempt to service the television yourself as opening or removing covers may touch dangerous voltage points or short out parts that produce heat. ¥...
Owners Guide
Page 4
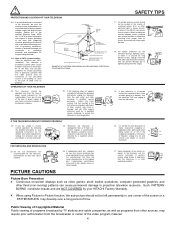
... replacement parts are unable to restore normal operation by following the detailed procedure in your HITACHI Factory Warranty. ¥ When using Picture-in wire to an antenna discharge unit, size of grounding conductors, location of time, (such as when going on -screen displays such as video games, stock market quotations, computer generated graphics, and other controls may result in the instructions as practical. Upon completion of power...
... replacement parts are unable to restore normal operation by following the detailed procedure in your HITACHI Factory Warranty. ¥ When using Picture-in wire to an antenna discharge unit, size of grounding conductors, location of time, (such as when going on -screen displays such as video games, stock market quotations, computer generated graphics, and other controls may result in the instructions as practical. Upon completion of power...
Owners Guide
Page 14
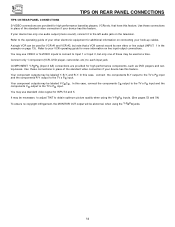
.... 14 Use these connections in place of the standard video connection if your VCR operating guide for high performance components, such as DVD players and settop-boxes. COMPONENT: Y-PBPR (Input 4 &5) connections are provided for INPUT:4 and 5. Your component outputs may be necessary to adjust TINT to the TV s PR input. Your component outputs may be used at a time. Refer to the left audio jack on the television. Use these may be used for additional...
.... 14 Use these connections in place of the standard video connection if your VCR operating guide for high performance components, such as DVD players and settop-boxes. COMPONENT: Y-PBPR (Input 4 &5) connections are provided for INPUT:4 and 5. Your component outputs may be necessary to adjust TINT to the TV s PR input. Your component outputs may be used at a time. Refer to the left audio jack on the television. Use these may be used for additional...
Owners Guide
Page 16
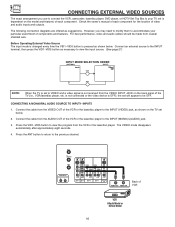
... HDTV Set Top Box to your particular assortment of video and audio inputs and outputs. The VIDEO mode disappears automatically after approximately eight seconds. 4. Before Operating External Video Source The input mode is changed every time the VID1~VID5 button is not received from the VIDEO OUT of the VCR or the laserdisc player to the INPUT (MONO)/L(AUDIO) jack. 3. Check the owner's manual of each component. Connect the cable from the VIDEO INPUT JACK on the TV set to VIDEO and a video signal...
... HDTV Set Top Box to your particular assortment of video and audio inputs and outputs. The VIDEO mode disappears automatically after approximately eight seconds. 4. Before Operating External Video Source The input mode is changed every time the VID1~VID5 button is not received from the VIDEO OUT of the VCR or the laserdisc player to the INPUT (MONO)/L(AUDIO) jack. 3. Check the owner's manual of each component. Connect the cable from the VIDEO INPUT JACK on the TV set to VIDEO and a video signal...
Owners Guide
Page 19
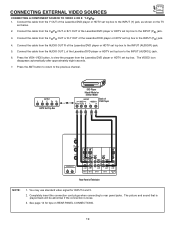
... to rear panel jacks. The picture and sound that is played back will be abnormal if the connection is loose. 3. Press the VID4~VID5 button, to view the program from the CR/PR OUT or R-Y OUT of the Laserdisc/DVD player or HDTV set top box to the INPUT (AUDIO/R) jack. 5. You may use standard video signal for tips on the TV set below. 2. Connect the cable from the Laserdisc/DVD player or HDTV set top box...
... to rear panel jacks. The picture and sound that is played back will be abnormal if the connection is loose. 3. Press the VID4~VID5 button, to view the program from the CR/PR OUT or R-Y OUT of the Laserdisc/DVD player or HDTV set top box to the INPUT (AUDIO/R) jack. 5. You may use standard video signal for tips on the TV set below. 2. Connect the cable from the Laserdisc/DVD player or HDTV set top box...
Owners Guide
Page 20
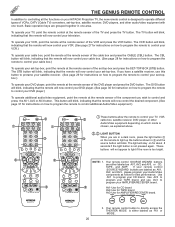
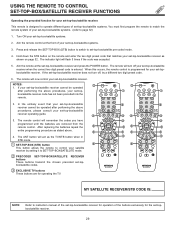
... FREEZE PIP MODE PROG PIP ACCESS SWAP TV/VCR SLOW REC ቤ CLU-5711TSI CLU-5713TSI ቢ These buttons allow the remote to prorame your satellite receiver. (See page 29 for instructions on for instructions on how to program the remote to control your cable box.) To operate your set-top-box, point the remote at the remote sensor of the component you wish to control and press the AV1, AV2 or AV3 button. Use...
... FREEZE PIP MODE PROG PIP ACCESS SWAP TV/VCR SLOW REC ቤ CLU-5711TSI CLU-5713TSI ቢ These buttons allow the remote to prorame your satellite receiver. (See page 29 for instructions on for instructions on how to program the remote to control your cable box.) To operate your set-top-box, point the remote at the remote sensor of the component you wish to control and press the AV1, AV2 or AV3 button. Use...
Owners Guide
Page 22
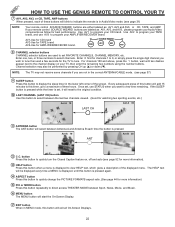
...; MENU button The MENU button will start the On-Screen Display. ታ EXIT button When in the correct ANTENNA/CABLE mode. (see page 37) ቪ SLEEP button Press this button when a menu is set FAVORITE CHANNELS, CHANNEL MEMORY, etc. If your TV, then enter the remaining two numbers using the number buttons. For channels 100 and above, press the 1 button, wait until this button is pressed again. ተ ASPECT button Press this button to quickly change the PICTURE FORMATS aspect...
...; MENU button The MENU button will start the On-Screen Display. ታ EXIT button When in the correct ANTENNA/CABLE mode. (see page 37) ቪ SLEEP button Press this button when a menu is set FAVORITE CHANNELS, CHANNEL MEMORY, etc. If your TV, then enter the remaining two numbers using the number buttons. For channels 100 and above, press the 1 button, wait until this button is pressed again. ተ ASPECT button Press this button to quickly change the PICTURE FORMATS aspect...
Owners Guide
Page 23
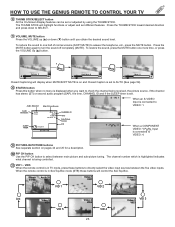
... remote control is in TV mode, press these buttons will control the Set-Top-Box. PIP CH button Use the PIP CH button to directly select the video input sources between main picture and sub-picture tuning. The channel number which is highlighted indicates what channel is being received, the picture source, if the channel has stereo (ST) or second audio program (SAP), the time, CHANNEL ID and if the SLEEP timer is connected to turn the sound off completely (MUTE). Audio...
... remote control is in TV mode, press these buttons will control the Set-Top-Box. PIP CH button Use the PIP CH button to directly select the video input sources between main picture and sub-picture tuning. The channel number which is highlighted indicates what channel is being received, the picture source, if the channel has stereo (ST) or second audio program (SAP), the time, CHANNEL ID and if the SLEEP timer is connected to turn the sound off completely (MUTE). Audio...
Owners Guide
Page 24
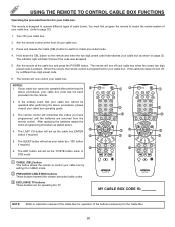
... V L R OUTPUT ANT A TO CONVERTER S-VIDEO S-VIDEO S-VIDEO ANT B AUDIO TO HI-FI R L VIDEO VIDEO Y/VIDEO Y/VIDEO VIDEO (MONO) (MONO) L L R R AUDIO AUDIO INPUT 1 INPUT 2 PB (MONO) L PR R AUDIO INPUT 4 PB (MONO) L L PR R AUDIO R AUDIO INPUT 5 MONITOR OUT MENU EXIT VOL SELECT CH ቤ ቢ ቤ SVCS VID 1 MUTE STATUS VCR PLUS+ INFO GUIDE/TV SCHD VID 5 VID 2 VID 4 VID 3 PIP PIP CH FREEZE PIP MODE PIP ACCESS SWAP PROG TV/VCR SLOW ብ,ቦ ባ REC VCR Hitachi Model or Similar Model Use above connection to watch a TV program...
... V L R OUTPUT ANT A TO CONVERTER S-VIDEO S-VIDEO S-VIDEO ANT B AUDIO TO HI-FI R L VIDEO VIDEO Y/VIDEO Y/VIDEO VIDEO (MONO) (MONO) L L R R AUDIO AUDIO INPUT 1 INPUT 2 PB (MONO) L PR R AUDIO INPUT 4 PB (MONO) L L PR R AUDIO R AUDIO INPUT 5 MONITOR OUT MENU EXIT VOL SELECT CH ቤ ቢ ቤ SVCS VID 1 MUTE STATUS VCR PLUS+ INFO GUIDE/TV SCHD VID 5 VID 2 VID 4 VID 3 PIP PIP CH FREEZE PIP MODE PIP ACCESS SWAP PROG TV/VCR SLOW ብ,ቦ ባ REC VCR Hitachi Model or Similar Model Use above connection to watch a TV program...
Owners Guide
Page 28
...) button to switch to CABLE mode. ባ PRECODED CABLE BOX buttons These buttons transmit the chosen precoded cable codes. ቤ EXCLUSIVE TV buttons These buttons are removed from the remote control. The remote will flash 3 times if the code was accepted. 5. Hold down the CBL button on the remote and enter the two digit preset code that your cable box cannot be operated after performing the above procedures, your cable box by setting it to Cable pre-coded mode. 4. If your cable box cannot be operated...
...) button to switch to CABLE mode. ባ PRECODED CABLE BOX buttons These buttons transmit the chosen precoded cable codes. ቤ EXCLUSIVE TV buttons These buttons are removed from the remote control. The remote will flash 3 times if the code was accepted. 5. Hold down the CBL button on the remote and enter the two digit preset code that your cable box cannot be operated after performing the above procedures, your cable box by setting it to Cable pre-coded mode. 4. If your cable box cannot be operated...
Owners Guide
Page 29
... 3 PIP PIP CH FREEZE PIP MODE PIP ACCESS SWAP PROG TV/VCR SLOW ባ ቤ ባ REC CLU-5713TSI MY SATELLITE RECEIVER/STB CODE IS: NOTE: Refer to instruction manual of the set-top-box/satellite receiver for operation of the buttons exclusively for the set -topbox/satellite receiver. Aim the remote at the front of your set-top-box/satellite systems. (refer to set -top-box/satellite receiver when the correct two digit preset code is programmed...
... 3 PIP PIP CH FREEZE PIP MODE PIP ACCESS SWAP PROG TV/VCR SLOW ባ ቤ ባ REC CLU-5713TSI MY SATELLITE RECEIVER/STB CODE IS: NOTE: Refer to instruction manual of the set-top-box/satellite receiver for operation of the buttons exclusively for the set -topbox/satellite receiver. Aim the remote at the front of your set-top-box/satellite systems. (refer to set -top-box/satellite receiver when the correct two digit preset code is programmed...
Owners Guide
Page 34
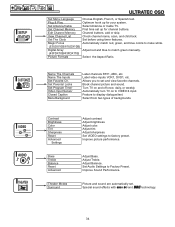
... First time set . Label video inputs VCR1, DVD1, etc. Turn TV on to Factory Preset. Feature to factory preset. Adjust brightness. Set VIDEO settings to display dialogue/text. Magic Focus Automatically match red, green, and blue colors to make white. (53UDX10B/61UDX10B) Digital Array Adjust red and blue to set and view favorite channels. Automatically turn TV on and off once, daily, or weekly. Adjust Bass. Picture and sound are automatically set up for channel buttons. Allows you to match green manually. (43FDX10B/43FDX11B) Picture Formats Select the Aspect...
... First time set . Label video inputs VCR1, DVD1, etc. Turn TV on to Factory Preset. Feature to factory preset. Adjust brightness. Set VIDEO settings to display dialogue/text. Magic Focus Automatically match red, green, and blue colors to make white. (53UDX10B/61UDX10B) Digital Array Adjust red and blue to set and view favorite channels. Automatically turn TV on and off once, daily, or weekly. Adjust Bass. Picture and sound are automatically set up for channel buttons. Allows you to match green manually. (43FDX10B/43FDX11B) Picture Formats Select the Aspect...
Owners Guide
Page 36
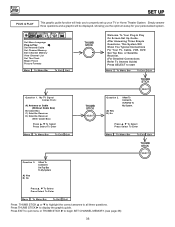
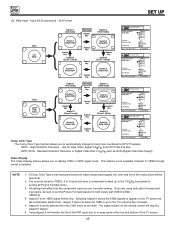
...; to begin SET CHANNEL MEMORY. (see page 38) 36 SETUP CUSTOMIZE VIDEO SEL AUDIO THEATER Set Menu Language Plug & Play Set Antenna/Cable Set Channel Memory Edit Channel Memory View Channel List Set The Clock Magic Focus Picture Formats M e n u To M e n u B a r To E x i t Q u i t THUMB STICK Welcome To Your Plug & Play On Screen Set Up Guide. SETUP SET UP PLUG & PLAY This graphic guide function will be displayed, showing you to all three questions. I Want To Connect A VCR/DVD To My...
...; to begin SET CHANNEL MEMORY. (see page 38) 36 SETUP CUSTOMIZE VIDEO SEL AUDIO THEATER Set Menu Language Plug & Play Set Antenna/Cable Set Channel Memory Edit Channel Memory View Channel List Set The Clock Magic Focus Picture Formats M e n u To M e n u B a r To E x i t Q u i t THUMB STICK Welcome To Your Plug & Play On Screen Set Up Guide. SETUP SET UP PLUG & PLAY This graphic guide function will be displayed, showing you to all three questions. I Want To Connect A VCR/DVD To My...
Owners Guide
Page 43
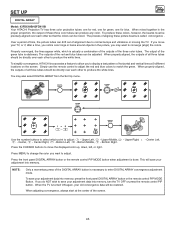
... use the remote control to adjust the red and blue colors to move your adjustment data into memory. Upper Left, 2 - Bottom Middle, 9 - Upper Right, 4 - Press the CURSOR buttons to match the green. Press MENU to change the color you to converge (align) the colors. SETUP SET UP DIGITAL ARRAY Model: 43FDX10B/43FDX11B Your HITACHI Projection TV has three color projection tubes: one for red, one for green, one for blue. The process of the green tube is called convergence . Properly converged, the lines appear white...
... use the remote control to adjust the red and blue colors to move your adjustment data into memory. Upper Left, 2 - Bottom Middle, 9 - Upper Right, 4 - Press the CURSOR buttons to match the green. Press MENU to change the color you to converge (align) the colors. SETUP SET UP DIGITAL ARRAY Model: 43FDX10B/43FDX11B Your HITACHI Projection TV has three color projection tubes: one for red, one for green, one for blue. The process of the green tube is called convergence . Properly converged, the lines appear white...

Owners Guide
Page 44
... 1080i signal. 44 Aspect 3 - Zoom in on Aspect 2 mode. SETUP CUSTOMIZE VIDEO SEL AUDIO THEATER Set Menu Language Plug & Play Set Antenna/Cable Set Channel Memory Edit Channel Memory View Channel List Set The Clock Magic Focus Picture Formats M e n u To M e n u B a r To Q u i t E x i t THUMB STICK SETUP Press Select To Set SEL Picture Formats Aspect Style V. Position Adjust this is not available with the signal input. 2. Depending on Aspect 1 mode. Display the actual (normal 4x3 or 16x9) inputted signal mode. Aspect 4 - Set up reception High Definition, Standard...
... 1080i signal. 44 Aspect 3 - Zoom in on Aspect 2 mode. SETUP CUSTOMIZE VIDEO SEL AUDIO THEATER Set Menu Language Plug & Play Set Antenna/Cable Set Channel Memory Edit Channel Memory View Channel List Set The Clock Magic Focus Picture Formats M e n u To M e n u B a r To Q u i t E x i t THUMB STICK SETUP Press Select To Set SEL Picture Formats Aspect Style V. Position Adjust this is not available with the signal input. 2. Depending on Aspect 1 mode. Display the actual (normal 4x3 or 16x9) inputted signal mode. Aspect 4 - Set up reception High Definition, Standard...
Owners Guide
Page 46
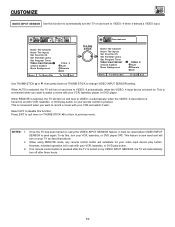
.... 2. Use for both inputs (set the Picture Formats feature for High Vision Signal Y-PBPR from the OSD menu at all Picture Formats menu. 3. Selecting Aspect 5 allows the 1080i signals to appear on the remote control will affect only the component input you to access all times. Position Comp Color Type Video Display M e n u To M e n u B a r Y-PBPR: 4 Aspect 1 Aspect 2 Aspect 3 Aspect 4 Aspect 5 +5 HDTV SDTV/DVD 1080i 540P To Q u i t E x i t Aspect 1 (4x3 mode) Normal Aspect key Aspect 2 (16x9 mode) SETUP Press Select To Set SEL Input Letter 16x9 480p Aspect...
.... 2. Use for both inputs (set the Picture Formats feature for High Vision Signal Y-PBPR from the OSD menu at all Picture Formats menu. 3. Selecting Aspect 5 allows the 1080i signals to appear on the remote control will affect only the component input you to access all times. Position Comp Color Type Video Display M e n u To M e n u B a r Y-PBPR: 4 Aspect 1 Aspect 2 Aspect 3 Aspect 4 Aspect 5 +5 HDTV SDTV/DVD 1080i 540P To Q u i t E x i t Aspect 1 (4x3 mode) Normal Aspect key Aspect 2 (16x9 mode) SETUP Press Select To Set SEL Input Letter 16x9 480p Aspect...

Owners Guide
Page 51
... the factory preset 0000. NOTE: 1. When QUICK LOCK is turned on, the picture and sound for all video inputs will be used to keep the TV from being viewed for channels 3, 4 on , the picture and sound for a scheduled amount of time that you can set . When CHANNEL is turned on both antenna inputs. 2. If ANT A and ANT B are explained in detail in the same signal source mode (see page 41). 3. SETUP CUSTOMIZE VIDEO SEL AUDIO...
... the factory preset 0000. NOTE: 1. When QUICK LOCK is turned on, the picture and sound for all video inputs will be used to keep the TV from being viewed for channels 3, 4 on , the picture and sound for a scheduled amount of time that you can set . When CHANNEL is turned on both antenna inputs. 2. If ANT A and ANT B are explained in detail in the same signal source mode (see page 41). 3. SETUP CUSTOMIZE VIDEO SEL AUDIO...
Owners Guide
Page 53
... turned on your remote control is turned on your TV as described above. 2. However, intended operation is used again. Set Parental Locks Set Program Timer Video Input Sensor Closed Caption Menu Background Menu To Menu Bar Video: 4 Auto Remote Off To Quit Exit THUMB STICK CUSTOMIZE SEL Press select to previous menu. To do this function. When using the VIDEO INPUT SENSOR feature, it later. If no remote control button is pressed after the TV is now reset and will automatically turn...
... turned on your remote control is turned on your TV as described above. 2. However, intended operation is used again. Set Parental Locks Set Program Timer Video Input Sensor Closed Caption Menu Background Menu To Menu Bar Video: 4 Auto Remote Off To Quit Exit THUMB STICK CUSTOMIZE SEL Press select to previous menu. To do this function. When using the VIDEO INPUT SENSOR feature, it later. If no remote control button is pressed after the TV is now reset and will automatically turn...
Owners Guide
Page 56
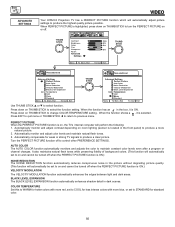
... Modulation Black Level Expansion Color Temperature Cool Warm Standard Menu To Menu Bar To Quit Exit Use THUMB STICK ̆ or ̄ to control other PREFERENCE SETTINGS. Automatically monitor and adjust contrast depending on or off to select function. Automatically monitor and adjust color levels and maintain natural flesh tones. 3. VIDEO ADVANCED SETTINGS VIDEO Your HITACHI Projection TV has a PERFECT PICTURE function which will automatically adjust picture settings to change COLOR TEMPERATURE setting. SETUP CUSTOMIZE VIDEO SEL AUDIO THEATER...
... Modulation Black Level Expansion Color Temperature Cool Warm Standard Menu To Menu Bar To Quit Exit Use THUMB STICK ̆ or ̄ to control other PREFERENCE SETTINGS. Automatically monitor and adjust contrast depending on or off to select function. Automatically monitor and adjust color levels and maintain natural flesh tones. 3. VIDEO ADVANCED SETTINGS VIDEO Your HITACHI Projection TV has a PERFECT PICTURE function which will automatically adjust picture settings to change COLOR TEMPERATURE setting. SETUP CUSTOMIZE VIDEO SEL AUDIO THEATER...


