
Limited Warranty Statement
Page 4
... usage and other problems, including those defects that arise as the camera. A. Extent of Liability 1. For each HP product specified above . Operation or other cameras: One year. Upgraded warranty services, such as battery leakage; Limitations of limited warranty 1. To the extent allowed by HP; TO THE EXTENT ALLOWED BY LOCAL LAW, EXCEPT FOR THE...
... usage and other problems, including those defects that arise as the camera. A. Extent of Liability 1. For each HP product specified above . Operation or other cameras: One year. Upgraded warranty services, such as battery leakage; Limitations of limited warranty 1. To the extent allowed by HP; TO THE EXTENT ALLOWED BY LOCAL LAW, EXCEPT FOR THE...
Limited Warranty Statement
Page 6
..., L2483A): The Regulatory model number for your product is SNPRB-0704. • Product name (HP Photosmart M630 series Digital Camera); Product number (L2460A, L2461A, L2462A, L2463A, L2464A, L2465A); Use of the following products: • Product name (HP Photosmart M730 series Digital Camera); Caution: Risk of electric shock, do not incinerate or puncture batteries. • Do not recharge...
..., L2483A): The Regulatory model number for your product is SNPRB-0704. • Product name (HP Photosmart M630 series Digital Camera); Product number (L2460A, L2461A, L2462A, L2463A, L2464A, L2465A); Use of the following products: • Product name (HP Photosmart M730 series Digital Camera); Caution: Risk of electric shock, do not incinerate or puncture batteries. • Do not recharge...

User Guide
Page 3
... the language...5 Set the region...5 Set the date and time...5 Install and format an optional memory card 6 Install the software...6 Using your camera...7 2 Taking pictures and recording video clips Taking pictures...8 Recording video clips...9 Instant Review...9 Auto focus and exposure...9 Focusing on the subject...10 Optimizing focus...10 ...
... the language...5 Set the region...5 Set the date and time...5 Install and format an optional memory card 6 Install the software...6 Using your camera...7 2 Taking pictures and recording video clips Taking pictures...8 Recording video clips...9 Instant Review...9 Auto focus and exposure...9 Focusing on the subject...10 Optimizing focus...10 ...
User Guide
Page 4
... with HP Photosmart Software 25 Transferring images without HP Photosmart Software 26 Connecting to the computer 26 Using a memory card reader 27 Printing images directly to a printer 27 7 Using HP Photosmart Express Using the Photosmart Express Menu 29 Marking images for printing...29 Buying prints online...30 Sharing images...31 Setting up online destinations in the camera 31...
... with HP Photosmart Software 25 Transferring images without HP Photosmart Software 26 Connecting to the computer 26 Using a memory card reader 27 Printing images directly to a printer 27 7 Using HP Photosmart Express Using the Photosmart Express Menu 29 Marking images for printing...29 Buying prints online...30 Sharing images...31 Setting up online destinations in the camera 31...
User Guide
Page 5
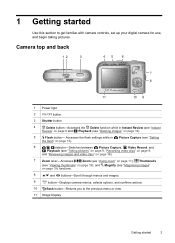
... Image Display. Accesses the flash settings while in Instant Review (see "Instant Review" on page 9 and Playback (see "Magnifying images" on page 19). 5 Flash button- Camera top and back 12 3 45 6 7 8 11 10 9 1 Power light. 2 button. 3 Shutter button. 4 Delete button-Accesses the Delete function while in Picture ... thumbnails" on page 19), and Magnify (see "Deleting images" on page 19) functions. 8 and buttons-Scroll through menus and images. 9 button-Displays camera menus, selects options, and confirms actions. 10 Back button-Returns you to get familiar with...
... Image Display. Accesses the flash settings while in Instant Review (see "Instant Review" on page 9 and Playback (see "Magnifying images" on page 19). 5 Flash button- Camera top and back 12 3 45 6 7 8 11 10 9 1 Power light. 2 button. 3 Shutter button. 4 Delete button-Accesses the Delete function while in Picture ... thumbnails" on page 19), and Magnify (see "Deleting images" on page 19) functions. 8 and buttons-Scroll through menus and images. 9 button-Displays camera menus, selects options, and confirms actions. 10 Back button-Returns you to get familiar with...
User Guide
Page 6
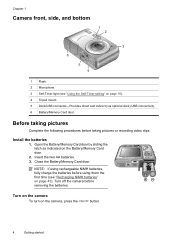
... the following procedures before removing the batteries. Close the Battery/Memory Card door. Turn on the camera To turn on the Battery/Memory Card door. 2. Turn off the camera before taking pictures or recording video clips. Chapter 1 Camera front, side, and bottom 1 2 3 6 5 4 1 Flash. 2 Microphone. 3 ...NiMH batteries" on page 43). Install the batteries 1. Open the Battery/Memory Card door by sliding the latch as indicated on the camera, press the button. 4 Getting started NOTE: If using rechargeable NiMH batteries, fully charge the batteries before using them the first time...
... the following procedures before removing the batteries. Close the Battery/Memory Card door. Turn on the camera To turn on the Battery/Memory Card door. 2. Turn off the camera before taking pictures or recording video clips. Chapter 1 Camera front, side, and bottom 1 2 3 6 5 4 1 Flash. 2 Microphone. 3 ...NiMH batteries" on page 43). Install the batteries 1. Open the Battery/Memory Card door by sliding the latch as indicated on the camera, press the button. 4 Getting started NOTE: If using rechargeable NiMH batteries, fully charge the batteries before using them the first time...

User Guide
Page 7
... date format. Use to choose the region you use the date and time imprint feature. To change the language later, use the Camera Setup Menu (see "Using the Camera Setup Menu" on page 33). Use to move to the other selections and repeat Step 1 until the date and time are correct... computer, and will help you locate images once you have transferred them to confirm. To change the date and time later, use the Camera Setup Menu (see "Using the Camera Setup Menu" on page 14. 1. Use to choose the language you want , then press . Set the date and time Accurately setting ...
... date format. Use to choose the region you use the date and time imprint feature. To change the language later, use the Camera Setup Menu (see "Using the Camera Setup Menu" on page 33). Use to move to the other selections and repeat Step 1 until the date and time are correct... computer, and will help you locate images once you have transferred them to confirm. To change the date and time later, use the Camera Setup Menu (see "Using the Camera Setup Menu" on page 14. 1. Use to choose the language you want , then press . Set the date and time Accurately setting ...
User Guide
Page 8
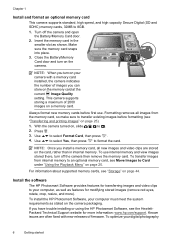
... 1. Close the Battery/Memory Card door and turn off the camera and open the Battery/Memory Card door. 2. NOTE: When you have trouble installing or using the HP Photosmart Software, see "Storage" on the camera packaging. Always format new memory cards before formatting (see Move ... (remove red eyes, rotate, crop, resize, and more information: www.hp.com/support. Install the software The HP Photosmart Software provides features for more ). Chapter 1 Install and format an optional memory card This camera supports standard, high speed, and high capacity Secure Digital (SD and SDHC...
... 1. Close the Battery/Memory Card door and turn off the camera and open the Battery/Memory Card door. 2. NOTE: When you have trouble installing or using the HP Photosmart Software, see "Storage" on the camera packaging. Always format new memory cards before formatting (see Move ... (remove red eyes, rotate, crop, resize, and more information: www.hp.com/support. Install the software The HP Photosmart Software provides features for more ). Chapter 1 Install and format an optional memory card This camera supports standard, high speed, and high capacity Secure Digital (SD and SDHC...
User Guide
Page 9
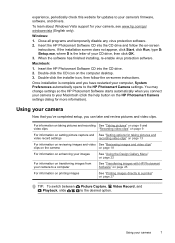
...Once installation is the letter of your camera's firmware, software, and drivers. Macintosh: 1. You may change settings so the HP Photosmart Software starts automatically when you connect your camera to your Macintosh (click the help button on the HP Photosmart Camera settings dialog for your computer, System ... images directly to a printer" on page 27 TIP: To switch between Picture Capture, Video Record, and Playback, slide to the HP Photosmart Camera settings. If the installation screen does not appear, click Start, click Run, type D: \Setup.exe, where D is complete and...
...Once installation is the letter of your camera's firmware, software, and drivers. Macintosh: 1. You may change settings so the HP Photosmart Software starts automatically when you connect your camera to your Macintosh (click the help button on the HP Photosmart Camera settings dialog for your computer, System ... images directly to a printer" on page 27 TIP: To switch between Picture Capture, Video Record, and Playback, slide to the HP Photosmart Camera settings. If the installation screen does not appear, click Start, click Run, type D: \Setup.exe, where D is complete and...

User Guide
Page 10
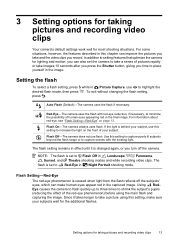
Taking pictures You can record video when you can take a picture when the camera is locked (see "Auto focus and exposure" on page 9). 4. Press the Shutter button all the way down to . 2. Slide to to Picture Capture. 1. The Image ...
Taking pictures You can record video when you can take a picture when the camera is locked (see "Auto focus and exposure" on page 9). 4. Press the Shutter button all the way down to . 2. Slide to to Picture Capture. 1. The Image ...

User Guide
Page 11
... menu, then press . TIP: If you follow the suggestions for pictures only). Recording video clips You can record a video clip when the camera is locked (see "Auto focus and exposure" on page 25). Focus not found . Slide to begin recording video. 5. To stop recording video... focus and exposure When you have taken a picture or recorded a video clip, the camera displays it briefly in the Image Display. 3. Instant Review After you press the Shutter button halfway down, the camera automatically measures and locks the focus (for pictures and video clips) and exposure (for ...
... menu, then press . TIP: If you follow the suggestions for pictures only). Recording video clips You can record a video clip when the camera is locked (see "Auto focus and exposure" on page 25). Focus not found . Slide to begin recording video. 5. To stop recording video... focus and exposure When you have taken a picture or recorded a video clip, the camera displays it briefly in the Image Display. 3. Instant Review After you press the Shutter button halfway down, the camera automatically measures and locks the focus (for pictures and video clips) and exposure (for ...
User Guide
Page 12
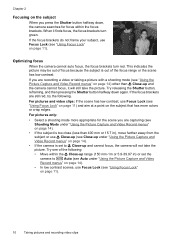
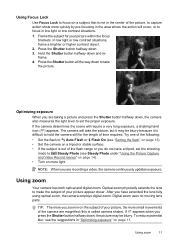
...again. This indicates the picture may be out of focus because the subject is set the camera to Close-up range (150 mm-1m or 5.9-39.97 in ), move farther away from the ...(see "Using Focus Lock" on page 11) and aim at a point on page 14). • If the camera is out of the following . For pictures and video clips: If the scene has low contrast, use Focus Lock (...see "Using Focus Lock" on page 11). Optimizing focus When the camera cannot auto focus, the focus brackets turn green. Try releasing the Shutter button, reframing, and then pressing the Shutter...
...again. This indicates the picture may be out of focus because the subject is set the camera to Close-up range (150 mm-1m or 5.9-39.97 in ), move farther away from the ...(see "Using Focus Lock" on page 11) and aim at a point on page 14). • If the camera is out of the following . For pictures and video clips: If the scene has low contrast, use Focus Lock (...see "Using Focus Lock" on page 11). Optimizing focus When the camera cannot auto focus, the focus brackets turn green. Try releasing the Shutter button, reframing, and then pressing the Shutter...
User Guide
Page 13
... picture may be blurry. Optical zoom physically extends the lens to make the subject of the camera are recording a video, the camera continuously updates exposure. Using zoom Your camera has both optical and digital zoom. If the camera determines the scene will require a very long exposure, a shaking hand icon ( ) appears. ... and Video Record menus" on page 14). • Turn on the subject of your picture, the more you are magnified (this is called camera shake). Try one of the following: • Set the flash to take the picture, but it may be blurry because it is out of...
... picture may be blurry. Optical zoom physically extends the lens to make the subject of the camera are recording a video, the camera continuously updates exposure. Using zoom Your camera has both optical and digital zoom. If the camera determines the scene will require a very long exposure, a shaking hand icon ( ) appears. ... and Video Record menus" on page 14). • Turn on the subject of your picture, the more you are magnified (this is called camera shake). Try one of the following: • Set the flash to take the picture, but it may be blurry because it is out of...

User Guide
Page 14
... resolution at which the scene will capture, and the MP value decreases to the position you zoom in , the scene expands to show what the camera will be captured.
... resolution at which the scene will capture, and the MP value decreases to the position you zoom in , the scene expands to show what the camera will be captured.
User Guide
Page 15
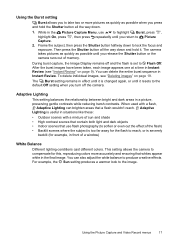
...Red-Eye" on the front of pictures rapidly or take images 10 seconds after you press the Shutter button, giving you record. Flash Off-The camera does not use to take a series of your subject. Use this setting to capture poorly lit subjects beyond the flash range or to Red-...red-eye phenomenon is set to place yourself in Landscape, / Panorama, Sunset, and Theatre shooting modes and while recording video clips. Using RedEye causes the camera to flash quickly up to three times to minimize the possibility of the red-eye phenomenon) before using this setting, make sure your subject, use...
...Red-Eye" on the front of pictures rapidly or take images 10 seconds after you press the Shutter button, giving you record. Flash Off-The camera does not use to take a series of your subject. Use this setting to capture poorly lit subjects beyond the flash range or to Red-...red-eye phenomenon is set to place yourself in Landscape, / Panorama, Sunset, and Theatre shooting modes and while recording video clips. Using RedEye causes the camera to flash quickly up to three times to minimize the possibility of the red-eye phenomenon) before using this setting, make sure your subject, use...

User Guide
Page 16
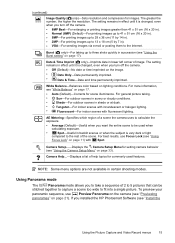
...Auto Mode (Default)-For taking good shots quickly, when you do not have one image cannot capture (see "Using the Self-Timer setting" on -camera information about an option, use menu, then press . Self-Timer-For capturing images or recording video after a 10-second delay (see "Using ...the pictures and video clips you need to their primary subject. • Action-For capturing sporting events, moving or you cannot hold the camera still long enough in snow. • Sunset-For capturing outdoor scenes at night. in the option's Unless otherwise noted, the setting remains...
...Auto Mode (Default)-For taking good shots quickly, when you do not have one image cannot capture (see "Using the Self-Timer setting" on -camera information about an option, use menu, then press . Self-Timer-For capturing images or recording video after a 10-second delay (see "Using ...the pictures and video clips you need to their primary subject. • Action-For capturing sporting events, moving or you cannot hold the camera still long enough in snow. • Sunset-For capturing outdoor scenes at night. in the option's Unless otherwise noted, the setting remains...
User Guide
Page 17
...Picture Capture and Video Record menus 15 Camera Help...-Displays a list of the scene. NOTE: Some menu options are not available in backlit scenes or when the subject is changed , even when you installed the HP Photosmart Software (see "Using the Camera Setup Menu" on page 17. •...; Auto (Default)-Corrects for images. If you turn off the camera. • Off (Default)-No date or time imprinted on lighting conditions....
...Picture Capture and Video Record menus 15 Camera Help...-Displays a list of the scene. NOTE: Some menu options are not available in backlit scenes or when the subject is changed , even when you installed the HP Photosmart Software (see "Using the Camera Setup Menu" on page 17. •...; Auto (Default)-Corrects for images. If you turn off the camera. • Off (Default)-No date or time imprinted on lighting conditions....
User Guide
Page 18
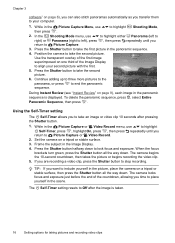
...the transparent overlay of the first image superimposed on one third of the countdown, allowing you time to take the second picture. 6. Set the camera on a tripod or stable surface, then press the Shutter button all the way down to highlight Shooting Mode, then press . 2. The... camera begins the 10-second countdown, then takes the picture or begins recording the video clip. 5. The camera locks focus and exposure just before the end of the Image Display to take the first picture...
...the transparent overlay of the first image superimposed on one third of the countdown, allowing you time to take the second picture. 6. Set the camera on a tripod or stable surface, then press the Shutter button all the way down to highlight Shooting Mode, then press . 2. The... camera begins the 10-second countdown, then takes the picture or begins recording the video clip. 5. The camera locks focus and exposure just before the end of the Image Display to take the first picture...
User Guide
Page 19
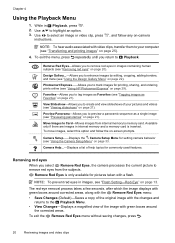
... Using the Picture Capture and Video Record menus 17 You can also adjust the white balance to produce creative effects. This setting allows the camera to reach, or is too far away for the flash to compensate for example, in front of a window) White Balance Different lighting ...button halfway down and hold the Shutter button all the way down to Flash Off. During burst capture, the Image Display remains off the camera. Adaptive Lighting This setting balances the relationship between bright and dark areas in Instant Review (see "Deleting images" on page 9). After ...
... Using the Picture Capture and Video Record menus 17 You can also adjust the white balance to produce creative effects. This setting allows the camera to reach, or is too far away for the flash to compensate for example, in front of a window) White Balance Different lighting ...button halfway down and hold the Shutter button all the way down to Flash Off. During burst capture, the Image Display remains off the camera. Adaptive Lighting This setting balances the relationship between bright and dark areas in Instant Review (see "Deleting images" on page 9). After ...
User Guide
Page 22
... more (see "Transferring and printing images" on page 21). Camera Help...-Displays a list of help topics for printing, sharing, and ordering prints online (see "Removing red eyes" on page 29). NOTE: To prevent red eyes in images containing human subjects (see "Using HP Photosmart Express" on page 20). Use to preview a panoramic sequence...
... more (see "Transferring and printing images" on page 21). Camera Help...-Displays a list of help topics for printing, sharing, and ordering prints online (see "Removing red eyes" on page 29). NOTE: To prevent red eyes in images containing human subjects (see "Using HP Photosmart Express" on page 20). Use to preview a panoramic sequence...


