User Guide
Page 3
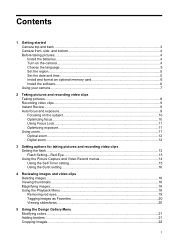
... the language...5 Set the region...5 Set the date and time...5 Install and format an optional memory card 6 Install the software...6 Using your camera...7 2 Taking pictures and recording video clips Taking pictures...8 Recording video clips...9 Instant Review...9 Auto focus and exposure...9 Focusing on the subject...10 Optimizing focus...10 ...
... the language...5 Set the region...5 Set the date and time...5 Install and format an optional memory card 6 Install the software...6 Using your camera...7 2 Taking pictures and recording video clips Taking pictures...8 Recording video clips...9 Instant Review...9 Auto focus and exposure...9 Focusing on the subject...10 Optimizing focus...10 ...
User Guide
Page 4
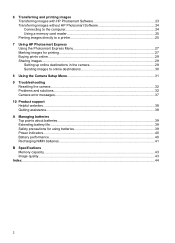
... with HP Photosmart Software 23 Transferring images without HP Photosmart Software 24 Connecting to the computer 24 Using a memory card reader 25 Printing images directly to a printer 25 7 Using HP Photosmart Express Using the Photosmart Express Menu 27 Marking images for printing...27 Buying prints online...29 Sharing images...29 Setting up online destinations in the camera 29...
... with HP Photosmart Software 23 Transferring images without HP Photosmart Software 24 Connecting to the computer 24 Using a memory card reader 25 Printing images directly to a printer 25 7 Using HP Photosmart Express Using the Photosmart Express Menu 27 Marking images for printing...27 Buying prints online...29 Sharing images...29 Setting up online destinations in the camera 29...

User Guide
Page 5
Press and hold to the previous menu or view. Getting started Use this section to get familiar with camera controls, set up your digital camera for use, and begin taking pictures. 1 Getting started 3 Accesses the flash settings while in Instant Review (see "Instant ...Review" on page 9) and Playback (see "Magnifying images" on page 18). 5 Flash button- Camera top and back 12 3 45 6 7 8 11 10 9 1 Power light. 2 button. 3 Shutter button. 4 Delete button-Accesses the Delete function while in...
Press and hold to the previous menu or view. Getting started Use this section to get familiar with camera controls, set up your digital camera for use, and begin taking pictures. 1 Getting started 3 Accesses the flash settings while in Instant Review (see "Instant ...Review" on page 9) and Playback (see "Magnifying images" on page 18). 5 Flash button- Camera top and back 12 3 45 6 7 8 11 10 9 1 Power light. 2 button. 3 Shutter button. 4 Delete button-Accesses the Delete function while in...
User Guide
Page 6
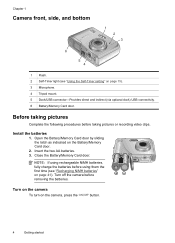
...page 41). Open the Battery/Memory Card door by sliding the latch as indicated on the camera, press the button. 4 Getting started Insert the two AA batteries. 3. Turn on the camera To turn on the Battery/Memory Card door. 2. Before taking pictures or recording video ...clips. Close the Battery/Memory Card door. Install the batteries 1. Turn off the camera before taking pictures Complete the following procedures before removing the batteries. NOTE: If using rechargeable NiMH batteries, fully charge the batteries before ...
...page 41). Open the Battery/Memory Card door by sliding the latch as indicated on the camera, press the button. 4 Getting started Insert the two AA batteries. 3. Turn on the camera To turn on the Battery/Memory Card door. 2. Before taking pictures or recording video ...clips. Close the Battery/Memory Card door. Install the batteries 1. Turn off the camera before taking pictures Complete the following procedures before removing the batteries. NOTE: If using rechargeable NiMH batteries, fully charge the batteries before ...
User Guide
Page 7
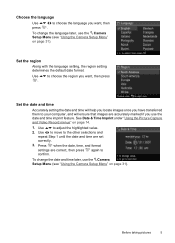
...to the other selections and repeat Step 1 until the date and time are set correctly. 3. To change the language later, use the Camera Setup Menu (see "Using the Camera Setup Menu" on page 31). Use to adjust the highlighted value. 2. Before taking pictures 5 Use to move to your computer, and...Accurately setting the date and time will ensure that images are correct, then press again to choose the language you use the Camera Setup Menu (see "Using the Camera Setup Menu" on page 31). To change the date and time later, use the date and time imprint feature. Choose the...
...to the other selections and repeat Step 1 until the date and time are set correctly. 3. To change the language later, use the Camera Setup Menu (see "Using the Camera Setup Menu" on page 31). Use to adjust the highlighted value. 2. Before taking pictures 5 Use to move to your computer, and...Accurately setting the date and time will ensure that images are correct, then press again to choose the language you use the Camera Setup Menu (see "Using the Camera Setup Menu" on page 31). To change the date and time later, use the date and time imprint feature. Choose the...
User Guide
Page 8
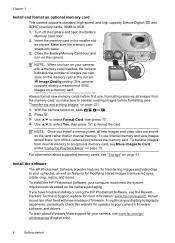
... learn about supported memory cards, see "Transferring and printing images" on the camera packaging. Turn off the camera then remove the memory card. Press . 3. To install the HP Photosmart Software, your camera, see Move Images to an optional memory card, see www.hp.com/go/ windowsvista (English only). 6 Getting started To optimize your digital photography experience...
... learn about supported memory cards, see "Transferring and printing images" on the camera packaging. Turn off the camera then remove the memory card. Press . 3. To install the HP Photosmart Software, your camera, see Move Images to an optional memory card, see www.hp.com/go/ windowsvista (English only). 6 Getting started To optimize your digital photography experience...

User Guide
Page 9
...follow the on page 25 TIP: To switch between Picture Capture, Video Record, and Playback, slide to the HP Photosmart Camera settings. Using your camera 7 For information on taking pictures and video record settings recording video clips" on page 13 For information on ... and See "Setting options for more information). You may change settings so the HP Photosmart Software starts automatically when you have restarted your camera to a computer See "Transferring images with HP Photosmart Software" on page 23 For information on printing images See "Printing images directly...
...follow the on page 25 TIP: To switch between Picture Capture, Video Record, and Playback, slide to the HP Photosmart Camera settings. Using your camera 7 For information on taking pictures and video record settings recording video clips" on page 13 For information on ... and See "Setting options for more information). You may change settings so the HP Photosmart Software starts automatically when you have restarted your camera to a computer See "Transferring images with HP Photosmart Software" on page 23 For information on printing images See "Printing images directly...
User Guide
Page 10
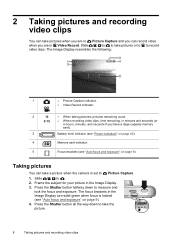
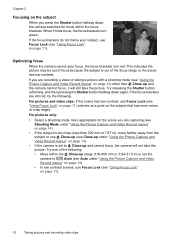
... indicators" on page 40). 4 Memory card indicator. 5 Focus brackets (see "Auto focus and exposure" on page 9). Slide to . 2. Slide to to take a picture when the camera is locked (see "Auto focus and exposure" on page 9). 4. Frame the subject for your picture in the Image Display. 3. The focus brackets in the Image...
... indicators" on page 40). 4 Memory card indicator. 5 Focus brackets (see "Auto focus and exposure" on page 9). Slide to . 2. Slide to to take a picture when the camera is locked (see "Auto focus and exposure" on page 9). 4. Frame the subject for your picture in the Image Display. 3. The focus brackets in the Image...
User Guide
Page 11
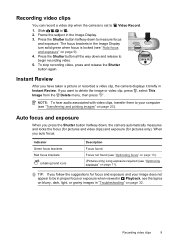
...focus brackets in the Image Display turn solid green when focus is set to . 2. TIP: If you have taken a picture or recorded a video clip, the camera displays it briefly in Instant Review. Recording video clips 9 Instant Review After you follow the suggestions for pictures only). Frame the subject in the Image... Display. 3. Slide to Video Record. 1. Recording video clips You can record a video clip when the camera is locked (see the topics on blurry, dark, light, or grainy images in "Troubleshooting" on page 9). 4.
...focus brackets in the Image Display turn solid green when focus is set to . 2. TIP: If you have taken a picture or recorded a video clip, the camera displays it briefly in Instant Review. Recording video clips 9 Instant Review After you follow the suggestions for pictures only). Frame the subject in the Image... Display. 3. Slide to Video Record. 1. Recording video clips You can record a video clip when the camera is locked (see the topics on blurry, dark, light, or grainy images in "Troubleshooting" on page 9). 4.
User Guide
Page 12
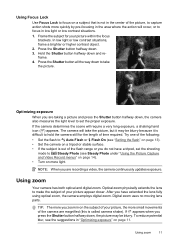
... low contrast scenes, use Focus Lock (see Shooting Mode under "Using the Picture Capture and Video Record menus" on page 14). • If the camera is out of the focus range or the scene has low contrast. For pictures only: • Select a shooting mode more colors or crisp edges. When... the Picture Capture and Video Record menus" on page 14). • If the subject is too close (less than Close-up and cannot focus, the camera will still take the picture. If you are still red, try the following : • Move within the focus brackets. Chapter 2 Focusing on the subject...
... low contrast scenes, use Focus Lock (see Shooting Mode under "Using the Picture Capture and Video Record menus" on page 14). • If the camera is out of the focus range or the scene has low contrast. For pictures only: • Select a shooting mode more colors or crisp edges. When... the Picture Capture and Video Record menus" on page 14). • If the subject is too close (less than Close-up and cannot focus, the camera will still take the picture. If you are still red, try the following : • Move within the focus brackets. Chapter 2 Focusing on the subject...
User Guide
Page 13
... will require a very long exposure, a shaking hand icon ( ) appears. Optimizing exposure When you have a tripod, set the proper exposure. The camera will take the picture. Try one of the flash range or you zoom in low light or low contrast situations. 1. After you are recording a ...video, the camera continuously updates exposure. In low light or low contrast situations, frame a brighter or higher contrast object. 2. To reduce potential blur, see Steady Photo...
... will require a very long exposure, a shaking hand icon ( ) appears. Optimizing exposure When you have a tripod, set the proper exposure. The camera will take the picture. Try one of the flash range or you zoom in low light or low contrast situations. 1. After you are recording a ...video, the camera continuously updates exposure. In low light or low contrast situations, frame a brighter or higher contrast object. 2. To reduce potential blur, see Steady Photo...
User Guide
Page 14
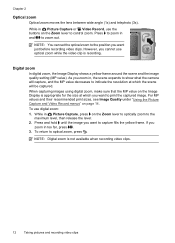
NOTE: You can set the optical zoom to the position you zoom in, the scene expands to show what the camera will be captured. As you want just before recording video clips. While in Picture Capture or Video Record, use the buttons on the Image Display ...
NOTE: You can set the optical zoom to the position you zoom in, the scene expands to show what the camera will be captured. As you want just before recording video clips. While in Picture Capture or Video Record, use the buttons on the Image Display ...
User Guide
Page 15
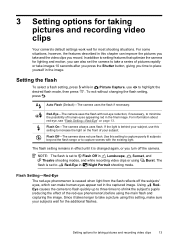
... you take a series of human eyes appearing red in this setting, make human eyes appear red in the captured image. Flash Off-The camera does not use to take images 10 seconds after you press the Shutter button, giving you record. The flash setting remains in effect until ...the flash with the existing light. NOTE: The flash is caused when light from the flash reflects off the camera. 3 Setting options for taking pictures and recording video clips Your camera's default settings work well for taking pictures and recording video clips 13 For information about red-eye, see "...
... you take a series of human eyes appearing red in this setting, make human eyes appear red in the captured image. Flash Off-The camera does not use to take images 10 seconds after you press the Shutter button, giving you record. The flash setting remains in effect until ...the flash with the existing light. NOTE: The flash is caused when light from the flash reflects off the camera. 3 Setting options for taking pictures and recording video clips Your camera's default settings work well for taking pictures and recording video clips 13 For information about red-eye, see "...
User Guide
Page 16
...; Action-For capturing sporting events, moving or you cannot hold down until it is moving cars, or any scene where you must set the camera on a tripod or stable surface. • Sunset-For capturing outdoor scenes at night. Shooting Mode ( only)-For selecting a predefined setting optimized... option's Unless otherwise noted, the setting remains in effect until the menu disappears. The setting remains in effect until you turn off the camera. Use to highlight an option, then press to display the option's menu. 3. This mode uses the flash and a long exposure. ...
...; Action-For capturing sporting events, moving or you cannot hold down until it is moving cars, or any scene where you must set the camera on a tripod or stable surface. • Sunset-For capturing outdoor scenes at night. Shooting Mode ( only)-For selecting a predefined setting optimized... option's Unless otherwise noted, the setting remains in effect until the menu disappears. The setting remains in effect until you turn off the camera. Use to highlight an option, then press to display the option's menu. 3. This mode uses the flash and a long exposure. ...
User Guide
Page 17
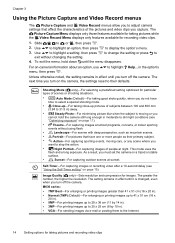
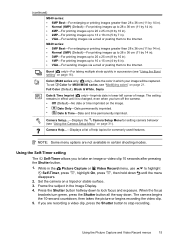
... to stop recording. Using the Self-Timer setting The Self-Timer allows you are not available in certain shooting modes. Color (M440 series only; Camera Help...-Displays a list of image. While in the Picture Capture or Video Record menu, use to take an image or video clip 10 seconds ... (8 by 10 in). • 2MP-For printing images up to 10 x 15 cm (4 by 7 in lower left corner of help topics for M630/M540 series, see "Using the Camera Setup Menu" on page 31). Full Color (Default), Black & White, Sepia Date & Time Imprint ( only)-Imprints date in ). • VGA-For ...
... to stop recording. Using the Self-Timer setting The Self-Timer allows you are not available in certain shooting modes. Color (M440 series only; Camera Help...-Displays a list of image. While in the Picture Capture or Video Record menu, use to take an image or video clip 10 seconds ... (8 by 10 in). • 2MP-For printing images up to 10 x 15 cm (4 by 7 in lower left corner of help topics for M630/M540 series, see "Using the Camera Setup Menu" on page 31). Full Color (Default), Black & White, Sepia Date & Time Imprint ( only)-Imprints date in ). • VGA-For ...
User Guide
Page 18
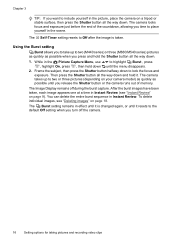
... images, see "Instant Review" on page 18. Using the Burst setting Burst allows you to take up to two or three pictures (depending on your camera model) as quickly as possible when you press and hold it resets to the default Off setting when you turn off during the burst capture... a tripod or stable surface, then press the Shutter button all the way down until the menu disappears. 2. The camera takes up to two (M440 series) or three (M630/M540 series) pictures as quickly as possible until it . Then press the Shutter button all the way down and hold the Shutter button all...
... images, see "Instant Review" on page 18. Using the Burst setting Burst allows you to take up to two or three pictures (depending on your camera model) as quickly as possible when you press and hold it resets to the default Off setting when you turn off during the burst capture... a tripod or stable surface, then press the Shutter button all the way down until the menu disappears. 2. The camera takes up to two (M440 series) or three (M630/M540 series) pictures as quickly as possible until it . Then press the Shutter button all the way down and hold the Shutter button all...
User Guide
Page 21
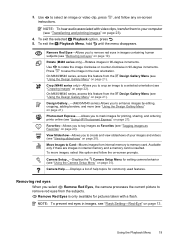
..."Using the Design Gallery Menu" on page 23). 4. Available only if there are images in images containing human subjects (see "Using HP Photosmart Express" on page 21). Camera Help...-Displays a list of your computer (see "Transferring and printing images" on page 21). To exit the selected Playback option, press ...Design Gallery Menu" on -screen prompts. To move images, select this feature from the subjects. Using the Playback Menu 19 On M630/M540 series, access this option and follow any on page 20). Remove Red Eyes is inserted. To exit the Playback Menu, hold until ...
..."Using the Design Gallery Menu" on page 23). 4. Available only if there are images in images containing human subjects (see "Using HP Photosmart Express" on page 21). Camera Help...-Displays a list of your computer (see "Transferring and printing images" on page 21). To exit the selected Playback option, press ...Design Gallery Menu" on -screen prompts. To move images, select this feature from the subjects. Using the Playback Menu 19 On M630/M540 series, access this option and follow any on page 20). Remove Red Eyes is inserted. To exit the Playback Menu, hold until ...
User Guide
Page 22
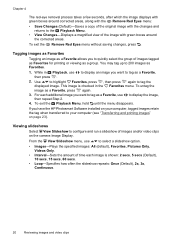
To untag the image as a Favorite allows you have the HP Photosmart Software installed on your computer (see "Transferring and printing images" on the camera Image Display. Viewing slideshows Select View Slideshow to your computer, tagged images retain the tag when transferred to configure and run a slideshow of images and/...
To untag the image as a Favorite allows you have the HP Photosmart Software installed on your computer (see "Transferring and printing images" on the camera Image Display. Viewing slideshows Select View Slideshow to your computer, tagged images retain the tag when transferred to configure and run a slideshow of images and/...
User Guide
Page 23
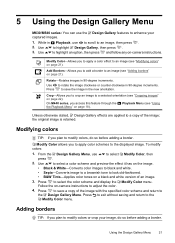
...3. From the Design Gallery Menu, use press . Press to save the image in 90-degree increments. 5 Using the Design Gallery Menu M630/M540 series: You can use the Design Gallery features to enhance your image, do so before adding a border. Use to modify colors or crop ...your captured images. 1. Use to highlight an option, then press and follow any on -camera instructions to look old-fashioned. • B&W Tints-Applies color tones on page 18). Use to select a color scheme and preview the effect it...
...3. From the Design Gallery Menu, use press . Press to save the image in 90-degree increments. 5 Using the Design Gallery Menu M630/M540 series: You can use the Design Gallery features to enhance your image, do so before adding a border. Use to modify colors or crop ...your captured images. 1. Use to highlight an option, then press and follow any on -camera instructions to look old-fashioned. • B&W Tints-Applies color tones on page 18). Use to select a color scheme and preview the effect it...
User Guide
Page 24
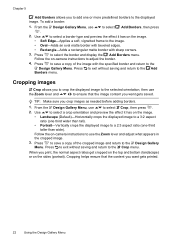
...a copy of the cropped image and return to the Design Gallery Menu. Use to select a crop orientation and preview the effect it has on -camera instructions to use . Press to select Add Borders, then press 2. Cropping helps ensure that the image content you print, the normal aspect ratios get... cropped on the top and bottom (landscape) or on -camera instructions to adjust the border. 4. to select the border and display the Add Borders menu. TIP: Make sure you want gets saved. To add ...
...a copy of the cropped image and return to the Design Gallery Menu. Use to select a crop orientation and preview the effect it has on -camera instructions to use . Press to select Add Borders, then press 2. Cropping helps ensure that the image content you print, the normal aspect ratios get... cropped on the top and bottom (landscape) or on -camera instructions to adjust the border. 4. to select the border and display the Add Borders menu. TIP: Make sure you want gets saved. To add ...


