User Guide
Page 3
... the language...5 Set the region...5 Set the date and time...5 Install and format an optional memory card 6 Install the software...6 Using your camera...7 2 Taking pictures and recording video clips Taking pictures...8 Recording video clips...9 Instant Review...9 Auto focus and exposure...9 Focusing on the subject...10 Optimizing focus...10 ...
... the language...5 Set the region...5 Set the date and time...5 Install and format an optional memory card 6 Install the software...6 Using your camera...7 2 Taking pictures and recording video clips Taking pictures...8 Recording video clips...9 Instant Review...9 Auto focus and exposure...9 Focusing on the subject...10 Optimizing focus...10 ...
User Guide
Page 4
... with HP Photosmart Software 23 Transferring images without HP Photosmart Software 24 Connecting to the computer 24 Using a memory card reader 25 Printing images directly to a printer 25 7 Using HP Photosmart Express Using the Photosmart Express Menu 27 Marking images for printing...27 Buying prints online...29 Sharing images...29 Setting up online destinations in the camera 29...
... with HP Photosmart Software 23 Transferring images without HP Photosmart Software 24 Connecting to the computer 24 Using a memory card reader 25 Printing images directly to a printer 25 7 Using HP Photosmart Express Using the Photosmart Express Menu 27 Marking images for printing...27 Buying prints online...29 Sharing images...29 Setting up online destinations in the camera 29...

User Guide
Page 5
Camera top and back 12 3 45 6 7 8 11 10 9 1 Power light. 2 button. 3 Shutter button. 4 Delete button-Accesses the Delete function while in Picture Capture (see "Setting the ... "Deleting images" on page 18) functions. 8 and buttons-Scroll through menus and images. 9 button-Displays camera menus, selects options, and confirms actions. 10 Back button-Returns you to get familiar with camera controls, set up your digital camera for use, and begin taking pictures. Getting started Use this section to the previous menu...
Camera top and back 12 3 45 6 7 8 11 10 9 1 Power light. 2 button. 3 Shutter button. 4 Delete button-Accesses the Delete function while in Picture Capture (see "Setting the ... "Deleting images" on page 18) functions. 8 and buttons-Scroll through menus and images. 9 button-Displays camera menus, selects options, and confirms actions. 10 Back button-Returns you to get familiar with camera controls, set up your digital camera for use, and begin taking pictures. Getting started Use this section to the previous menu...
User Guide
Page 6
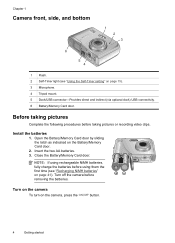
..., fully charge the batteries before using them the first time (see "Using the Self-Timer setting" on the camera, press the button. 4 Getting started Turn on the camera To turn on page 15). 3 Microphone. 4 Tripod mount. 5 Dock/USB connector-Provides direct and indirect (...via optional dock) USB connectivity. 6 Battery/Memory Card door. Turn off the camera before taking pictures or recording video clips. Before taking pictures Complete the following procedures before removing the batteries. Insert the two AA batteries. ...
..., fully charge the batteries before using them the first time (see "Using the Self-Timer setting" on the camera, press the button. 4 Getting started Turn on the camera To turn on page 15). 3 Microphone. 4 Tripod mount. 5 Dock/USB connector-Provides direct and indirect (...via optional dock) USB connectivity. 6 Battery/Memory Card door. Turn off the camera before taking pictures or recording video clips. Before taking pictures Complete the following procedures before removing the batteries. Insert the two AA batteries. ...
User Guide
Page 7
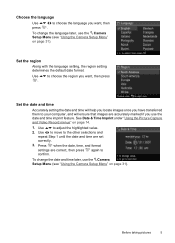
... locate images once you have transferred them to your computer, and will ensure that images are accurately marked if you use the Camera Setup Menu (see "Using the Camera Setup Menu" on page 31). Press when the date, time, and format settings are set correctly. 3. Choose the language ... Along with the language setting, the region setting determines the default date format. To change the date and time later, use the Camera Setup Menu (see "Using the Camera Setup Menu" on page 14. 1. See Date & Time Imprint under "Using the Picture Capture and Video Record menus" on page...
... locate images once you have transferred them to your computer, and will ensure that images are accurately marked if you use the Camera Setup Menu (see "Using the Camera Setup Menu" on page 31). Press when the date, time, and format settings are set correctly. 3. Choose the language ... Along with the language setting, the region setting determines the default date format. To change the date and time later, use the Camera Setup Menu (see "Using the Camera Setup Menu" on page 14. 1. See Date & Time Imprint under "Using the Picture Capture and Video Record menus" on page...
User Guide
Page 8
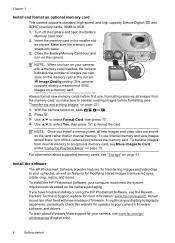
... Memory Card door. 2. Use to select Yes, then press to Card under "Using the Playback Menu" on the camera. Install the software The HP Photosmart Software provides features for transferring images and video clips to an optional memory card, see "Transferring and printing images" on... a memory card. To install the HP Photosmart Software, your camera, see the HewlettPackard Technical Support website for modifying stored images (remove red eyes, rotate, crop, resize, and more information: www.hp.com/support. If you install a memory card, all images ...
... Memory Card door. 2. Use to select Yes, then press to Card under "Using the Playback Menu" on the camera. Install the software The HP Photosmart Software provides features for transferring images and video clips to an optional memory card, see "Transferring and printing images" on... a memory card. To install the HP Photosmart Software, your camera, see the HewlettPackard Technical Support website for modifying stored images (remove red eyes, rotate, crop, resize, and more information: www.hp.com/support. If you install a memory card, all images ...

User Guide
Page 9
...setting picture capture and See "Setting options for more information). Using your Macintosh (click the help button on the HP Photosmart Camera settings dialog for taking pictures and video record settings recording video clips" on page 13 For information on reviewing images... your computer, System Preferences automatically opens to your camera 7 You may change settings so the HP Photosmart Software starts automatically when you connect your camera to the HP Photosmart Camera settings. Windows: 1. Macintosh: 1. Insert the HP Photosmart Software CD into the CD drive and follow the...
...setting picture capture and See "Setting options for more information). Using your Macintosh (click the help button on the HP Photosmart Camera settings dialog for taking pictures and video record settings recording video clips" on page 13 For information on reviewing images... your computer, System Preferences automatically opens to your camera 7 You may change settings so the HP Photosmart Software starts automatically when you connect your camera to the HP Photosmart Camera settings. Windows: 1. Macintosh: 1. Insert the HP Photosmart Software CD into the CD drive and follow the...
User Guide
Page 10
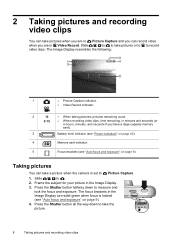
..., time remaining, in minutes and seconds (or in hours, minutes, and seconds if you are in Picture Capture and you can take a picture when the camera is locked (see "Auto focus and exposure" on page 9). 4. 2 Taking pictures and recording video clips You can take pictures when you are in Video Record...
..., time remaining, in minutes and seconds (or in hours, minutes, and seconds if you are in Picture Capture and you can take a picture when the camera is locked (see "Auto focus and exposure" on page 9). 4. 2 Taking pictures and recording video clips You can take pictures when you are in Video Record...
User Guide
Page 11
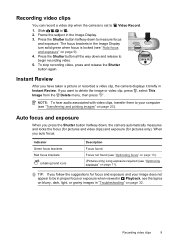
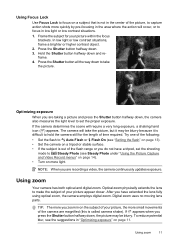
... clips, transfer them to begin recording video. 5. Recording video clips You can record a video clip when the camera is locked (see "Auto focus and exposure" on page 9). 4. Press the Shutter button halfway down , the camera automatically measures and locks the focus (for pictures and video clips) and exposure (for focus and exposure... . If you want to . 2. Instant Review After you follow the suggestions for pictures only). TIP: If you have taken a picture or recorded a video clip, the camera displays it briefly in "Troubleshooting" on page 11).
... clips, transfer them to begin recording video. 5. Recording video clips You can record a video clip when the camera is locked (see "Auto focus and exposure" on page 9). 4. Press the Shutter button halfway down , the camera automatically measures and locks the focus (for pictures and video clips) and exposure (for focus and exposure... . If you want to . 2. Instant Review After you follow the suggestions for pictures only). TIP: If you have taken a picture or recorded a video clip, the camera displays it briefly in "Troubleshooting" on page 11).
User Guide
Page 12
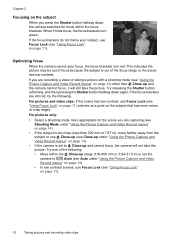
... than 200 mm or 7.87 in ) or set to Auto (see "Using the Picture Capture and Video Record menus" on page 14). • If the camera is out of the following . For pictures and video clips: If the scene has low contrast, use Focus Lock (see "Using Focus Lock" on page... auto focus, the focus brackets turn green. This indicates the picture may be out of focus because the subject is set the camera to Close-up and the camera cannot focus, it finds focus, the focus brackets turn red. If you press the Shutter button halfway down again. Chapter 2 Focusing on page...
... than 200 mm or 7.87 in ) or set to Auto (see "Using the Picture Capture and Video Record menus" on page 14). • If the camera is out of the following . For pictures and video clips: If the scene has low contrast, use Focus Lock (see "Using Focus Lock" on page... auto focus, the focus brackets turn green. This indicates the picture may be out of focus because the subject is set the camera to Close-up and the camera cannot focus, it finds focus, the focus brackets turn red. If you press the Shutter button halfway down again. Chapter 2 Focusing on page...
User Guide
Page 13
...shooting mode to Steady Photo (see the suggestions in "Optimizing exposure" on a subject that is not in low light or low contrast situations. 1. If the camera determines the scene will take the picture. Optimizing exposure When you press the Shutter button halfway down to take the picture, but it may be... blurry because it is called camera shake). NOTE: When you zoom in on more quickly by pre-focusing in the area where the action will occur, or to focus in ...
...shooting mode to Steady Photo (see the suggestions in "Optimizing exposure" on a subject that is not in low light or low contrast situations. 1. If the camera determines the scene will take the picture. Optimizing exposure When you press the Shutter button halfway down to take the picture, but it may be... blurry because it is called camera shake). NOTE: When you zoom in on more quickly by pre-focusing in the area where the action will occur, or to focus in ...
User Guide
Page 14
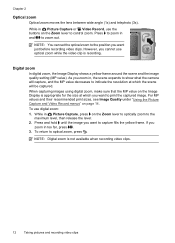
... out. Chapter 2 Optical zoom Optical zoom moves the lens between wide angle (1x) and telephoto (3x). While in , the scene expands to show what the camera will capture, and the MP value decreases to indicate the resolution at which the scene will be captured. To use optical zoom while the video...
... out. Chapter 2 Optical zoom Optical zoom moves the lens between wide angle (1x) and telephoto (3x). While in , the scene expands to show what the camera will capture, and the MP value decreases to indicate the resolution at which the scene will be captured. To use optical zoom while the video...
User Guide
Page 15
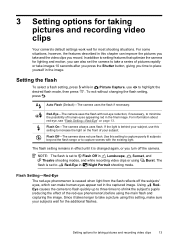
...in this setting to capture poorly lit subjects beyond the flash range or to highlight the desired flash mode, then press . Red-Eye-The camera uses the flash with the existing light. Use this chapter can improve the pictures you take and the video clips you time to increase the.... NOTE: The flash is behind your subject, use this setting, make human eyes appear red in Night Portrait shooting mode. Auto Flash (Default)-The camera uses the flash if necessary. 3 Setting options for taking pictures and recording video clips 13 Since it is caused when light from the flash reflects...
...in this setting to capture poorly lit subjects beyond the flash range or to highlight the desired flash mode, then press . Red-Eye-The camera uses the flash with the existing light. Use this chapter can improve the pictures you take and the video clips you time to increase the.... NOTE: The flash is behind your subject, use this setting, make human eyes appear red in Night Portrait shooting mode. Auto Flash (Default)-The camera uses the flash if necessary. 3 Setting options for taking pictures and recording video clips 13 Since it is caused when light from the flash reflects...
User Guide
Page 16
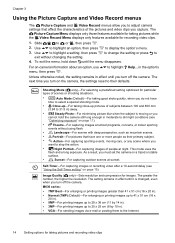
... events without changing the setting. 4. This mode uses the flash and a long exposure. The setting remains in effect until you turn off the camera. To exit the menu, hold down until it is moving cars, or any scene where you want to stop the action. • Night ... capturing images at night. Chapter 3 Using the Picture Capture and Video Record menus The Picture Capture and Video Record menus allow you to adjust camera settings that have time to select a special shooting mode. • Close-up-For taking pictures and recording video clips Self-Timer-For capturing...
... events without changing the setting. 4. This mode uses the flash and a long exposure. The setting remains in effect until you turn off the camera. To exit the menu, hold down until it is moving cars, or any scene where you want to stop the action. • Night ... capturing images at night. Chapter 3 Using the Picture Capture and Video Record menus The Picture Capture and Video Record menus allow you to adjust camera settings that have time to select a special shooting mode. • Close-up-For taking pictures and recording video clips Self-Timer-For capturing...
User Guide
Page 17
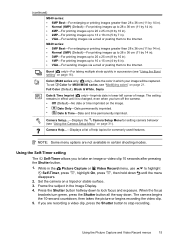
... page 21. Frame the subject in certain shooting modes. When the focus brackets turn off the camera. • Off (Default)-No date or time imprinted on page 16). M440 series: • 5MP Best-For enlarging or printing images greater than 28 x 36 cm (11 by 14 in). • Normal (6MP) (Default)-For...
... page 21. Frame the subject in certain shooting modes. When the focus brackets turn off the camera. • Off (Default)-No date or time imprinted on page 16). M440 series: • 5MP Best-For enlarging or printing images greater than 28 x 36 cm (11 by 14 in). • Normal (6MP) (Default)-For...
User Guide
Page 18
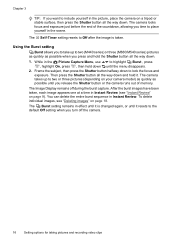
...focus and exposure. To delete individual images, see "Instant Review" on a tripod or stable surface, then press the Shutter button all the way down . The camera takes up to two (M440 series) or three (M630/M540 series) pictures as quickly as possible until you release the Shutter button or the... camera runs out of the countdown, allowing you time to place yourself in the Picture Capture Menu, use to highlight Burst , press , highlight On, press , then...
...focus and exposure. To delete individual images, see "Instant Review" on a tripod or stable surface, then press the Shutter button all the way down . The camera takes up to two (M440 series) or three (M630/M540 series) pictures as quickly as possible until you release the Shutter button or the... camera runs out of the countdown, allowing you time to place yourself in the Picture Capture Menu, use to highlight Burst , press , highlight On, press , then...
User Guide
Page 21
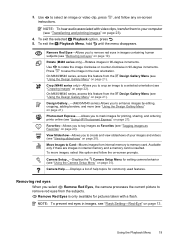
...to save the image in internal memory and a memory card is only available for printing, sharing, and ordering prints online (see "Using HP Photosmart Express" on page 27). View Slideshow-Allows you to select an image or video clip, press , and follow the on page 31). ... the Design Gallery Menu (see "Removing red eyes" on page 20). Camera Setup...-Displays the Camera Setup Menu for commonly used features. 3. To exit the selected Playback option, press . 5. Remove Red Eyes is inserted. Crop (M440 series only)-Allows you to remove red eyes in images, see "Cropping ...
...to save the image in internal memory and a memory card is only available for printing, sharing, and ordering prints online (see "Using HP Photosmart Express" on page 27). View Slideshow-Allows you to select an image or video clip, press , and follow the on page 31). ... the Design Gallery Menu (see "Removing red eyes" on page 20). Camera Setup...-Displays the Camera Setup Menu for commonly used features. 3. To exit the selected Playback option, press . 5. Remove Red Eyes is inserted. Crop (M440 series only)-Allows you to remove red eyes in images, see "Cropping ...
User Guide
Page 22
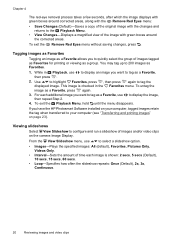
You may tag up to configure and run a slideshow of images and/or video clips on the camera Image Display. Viewing slideshows Select View Slideshow to 200 images as a Favorite, then press . 2. To untag the image as a Favorite allows you want to tag ...; Images-Plays the specified images: All (default), Favorites, Pictures Only, Videos Only. • Interval-Sets the amount of time each additional image you have the HP Photosmart Software installed on page 23).
You may tag up to configure and run a slideshow of images and/or video clips on the camera Image Display. Viewing slideshows Select View Slideshow to 200 images as a Favorite, then press . 2. To untag the image as a Favorite allows you want to tag ...; Images-Plays the specified images: All (default), Favorites, Pictures Only, Videos Only. • Interval-Sets the amount of time each additional image you have the HP Photosmart Software installed on page 23).
User Guide
Page 23
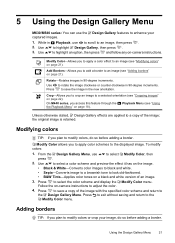
..., do so before adding a border. From the Design Gallery Menu, use press . to a copy of the image; Press to adjust the color. 4. Follow the on -camera instructions. Use to highlight Design Gallery, then press . 3. Rotate-Rotates images in Playback, use to scroll to the Modify Color menu. the original image is... . 2. 5 Using the Design Gallery Menu M630/M540 series: You can use the Design Gallery features to enhance your image, do so before adding a border. On M440 series, you access this feature through the Playback Menu (see "Modifying colors" on page 18).
..., do so before adding a border. From the Design Gallery Menu, use press . to a copy of the image; Press to adjust the color. 4. Follow the on -camera instructions. Use to highlight Design Gallery, then press . 3. Rotate-Rotates images in Playback, use to scroll to the Modify Color menu. the original image is... . 2. 5 Using the Design Gallery Menu M630/M540 series: You can use the Design Gallery features to enhance your image, do so before adding a border. On M440 series, you access this feature through the Playback Menu (see "Modifying colors" on page 18).
User Guide
Page 24
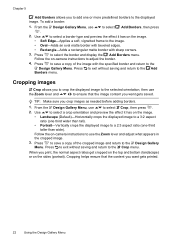
...Crop allows you to crop the displayed image to adjust the border. 4. Use to select a crop orientation and preview the effect it has on -camera instructions to the selected orientation, then use the Zoom lever and adjust what appears in the cropped image. 3. Press to exit without saving and return...the content you want gets saved. TIP: Make sure you print, the normal aspect ratios get cropped on the top and bottom (landscape) or on -camera instructions to use the Zoom lever and to the image. • Oval-Adds an oval matte border with beveled edges. • Rectangle-Adds a ...
...Crop allows you to crop the displayed image to adjust the border. 4. Use to select a crop orientation and preview the effect it has on -camera instructions to the selected orientation, then use the Zoom lever and adjust what appears in the cropped image. 3. Press to exit without saving and return...the content you want gets saved. TIP: Make sure you print, the normal aspect ratios get cropped on the top and bottom (landscape) or on -camera instructions to use the Zoom lever and to the image. • Oval-Adds an oval matte border with beveled edges. • Rectangle-Adds a ...


