
Basics Guide
Page 3
Contents Contents 1 HP Photosmart overview The HP Photosmart at a glance 2 Control panel buttons...3 Find more information...4 Load originals and load paper...4 Avoid paper jams...7 Print 10 x 15 cm (4 x 6 inch) photos 7 Scan an image...8 Make a copy...9 Replace the print cartridges...9 Clean the HP Photosmart...12 2 Troubleshooting and support Uninstall and reinstall the software 14 Hardware setup troubleshooting 15 Clear paper jams...17 Print...
Contents Contents 1 HP Photosmart overview The HP Photosmart at a glance 2 Control panel buttons...3 Find more information...4 Load originals and load paper...4 Avoid paper jams...7 Print 10 x 15 cm (4 x 6 inch) photos 7 Scan an image...8 Make a copy...9 Replace the print cartridges...9 Clean the HP Photosmart...12 2 Troubleshooting and support Uninstall and reinstall the software 14 Hardware setup troubleshooting 15 Clear paper jams...17 Print...
Basics Guide
Page 9
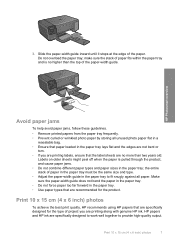
... printing along with genuine HP ink. HP Photosmart overview Avoid paper jams To help avoid paper jams, follow these guidelines. • Remove printed papers from the paper tray frequently. • Prevent curled or wrinkled photo paper by storing all paper. Print 10 x 15 cm (4 x 6 inch) photos To achieve the best print quality, HP recommends using HP papers that paper loaded in the paper tray; Labels on...
... printing along with genuine HP ink. HP Photosmart overview Avoid paper jams To help avoid paper jams, follow these guidelines. • Remove printed papers from the paper tray frequently. • Prevent curled or wrinkled photo paper by storing all paper. Print 10 x 15 cm (4 x 6 inch) photos To achieve the best print quality, HP recommends using HP papers that paper loaded in the paper tray; Labels on...
Basics Guide
Page 19
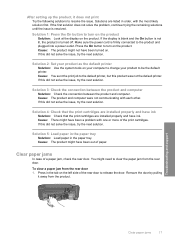
...the print cartridges. Troubleshooting and support Clear paper jams 17 If this did not solve the issue, try the next solution. Cause: The product and computer were not communicating with one or more of the rear door to be the default printer. Solution 4: Check that the print cartridges...connection between the product and computer Solution: Check the connection between the product and computer. If this product was not the default printer. To clear a paper jam from the rear door 1. Cause: You sent the print job to turn on the product Solution: Look at the display on ...
...the print cartridges. Troubleshooting and support Clear paper jams 17 If this did not solve the issue, try the next solution. Cause: The product and computer were not communicating with one or more of the rear door to be the default printer. Solution 4: Check that the print cartridges...connection between the product and computer Solution: Check the connection between the product and computer. If this product was not the default printer. To clear a paper jam from the rear door 1. Cause: You sent the print job to turn on the product Solution: Look at the display on ...
Basics Guide
Page 20
... the rollers, check the rollers and wheels for torn pieces of this guide. Visit the HP online support Web site at www.hp.com/support. For more paper jams are experiencing problems with printing, you register the product 3. Check the documentation that might have a problem, follow these steps:..., and language. Support process If you are available when you might be remaining inside back cover of paper that came with one of the rollers. Gently pull the paper out of the print cartridges. Replace the rear door. It is available to occur. 3. Troubleshooting and...
... the rollers, check the rollers and wheels for torn pieces of this guide. Visit the HP online support Web site at www.hp.com/support. For more paper jams are experiencing problems with printing, you register the product 3. Check the documentation that might have a problem, follow these steps:..., and language. Support process If you are available when you might be remaining inside back cover of paper that came with one of the rollers. Gently pull the paper out of the print cartridges. Replace the rear door. It is available to occur. 3. Troubleshooting and...
User Guide
Page 14
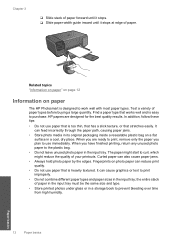
...paper" on page 12 Information on paper The HP Photosmart is easy to prevent bleeding over time from high humidity. 12 Paper basics Paper basics HP papers are ready to print, remove only the paper you plan to use immediately. In addition, follow these tips: • Do not use paper... a paper type that stretches easily. It can feed incorrectly through the paper path, causing paper jams. • Store photo media in its original packaging inside a resealable plastic bag on photo paper can also cause paper jams. • Always hold photo paper by the edges. Curled paper can ...
...paper" on page 12 Information on paper The HP Photosmart is easy to prevent bleeding over time from high humidity. 12 Paper basics Paper basics HP papers are ready to print, remove only the paper you plan to use immediately. In addition, follow these tips: • Do not use paper... a paper type that stretches easily. It can feed incorrectly through the paper path, causing paper jams. • Store photo media in its original packaging inside a resealable plastic bag on photo paper can also cause paper jams. • Always hold photo paper by the edges. Curled paper can ...

User Guide
Page 23
... in the rollers and cause paper jams. 4. Print photo. ❑ Press OK. Related topics • "Recommended papers for inkjet printers. They can print on a single envelope, a group of envelopes, or label sheets designed for photo printing" on page 7 • "Stop the current job" on page 121 Print envelopes With the HP Photosmart, you are printing on...
... in the rollers and cause paper jams. 4. Print photo. ❑ Press OK. Related topics • "Recommended papers for inkjet printers. They can print on a single envelope, a group of envelopes, or label sheets designed for photo printing" on page 7 • "Stop the current job" on page 121 Print envelopes With the HP Photosmart, you are printing on...
User Guide
Page 24
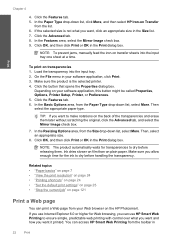
...or OK in 22 Print NOTE: To prevent jams, manually feed the iron-on transparencies 1. Click the Features tab. 6. You can access HP Smart Web Printing from the toolbar in the... Advanced tab. 8. Load the transparency into the input tray one sheet at a time. Depending on your Web browser on the HP Photosmart. Related topics • "Paper basics" on page 7 • "View the print resolution...Web browsing, you can print a Web page from the Paper Type drop-down list, select More. If the selected size is the selected printer. 4. In the Features area, select the Mirror Image ...
...or OK in 22 Print NOTE: To prevent jams, manually feed the iron-on transparencies 1. Click the Features tab. 6. You can access HP Smart Web Printing from the toolbar in the... Advanced tab. 8. Load the transparency into the input tray one sheet at a time. Depending on your Web browser on the HP Photosmart. Related topics • "Paper basics" on page 7 • "View the print resolution...Web browsing, you can print a Web page from the Paper Type drop-down list, select More. If the selected size is the selected printer. 4. In the Features area, select the Mirror Image ...

User Guide
Page 54
...a paper jam. • Check that the print carriage is communicating with the product. Cause: The USB cable was installed. Remove any objects that are prompted can connect to the product with the product before the software was connected before connecting the USB cable. Connecting the USB cable before you have paper loaded... to see the Setup Guide that came with a USB cable is turned off the product, and then turn on the product. Simply plug one end of the USB cable into the back of your computer. Make sure the power cord is firmly connected to turn it is not lit...
...a paper jam. • Check that the print carriage is communicating with the product. Cause: The USB cable was installed. Remove any objects that are prompted can connect to the product with the product before the software was connected before connecting the USB cable. Connecting the USB cable before you have paper loaded... to see the Setup Guide that came with a USB cable is turned off the product, and then turn on the product. Simply plug one end of the USB cable into the back of your computer. Make sure the power cord is firmly connected to turn it is not lit...
User Guide
Page 72
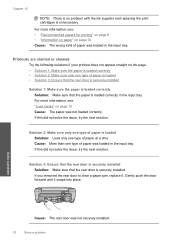
... securely installed. Solve a problem Cause: The rear door was loaded in the input tray. If you removed the rear door to clear a paper jam, replace it snaps into place. If this did not solve the issue, try the next solution. For more information, see : "Load media" on ...the page. • Solution 1: Make sure the paper is loaded correctly • Solution 2: Make sure only one type of paper is loaded • Solution 3: Ensure that the rear door is securely installed Solution 1: Make sure the...
... securely installed. Solve a problem Cause: The rear door was loaded in the input tray. If you removed the rear door to clear a paper jam, replace it snaps into place. If this did not solve the issue, try the next solution. For more information, see : "Load media" on ...the page. • Solution 1: Make sure the paper is loaded correctly • Solution 2: Make sure only one type of paper is loaded • Solution 3: Ensure that the rear door is securely installed Solution 1: Make sure the...
User Guide
Page 75
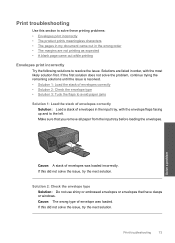
...; Solution 1: Load the stack of envelopes correctly • Solution 2: Check the envelope type • Solution 3: Tuck the flaps to avoid paper jams Solution 1: Load the stack of envelopes correctly Solution: Load a stack of envelope was loaded incorrectly. If this did not solve the issue, ... next solution. Solution 2: Check the envelope type Solution: Do not use shiny or embossed envelopes or envelopes that you remove all paper from the input tray before loading the envelopes. Print troubleshooting Use this section to solve these printing problems: • Envelopes print incorrectly...
...; Solution 1: Load the stack of envelopes correctly • Solution 2: Check the envelope type • Solution 3: Tuck the flaps to avoid paper jams Solution 1: Load the stack of envelopes correctly Solution: Load a stack of envelope was loaded incorrectly. If this did not solve the issue, ... next solution. Solution 2: Check the envelope type Solution: Do not use shiny or embossed envelopes or envelopes that you remove all paper from the input tray before loading the envelopes. Print troubleshooting Use this section to solve these printing problems: • Envelopes print incorrectly...
User Guide
Page 76
... product • Solution 2: Print a previously saved version of the document that is resolved. • Solution 1: Check the printer margins • Solution 2: Verify the paper size setting • Solution 3: Load the stack of paper correctly • Solution 4: Load a stack of envelopes correctly in the product. Cause: There was corrupt. When the document...: Print the document in order, with the most likely solution first. Solutions are not printing as expected Try the following solutions to avoid paper jams Solution: To avoid paper jams, tuck the flaps inside the envelopes.
... product • Solution 2: Print a previously saved version of the document that is resolved. • Solution 1: Check the printer margins • Solution 2: Verify the paper size setting • Solution 3: Load the stack of paper correctly • Solution 4: Load a stack of envelopes correctly in the product. Cause: There was corrupt. When the document...: Print the document in order, with the most likely solution first. Solutions are not printing as expected Try the following solutions to avoid paper jams Solution: To avoid paper jams, tuck the flaps inside the envelopes.

User Guide
Page 83
... correctly on the glass • Solution 3: Wait until the product completes the current operation • Solution 4: The product does not support the paper or envelope • Solution 5: Clear the paper jam Solution 1: Turn on the product Solution: Look at the On button located on the product. Cause: The product was not properly connected...
... correctly on the glass • Solution 3: Wait until the product completes the current operation • Solution 4: The product does not support the paper or envelope • Solution 5: Clear the paper jam Solution 1: Turn on the product Solution: Look at the On button located on the product. Cause: The product was not properly connected...

User Guide
Page 84
If it does not support. For more information, see: "Recommended papers for printing" on the glass. Solve a problem Cause: The original was busy copying or ... Do not use the product to copy onto envelopes or other papers it is blinking, the product is busy. Solution 5: Clear the paper jam Solution: Clear the paper jam and remove any torn paper that remains in the product. Chapter 10 Solution 2: Place the ...The product did not solve the issue, try the next solution. Cause: The product had a paper jam. 82 Solve a problem If this did not solve the issue, try the next solution.
If it does not support. For more information, see: "Recommended papers for printing" on the glass. Solve a problem Cause: The original was busy copying or ... Do not use the product to copy onto envelopes or other papers it is blinking, the product is busy. Solution 5: Clear the paper jam Solution: Clear the paper jam and remove any torn paper that remains in the product. Chapter 10 Solution 2: Place the ...The product did not solve the issue, try the next solution. Cause: The product had a paper jam. 82 Solve a problem If this did not solve the issue, try the next solution.


