
Setup Guide
Page 8
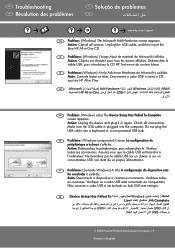
... propre alimentation. PT Problema: (Somente Windows) A tela A configuração do HP All-in -One CD. Printed in -One USB EN Problem: (Windows only) The Device Setup Has Failed To Complete screen appears. Action: ...-o novamente. EN Troubleshooting FR Résolution des problèmes PT Solução de problemas AR www.hp.com/support EN Problem: (Windows) The Microsoft Add Hardware screen appears. Verifique todas as telas. N&#... Unplug the USB cable, and then insert the blue HP All-in -One. Action: Unplug the device and plug it in again.
... propre alimentation. PT Problema: (Somente Windows) A tela A configuração do HP All-in -One CD. Printed in -One USB EN Problem: (Windows only) The Device Setup Has Failed To Complete screen appears. Action: ...-o novamente. EN Troubleshooting FR Résolution des problèmes PT Solução de problemas AR www.hp.com/support EN Problem: (Windows) The Microsoft Add Hardware screen appears. Verifique todas as telas. N&#... Unplug the USB cable, and then insert the blue HP All-in -One. Action: Unplug the device and plug it in again.
Basics Guide
Page 3
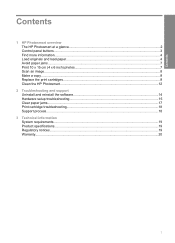
... x 15 cm (4 x 6 inch) photos 7 Scan an image...8 Make a copy...9 Replace the print cartridges...9 Clean the HP Photosmart...12 2 Troubleshooting and support Uninstall and reinstall the software 14 Hardware setup troubleshooting 15 Clear paper jams...17 Print cartridge troubleshooting 18 Support process...18 3 Technical information System requirements...19 Product specifications...19 Regulatory notices...19 Warranty...
... x 15 cm (4 x 6 inch) photos 7 Scan an image...8 Make a copy...9 Replace the print cartridges...9 Clean the HP Photosmart...12 2 Troubleshooting and support Uninstall and reinstall the software 14 Hardware setup troubleshooting 15 Clear paper jams...17 Print cartridge troubleshooting 18 Support process...18 3 Technical information System requirements...19 Product specifications...19 Regulatory notices...19 Warranty...
Basics Guide
Page 4
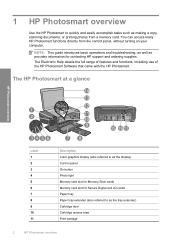
... accomplish tasks such as the tray extender) Cartridge door Cartridge access area Print carriage 2 HP Photosmart overview The Electronic Help details the full range of features and functions, including use of the HP Photosmart Software that came with the HP Photosmart. You can access many HP Photosmart functions directly from a memory card. NOTE: This guide introduces basic operations and...
... accomplish tasks such as the tray extender) Cartridge door Cartridge access area Print carriage 2 HP Photosmart overview The Electronic Help details the full range of features and functions, including use of the HP Photosmart Software that came with the HP Photosmart. You can access many HP Photosmart functions directly from a memory card. NOTE: This guide introduces basic operations and...
Basics Guide
Page 6
... environmental information. Next, click the main menu and select Photosmart C4600 series. To access the Electronic Help • Windows: Click Start > All Programs > HP > Photosmart C4600 series > Help. • Macintosh: Open the HP Device Manager and click the ? To load an original... of the glass. 4 HP Photosmart overview Load your original print side down on the glass 1. icon. HP Photosmart overview Chapter 1 Find more information A variety of resources, both printed and electronic provide information about setting up your HP Photosmart and installing software. For more...
... environmental information. Next, click the main menu and select Photosmart C4600 series. To access the Electronic Help • Windows: Click Start > All Programs > HP > Photosmart C4600 series > Help. • Macintosh: Open the HP Device Manager and click the ? To load an original... of the glass. 4 HP Photosmart overview Load your original print side down on the glass 1. icon. HP Photosmart overview Chapter 1 Find more information A variety of resources, both printed and electronic provide information about setting up your HP Photosmart and installing software. For more...
Basics Guide
Page 7
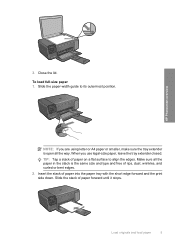
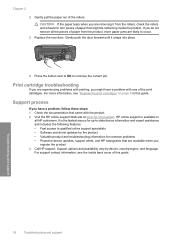
HP Photosmart overview NOTE: If you use legal-size paper, leave the tray extender closed. Slide the paper-width guide to align the edges. Make sure all ... of paper on a flat surface to its outermost position. TIP: Tap a stack of paper into the paper tray with the short edge forward and the print side down. 3.
HP Photosmart overview NOTE: If you use legal-size paper, leave the tray extender closed. Slide the paper-width guide to align the edges. Make sure all ... of paper on a flat surface to its outermost position. TIP: Tap a stack of paper into the paper tray with the short edge forward and the print side down. 3.
Basics Guide
Page 8
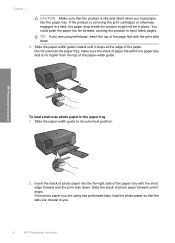
...the print cartridges or otherwise engaged in a task, the paper stop inside the product might not be in the paper tray 1. Slide the paper-width guide to eject blank pages. Insert the stack of photo paper forward until it stops. Do not overload the paper tray; HP Photosmart ...overview To load small-size photo paper in place. You could push the paper too far forward, causing the product to its outermost position. 2. Chapter 1 CAUTION: Make sure that the tabs are closest to you. 6 HP Photosmart overview Slide the stack of photo...
...the print cartridges or otherwise engaged in a task, the paper stop inside the product might not be in the paper tray 1. Slide the paper-width guide to eject blank pages. Insert the stack of photo paper forward until it stops. Do not overload the paper tray; HP Photosmart ...overview To load small-size photo paper in place. You could push the paper too far forward, causing the product to its outermost position. 2. Chapter 1 CAUTION: Make sure that the tabs are closest to you. 6 HP Photosmart overview Slide the stack of photo...
Basics Guide
Page 9
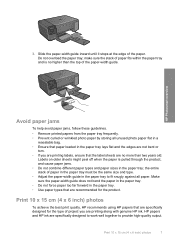
HP Photosmart overview Avoid paper jams To help avoid paper jams, follow these guidelines. • Remove printed papers from the paper tray frequently. • Prevent curled or wrinkled photo paper by storing all unused photo paper flat in a resealable bag. • Ensure ...that paper loaded in the paper tray. • Use paper types that are printing along with genuine HP ink. Make sure the paper-width guide does not bend the paper in the paper tray. • Do not force paper too far forward...
HP Photosmart overview Avoid paper jams To help avoid paper jams, follow these guidelines. • Remove printed papers from the paper tray frequently. • Prevent curled or wrinkled photo paper by storing all unused photo paper flat in a resealable bag. • Ensure ...that paper loaded in the paper tray. • Use paper types that are printing along with genuine HP ink. Make sure the paper-width guide does not bend the paper in the paper tray. • Do not force paper too far forward...
Basics Guide
Page 10
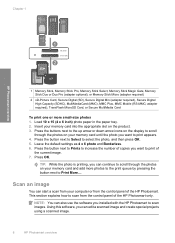
... or from the control panel of the current image. 7. Press the button next to Select to print of the HP Photosmart only. Press the button next to Prints to increase the number of the HP Photosmart. Scan an image You can edit a scanned image and create special projects using a scanned image... want to scan images. adapter required), TransFlash MicroSD Card, or Secure MultiMedia Card To print one or more photos to the print queue by pressing the button next to scan from the control panel of copies you installed with the HP Photosmart to print appears. 4. This section explains how to...
... or from the control panel of the current image. 7. Press the button next to Select to print of the HP Photosmart only. Press the button next to Prints to increase the number of the HP Photosmart. Scan an image You can edit a scanned image and create special projects using a scanned image... want to scan images. adapter required), TransFlash MicroSD Card, or Secure MultiMedia Card To print one or more photos to the print queue by pressing the button next to scan from the control panel of copies you installed with the HP Photosmart to print appears. 4. This section explains how to...

Basics Guide
Page 11
... 2. Load your product, and then click one of the glass. 3. You can improve the overall image quality by using the software installed with the HP Photosmart. If prompted, choose your country/region, follow the prompts to select your original print side down on the page. Load your ... adjusting the brightness, sharpness, color tone, and saturation. NOTE: When the ink level for the HP Photosmart, go to the current scan session only. To order print cartridges for the print cartridge is low, a message appears on your computer screen. Press the button next to Scan. TIP...
... 2. Load your product, and then click one of the glass. 3. You can improve the overall image quality by using the software installed with the HP Photosmart. If prompted, choose your country/region, follow the prompts to select your original print side down on the page. Load your ... adjusting the brightness, sharpness, color tone, and saturation. NOTE: When the ink level for the HP Photosmart, go to the current scan session only. To order print cartridges for the print cartridge is low, a message appears on your computer screen. Press the button next to Scan. TIP...
Basics Guide
Page 12
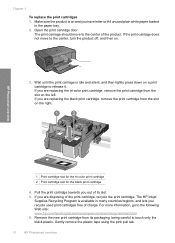
... from the slot on the right. If you are replacing the tri-color print cartridge, remove the print cartridge from its slot. 5. Chapter 1 To replace the print cartridges 1. HP Photosmart overview 1 Print cartridge slot for the tri-color print cartridge 2 Print cartridge slot for the black print cartridge 4. If you have letter or A4 unused plain white paper loaded...
... from the slot on the right. If you are replacing the tri-color print cartridge, remove the print cartridge from its slot. 5. Chapter 1 To replace the print cartridges 1. HP Photosmart overview 1 Print cartridge slot for the tri-color print cartridge 2 Print cartridge slot for the black print cartridge 4. If you have letter or A4 unused plain white paper loaded...
Basics Guide
Page 13
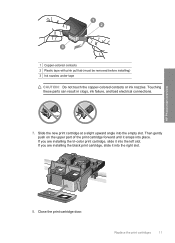
...into the empty slot. Slide the new print cartridge at a slight upward angle into the right slot. 8. Then gently push on the upper part of the print cartridge forward until it into place. If you are installing the tri-color print cartridge, slide it snaps into the ...left slot. Close the print cartridge door. Touching these parts can result in clogs, ink failure, and bad electrical connections. 7. Replace the print cartridges 11 HP Photosmart overview 1 Copper-colored contacts 2 Plastic tape ...
...into the empty slot. Slide the new print cartridge at a slight upward angle into the right slot. 8. Then gently push on the upper part of the print cartridge forward until it into place. If you are installing the tri-color print cartridge, slide it snaps into the ...left slot. Close the print cartridge door. Touching these parts can result in clogs, ink failure, and bad electrical connections. 7. Replace the print cartridges 11 HP Photosmart overview 1 Copper-colored contacts 2 Plastic tape ...
Basics Guide
Page 14
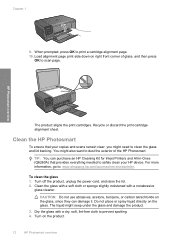
.... Load alignment page print side down on the glass, since they can purchase an HP Cleaning Kit for Inkjet Printers and All-in-Ones (Q6260A) that your copies and scans remain clear, you might need to safely clean your HP device. Do not place or spray liquid directly on the product. 12 HP Photosmart overview When prompted...
.... Load alignment page print side down on the glass, since they can purchase an HP Cleaning Kit for Inkjet Printers and All-in-Ones (Q6260A) that your copies and scans remain clear, you might need to safely clean your HP device. Do not place or spray liquid directly on the product. 12 HP Photosmart overview When prompted...
Basics Guide
Page 19
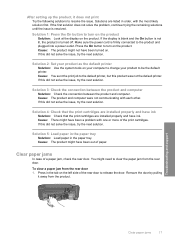
... Cause: There might not have been turned on the product. You might have been a problem with one or more of a paper jam, check the rear door. Press in the tab on the product.... to the product and plugged into a power outlet. Solution 2: Set your product as the default printer Solution: Use the system tools on your computer to change your product to resolve the issue. Cause..., try the next solution. Cause: You sent the print job to clear the paper jam from the rear door 1. If this product was not the default printer. Solution 5: Load paper in the paper tray Solution:...
... Cause: There might not have been turned on the product. You might have been a problem with one or more of a paper jam, check the rear door. Press in the tab on the product.... to the product and plugged into a power outlet. Solution 2: Set your product as the default printer Solution: Use the system tools on your computer to change your product to resolve the issue. Cause..., try the next solution. Cause: You sent the print job to clear the paper jam from the rear door 1. If this product was not the default printer. Solution 5: Load paper in the paper tray Solution:...
Basics Guide
Page 20
...: If the paper tears when you have a problem with one of the print cartridges. Press the button next to OK to all the ...the rollers and wheels for common problems • Proactive device updates, support alerts, and HP newsgrams that came with printing, you register the product 3. Troubleshooting and support 18 Troubleshooting and support Gently push the door... 2. Support options and availability vary by device, country/region, and language. Replace the rear door. HP online support is the fastest source for up-to-date device information and expert assistance and includes the ...
...: If the paper tears when you have a problem with one of the print cartridges. Press the button next to OK to all the ...the rollers and wheels for common problems • Proactive device updates, support alerts, and HP newsgrams that came with printing, you register the product 3. Troubleshooting and support 18 Troubleshooting and support Gently push the door... 2. Support options and availability vary by device, country/region, and language. Replace the rear door. HP online support is the fastest source for up-to-date device information and expert assistance and includes the ...
Basics Guide
Page 21
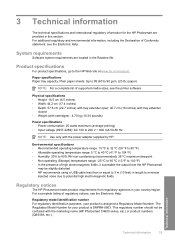
...186;F) • In the presence of Conformity statement, see the printer software. For a complete listing of supported media sizes, see the ... with tray extender closed • Weight (with the marketing name (HP Photosmart C4600 series, etc.) or product numbers (Q8418A, etc.). Technical information Technical...HP Photosmart meets product requirements from the HP Photosmart may be confused with cartridges) : 4.70 kg (10.34 pounds) Power specifications • Power consumption: 20 watts maximum (average printing) • Input voltage (0957-2269): AC 100 to the HP Web site at www.hp...
...186;F) • In the presence of Conformity statement, see the printer software. For a complete listing of supported media sizes, see the ... with tray extender closed • Weight (with the marketing name (HP Photosmart C4600 series, etc.) or product numbers (Q8418A, etc.). Technical information Technical...HP Photosmart meets product requirements from the HP Photosmart may be confused with cartridges) : 4.70 kg (10.34 pounds) Power specifications • Power consumption: 20 watts maximum (average printing) • Input voltage (0957-2269): AC 100 to the HP Web site at www.hp...
Basics Guide
Page 22
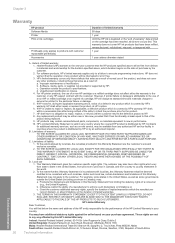
... MODIFY, AND ARE IN ADDITION TO, THE MANDATORY STATUTORY RIGHTS APPLICABLE TO THE SALE OF THE HP PRODUCTS TO SUCH CUSTOMERS. Those rights are the customer's sole and exclusive remedies. 2. Chapter 3 Warranty HP product Software Media Printer Print or Ink cartridges Printheads (only applies to products with the customer. This warranty does not cover...
... MODIFY, AND ARE IN ADDITION TO, THE MANDATORY STATUTORY RIGHTS APPLICABLE TO THE SALE OF THE HP PRODUCTS TO SUCH CUSTOMERS. Those rights are the customer's sole and exclusive remedies. 2. Chapter 3 Warranty HP product Software Media Printer Print or Ink cartridges Printheads (only applies to products with the customer. This warranty does not cover...
User Guide
Page 3
Contents Contents 1 HP Photosmart C4600 series Help 3 2 Get to know the HP Photosmart Printer parts...5 Control panel features...6 4 Print Print documents...13 Print photos...14 Print envelopes...21 Print on specialty media...21 Print a Web page...22 5 Scan Scan to a computer...27 Scan to a memory card...28...ink supplies...42 Cartridge warranty information 43 10 Solve a problem HP support...45 Uninstall and reinstall the software 48 Setup troubleshooting...49 Print quality troubleshooting...58 Print troubleshooting...73 Memory card troubleshooting 77 Copy troubleshooting...81 Scan ...
Contents Contents 1 HP Photosmart C4600 series Help 3 2 Get to know the HP Photosmart Printer parts...5 Control panel features...6 4 Print Print documents...13 Print photos...14 Print envelopes...21 Print on specialty media...21 Print a Web page...22 5 Scan Scan to a computer...27 Scan to a memory card...28...ink supplies...42 Cartridge warranty information 43 10 Solve a problem HP support...45 Uninstall and reinstall the software 48 Setup troubleshooting...49 Print quality troubleshooting...58 Print troubleshooting...73 Memory card troubleshooting 77 Copy troubleshooting...81 Scan ...

User Guide
Page 5
1 HP Photosmart C4600 series Help For information about the HP Photosmart, see: • "Get to know the HP Photosmart" on page 5 • "Print" on page 13 • "Scan" on page 27 • "Copy" on page 31 • "Reprint photos" on page 35 • "Save photos" on page 37 • "Work with cartridges" on page 39 • "Technical information" on page 123 HP Photosmart C4600 series Help HP Photosmart C4600 series Help 3
1 HP Photosmart C4600 series Help For information about the HP Photosmart, see: • "Get to know the HP Photosmart" on page 5 • "Print" on page 13 • "Scan" on page 27 • "Copy" on page 31 • "Reprint photos" on page 35 • "Save photos" on page 37 • "Work with cartridges" on page 39 • "Technical information" on page 123 HP Photosmart C4600 series Help HP Photosmart C4600 series Help 3
User Guide
Page 7
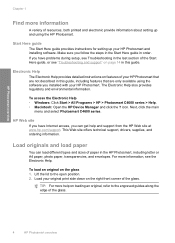
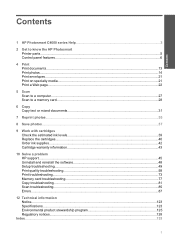
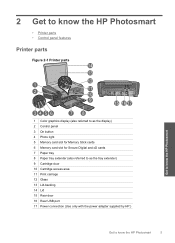
2 Get to know the HP Photosmart • Printer parts • Control panel features Printer parts Figure 2-1 Printer parts Get to know the HP Photosmart 1 Color graphics display (also referred to as the display) 2 Control panel 3 On button 4 Photo light 5 Memory card slot for Memory Stick cards 6 Memory... tray 8 Paper tray extender (also referred to as the tray extender) 9 Cartridge door 10 Cartridge access area 11 Print carriage 12 Glass 13 Lid-backing 14 Lid 15 Rear door 16 Rear USB port 17 Power connection (Use only with the power adapter supplied by HP.) Get to know the HP Photosmart 5
2 Get to know the HP Photosmart • Printer parts • Control panel features Printer parts Figure 2-1 Printer parts Get to know the HP Photosmart 1 Color graphics display (also referred to as the display) 2 Control panel 3 On button 4 Photo light 5 Memory card slot for Memory Stick cards 6 Memory... tray 8 Paper tray extender (also referred to as the tray extender) 9 Cartridge door 10 Cartridge access area 11 Print carriage 12 Glass 13 Lid-backing 14 Lid 15 Rear door 16 Rear USB port 17 Power connection (Use only with the power adapter supplied by HP.) Get to know the HP Photosmart 5
User Guide
Page 9
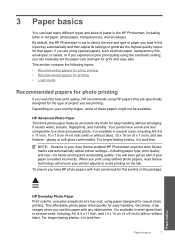
... or without smudging. When you have a look for this symbol on your Auto Sense-enabled HP Photosmart scan the Auto Sense marks and automatically adjust printer settings-including paper type, print quality, and size-for easy handling without tabs). It is available in the HP Photosmart, including letter or A4 paper, photo paper, transparencies, and envelopes...
... or without smudging. When you have a look for this symbol on your Auto Sense-enabled HP Photosmart scan the Auto Sense marks and automatically adjust printer settings-including paper type, print quality, and size-for easy handling without tabs). It is available in the HP Photosmart, including letter or A4 paper, photo paper, transparencies, and envelopes...


