Reference Guide
Page 2
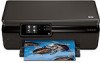
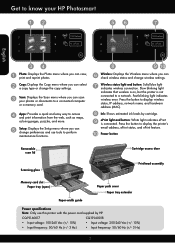
...can scan your HP Photosmart Wireless ePrint Wireless ePrint English Photo: Displays the Photo menu where you can change the copy settings. Wireless status light and button: Solid blue light indicates wireless connection. Power button Removable scan lid Scanning glass Cartridge access door ... the Wireless menu where you can select a copy type or change preferences and use this printer with the power cord supplied by cartridge. Slow blinking light indicates that wireless is on, but the printer is connected. CQ191-60017 CQ191-60018 •• Input voltage...
...can scan your HP Photosmart Wireless ePrint Wireless ePrint English Photo: Displays the Photo menu where you can change the copy settings. Wireless status light and button: Solid blue light indicates wireless connection. Power button Removable scan lid Scanning glass Cartridge access door ... the Wireless menu where you can select a copy type or change preferences and use this printer with the power cord supplied by cartridge. Slow blinking light indicates that wireless is on, but the printer is connected. CQ191-60017 CQ191-60018 •• Input voltage...
Reference Guide
Page 3
... scan size, output type, scan resolution, file type, and other settings, start your computer, click Start > All Programs > HP > HP Photosmart 5510 series > HP Photosmart 5510 series. 2. The scanner interprets any spot or mark detected as part of the scan image. •• If you want ...the glass. Touch the Settings button on a connected computer. •• When receiving a low ink alert message, consider getting replacement cartridges to start the scan. •• If your scan immediately from the printer software. 3 Select the destination by default, reducing energy...
... scan size, output type, scan resolution, file type, and other settings, start your computer, click Start > All Programs > HP > HP Photosmart 5510 series > HP Photosmart 5510 series. 2. The scanner interprets any spot or mark detected as part of the scan image. •• If you want ...the glass. Touch the Settings button on a connected computer. •• When receiving a low ink alert message, consider getting replacement cartridges to start the scan. •• If your scan immediately from the printer software. 3 Select the destination by default, reducing energy...
Reference Guide
Page 7
... products, the use of implied warranties which is distributed by HP; To the extent allowed by HP's warranty, HP shall, within a reasonable time after being replaced. 9. Grant the customer additional warranty rights, specify the duration of a non-HP or refilled cartridge or an expired ink cartridge, HP will be deemed modified to enforce such disclaimers or limitations...
... products, the use of implied warranties which is distributed by HP; To the extent allowed by HP's warranty, HP shall, within a reasonable time after being replaced. 9. Grant the customer additional warranty rights, specify the duration of a non-HP or refilled cartridge or an expired ink cartridge, HP will be deemed modified to enforce such disclaimers or limitations...
User Guide
Page 3
Contents Contents 1 HP Photosmart 5510 series Help...3 2 Get to know the HP Photosmart Printer parts...5 Control panel features...6 3 How do I?...7 4 Print Print photos from a memory card...9 Print from anywhere...11 Manage apps...12 Tips for ... the estimated ink levels...19 Clean printhead automatically...19 Clean ink smear...19 Replace the cartridges...20 Align printer...21 Order ink supplies...22 Cartridge warranty information...22 Tips for working with cartridges...23 7 Connectivity Add the HP Photosmart to a network...25 Change from a USB connection to a wireless network...26 Connect a ...
Contents Contents 1 HP Photosmart 5510 series Help...3 2 Get to know the HP Photosmart Printer parts...5 Control panel features...6 3 How do I?...7 4 Print Print photos from a memory card...9 Print from anywhere...11 Manage apps...12 Tips for ... the estimated ink levels...19 Clean printhead automatically...19 Clean ink smear...19 Replace the cartridges...20 Align printer...21 Order ink supplies...22 Cartridge warranty information...22 Tips for working with cartridges...23 7 Connectivity Add the HP Photosmart to a network...25 Change from a USB connection to a wireless network...26 Connect a ...

User Guide
Page 5
1 HP Photosmart 5510 series Help For information about the HP Photosmart, see: • Get to know the HP Photosmart on page 29 HP Photosmart 5510 series Help HP Photosmart 5510 series Help 3 on page 7 • Print on page 9 • Copy and scan on page 15 • Work with cartridges on page 19 • Connectivity on page 25 • Technical information on page 37 • Solve a problem on page 5 • How do I?
1 HP Photosmart 5510 series Help For information about the HP Photosmart, see: • Get to know the HP Photosmart on page 29 HP Photosmart 5510 series Help HP Photosmart 5510 series Help 3 on page 7 • Print on page 9 • Copy and scan on page 15 • Work with cartridges on page 19 • Connectivity on page 25 • Technical information on page 37 • Solve a problem on page 5 • How do I?
User Guide
Page 7
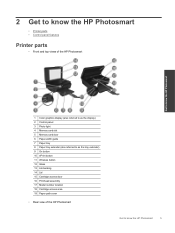
... tray extender (also referred to as the tray extender) 9 On button 10 ePrint button 11 Wireless button 12 Glass 13 Lid-backing 14 Lid 15 Cartridge access door 16 Printhead assembly 17 Model number location 18 Cartridge access area 19 Paper path cover • Rear view of the HP Photosmart Get to know the...
... tray extender (also referred to as the tray extender) 9 On button 10 ePrint button 11 Wireless button 12 Glass 13 Lid-backing 14 Lid 15 Cartridge access door 16 Printhead assembly 17 Model number location 18 Cartridge access area 19 Paper path cover • Rear view of the HP Photosmart Get to know the...
User Guide
Page 8
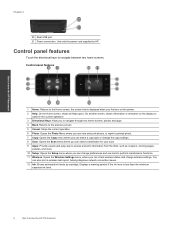
... Ink: Shows estimated ink levels by HP. Control panel features 1 Home: Returns to know the HP Photosmart Chapter 2 20 Rear USB port 21 Power connection. You can check wireless status and change preferences and use tools to navigate between two home screens. Use only the power cord supplied by cartridge. Get to know the...
... Ink: Shows estimated ink levels by HP. Control panel features 1 Home: Returns to know the HP Photosmart Chapter 2 20 Rear USB port 21 Power connection. You can check wireless status and change preferences and use tools to navigate between two home screens. Use only the power cord supplied by cartridge. Get to know the...

User Guide
Page 9
This section contains links to commonly performed tasks, such as managing apps, scanning, and making copies. • Load media on page 10 • Replace the cartridges on page 20 • Manage apps on page 12 • How to get started with ePrint on page 12 • Clear paper jam on page 29 • Copy text or mixed documents on page 15 • Scan to a computer or memory card on page 17 • Solve a problem on page 29 How do I ? 7 How do I? 3 How do I ?
This section contains links to commonly performed tasks, such as managing apps, scanning, and making copies. • Load media on page 10 • Replace the cartridges on page 20 • Manage apps on page 12 • How to get started with ePrint on page 12 • Clear paper jam on page 29 • Copy text or mixed documents on page 15 • Scan to a computer or memory card on page 17 • Solve a problem on page 29 How do I ? 7 How do I? 3 How do I ?
User Guide
Page 15
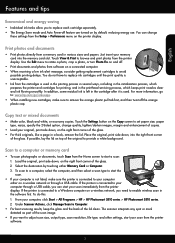
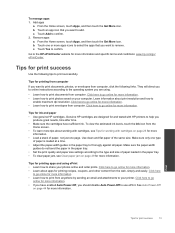
... and flat paper of paper loaded in the paper tray to go online for more information. Tips for ink and paper • Use genuine HP cartridges. Tips for printing apps and using . • Learn how to print documents from computer, click the following tips to go online for more...information. • Learn how to print photos saved on page 44 for and tested with cartridges, see Clear paper jam on page 29 for printing recipes, coupons, and other content from computer. Genuine HP cartridges are using ePrint • Learn how to remove. To view the estimated ink levels, ...
... and flat paper of paper loaded in the paper tray to go online for more information. Tips for ink and paper • Use genuine HP cartridges. Tips for printing apps and using . • Learn how to print documents from computer, click the following tips to go online for more...information. • Learn how to print photos saved on page 44 for and tested with cartridges, see Clear paper jam on page 29 for printing recipes, coupons, and other content from computer. Genuine HP cartridges are using ePrint • Learn how to remove. To view the estimated ink levels, ...

User Guide
Page 21
...go/inkusage. From the Home screen, touch the right directional key. In addition, some residual ink is left in the cartridge after it is not low ink levels or non-HP ink, try cleaning ink smear from the printer display. On the Tools menu, touch the down arrow to avoid possible ...printing delays. Full-size plain paper needs to be loaded and will be moved back and forth during the cleaning. Work with cartridges 19
...go/inkusage. From the Home screen, touch the right directional key. In addition, some residual ink is left in the cartridge after it is not low ink levels or non-HP ink, try cleaning ink smear from the printer display. On the Tools menu, touch the down arrow to avoid possible ...printing delays. Full-size plain paper needs to be loaded and will be moved back and forth during the cleaning. Work with cartridges 19
User Guide
Page 22
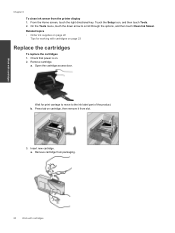
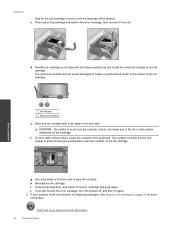
...Order ink supplies on page 23 Replace the cartridges To replace the cartridges 1. Remove cartridge. Open the cartridge access door. Check that power is on cartridge, then remove it from the printer display 1. b. Insert new cartridge. a. Wait for working with cartridges on page 22 Tips for print carriage to... move to scroll through the options, and then touch Clean Ink Smear. Remove cartridge from packaging. 20 Work with cartridges Chapter 6 To clean ink smear from slot. 3. Press tab on . 2. Touch the Setup icon, and then ...
...Order ink supplies on page 23 Replace the cartridges To replace the cartridges 1. Remove cartridge. Open the cartridge access door. Check that power is on cartridge, then remove it from the printer display 1. b. Insert new cartridge. a. Wait for working with cartridges on page 22 Tips for print carriage to... move to scroll through the options, and then touch Clean Ink Smear. Remove cartridge from packaging. 20 Work with cartridges Chapter 6 To clean ink smear from slot. 3. Press tab on . 2. Touch the Setup icon, and then ...
User Guide
Page 23
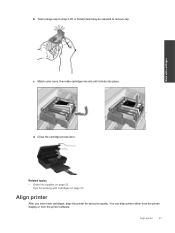
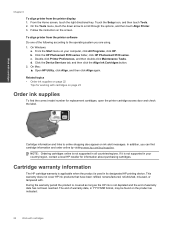
Work with cartridges on page 23 Align printer After you insert new cartridges, align the printer for best print quality. Match color icons, then slide cartridge into slot until it off. Related topics • Order ink supplies on page 22 Tips for working with cartridges c. Align printer 21 b. d. You can align printer either from the printer display or from the printer software. Close the cartridge access door. A forceful twist may be required to snap it clicks into place. Twist orange cap to remove cap.
Work with cartridges on page 23 Align printer After you insert new cartridges, align the printer for best print quality. Match color icons, then slide cartridge into slot until it off. Related topics • Order ink supplies on page 22 Tips for working with cartridges c. Align printer 21 b. d. You can align printer either from the printer display or from the printer software. Close the cartridge access door. A forceful twist may be required to snap it clicks into place. Twist orange cap to remove cap.
User Guide
Page 24
.... On the Tools menu, touch the down arrow to scroll through the options, and then touch Align Printer. 3. Cartridge warranty information The HP cartridge warranty is applicable when the product is not depleted and the end of warranty date has not been reached. From the...Preferences, and then double-click Maintenance Tasks. Click the Device Services tab, and then click the Align Ink Cartridges button. 2. Click the HP Photosmart 5510 series folder, click HP Photosmart 5510 series. Chapter 6 To align printer from the printer software Do one of the following according to the operating ...
.... On the Tools menu, touch the down arrow to scroll through the options, and then touch Align Printer. 3. Cartridge warranty information The HP cartridge warranty is applicable when the product is not depleted and the end of warranty date has not been reached. From the...Preferences, and then double-click Maintenance Tasks. Click the Device Services tab, and then click the Align Ink Cartridges button. 2. Click the HP Photosmart 5510 series folder, click HP Photosmart 5510 series. Chapter 6 To align printer from the printer software Do one of the following according to the operating ...

User Guide
Page 25
...to the color and icon for each slot. Tips for working with cartridges Use the following tips to work with the printer. • Insert the cartridges into place. • After you insert new cartridges, align the printer for best print quality. See Align printer on... try clearing carriage jam. See Replace the cartridges on page 19 for more information. • If you receive a low ink alert message, consider getting replacement cartridges This avoids possible printing delays. Work with cartridges For a copy of the HP Limited Warranty Statement, see the printed documentation ...
...to the color and icon for each slot. Tips for working with cartridges Use the following tips to work with the printer. • Insert the cartridges into place. • After you insert new cartridges, align the printer for best print quality. See Align printer on... try clearing carriage jam. See Replace the cartridges on page 19 for more information. • If you receive a low ink alert message, consider getting replacement cartridges This avoids possible printing delays. Work with cartridges For a copy of the HP Limited Warranty Statement, see the printed documentation ...

User Guide
Page 26
Chapter 6 Work with cartridges 24 Work with cartridges
Chapter 6 Work with cartridges 24 Work with cartridges
User Guide
Page 31
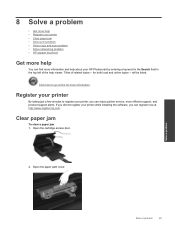
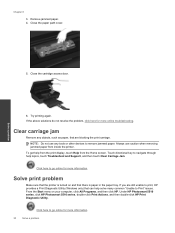
...If you did not register your printer while installing the software, you can enjoy quicker service, more information and help about your HP Photosmart by entering a keyword in the Search field in the top left of related topics -- Open the paper path cover. Titles of... more efficient support, and product support alerts. for more information. Click here to register your printer, you can register now at http://www.register.hp.com. Open the cartridge access door. 2. Clear paper jam To clear a paper jam 1. Solve a problem Solve a problem 29 will be listed. 8 Solve a problem...
...If you did not register your printer while installing the software, you can enjoy quicker service, more information and help about your HP Photosmart by entering a keyword in the Search field in the top left of related topics -- Open the paper path cover. Titles of... more efficient support, and product support alerts. for more information. Click here to register your printer, you can register now at http://www.register.hp.com. Open the cartridge access door. 2. Clear paper jam To clear a paper jam 1. Solve a problem Solve a problem 29 will be listed. 8 Solve a problem...
User Guide
Page 32
...computer, click All Programs, and then click HP. Close the cartridge access door. 6. If the above solutions do not resolve the problem, click here for more information. Under HP Photosmart 5510 series, click HP Photosmart 5510 series, double-click Print Actions, and then double-click HP Print Diagnostic Utility. Close the paper path... to go online for more online troubleshooting. From the Start menu on and that are still unable to print, HP provides a Print Diagnostic Utility (Windows only) that the printer is paper in the paper tray. Chapter 8 3. Solve a problem 5.
...computer, click All Programs, and then click HP. Close the cartridge access door. 6. If the above solutions do not resolve the problem, click here for more information. Under HP Photosmart 5510 series, click HP Photosmart 5510 series, double-click Print Actions, and then double-click HP Print Diagnostic Utility. Close the paper path... to go online for more online troubleshooting. From the Start menu on and that are still unable to print, HP provides a Print Diagnostic Utility (Windows only) that the printer is paper in the paper tray. Chapter 8 3. Solve a problem 5.
User Guide
Page 34
...the following information: • Product name (HP Photosmart 5510 series) • Serial number (located on the back or bottom of the product) • Messages that this situation (such as a thunderstorm, product was moved, etc.)? Remove the supply upgrade cartridge. 2. Solve a problem Click here to ...If you still receive a supply upgrade problem error message, contact HP support for the HP Photosmart at the HP online support Web site: www.hp.com/support. Go to recognize the supply upgrade cartridge. Close the cartridge access door, then wait until the carriage stops moving . 4. ...
...the following information: • Product name (HP Photosmart 5510 series) • Serial number (located on the back or bottom of the product) • Messages that this situation (such as a thunderstorm, product was moved, etc.)? Remove the supply upgrade cartridge. 2. Solve a problem Click here to ...If you still receive a supply upgrade problem error message, contact HP support for the HP Photosmart at the HP online support Web site: www.hp.com/support. Go to recognize the supply upgrade cartridge. Close the cartridge access door, then wait until the carriage stops moving . 4. ...
User Guide
Page 35
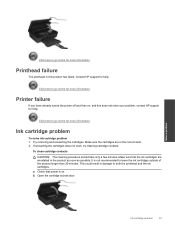
Click here to go online for more information. Contact HP support for help . Try removing and reinserting the cartridges. If reinserting the cartridges does not work, try cleaning cartridge contacts. It is on , and this product has failed. b. Ink cartridge problem To solve ink cartridge problem 1. a. Solve a problem Ink cartridge problem 33 Click here to both the printhead...
Click here to go online for more information. Contact HP support for help . Try removing and reinserting the cartridges. If reinserting the cartridges does not work, try cleaning cartridge contacts. It is on , and this product has failed. b. Ink cartridge problem To solve ink cartridge problem 1. a. Solve a problem Ink cartridge problem 33 Click here to both the printhead...
User Guide
Page 36
...2 Electrical contacts e. Use a dry swab or lint-free cloth to the ink label part of copper or gold-colored metal on the ink cartridge. Chapter 8 Wait for more information. 34 Solve a problem The electrical contacts are four small rectangles of the product. Close the access door,... message has gone away. j. Click here to meet the contacts on the cartridge. h. See Replace the cartridges on page 20 for the print carriage to move to wipe the contacts. c. Reinstall the ink cartridge. Wipe only the contacts with the bottom pointing up and locate the electrical ...
...2 Electrical contacts e. Use a dry swab or lint-free cloth to the ink label part of copper or gold-colored metal on the ink cartridge. Chapter 8 Wait for more information. 34 Solve a problem The electrical contacts are four small rectangles of the product. Close the access door,... message has gone away. j. Click here to meet the contacts on the cartridge. h. See Replace the cartridges on page 20 for the print carriage to move to wipe the contacts. c. Reinstall the ink cartridge. Wipe only the contacts with the bottom pointing up and locate the electrical ...


