Upgrading and Servicing Guide
Page 16
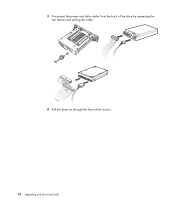
MASTER SLAVE To CPU 4 Pull the drive out through the front of the drive by squeezing the two latches and pulling the cable. 3 Disconnect the power and data cables from the back of the chassis. 12 Upgrading and Servicing Guide
MASTER SLAVE To CPU 4 Pull the drive out through the front of the drive by squeezing the two latches and pulling the cable. 3 Disconnect the power and data cables from the back of the chassis. 12 Upgrading and Servicing Guide
Upgrading and Servicing Guide
Page 18
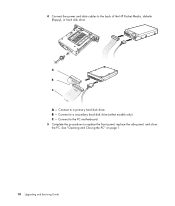
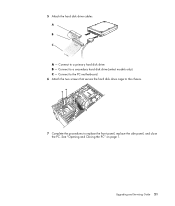
A B MASTER C SLAVE To CPU A - Connect to replace the front panel, replace the side panel, and close the PC. See "Opening and Closing the PC" on page 1. 14 Upgrading and Servicing Guide C - Connect to the PC motherboard. 5 Complete the procedures to a primary hard disk drive. Connect to the back of the HP Pocket Media, diskette (floppy), or hard disk drive. B - 4 Connect the power and data cables to a secondary hard disk drive (select models only).
A B MASTER C SLAVE To CPU A - Connect to replace the front panel, replace the side panel, and close the PC. See "Opening and Closing the PC" on page 1. 14 Upgrading and Servicing Guide C - Connect to the PC motherboard. 5 Complete the procedures to a primary hard disk drive. Connect to the back of the HP Pocket Media, diskette (floppy), or hard disk drive. B - 4 Connect the power and data cables to a secondary hard disk drive (select models only).
Upgrading and Servicing Guide
Page 22
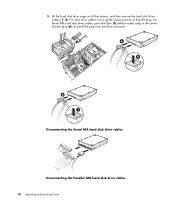
For Serial ATA hard disk drive cables, press the latch (5) (select models only) in the center of the chassis, and then remove the hard disk drive cables (1, 2). For most drive cables, use a gentle rocking motion to free the plug. 5 Lift the hard disk drive cage out of each plug (6), and pull the plug from the drive connector. 6 5 2 1 Disconnecting the Serial ATA hard disk drive cables MASTER SLAVE To CPU Disconnecting the Parallel ATA hard disk drive cables 18 Upgrading and Servicing Guide
For Serial ATA hard disk drive cables, press the latch (5) (select models only) in the center of the chassis, and then remove the hard disk drive cables (1, 2). For most drive cables, use a gentle rocking motion to free the plug. 5 Lift the hard disk drive cage out of each plug (6), and pull the plug from the drive connector. 6 5 2 1 Disconnecting the Serial ATA hard disk drive cables MASTER SLAVE To CPU Disconnecting the Parallel ATA hard disk drive cables 18 Upgrading and Servicing Guide
Upgrading and Servicing Guide
Page 25
Connect to replace the front panel, replace the side panel, and close the PC. Upgrading and Servicing Guide 21 A B MASTER C SLAVE To CPU A - B - Connect to the PC motherboard. 6 Attach the two screws that secure the hard disk drive cage to the chassis. 7 Complete the procedures to a secondary hard disk drive (select models only). C - See "Opening and Closing the PC" on page 1. Connect to a primary hard disk drive. 5 Attach the hard disk drive cables.
Connect to replace the front panel, replace the side panel, and close the PC. Upgrading and Servicing Guide 21 A B MASTER C SLAVE To CPU A - B - Connect to the PC motherboard. 6 Attach the two screws that secure the hard disk drive cage to the chassis. 7 Complete the procedures to a secondary hard disk drive (select models only). C - See "Opening and Closing the PC" on page 1. Connect to a primary hard disk drive. 5 Attach the hard disk drive cables.


