
End User License Agreement
Page 2
... the other terms will also terminate upon conditions set forth elsewhere in this EULA. 5. TRANSFER. You shall not remove any other form, may not reverse engineer, decompile, or disassemble the Software Product, except and only to the extent...drive-based solution, an external media-based recovery solution (e.g. LIMITATION ON REVERSE ENGINEERING. This EULA applies to updates or supplements to the original Software Product provided by HP as eligible for restoring the hard disk of the Software Product may not be licensed for the original Software Product identified by HP unless HP...
... the other terms will also terminate upon conditions set forth elsewhere in this EULA. 5. TRANSFER. You shall not remove any other form, may not reverse engineer, decompile, or disassemble the Software Product, except and only to the extent...drive-based solution, an external media-based recovery solution (e.g. LIMITATION ON REVERSE ENGINEERING. This EULA applies to updates or supplements to the original Software Product provided by HP as eligible for restoring the hard disk of the Software Product may not be licensed for the original Software Product identified by HP unless HP...
Warranty
Page 7
... from loss or damage in transit; UNITS SENT IN FOR SERVICE MAY HAVE THE DATA ERASED FROM THE HARD DRIVE AND THE PROGRAMS RESTORED TO THEIR ORIGINAL STATE. HP IS NOT RESPONSIBLE FOR THE RESTORATION OR REINSTALLATION OF ANY PROGRAMS OR DATA OTHER THAN SOFTWARE INSTALLED BY...BEFORE RETURNING ANY UNIT FOR SERVICE, BE SURE TO BACK UP DATA AND REMOVE ANY CONFIDENTIAL, PROPRIETARY, OR PERSONAL INFORMATION. HP IS NOT RESPONSIBLE FOR DAMAGE TO OR LOSS OF ANY PROGRAMS, DATA, OR REMOVABLE STORAGE MEDIA. THESE TERMS AND CONDITIONS SUPERSEDE ANY PRIOR AGREEMENTS OR REPRESENTATIONS-INCLUDING...
... from loss or damage in transit; UNITS SENT IN FOR SERVICE MAY HAVE THE DATA ERASED FROM THE HARD DRIVE AND THE PROGRAMS RESTORED TO THEIR ORIGINAL STATE. HP IS NOT RESPONSIBLE FOR THE RESTORATION OR REINSTALLATION OF ANY PROGRAMS OR DATA OTHER THAN SOFTWARE INSTALLED BY...BEFORE RETURNING ANY UNIT FOR SERVICE, BE SURE TO BACK UP DATA AND REMOVE ANY CONFIDENTIAL, PROPRIETARY, OR PERSONAL INFORMATION. HP IS NOT RESPONSIBLE FOR DAMAGE TO OR LOSS OF ANY PROGRAMS, DATA, OR REMOVABLE STORAGE MEDIA. THESE TERMS AND CONDITIONS SUPERSEDE ANY PRIOR AGREEMENTS OR REPRESENTATIONS-INCLUDING...
Limited Warranty and Support Guide (Refurbished Desktops)
Page 3
...or other than (i) HP, (ii) an HP authorized service provider, or (iii) your own installation of the HP Hardware Product they are replacing or in materials or workmanship during the Limited Warranty Period. UNITS SENT IN FOR SERVICE MAY HAVE THE DATA ERASED FROM THE HARD DRIVE AND THE PROGRAMS ...RESTORED TO THEIR ORIGINAL STATE. THAT MAY HAVE BEEN MADE IN CONNECTION WITH YOUR PURCHASE OR LEASE OF THE HP HARDWARE PRODUCT. HP may elect to an original product that manifests a defect in which the serial number has been removed or that your...
...or other than (i) HP, (ii) an HP authorized service provider, or (iii) your own installation of the HP Hardware Product they are replacing or in materials or workmanship during the Limited Warranty Period. UNITS SENT IN FOR SERVICE MAY HAVE THE DATA ERASED FROM THE HARD DRIVE AND THE PROGRAMS ...RESTORED TO THEIR ORIGINAL STATE. THAT MAY HAVE BEEN MADE IN CONNECTION WITH YOUR PURCHASE OR LEASE OF THE HP HARDWARE PRODUCT. HP may elect to an original product that manifests a defect in which the serial number has been removed or that your...
Upgrading and Servicing Guide
Page 3
... PC 2 After Closing the PC 3 Removing the Side Panel 3 Replacing the Side Panel 4 Removing the Front Panel 5 Replacing the Front Panel 6 Locating Components Inside the Computer 7 Removing and Replacing Drives 8 Removing an Optical Drive 8 Adding or Replacing an Optical Drive 9 Removing the HP Pocket Media or Diskette or Hard Disk Drive 11 Adding or Replacing the HP Pocket Media or Diskette or Hard Disk Drive 13 Removing...
... PC 2 After Closing the PC 3 Removing the Side Panel 3 Replacing the Side Panel 4 Removing the Front Panel 5 Replacing the Front Panel 6 Locating Components Inside the Computer 7 Removing and Replacing Drives 8 Removing an Optical Drive 8 Adding or Replacing an Optical Drive 9 Removing the HP Pocket Media or Diskette or Hard Disk Drive 11 Adding or Replacing the HP Pocket Media or Diskette or Hard Disk Drive 13 Removing...

Upgrading and Servicing Guide
Page 9
Upgrading and Servicing Guide 5 B 2 Swing the front panel away from the outside edge of the chassis. Removing the Front Panel This procedure is necessary only when removing or replacing an optical drive, memory card reader, an HP Pocket Media Drive, diskette drive, or the hard disk drive. 1 Pull the three tabs (B) away from the chassis toward the left to remove it.
Upgrading and Servicing Guide 5 B 2 Swing the front panel away from the outside edge of the chassis. Removing the Front Panel This procedure is necessary only when removing or replacing an optical drive, memory card reader, an HP Pocket Media Drive, diskette drive, or the hard disk drive. 1 Pull the three tabs (B) away from the chassis toward the left to remove it.
Upgrading and Servicing Guide
Page 12
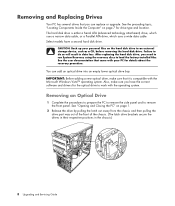
... a second hard disk drive. Also, make sure that it is either a Serial ATA (advanced technology attachment) drive, which uses a narrow data cable, or a Parallel ATA drive, which uses a wide data cable. See "Opening and Closing the PC" on page 7 for details about the recovery procedure. Removing an Optical Drive 1 Complete the procedures to prepare the PC to remove the...
... a second hard disk drive. Also, make sure that it is either a Serial ATA (advanced technology attachment) drive, which uses a narrow data cable, or a Parallel ATA drive, which uses a wide data cable. See "Opening and Closing the PC" on page 7 for details about the recovery procedure. Removing an Optical Drive 1 Complete the procedures to prepare the PC to remove the...

Upgrading and Servicing Guide
Page 13
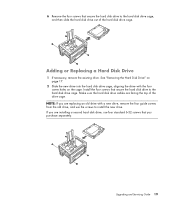
...into the knockout plate slot (B) and rotate the screwdriver to break the knockout plate out of the optical drive you must remove the knockout plate from the bay. For Serial ATA hard disk drive cables, press the latch (select models only) in the center of each plug, and pull the ...plug from the drive connector. 4 Pull the drive out through the front of the front cover. A B Upgrading and Servicing Guide 9 To do ...
...into the knockout plate slot (B) and rotate the screwdriver to break the knockout plate out of the optical drive you must remove the knockout plate from the bay. For Serial ATA hard disk drive cables, press the latch (select models only) in the center of each plug, and pull the ...plug from the drive connector. 4 Pull the drive out through the front of the front cover. A B Upgrading and Servicing Guide 9 To do ...
Upgrading and Servicing Guide
Page 15
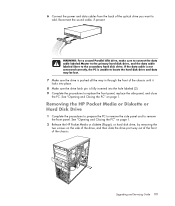
...locks into place. 8 Make sure the drive latch pin is fully inserted into the hole labeled (2). 9 Complete the procedures to remove the front panel. Removing the HP Pocket Media or Diskette or Hard Disk Drive 1 Complete the procedures to prepare the PC to remove the side panel and to replace the ...front panel, replace the side panel, and close the PC. Upgrading and Servicing Guide 11 ...
...locks into place. 8 Make sure the drive latch pin is fully inserted into the hole labeled (2). 9 Complete the procedures to remove the front panel. Removing the HP Pocket Media or Diskette or Hard Disk Drive 1 Complete the procedures to prepare the PC to remove the side panel and to replace the ...front panel, replace the side panel, and close the PC. Upgrading and Servicing Guide 11 ...

Upgrading and Servicing Guide
Page 17
... sure to insert the screw into the holes labeled HDD. Upgrading and Servicing Guide 13 See "Removing the HP Pocket Media or Diskette or Hard Disk Drive" on page 11. 2 Slide the HP Pocket Media, diskette (floppy), or hard disk drive into the front of the chassis until it locks into place. 3 Align the two screw holes...
... sure to insert the screw into the holes labeled HDD. Upgrading and Servicing Guide 13 See "Removing the HP Pocket Media or Diskette or Hard Disk Drive" on page 11. 2 Slide the HP Pocket Media, diskette (floppy), or hard disk drive into the front of the chassis until it locks into place. 3 Align the two screw holes...
Upgrading and Servicing Guide
Page 21
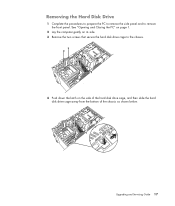
Upgrading and Servicing Guide 17 See "Opening and Closing the PC" on page 1. 2 Lay the computer gently on its side. 3 Remove the two screws that secure the hard disk drive cage to remove the front panel. Removing the Hard Disk Drive 1 Complete the procedures to prepare the PC to remove the side panel and to the chassis. 4 Push down the latch on the side of the hard disk drive cage, and then slide the hard disk drive cage away from the bottom of the chassis as shown below.
Upgrading and Servicing Guide 17 See "Opening and Closing the PC" on page 1. 2 Lay the computer gently on its side. 3 Remove the two screws that secure the hard disk drive cage to remove the front panel. Removing the Hard Disk Drive 1 Complete the procedures to prepare the PC to remove the side panel and to the chassis. 4 Push down the latch on the side of the hard disk drive cage, and then slide the hard disk drive cage away from the bottom of the chassis as shown below.
Upgrading and Servicing Guide
Page 22
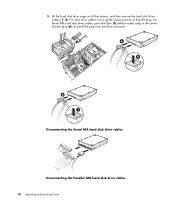
For most drive cables, use a gentle rocking motion to free the plug. For Serial ATA hard disk drive cables, press the latch (5) (select models only) in the center of the chassis, and then remove the hard disk drive cables (1, 2). 5 Lift the hard disk drive cage out of each plug (6), and pull the plug from the drive connector. 6 5 2 1 Disconnecting the Serial ATA hard disk drive cables MASTER SLAVE To CPU Disconnecting the Parallel ATA hard disk drive cables 18 Upgrading and Servicing Guide
For most drive cables, use a gentle rocking motion to free the plug. For Serial ATA hard disk drive cables, press the latch (5) (select models only) in the center of the chassis, and then remove the hard disk drive cables (1, 2). 5 Lift the hard disk drive cage out of each plug (6), and pull the plug from the drive connector. 6 5 2 1 Disconnecting the Serial ATA hard disk drive cables MASTER SLAVE To CPU Disconnecting the Parallel ATA hard disk drive cables 18 Upgrading and Servicing Guide
Upgrading and Servicing Guide
Page 23
... drive cage, aligning the drive with a new drive, remove the four guide screws from the old drive, and use the screws to install the new drive. 6 Remove the four screws that secure the hard disk drive to the hard disk drive cage. NOTE: If you purchase separately. See "Removing the Hard Disk Drive" on the cage. Adding or Replacing a Hard Disk Drive 1 If necessary, remove the existing drive...
... drive cage, aligning the drive with a new drive, remove the four guide screws from the old drive, and use the screws to install the new drive. 6 Remove the four screws that secure the hard disk drive to the hard disk drive cage. NOTE: If you purchase separately. See "Removing the Hard Disk Drive" on the cage. Adding or Replacing a Hard Disk Drive 1 If necessary, remove the existing drive...
Getting Started Guide
Page 104
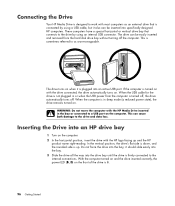
...when the USB power from the hard disk drive bay without turning off . The drive can be inserted into specifically designed HP computers. Inserting the Drive into the drive bay until the drive is lit. 96 Getting Started it also can cause both damage to the drive and data loss. With the ...the internal connections. This can be easily inserted and removed from the computer is sometimes referred to as an external drive that connects to the drive by using an internal USB connector. These computers have a special horizontal or vertical drive bay that is plugged into the bay; If ...
...when the USB power from the hard disk drive bay without turning off . The drive can be inserted into specifically designed HP computers. Inserting the Drive into the drive bay until the drive is lit. 96 Getting Started it also can cause both damage to the drive and data loss. With the ...the internal connections. This can be easily inserted and removed from the computer is sometimes referred to as an external drive that connects to the drive by using an internal USB connector. These computers have a special horizontal or vertical drive bay that is plugged into the bay; If ...
Getting Started Guide
Page 106
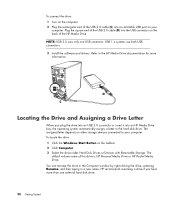
... USB connector on the taskbar. 2 Click Computer. 3 Select the drive under Hard Disk Drives or Devices with Removable Storage. HP recommends renaming a drive if you plug the drive into an USB 2.0 connector or insert it into an HP Media Drive bay, the operating system automatically assigns a letter to the HP Media Drive documentation for more than one USB connector. USB 1.x systems...
... USB connector on the taskbar. 2 Click Computer. 3 Select the drive under Hard Disk Drives or Devices with Removable Storage. HP recommends renaming a drive if you plug the drive into an USB 2.0 connector or insert it into an HP Media Drive bay, the operating system automatically assigns a letter to the HP Media Drive documentation for more than one USB connector. USB 1.x systems...
Getting Started Guide
Page 107
...hard disk drives from using the HP Media Drive connected externally to your computer, place the drive in , low-noise fan is designed to turn on automatically at pre-set temperatures. If you connect and disconnect this drive and other devices. Using the HP Personal Media Drive and HP Pocket Media Drive 99 To assign a drive... letter: 1 Click the Windows Start Button on the HP Media Drive if a drive letter is always best to remove your files and then ...
...hard disk drives from using the HP Media Drive connected externally to your computer, place the drive in , low-noise fan is designed to turn on automatically at pre-set temperatures. If you connect and disconnect this drive and other devices. Using the HP Personal Media Drive and HP Pocket Media Drive 99 To assign a drive... letter: 1 Click the Windows Start Button on the HP Media Drive if a drive letter is always best to remove your files and then ...

Getting Started Guide
Page 126
...video camera You can use a large amount of free space available on your computer hard disk drive. To capture live video in camera mode enables you are most interested in using in your DV camera. To remove the file from your movie project, select it to VCR mode. See "Capturing ...recorded video from a DV camera." To capture (copy) recorded video to your hard disk drive: 1 Connect your DV camera to the FireWire (IEEE 1394)...
...video camera You can use a large amount of free space available on your computer hard disk drive. To capture live video in camera mode enables you are most interested in using in your DV camera. To remove the file from your movie project, select it to VCR mode. See "Capturing ...recorded video from a DV camera." To capture (copy) recorded video to your hard disk drive: 1 Connect your DV camera to the FireWire (IEEE 1394)...
Getting Started Guide
Page 127
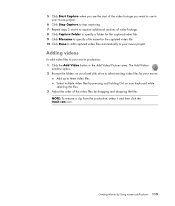
NOTE: To remove a clip from the production, select it and then click the trash can icon. Adding videos To add video files to your movie: Add up to ... files. The Add Videos window opens. 2 Browse the folders on your movie project. Select multiple video files by pressing and holding Ctrl on your hard disk drive to select existing video files for the captured video file. 10 Click Done to add captured video files automatically to your keyboard while selecting the...
NOTE: To remove a clip from the production, select it and then click the trash can icon. Adding videos To add video files to your movie: Add up to ... files. The Add Videos window opens. 2 Browse the folders on your movie project. Select multiple video files by pressing and holding Ctrl on your hard disk drive to select existing video files for the captured video file. 10 Click Done to add captured video files automatically to your keyboard while selecting the...
Getting Started Guide
Page 129
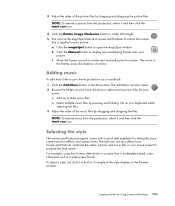
...setting the pace, scene transition effects, and caption fonts. The arrow in muvee autoProducer to control the motion that is applied to your hard disk drive to open the magicSpot window. Selecting the style The muvee autoProducer program comes with a set the start and end points for motion....opens. 2 Browse the folders on your keyboard while selecting the files. 3 Adjust the order of style templates for your picture. NOTE: To remove music from the production, select it and then click the trash can use also affects how muvee autoProducer combines the video, picture, and music...
...setting the pace, scene transition effects, and caption fonts. The arrow in muvee autoProducer to control the motion that is applied to your hard disk drive to open the magicSpot window. Selecting the style The muvee autoProducer program comes with a set the start and end points for motion....opens. 2 Browse the folders on your keyboard while selecting the files. 3 Adjust the order of style templates for your picture. NOTE: To remove music from the production, select it and then click the trash can use also affects how muvee autoProducer combines the video, picture, and music...
Getting Started Guide
Page 133
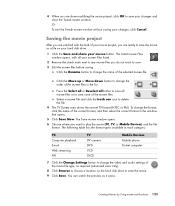
... all your muvee Files listed. 2 Remove the check mark next to any muvee files you do not want to change the video and audio settings of the movie file type, as required (advanced users only). 8 Click Browse to choose a location on your hard disk drive: 1 Click the Save and share... your muvee button. The following table lists the format types available in each category: PC Computer playback E-mail Web streaming AVI TV DV camera DVD VCD SVCD Mobile Devices Mobile...
... all your muvee Files listed. 2 Remove the check mark next to any muvee files you do not want to change the video and audio settings of the movie file type, as required (advanced users only). 8 Click Browse to choose a location on your hard disk drive: 1 Click the Save and share... your muvee button. The following table lists the format types available in each category: PC Computer playback E-mail Web streaming AVI TV DV camera DVD VCD SVCD Mobile Devices Mobile...
Limited Warranty and Support Guide
Page 3
... SURE TO BACK UP DATA AND REMOVE ANY CONFIDENTIAL, PROPRIETARY, OR PERSONAL INFORMATION. UNITS SENT IN FOR SERVICE MAY HAVE THE DATA ERASED FROM THE HARD DRIVE AND THE PROGRAMS RESTORED TO THEIR ORIGINAL STATE. INCLUDING REPRESENTATIONS MADE IN HP SALES LITERATURE OR ADVICE GIVEN TO YOU BY HP OR AN AGENT OR EMPLOYEE OF...
... SURE TO BACK UP DATA AND REMOVE ANY CONFIDENTIAL, PROPRIETARY, OR PERSONAL INFORMATION. UNITS SENT IN FOR SERVICE MAY HAVE THE DATA ERASED FROM THE HARD DRIVE AND THE PROGRAMS RESTORED TO THEIR ORIGINAL STATE. INCLUDING REPRESENTATIONS MADE IN HP SALES LITERATURE OR ADVICE GIVEN TO YOU BY HP OR AN AGENT OR EMPLOYEE OF...


