Limited Warranty and Support Guide (Refurbished Desktops)
Page 7
... not expressly granted to another end user. Recovery Solution. To use a Software Product identified as an upgrade, you must first be licensed for the original Software Product identified by HP as a consignment. TRANSFER. The initial user of the Software Product may copy the Software Product into ... EULA in any other form, may load the Software Product into the local memory or storage device of the original Software Product's proprietary notices and that is not otherwise subject to you and HP or its online documentation. You may only be governed entirely by the terms...
... not expressly granted to another end user. Recovery Solution. To use a Software Product identified as an upgrade, you must first be licensed for the original Software Product identified by HP as a consignment. TRANSFER. The initial user of the Software Product may copy the Software Product into ... EULA in any other form, may load the Software Product into the local memory or storage device of the original Software Product's proprietary notices and that is not otherwise subject to you and HP or its online documentation. You may only be governed entirely by the terms...

Upgrading and Servicing Guide
Page 9
Upgrading and Servicing Guide 5 B 2 Swing the front panel away from the outside edge of the chassis. Removing the Front Panel This procedure is necessary only when removing or replacing an optical drive, memory card reader, an HP Pocket Media Drive, diskette drive, or the hard disk drive. 1 Pull the three tabs (B) away from the chassis toward the left to remove it.
Upgrading and Servicing Guide 5 B 2 Swing the front panel away from the outside edge of the chassis. Removing the Front Panel This procedure is necessary only when removing or replacing an optical drive, memory card reader, an HP Pocket Media Drive, diskette drive, or the hard disk drive. 1 Pull the three tabs (B) away from the chassis toward the left to remove it.

Upgrading and Servicing Guide
Page 11
Upgrading and Servicing Guide 7 Locating Components Inside the Computer A B C D E F A Memory card reader (select models) B Upper 5.25-inch optical drive bay, may be a CD-ROM, CD-RW, DVD-ROM, DVD+RW/+R, or combination drive C Lower 5.25-...inch optical drive bay, may be empty (knockout plate) or a CD-ROM, CD-RW, DVD-ROM, DVD+RW/+R, combination drive, or HP Personal Media Drive bay (select models) D HP Pocket Media Drive bay, a hard disk drive, or a diskette (floppy) drive (select models) E Front connector panel (no replacement instructions) F Hard disk drive...
Upgrading and Servicing Guide 7 Locating Components Inside the Computer A B C D E F A Memory card reader (select models) B Upper 5.25-inch optical drive bay, may be a CD-ROM, CD-RW, DVD-ROM, DVD+RW/+R, or combination drive C Lower 5.25-...inch optical drive bay, may be empty (knockout plate) or a CD-ROM, CD-RW, DVD-ROM, DVD+RW/+R, combination drive, or HP Personal Media Drive bay (select models) D HP Pocket Media Drive bay, a hard disk drive, or a diskette (floppy) drive (select models) E Front connector panel (no replacement instructions) F Hard disk drive...
Upgrading and Servicing Guide
Page 19
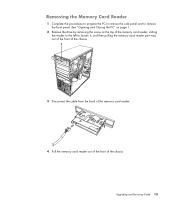
Upgrading and Servicing Guide 15 See "Opening and Closing the PC" on page 1. 2 Release the drive by removing the screw on the top of the chassis. Removing the Memory Card Reader 1 Complete the procedures to prepare the PC to remove the side panel and to loosen it, and then pulling the memory card reader part way out of the front of the chassis. 3 Disconnect the cable from the back of the memory card reader. 4 Pull the memory card reader out of the front of the memory card reader, sliding the reader to the left to remove the front panel.
Upgrading and Servicing Guide 15 See "Opening and Closing the PC" on page 1. 2 Release the drive by removing the screw on the top of the chassis. Removing the Memory Card Reader 1 Complete the procedures to prepare the PC to remove the side panel and to loosen it, and then pulling the memory card reader part way out of the front of the chassis. 3 Disconnect the cable from the back of the memory card reader. 4 Pull the memory card reader out of the front of the memory card reader, sliding the reader to the left to remove the front panel.

Upgrading and Servicing Guide
Page 20
...memory card reader. 4 Push the memory card reader into the front of the chassis. 3 Attach the cable to remove the memory card reader, if necessary. See "Opening and Closing the PC" on the top of the memory ...card reader, and then insert the short screw to secure the memory card reader to the ... the front panel, replace the side panel, and close the PC. See "Removing the Memory Card Reader" on page 15. 2 Slide the memory card reader part way into the chassis until the screw hole on...
...memory card reader. 4 Push the memory card reader into the front of the chassis. 3 Attach the cable to remove the memory card reader, if necessary. See "Opening and Closing the PC" on the top of the memory ...card reader, and then insert the short screw to secure the memory card reader to the ... the front panel, replace the side panel, and close the PC. See "Removing the Memory Card Reader" on page 15. 2 Slide the memory card reader part way into the chassis until the screw hole on...
Upgrading and Servicing Guide
Page 26
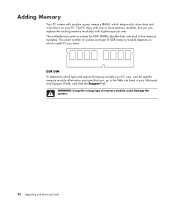
... memory modules, but you can replace the existing memory module(s) with random access memory (RAM), which model PC you have. Adding Memory Your PC comes with higher-capacity ones. WARNING: Using the wrong type of memory module your PC uses, and for DDR DIMMs (double data rate dual in your PC...., and click the Support link. The motherboard contains sockets for specific memory module information and specifications, go to the Web site listed in -line memory modules). DDR DIM To determine which type and speed of memory module could damage the system. 22 Upgrading and Servicing Guide
... memory modules, but you can replace the existing memory module(s) with random access memory (RAM), which model PC you have. Adding Memory Your PC comes with higher-capacity ones. WARNING: Using the wrong type of memory module your PC uses, and for DDR DIMMs (double data rate dual in your PC...., and click the Support link. The motherboard contains sockets for specific memory module information and specifications, go to the Web site listed in -line memory modules). DDR DIM To determine which type and speed of memory module could damage the system. 22 Upgrading and Servicing Guide
Upgrading and Servicing Guide
Page 27
...remove the side panel. See "Opening and Closing the PC" on page 1. 2 Gently lay the PC on its side. 3 Locate the memory sockets on the ends of the memory socket until the memory module pops out of the socket. CAUTION: When handling a memory module, be careful not to touch any cabling out... of the way, if necessary. 5 Push down the two retaining clips on the motherboard. Upgrading...
...remove the side panel. See "Opening and Closing the PC" on page 1. 2 Gently lay the PC on its side. 3 Locate the memory sockets on the ends of the memory socket until the memory module pops out of the socket. CAUTION: When handling a memory module, be careful not to touch any cabling out... of the way, if necessary. 5 Push down the two retaining clips on the motherboard. Upgrading...
Upgrading and Servicing Guide
Page 28
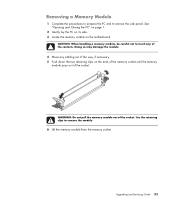
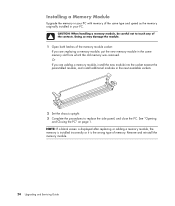
... close the PC. Installing a Memory Module Upgrade the memory in your PC. Or If you are adding a memory module, install the new module into the socket nearest the preinstalled module, and install additional modules in your PC with memory of the same type and speed as the memory originally installed ...the module. 1 Open both latches of memory. See "Opening and Closing the PC" on page 1. Remove and reinstall the memory module. 24 Upgrading and Servicing Guide NOTE: If a blank screen is displayed after replacing or adding a memory module, the memory is installed incorrectly or it is the ...
... close the PC. Installing a Memory Module Upgrade the memory in your PC. Or If you are adding a memory module, install the new module into the socket nearest the preinstalled module, and install additional modules in your PC with memory of the same type and speed as the memory originally installed ...the module. 1 Open both latches of memory. See "Opening and Closing the PC" on page 1. Remove and reinstall the memory module. 24 Upgrading and Servicing Guide NOTE: If a blank screen is displayed after replacing or adding a memory module, the memory is installed incorrectly or it is the ...
Upgrading and Servicing Guide
Page 32
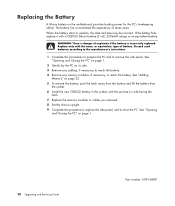
...battery on page 1. 28 Upgrading and Servicing Guide Part number: 5991-6989 WARNING: There is incorrectly replaced. See "Adding Memory" on its side. 3 Remove any cabling, if necessary, to reach the battery. 4 Remove any memory modules, if necessary, to close the PC. See "Opening and Closing the PC" on page 1. 2 ...Gently lay the PC on page 22. 5 To remove the battery, push the latch away from the battery and...
...battery on page 1. 28 Upgrading and Servicing Guide Part number: 5991-6989 WARNING: There is incorrectly replaced. See "Adding Memory" on its side. 3 Remove any cabling, if necessary, to reach the battery. 4 Remove any memory modules, if necessary, to close the PC. See "Opening and Closing the PC" on page 1. 2 ...Gently lay the PC on page 22. 5 To remove the battery, push the latch away from the battery and...
Getting Started Guide
Page 138
...Help and Support 36 home stereo system connecting to the PC 24 home videos 110, 118 HP Media Drive inserting a drive 96 HP Personal Media Drive 95 activity and power lights 96 automatic ...HP Pocket Media Drive 95 HP Total Care Advisor 51 I Internet security 42, 71 K keyboard customizing buttons 59 shortcuts 59 types of buttons 53 using 53 L LAN 6 LAN antenna 9 local area network (LAN) 6 M magicSpot 121 manuals storing 6 memory card reader card types 89 in-use light 93 troubleshooting 94 using 89 memory... duration of video 122 upgrading 127 using the magicMoments feature 120 130 Getting Started
...Help and Support 36 home stereo system connecting to the PC 24 home videos 110, 118 HP Media Drive inserting a drive 96 HP Personal Media Drive 95 activity and power lights 96 automatic ...HP Pocket Media Drive 95 HP Total Care Advisor 51 I Internet security 42, 71 K keyboard customizing buttons 59 shortcuts 59 types of buttons 53 using 53 L LAN 6 LAN antenna 9 local area network (LAN) 6 M magicSpot 121 manuals storing 6 memory card reader card types 89 in-use light 93 troubleshooting 94 using 89 memory... duration of video 122 upgrading 127 using the magicMoments feature 120 130 Getting Started
Limited Warranty and Support Guide
Page 6
... the Software Product into Your Computer's temporary memory (RAM) for purposes of the Software Product which the recovery solution was originally licensed for the upgrade. b. You may not separate component parts of download. HP and its suppliers reserve all rights not expressly...single entity) and (b) Hewlett-Packard Company ("HP") that governs your use of the HP Product. Any software recovery solution provided with your HP product ("HP Product"), that formed the basis for your upgrade eligibility. 6 To use with /for your HP Product, whether in such recovery solution shall...
... the Software Product into Your Computer's temporary memory (RAM) for purposes of the Software Product which the recovery solution was originally licensed for the upgrade. b. You may not separate component parts of download. HP and its suppliers reserve all rights not expressly...single entity) and (b) Hewlett-Packard Company ("HP") that governs your use of the HP Product. Any software recovery solution provided with your HP product ("HP Product"), that formed the basis for your upgrade eligibility. 6 To use with /for your HP Product, whether in such recovery solution shall...
PC Troubleshooting and Maintenance Guide
Page 22
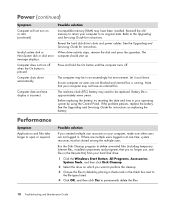
... that you no longer use, and files in . Computer shuts down . Refer to delete by using the Control Panel. See the Upgrading and Servicing Guide for instructions. The computer may not have been installed. Performance Symptom Applications and files take longer to be replaced. Computer...Start Button, All Programs, Accessories, System Tools, and then click Disk Cleanup. 2 Select the drive on or start up. Reinstall the old memory to its original state. The computer should start . (continued) Invalid system disk or Non-System disk or disk error message displays. Battery life ...
... that you no longer use, and files in . Computer shuts down . Refer to delete by using the Control Panel. See the Upgrading and Servicing Guide for instructions. The computer may not have been installed. Performance Symptom Applications and files take longer to be replaced. Computer...Start Button, All Programs, Accessories, System Tools, and then click Disk Cleanup. 2 Select the drive on or start up. Reinstall the old memory to its original state. The computer should start . (continued) Invalid system disk or Non-System disk or disk error message displays. Battery life ...

Troubleshooting and Maintenance Guide
Page 22
...Let it cool down automatically. The real-time clock (RTC) battery may be replaced. Reinstall the old memory to return your operating system by using the Control Panel. See the Upgrading and Servicing Guide for instructions. Press and hold the On button until the computer turns off when the... on which you want to perform the cleanup. 3 Choose the files to delete by placing a check mark in your computer to the Upgrading and Servicing Guide for instructions. Performance Symptom Applications and files take longer to be in an exceedingly hot environment. Possible solution If you no...
...Let it cool down automatically. The real-time clock (RTC) battery may be replaced. Reinstall the old memory to return your operating system by using the Control Panel. See the Upgrading and Servicing Guide for instructions. Press and hold the On button until the computer turns off when the... on which you want to perform the cleanup. 3 Choose the files to delete by placing a check mark in your computer to the Upgrading and Servicing Guide for instructions. Performance Symptom Applications and files take longer to be in an exceedingly hot environment. Possible solution If you no...


