
End User License Agreement
Page 2
... EULA will prevail. 4. In case of a hard disk drive-based solution, an external media-based recovery solution (e.g. You agree that the right to do so is mandated under applicable law notwithstanding this limitation or it is expressly provided for the original Software Product identified by HP as a consignment. After upgrading, you provide in...
... EULA will prevail. 4. In case of a hard disk drive-based solution, an external media-based recovery solution (e.g. You agree that the right to do so is mandated under applicable law notwithstanding this limitation or it is expressly provided for the original Software Product identified by HP as a consignment. After upgrading, you provide in...

Safety and Regulatory Information Desktops, Thin Clients, and Personal Workstations
Page 29
...Cd) Hexavalent Chromium (Cr(VI)) Memory X O O O I/O PCAs X O O O Power supply X O O O Keyboard X O O O Mouse X O O O Chassis/Other X O O O Fans X O O O Internal/External Media Reading X O O O Devices External Control Devices X O O O Cable X O O O Hard Disk Drive X O O O Display X X O O Polybrominated biphenyls (PBB) Polybrominated diphenyl ethers (PBDE) O O O O O O O O O O O O O O O O O O O O O O O O O: Indicates that this toxic or hazardous substance contained in at least one of the homogeneous materials...
...Cd) Hexavalent Chromium (Cr(VI)) Memory X O O O I/O PCAs X O O O Power supply X O O O Keyboard X O O O Mouse X O O O Chassis/Other X O O O Fans X O O O Internal/External Media Reading X O O O Devices External Control Devices X O O O Cable X O O O Hard Disk Drive X O O O Display X X O O Polybrominated biphenyls (PBB) Polybrominated diphenyl ethers (PBDE) O O O O O O O O O O O O O O O O O O O O O O O O O: Indicates that this toxic or hazardous substance contained in at least one of the homogeneous materials...
Warranty
Page 7
... rendered defective (a) as a result of your product in the servicing country/region. UNITS SENT IN FOR SERVICE MAY HAVE THE DATA ERASED FROM THE HARD DRIVE AND THE PROGRAMS RESTORED TO THEIR ORIGINAL STATE. HP IS NOT RESPONSIBLE FOR THE RESTORATION OR REINSTALLATION OF ANY PROGRAMS OR DATA OTHER THAN SOFTWARE INSTALLED BY...
... rendered defective (a) as a result of your product in the servicing country/region. UNITS SENT IN FOR SERVICE MAY HAVE THE DATA ERASED FROM THE HARD DRIVE AND THE PROGRAMS RESTORED TO THEIR ORIGINAL STATE. HP IS NOT RESPONSIBLE FOR THE RESTORATION OR REINSTALLATION OF ANY PROGRAMS OR DATA OTHER THAN SOFTWARE INSTALLED BY...
Warranty
Page 12
...single computer ("Your Computer"). You may copy the Software Product into Your Computer's temporary memory (RAM) for which constitutes non-proprietary HP software or software provided under public license by third parties ("Freeware"), is not otherwise subject to a separate license agreement between (a) ... in its suppliers reserve all terms and conditions of using the Software Product. Other software may install and use of a hard disk drive-based solution, an external media-based recovery solution (e.g. f. If the Software Product is used for use the Software Product...
...single computer ("Your Computer"). You may copy the Software Product into Your Computer's temporary memory (RAM) for which constitutes non-proprietary HP software or software provided under public license by third parties ("Freeware"), is not otherwise subject to a separate license agreement between (a) ... in its suppliers reserve all terms and conditions of using the Software Product. Other software may install and use of a hard disk drive-based solution, an external media-based recovery solution (e.g. f. If the Software Product is used for use the Software Product...
Warranty
Page 27
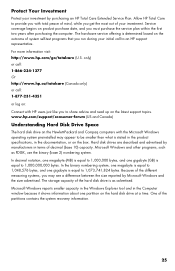
...the computer. Because of decimal (base 10) capacity. Service coverage begins on the hard disk drive at a time. only) or call: 1-866-234-1377 Or http://www.hp.ca/totalcare (Canada only) or call to an HP support representative. In decimal notation, one gigabyte (GB) is as FDISK, use...investment by purchasing an HP Total Care Extended Service Plan. www.hp.com/support/consumer-forum (US and Canada) Understanding Hard Disk Drive Space The hard disk drive on the Hewlett-Packard and Compaq computers with HP users just like you get the most out of the hard disk drive is equal to 1,000...
...the computer. Because of decimal (base 10) capacity. Service coverage begins on the hard disk drive at a time. only) or call: 1-866-234-1377 Or http://www.hp.ca/totalcare (Canada only) or call to an HP support representative. In decimal notation, one gigabyte (GB) is as FDISK, use...investment by purchasing an HP Total Care Extended Service Plan. www.hp.com/support/consumer-forum (US and Canada) Understanding Hard Disk Drive Space The hard disk drive on the Hewlett-Packard and Compaq computers with HP users just like you get the most out of the hard disk drive is equal to 1,000...
Limited Warranty and Support Guide (Refurbished Desktops)
Page 3
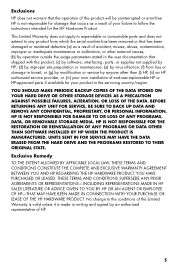
... materials equivalent to new in performance and reliability. EXCLUSIONS HP DOES NOT WARRANT THAT THE OPERATION OF THIS PRODUCT WILL BE UNINTERRUPTED OR ERROR-FREE. YOU SHOULD MAKE PERIODIC BACKUP COPIES OF THE DATA STORED ON YOUR HARD DRIVE OR OTHER STORAGE DEVICES AS A PRECAUTION AGAINST POSSIBLE FAILURES..., ALTERATION, OR LOSS OF THE DATA. HP IS NOT RESPONSIBLE FOR DAMAGE THAT OCCURS AS A RESULT OF YOUR FAILURE TO FOLLOW THE...
... materials equivalent to new in performance and reliability. EXCLUSIONS HP DOES NOT WARRANT THAT THE OPERATION OF THIS PRODUCT WILL BE UNINTERRUPTED OR ERROR-FREE. YOU SHOULD MAKE PERIODIC BACKUP COPIES OF THE DATA STORED ON YOUR HARD DRIVE OR OTHER STORAGE DEVICES AS A PRECAUTION AGAINST POSSIBLE FAILURES..., ALTERATION, OR LOSS OF THE DATA. HP IS NOT RESPONSIBLE FOR DAMAGE THAT OCCURS AS A RESULT OF YOUR FAILURE TO FOLLOW THE...
Limited Warranty and Support Guide (Refurbished Desktops)
Page 7
... only for purposes of Authenticity. This EULA applies to updates or supplements to the original Software Product provided by HP unless HP provides other form, may contain a EULA in the form of a hard disk drive-based solution, an external media-based recovery solution (e.g. END-USER LICENSE AGREEMENT PLEASE READ CAREFULLY BEFORE USING THIS EQUIPMENT...
... only for purposes of Authenticity. This EULA applies to updates or supplements to the original Software Product provided by HP unless HP provides other form, may contain a EULA in the form of a hard disk drive-based solution, an external media-based recovery solution (e.g. END-USER LICENSE AGREEMENT PLEASE READ CAREFULLY BEFORE USING THIS EQUIPMENT...
Upgrading and Servicing Guide
Page 3
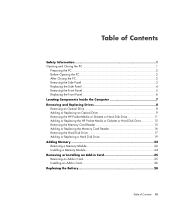
... the PC 1 Preparing the PC 2 Before Opening the PC 2 After Closing the PC 3 Removing the Side Panel 3 Replacing the Side Panel 4 Removing the Front Panel 5 Replacing the Front Panel 6 Locating Components Inside the Computer 7 Removing and Replacing Drives 8 Removing an Optical Drive 8 Adding or Replacing an Optical Drive 9 Removing the HP Pocket Media or Diskette or Hard Disk Drive 11...
... the PC 1 Preparing the PC 2 Before Opening the PC 2 After Closing the PC 3 Removing the Side Panel 3 Replacing the Side Panel 4 Removing the Front Panel 5 Replacing the Front Panel 6 Locating Components Inside the Computer 7 Removing and Replacing Drives 8 Removing an Optical Drive 8 Adding or Replacing an Optical Drive 9 Removing the HP Pocket Media or Diskette or Hard Disk Drive 11...

Upgrading and Servicing Guide
Page 9
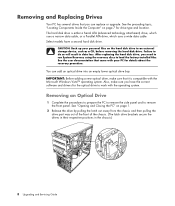
Removing the Front Panel This procedure is necessary only when removing or replacing an optical drive, memory card reader, an HP Pocket Media Drive, diskette drive, or the hard disk drive. 1 Pull the three tabs (B) away from the chassis toward the left to remove it. Upgrading and Servicing Guide 5 B 2 Swing the front panel away from the outside edge of the chassis.
Removing the Front Panel This procedure is necessary only when removing or replacing an optical drive, memory card reader, an HP Pocket Media Drive, diskette drive, or the hard disk drive. 1 Pull the three tabs (B) away from the chassis toward the left to remove it. Upgrading and Servicing Guide 5 B 2 Swing the front panel away from the outside edge of the chassis.

Upgrading and Servicing Guide
Page 11
... plate) or a CD-ROM, CD-RW, DVD-ROM, DVD+RW/+R, combination drive, or HP Personal Media Drive bay (select models) D HP Pocket Media Drive bay, a hard disk drive, or a diskette (floppy) drive (select models) E Front connector panel (no replacement instructions) F Hard disk drive and space for a second hard disk drive (located inside the chassis) (select models) NOTE: The connectors and components of...
... plate) or a CD-ROM, CD-RW, DVD-ROM, DVD+RW/+R, combination drive, or HP Personal Media Drive bay (select models) D HP Pocket Media Drive bay, a hard disk drive, or a diskette (floppy) drive (select models) E Front connector panel (no replacement instructions) F Hard disk drive and space for a second hard disk drive (located inside the chassis) (select models) NOTE: The connectors and components of...
Upgrading and Servicing Guide
Page 12
...add an optical drive into an empty lower optical drive bay. The hard disk drive is compatible with the Microsoft Windows Vista™ operating system. See the user documentation that you have a second hard disk drive. See "Opening and Closing the PC" on page 1. 2 Release the drive by pulling the...front of the chassis. (The latch drive brackets secure the drives in their respective positions in data loss. CAUTION: Back up your PC for drive type and location. See the preceding topic, "Locating Components Inside the Computer" on the hard disk drive to load the factory-installed files....
...add an optical drive into an empty lower optical drive bay. The hard disk drive is compatible with the Microsoft Windows Vista™ operating system. See the user documentation that you have a second hard disk drive. See "Opening and Closing the PC" on page 1. 2 Release the drive by pulling the...front of the chassis. (The latch drive brackets secure the drives in their respective positions in data loss. CAUTION: Back up your PC for drive type and location. See the preceding topic, "Locating Components Inside the Computer" on the hard disk drive to load the factory-installed files....

Upgrading and Servicing Guide
Page 13
...knockout plate. 3 Remove the knockout plate on page 8. 2 If you are adding a drive to an empty lower optical drive bay, you want to break the knockout plate out of the chassis. For Serial ATA hard disk drive cables, press the latch (select models only) in the center of each plug, and ...pull the plug from the bay. Adding or Replacing an Optical Drive 1 If necessary, remove the existing drive. A B Upgrading and Servicing Guide 9 To do so,...
...knockout plate. 3 Remove the knockout plate on page 8. 2 If you are adding a drive to an empty lower optical drive bay, you want to break the knockout plate out of the chassis. For Serial ATA hard disk drive cables, press the latch (select models only) in the center of each plug, and ...pull the plug from the bay. Adding or Replacing an Optical Drive 1 If necessary, remove the existing drive. A B Upgrading and Servicing Guide 9 To do so,...
Upgrading and Servicing Guide
Page 14
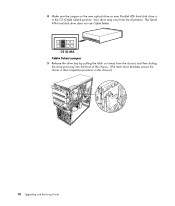
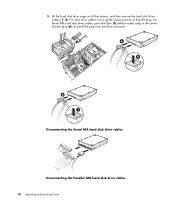
4 Make sure the jumper on the new optical drive or new Parallel ATA hard disk drive is in the chassis.) 10 Upgrading and Servicing Guide Your drive may vary from the chassis and then sliding the drive part way into the front of the chassis. (The latch drive brackets secure the drives in their respective positions in the CS (Cable Select) position. The Serial ATA hard disk drive does not use Cable Select. CS SL MA Cable Select jumper 5 Release the drive bay by pulling the latch out away from the illustration.
4 Make sure the jumper on the new optical drive or new Parallel ATA hard disk drive is in the chassis.) 10 Upgrading and Servicing Guide Your drive may vary from the chassis and then sliding the drive part way into the front of the chassis. (The latch drive brackets secure the drives in their respective positions in the CS (Cable Select) position. The Serial ATA hard disk drive does not use Cable Select. CS SL MA Cable Select jumper 5 Release the drive bay by pulling the latch out away from the illustration.
Upgrading and Servicing Guide
Page 15
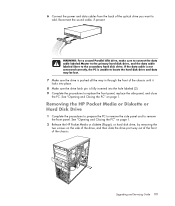
.... Removing the HP Pocket Media or Diskette or Hard Disk Drive 1 Complete the procedures to prepare the PC to remove the side panel and to the secondary hard disk drive. WARNING: For a second Parallel ATA drive, make sure to connect the data cable labeled Master to the primary hard disk drive, and the data...the chassis. See "Opening and Closing the PC" on page 1. 2 Release the HP Pocket Media or diskette (floppy), or hard disk drive, by removing the two screws on page 1. 6 Connect the power and data cables from the back of the optical drive you want to replace the front panel, replace...
.... Removing the HP Pocket Media or Diskette or Hard Disk Drive 1 Complete the procedures to prepare the PC to remove the side panel and to the secondary hard disk drive. WARNING: For a second Parallel ATA drive, make sure to connect the data cable labeled Master to the primary hard disk drive, and the data...the chassis. See "Opening and Closing the PC" on page 1. 2 Release the HP Pocket Media or diskette (floppy), or hard disk drive, by removing the two screws on page 1. 6 Connect the power and data cables from the back of the optical drive you want to replace the front panel, replace...

Upgrading and Servicing Guide
Page 17
... screws. Adding or Replacing the HP Pocket Media or Diskette or Hard Disk Drive 1 Complete the procedures to remove the HP Pocket Media, diskette (floppy), or hard disk drive, if necessary. See "Removing the HP Pocket Media or Diskette or Hard Disk Drive" on page 11. 2 Slide the HP Pocket Media, diskette (floppy), or hard disk drive into the front of the...
... screws. Adding or Replacing the HP Pocket Media or Diskette or Hard Disk Drive 1 Complete the procedures to remove the HP Pocket Media, diskette (floppy), or hard disk drive, if necessary. See "Removing the HP Pocket Media or Diskette or Hard Disk Drive" on page 11. 2 Slide the HP Pocket Media, diskette (floppy), or hard disk drive into the front of the...
Upgrading and Servicing Guide
Page 18
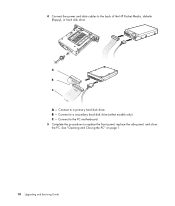
B - Connect to the back of the HP Pocket Media, diskette (floppy), or hard disk drive. A B MASTER C SLAVE To CPU A - C - 4 Connect the power and data cables to a secondary hard disk drive (select models only). See "Opening and Closing the PC" on page 1. 14 Upgrading and Servicing Guide Connect to replace the front panel, replace the side panel, and close the PC. Connect to the PC motherboard. 5 Complete the procedures to a primary hard disk drive.
B - Connect to the back of the HP Pocket Media, diskette (floppy), or hard disk drive. A B MASTER C SLAVE To CPU A - C - 4 Connect the power and data cables to a secondary hard disk drive (select models only). See "Opening and Closing the PC" on page 1. 14 Upgrading and Servicing Guide Connect to replace the front panel, replace the side panel, and close the PC. Connect to the PC motherboard. 5 Complete the procedures to a primary hard disk drive.
Upgrading and Servicing Guide
Page 21
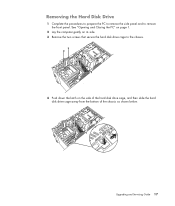
Removing the Hard Disk Drive 1 Complete the procedures to prepare the PC to remove the side panel and to the chassis. 4 Push down the latch on its side. 3 Remove the two screws that secure the hard disk drive cage to remove the front panel. Upgrading and Servicing Guide 17 See "Opening and Closing the PC" on page 1. 2 Lay the computer gently on the side of the hard disk drive cage, and then slide the hard disk drive cage away from the bottom of the chassis as shown below.
Removing the Hard Disk Drive 1 Complete the procedures to prepare the PC to remove the side panel and to the chassis. 4 Push down the latch on its side. 3 Remove the two screws that secure the hard disk drive cage to remove the front panel. Upgrading and Servicing Guide 17 See "Opening and Closing the PC" on page 1. 2 Lay the computer gently on the side of the hard disk drive cage, and then slide the hard disk drive cage away from the bottom of the chassis as shown below.
Upgrading and Servicing Guide
Page 22
For most drive cables, use a gentle rocking motion to free the plug. 5 Lift the hard disk drive cage out of each plug (6), and pull the plug from the drive connector. 6 5 2 1 Disconnecting the Serial ATA hard disk drive cables MASTER SLAVE To CPU Disconnecting the Parallel ATA hard disk drive cables 18 Upgrading and Servicing Guide For Serial ATA hard disk drive cables, press the latch (5) (select models only) in the center of the chassis, and then remove the hard disk drive cables (1, 2).
For most drive cables, use a gentle rocking motion to free the plug. 5 Lift the hard disk drive cage out of each plug (6), and pull the plug from the drive connector. 6 5 2 1 Disconnecting the Serial ATA hard disk drive cables MASTER SLAVE To CPU Disconnecting the Parallel ATA hard disk drive cables 18 Upgrading and Servicing Guide For Serial ATA hard disk drive cables, press the latch (5) (select models only) in the center of the chassis, and then remove the hard disk drive cables (1, 2).
Important FreeDOS Operating System Information
Page 1
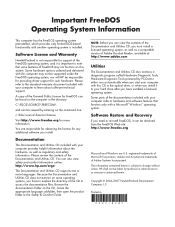
...operating system, as well as regulatory and safety information. Some parts of Microsoft Corporation. The information contained herein is installed. HP shall not be responsible for providing driver support for such hardware. Please refer to the standard warranty document included with your computer...and can be viewed by PC-Doctor either runs automatically when you start your hard drive after you have installed a licensed operating system. Printed in the optical drive, or when you can also view safety and comfort information online: http://www.hp.com/ergo The Documentation and...
...operating system, as well as regulatory and safety information. Some parts of Microsoft Corporation. The information contained herein is installed. HP shall not be responsible for providing driver support for such hardware. Please refer to the standard warranty document included with your computer...and can be viewed by PC-Doctor either runs automatically when you start your hard drive after you have installed a licensed operating system. Printed in the optical drive, or when you can also view safety and comfort information online: http://www.hp.com/ergo The Documentation and...
Limited Warranty and Support Guide
Page 3
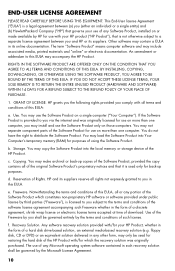
... FOR THE RESTORATION OR REINSTALLATION OF ANY PROGRAMS OR DATA OTHER THAN SOFTWARE INSTALLED BY HP WHEN THE PRODUCT IS MANUFACTURED. UNITS SENT IN FOR SERVICE MAY HAVE THE DATA ERASED FROM THE HARD DRIVE AND THE PROGRAMS RESTORED TO THEIR ORIGINAL STATE. Exclusive Remedy TO THE EXTENT ALLOWED BY... COPIES OF THE DATA STORED ON YOUR HARD DRIVE OR OTHER STORAGE DEVICES AS A PRECAUTION AGAINST POSSIBLE FAILURES, ALTERATION, OR LOSS OF THE DATA. INCLUDING REPRESENTATIONS MADE IN HP SALES LITERATURE OR ADVICE GIVEN TO YOU BY HP OR AN AGENT OR EMPLOYEE OF HP - HP may elect to new in transit; During...
... FOR THE RESTORATION OR REINSTALLATION OF ANY PROGRAMS OR DATA OTHER THAN SOFTWARE INSTALLED BY HP WHEN THE PRODUCT IS MANUFACTURED. UNITS SENT IN FOR SERVICE MAY HAVE THE DATA ERASED FROM THE HARD DRIVE AND THE PROGRAMS RESTORED TO THEIR ORIGINAL STATE. Exclusive Remedy TO THE EXTENT ALLOWED BY... COPIES OF THE DATA STORED ON YOUR HARD DRIVE OR OTHER STORAGE DEVICES AS A PRECAUTION AGAINST POSSIBLE FAILURES, ALTERATION, OR LOSS OF THE DATA. INCLUDING REPRESENTATIONS MADE IN HP SALES LITERATURE OR ADVICE GIVEN TO YOU BY HP OR AN AGENT OR EMPLOYEE OF HP - HP may elect to new in transit; During...


