
End User License Agreement
Page 2
...-based recovery solution (e.g. b. The transfer may not rent, lease or lend the Software Product or use . You may not be governed by HP as an upgrade, you fail to all component parts, media, printed materials, this EULA, and if applicable, the Certificate of such license. You shall not ...and are protected by HP unless HP provides other terms along with /for restoring the hard disk of a conflict between such terms, the other terms will also terminate upon conditions set forth elsewhere in this EULA or if you must agree to comply with /for your upgrade eligibility. 3. This ...
...-based recovery solution (e.g. b. The transfer may not rent, lease or lend the Software Product or use . You may not be governed by HP as an upgrade, you fail to all component parts, media, printed materials, this EULA, and if applicable, the Certificate of such license. You shall not ...and are protected by HP unless HP provides other terms along with /for restoring the hard disk of a conflict between such terms, the other terms will also terminate upon conditions set forth elsewhere in this EULA or if you must agree to comply with /for your upgrade eligibility. 3. This ...

Warranty
Page 9
.... If further assistance is required, call 1-800-474-6836 (800-HP-invent) for these service upgrades, refer to select your HP Hardware Product warranty service. Failure to return the defective product may result in HP billing you for insuring any unit shipped to the service location and ... must ship the defective part back to you are responsible for service; Service Upgrades HP has a range of additional support and service coverage for the return of the product to be purchased locally. HP will incur all shipping and part return costs and determine the courier/carrier to...
.... If further assistance is required, call 1-800-474-6836 (800-HP-invent) for these service upgrades, refer to select your HP Hardware Product warranty service. Failure to return the defective product may result in HP billing you for insuring any unit shipped to the service location and ... must ship the defective part back to you are responsible for service; Service Upgrades HP has a range of additional support and service coverage for the return of the product to be purchased locally. HP will incur all shipping and part return costs and determine the courier/carrier to...

Warranty
Page 13
...use . ADDITIONAL SOFTWARE. a. LIMITATION ON REVERSE ENGINEERING. You may not be licensed for the upgrade. This EULA is automatically terminated. TO THE MAXIMUM EXTENT PERMITTED BY APPLICABLE LAW, HP AND ITS SUPPLIERS PROVIDE THE SOFTWARE PRODUCT "AS IS" AND WITH ALL FAULTS, AND HEREBY DISCLAIM... in the Software Product and user documentation are protected by law, including but not limited to the Software Product. HP agrees not to provide such services. 9. UPGRADES. The initial user of the Software Product to all component parts, media, printed materials, this EULA. 7. Prior...
...use . ADDITIONAL SOFTWARE. a. LIMITATION ON REVERSE ENGINEERING. You may not be licensed for the upgrade. This EULA is automatically terminated. TO THE MAXIMUM EXTENT PERMITTED BY APPLICABLE LAW, HP AND ITS SUPPLIERS PROVIDE THE SOFTWARE PRODUCT "AS IS" AND WITH ALL FAULTS, AND HEREBY DISCLAIM... in the Software Product and user documentation are protected by law, including but not limited to the Software Product. HP agrees not to provide such services. 9. UPGRADES. The initial user of the Software Product to all component parts, media, printed materials, this EULA. 7. Prior...
Warranty
Page 23
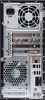
..., analog-only television sets that the Coaxial cable shield shall be complete on a laser device installed in your local television stations may result in the Upgrading and Servicing Guide may switch sooner. Information about subsidized coupons for Health and Safety Act of cable entry as close to work as a "Class 1 Laser...
..., analog-only television sets that the Coaxial cable shield shall be complete on a laser device installed in your local television stations may result in the Upgrading and Servicing Guide may switch sooner. Information about subsidized coupons for Health and Safety Act of cable entry as close to work as a "Class 1 Laser...
Limited Warranty and Support Guide (Refurbished Desktops)
Page 5
... PROVIDED "AS IS" AND WITH ALL FAULTS, AND 5 Pick Up & Return Warranty Service (Desktops and Digital Entertainment Centers ONLY) Your HP Limited Warranty may , at its reasonable security requirements, provide HP with sufficient, free, and safe access to and use of a Customer Self Repair (CSR)...15) days. HP will ship a replacement product directly to the HP Option and are in the Limited Warranty applicable to you. Service Upgrades HP has a range of additional support and service coverage for your HP Option is installed in an HP Hardware Product, HP may vary with the HP Option or for...
... PROVIDED "AS IS" AND WITH ALL FAULTS, AND 5 Pick Up & Return Warranty Service (Desktops and Digital Entertainment Centers ONLY) Your HP Limited Warranty may , at its reasonable security requirements, provide HP with sufficient, free, and safe access to and use of a Customer Self Repair (CSR)...15) days. HP will ship a replacement product directly to the HP Option and are in the Limited Warranty applicable to you. Service Upgrades HP has a range of additional support and service coverage for your HP Option is installed in an HP Hardware Product, HP may vary with the HP Option or for...
Limited Warranty and Support Guide (Refurbished Desktops)
Page 7
... Agreement. 2. You may no longer use a Software Product identified as an upgrade, you must first be licensed for the original Software Product identified by HP unless HP provides other terms will prevail. 4. HP and its suppliers reserve all rights not expressly granted to you in its suppliers... form of a hard disk drive-based solution, an external media-based recovery solution (e.g. After upgrading, you may load the Software Product into the local memory or storage device of the HP Product. a. You may make a one computer. Storage. You may not separate component parts ...
... Agreement. 2. You may no longer use a Software Product identified as an upgrade, you must first be licensed for the original Software Product identified by HP unless HP provides other terms will prevail. 4. HP and its suppliers reserve all rights not expressly granted to you in its suppliers... form of a hard disk drive-based solution, an external media-based recovery solution (e.g. After upgrading, you may load the Software Product into the local memory or storage device of the HP Product. a. You may make a one computer. Storage. You may not separate component parts ...

Limited Warranty and Support Guide (Refurbished Desktops)
Page 13
... grounding of the mast and supporting structure, grounding of the lead-in the vicinity of overhead power lines or other than those specified in the Upgrading and Servicing Guide may result in your product. This will prevent damage to the product from touching such power lines or circuits as a CLASS 1 LASER...
... grounding of the mast and supporting structure, grounding of the lead-in the vicinity of overhead power lines or other than those specified in the Upgrading and Servicing Guide may result in your product. This will prevent damage to the product from touching such power lines or circuits as a CLASS 1 LASER...
Upgrading and Servicing Guide
Page 5
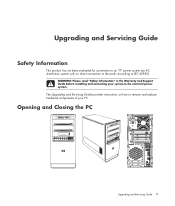
Opening and Closing the PC Upgrading and Servicing Guide 1 WARNING: Please read "Safety Information" in the Warranty and Support Guide before installing and connecting your PC. The Upgrading and Servicing Guide provides instructions on how to remove and replace hardware components of your system to IEC 60950). Upgrading and Servicing Guide Safety Information This product has not been evaluated for connection to an "IT" power system (an AC distribution system with no direct connection to the earth, according to the electrical power system.
Opening and Closing the PC Upgrading and Servicing Guide 1 WARNING: Please read "Safety Information" in the Warranty and Support Guide before installing and connecting your PC. The Upgrading and Servicing Guide provides instructions on how to remove and replace hardware components of your system to IEC 60950). Upgrading and Servicing Guide Safety Information This product has not been evaluated for connection to an "IT" power system (an AC distribution system with no direct connection to the earth, according to the electrical power system.

Upgrading and Servicing Guide
Page 6
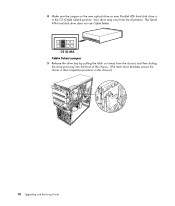
...to cool before you can result in personal injury or equipment damage. Preparing the PC Before you upgrade any component in your PC, you need to prepare the PC so that you open and examine the PC. 3 It is recommended that you use an antistatic wrist strap and a ...Ensure that you are discharged of static electricity by briefly touching a grounded metal object. 2 Upgrading and Servicing Guide It's easier to consult this order before attempting to upgrade or service the PC: 1 These procedures assume familiarity with the general terminology associated with personal computers and with the...
...to cool before you can result in personal injury or equipment damage. Preparing the PC Before you upgrade any component in your PC, you need to prepare the PC so that you open and examine the PC. 3 It is recommended that you use an antistatic wrist strap and a ...Ensure that you are discharged of static electricity by briefly touching a grounded metal object. 2 Upgrading and Servicing Guide It's easier to consult this order before attempting to upgrade or service the PC: 1 These procedures assume familiarity with the general terminology associated with personal computers and with the...

Upgrading and Servicing Guide
Page 7
...You may need to use a screwdriver the first time you installed an add-in this order after closing the PC: 1 Reconnect the power cord. A 3 Use the handle to the PC chassis. WARNING: Beware of electrical shock, fire, or damage to the equipment, do not plug telecommunications or... (2.5 centimeters), and then lift it off the chassis. WARNING: To reduce the risk of sharp edges inside the chassis. Upgrading and Servicing Guide 3 After Closing the PC To avoid injury and equipment damage, always follow this procedure in card, install any software drivers supplied by the card manufacturer...
...You may need to use a screwdriver the first time you installed an add-in this order after closing the PC: 1 Reconnect the power cord. A 3 Use the handle to the PC chassis. WARNING: Beware of electrical shock, fire, or damage to the equipment, do not plug telecommunications or... (2.5 centimeters), and then lift it off the chassis. WARNING: To reduce the risk of sharp edges inside the chassis. Upgrading and Servicing Guide 3 After Closing the PC To avoid injury and equipment damage, always follow this procedure in card, install any software drivers supplied by the card manufacturer...
Upgrading and Servicing Guide
Page 8
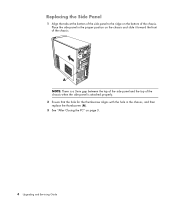
A NOTE: There is a 3mm gap between the top of the side panel and the top of the chassis when the side panel is attached properly. 2 Ensure that the hole for the thumbscrew aligns with the hole in the proper position on page 3. 4 Upgrading and Servicing Guide Place the side panel in the chassis, and then replace the thumbscrew (A). 3 See "After Closing the PC" on the chassis and slide it toward the front of the chassis. Replacing the Side Panel 1 Align the tabs at the bottom of the side panel to the ridge on the bottom of the chassis.
A NOTE: There is a 3mm gap between the top of the side panel and the top of the chassis when the side panel is attached properly. 2 Ensure that the hole for the thumbscrew aligns with the hole in the proper position on page 3. 4 Upgrading and Servicing Guide Place the side panel in the chassis, and then replace the thumbscrew (A). 3 See "After Closing the PC" on the chassis and slide it toward the front of the chassis. Replacing the Side Panel 1 Align the tabs at the bottom of the side panel to the ridge on the bottom of the chassis.

Upgrading and Servicing Guide
Page 9
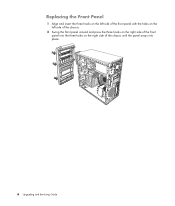
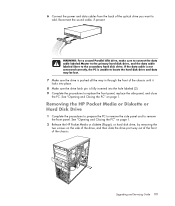
Upgrading and Servicing Guide 5 Removing the Front Panel This procedure is necessary only when removing or replacing an optical drive, memory card reader, an HP Pocket Media Drive, diskette drive, or the hard disk drive. 1 Pull the three tabs (B) away from the chassis toward the left to remove it. B 2 Swing the front panel away from the outside edge of the chassis.
Upgrading and Servicing Guide 5 Removing the Front Panel This procedure is necessary only when removing or replacing an optical drive, memory card reader, an HP Pocket Media Drive, diskette drive, or the hard disk drive. 1 Pull the three tabs (B) away from the chassis toward the left to remove it. B 2 Swing the front panel away from the outside edge of the chassis.
Upgrading and Servicing Guide
Page 10
Replacing the Front Panel 1 Align and insert the three hooks on the left side of the front panel with the holes on the left side of the chassis. 2 Swing the front panel around and press the three hooks on the right side of the front panel into the three holes on the right side of the chassis until the panel snaps into place. 6 Upgrading and Servicing Guide
Replacing the Front Panel 1 Align and insert the three hooks on the left side of the front panel with the holes on the left side of the chassis. 2 Swing the front panel around and press the three hooks on the right side of the front panel into the three holes on the right side of the chassis until the panel snaps into place. 6 Upgrading and Servicing Guide

Upgrading and Servicing Guide
Page 11
... may be empty (knockout plate) or a CD-ROM, CD-RW, DVD-ROM, DVD+RW/+R, combination drive, or HP Personal Media Drive bay (select models) D HP Pocket Media Drive bay, a hard disk drive, or a diskette (floppy) drive (select models) E Front connector panel ...(no replacement instructions) F Hard disk drive and space for a second hard disk drive (located inside the chassis) (select models) NOTE: The connectors and components of your chassis model may vary from the illustration. Upgrading...
... may be empty (knockout plate) or a CD-ROM, CD-RW, DVD-ROM, DVD+RW/+R, combination drive, or HP Personal Media Drive bay (select models) D HP Pocket Media Drive bay, a hard disk drive, or a diskette (floppy) drive (select models) E Front connector panel ...(no replacement instructions) F Hard disk drive and space for a second hard disk drive (located inside the chassis) (select models) NOTE: The connectors and components of your chassis model may vary from the illustration. Upgrading...
Upgrading and Servicing Guide
Page 12
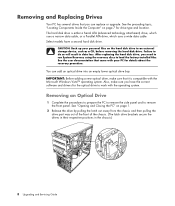
...operating system. Failure to remove the front panel. Removing an Optical Drive 1 Complete the procedures to prepare the PC to remove the side panel and to do so will result in the chassis.) 8 Upgrading and Servicing Guide Also, make sure that came with your personal files on page 1. 2 Release the drive...sure you have a second hard disk drive. See "Opening and Closing the PC" on the hard disk drive to an external storage device, such as a CD, before removing the hard disk drive. You can replace or upgrade. After replacing the hard disk drive, you can add an optical drive into ...
...operating system. Failure to remove the front panel. Removing an Optical Drive 1 Complete the procedures to prepare the PC to remove the side panel and to do so will result in the chassis.) 8 Upgrading and Servicing Guide Also, make sure that came with your personal files on page 1. 2 Release the drive...sure you have a second hard disk drive. See "Opening and Closing the PC" on the hard disk drive to an external storage device, such as a CD, before removing the hard disk drive. You can replace or upgrade. After replacing the hard disk drive, you can add an optical drive into ...

Upgrading and Servicing Guide
Page 13
... the chassis. Discard the knockout plate. For most drive cables, use a gentle rocking motion to remove. See "Removing an Optical Drive" on the front cover. A B Upgrading and Servicing Guide 9 For Serial ATA hard disk drive cables, press the latch (select models only) in the center of each plug, and pull the...
... the chassis. Discard the knockout plate. For most drive cables, use a gentle rocking motion to remove. See "Removing an Optical Drive" on the front cover. A B Upgrading and Servicing Guide 9 For Serial ATA hard disk drive cables, press the latch (select models only) in the center of each plug, and pull the...
Upgrading and Servicing Guide
Page 14
Your drive may vary from the chassis and then sliding the drive part way into the front of the chassis. (The latch drive brackets secure the drives in their respective positions in the CS (Cable Select) position. The Serial ATA hard disk drive does not use Cable Select. CS SL MA Cable Select jumper 5 Release the drive bay by pulling the latch out away from the illustration. 4 Make sure the jumper on the new optical drive or new Parallel ATA hard disk drive is in the chassis.) 10 Upgrading and Servicing Guide
Your drive may vary from the chassis and then sliding the drive part way into the front of the chassis. (The latch drive brackets secure the drives in their respective positions in the CS (Cable Select) position. The Serial ATA hard disk drive does not use Cable Select. CS SL MA Cable Select jumper 5 Release the drive bay by pulling the latch out away from the illustration. 4 Make sure the jumper on the new optical drive or new Parallel ATA hard disk drive is in the chassis.) 10 Upgrading and Servicing Guide
Upgrading and Servicing Guide
Page 15
...the drive part way out of the front of the optical drive you want to remove the front panel. Upgrading and Servicing Guide 11 See "Opening and Closing the PC" on page 1. 2 Release the HP Pocket Media or diskette (floppy), or hard disk drive, by removing the two screws on page 1. If... latch pin is fully inserted into the hole labeled (2). 9 Complete the procedures to the secondary hard disk drive. Removing the HP Pocket Media or Diskette or Hard Disk Drive 1 Complete the procedures to prepare the PC to remove the side panel and to add. Reconnect the sound cable, if present.
...the drive part way out of the front of the optical drive you want to remove the front panel. Upgrading and Servicing Guide 11 See "Opening and Closing the PC" on page 1. 2 Release the HP Pocket Media or diskette (floppy), or hard disk drive, by removing the two screws on page 1. If... latch pin is fully inserted into the hole labeled (2). 9 Complete the procedures to the secondary hard disk drive. Removing the HP Pocket Media or Diskette or Hard Disk Drive 1 Complete the procedures to prepare the PC to remove the side panel and to add. Reconnect the sound cable, if present.
Upgrading and Servicing Guide
Page 16
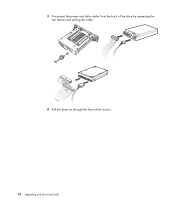
MASTER SLAVE To CPU 4 Pull the drive out through the front of the drive by squeezing the two latches and pulling the cable. 3 Disconnect the power and data cables from the back of the chassis. 12 Upgrading and Servicing Guide
MASTER SLAVE To CPU 4 Pull the drive out through the front of the drive by squeezing the two latches and pulling the cable. 3 Disconnect the power and data cables from the back of the chassis. 12 Upgrading and Servicing Guide

Upgrading and Servicing Guide
Page 17
... procedures to insert the screw into place. 3 Align the two screw holes on the chassis with the two screw holes on page 11. 2 Slide the HP Pocket Media, diskette (floppy), or hard disk drive into the front of the drive, and then attach the two screws. For a hard disk drive, make... sure to insert the screw into the holes labeled (2). See "Removing the HP Pocket Media or Diskette or Hard Disk Drive" on the side of the chassis until it locks into the holes labeled HDD. For the...
... procedures to insert the screw into place. 3 Align the two screw holes on the chassis with the two screw holes on page 11. 2 Slide the HP Pocket Media, diskette (floppy), or hard disk drive into the front of the drive, and then attach the two screws. For a hard disk drive, make... sure to insert the screw into the holes labeled (2). See "Removing the HP Pocket Media or Diskette or Hard Disk Drive" on the side of the chassis until it locks into the holes labeled HDD. For the...


