User Guide
Page 3
...language...5 Set the region...5 Set the date and time...5 Install and format an optional memory card 6 Install the software...6 Using your camera...7 2 Taking pictures and recording video clips Taking pictures...8 Recording video clips...9 Instant Review...9 Auto focus and exposure...9 Focusing on the ...subject...10 Optimizing focus...10 Using Focus Lock...11 Optimizing exposure...11 Using zoom...11 Optical zoom...12 Digital zoom...12 3 Setting options for taking pictures and recording video clips Setting the flash...13 Flash Setting-Red-Eye...13 Using the...
...language...5 Set the region...5 Set the date and time...5 Install and format an optional memory card 6 Install the software...6 Using your camera...7 2 Taking pictures and recording video clips Taking pictures...8 Recording video clips...9 Instant Review...9 Auto focus and exposure...9 Focusing on the ...subject...10 Optimizing focus...10 Using Focus Lock...11 Optimizing exposure...11 Using zoom...11 Optical zoom...12 Digital zoom...12 3 Setting options for taking pictures and recording video clips Setting the flash...13 Flash Setting-Red-Eye...13 Using the...
User Guide
Page 4
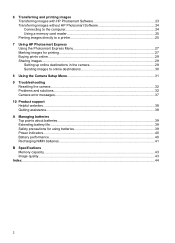
... with HP Photosmart Software 23 Transferring images without HP Photosmart Software 24 Connecting to the computer 24 Using a memory card reader 25 Printing images directly to a printer 25 7 Using HP Photosmart Express Using the Photosmart Express Menu 27 Marking images for printing...27 Buying prints online...29 Sharing images...29 Setting up online destinations in the camera 29...
... with HP Photosmart Software 23 Transferring images without HP Photosmart Software 24 Connecting to the computer 24 Using a memory card reader 25 Printing images directly to a printer 25 7 Using HP Photosmart Express Using the Photosmart Express Menu 27 Marking images for printing...27 Buying prints online...29 Sharing images...29 Setting up online destinations in the camera 29...

User Guide
Page 5
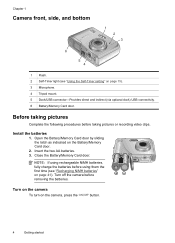
Getting started Use this section to get familiar with camera controls, set up your digital camera for use, and begin taking pictures. Press and hold to the previous menu or view. 1 Getting started 3 Accesses the flash settings while in Instant Review (...see "Instant Review" on page 9) and Playback (see "Magnifying images" on page 18). 5 Flash button- Camera top and back 12 3 45 6 7 8 11 ...
Getting started Use this section to get familiar with camera controls, set up your digital camera for use, and begin taking pictures. Press and hold to the previous menu or view. 1 Getting started 3 Accesses the flash settings while in Instant Review (...see "Instant Review" on page 9) and Playback (see "Magnifying images" on page 18). 5 Flash button- Camera top and back 12 3 45 6 7 8 11 ...
User Guide
Page 6
Install the batteries 1. Insert the two AA batteries. 3. Turn on the camera To turn on page 41). NOTE: If using rechargeable NiMH batteries, fully charge the batteries before using them the first time (see "Using the Self... and indirect (via optional dock) USB connectivity. 6 Battery/Memory Card door. Before taking pictures Complete the following procedures before removing the batteries. Turn off the camera before taking pictures or recording video clips. Chapter 1 Camera front, side, and bottom 1 2 3 6 5 4 1 Flash. 2 Self-Timer light (see "Recharging NiMH batteries" on the...
Install the batteries 1. Insert the two AA batteries. 3. Turn on the camera To turn on page 41). NOTE: If using rechargeable NiMH batteries, fully charge the batteries before using them the first time (see "Using the Self... and indirect (via optional dock) USB connectivity. 6 Battery/Memory Card door. Before taking pictures Complete the following procedures before removing the batteries. Turn off the camera before taking pictures or recording video clips. Chapter 1 Camera front, side, and bottom 1 2 3 6 5 4 1 Flash. 2 Self-Timer light (see "Recharging NiMH batteries" on the...
User Guide
Page 7
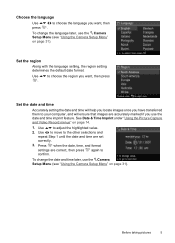
... and time will help you locate images once you have transferred them to confirm. Use to choose the region you use the Camera Setup Menu (see "Using the Camera Setup Menu" on page 31). Use to adjust the highlighted value. 2. Before taking pictures 5 To change the date and time... later, use the Camera Setup Menu (see "Using the Camera Setup Menu" on page 31). See Date & Time Imprint under "Using the Picture Capture ...
... and time will help you locate images once you have transferred them to confirm. Use to choose the region you use the Camera Setup Menu (see "Using the Camera Setup Menu" on page 31). Use to adjust the highlighted value. 2. Before taking pictures 5 To change the date and time... later, use the Camera Setup Menu (see "Using the Camera Setup Menu" on page 31). See Date & Time Imprint under "Using the Picture Capture ...
User Guide
Page 8
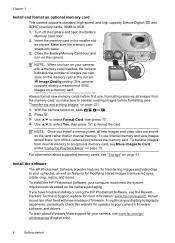
... on page 43. Install the software The HP Photosmart Software provides features for transferring images and video clips to your computer must meet the system requirements as features for updates to your camera, see Move Images to transfer existing images before...HP Photosmart Software, your computer, as well as stated on page 23). 1. Insert the memory card in internal memory. If you install a memory card, all images from internal memory to 8GB. 1. Chapter 1 Install and format an optional memory card This camera supports standard, high speed, and high capacity Secure Digital...
... on page 43. Install the software The HP Photosmart Software provides features for transferring images and video clips to your computer must meet the system requirements as features for updates to your camera, see Move Images to transfer existing images before...HP Photosmart Software, your computer, as well as stated on page 23). 1. Insert the memory card in internal memory. If you install a memory card, all images from internal memory to 8GB. 1. Chapter 1 Install and format an optional memory card This camera supports standard, high speed, and high capacity Secure Digital...

User Guide
Page 9
... images from your Macintosh (click the help button on the HP Photosmart Camera settings dialog for more information). Using your computer, System Preferences automatically opens to the desired option. Insert the HP Photosmart Software CD into the CD drive. 2. When the software has... finished installing, re-enable virus protection software. Using your camera Now that you've completed setup, you connect your camera to your camera to a computer See "Transferring images with HP Photosmart Software" on page 23 For information on printing images See "Printing ...
... images from your Macintosh (click the help button on the HP Photosmart Camera settings dialog for more information). Using your computer, System Preferences automatically opens to the desired option. Insert the HP Photosmart Software CD into the CD drive. 2. When the software has... finished installing, re-enable virus protection software. Using your camera Now that you've completed setup, you connect your camera to your camera to a computer See "Transferring images with HP Photosmart Software" on page 23 For information on printing images See "Printing ...
User Guide
Page 10
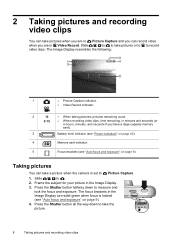
.... 1. Slide to . 2. Slide to to take pictures when you are in the Image Display. 3. Press the Shutter button halfway down to take a picture when the camera is locked (see "Auto focus and exposure" on page 9). 4. Frame the subject for your picture in Video Record. 2 Taking pictures and recording video clips You...
.... 1. Slide to . 2. Slide to to take pictures when you are in the Image Display. 3. Press the Shutter button halfway down to take a picture when the camera is locked (see "Auto focus and exposure" on page 9). 4. Frame the subject for your picture in Video Record. 2 Taking pictures and recording video clips You...
User Guide
Page 11
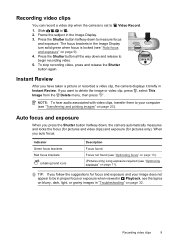
...clip, press , select This Image from the Delete menu, then press . If you have taken a picture or recorded a video clip, the camera displays it briefly in "Troubleshooting" on page 32. Auto focus and exposure When you auto focus: Indicator Green focus brackets Red focus brackets (... Instant Review. Press the Shutter button halfway down and release to Video Record. 1. When you press the Shutter button halfway down, the camera automatically measures and locks the focus (for pictures and video clips) and exposure (for focus and exposure and your computer (see "Transferring...
...clip, press , select This Image from the Delete menu, then press . If you have taken a picture or recorded a video clip, the camera displays it briefly in "Troubleshooting" on page 32. Auto focus and exposure When you auto focus: Indicator Green focus brackets Red focus brackets (... Instant Review. Press the Shutter button halfway down and release to Video Record. 1. When you press the Shutter button halfway down, the camera automatically measures and locks the focus (for pictures and video clips) and exposure (for focus and exposure and your computer (see "Transferring...
User Guide
Page 12
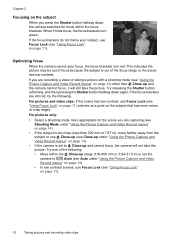
... of the following . This indicates the picture may be out of focus because the subject is too close (less than Close-up and the camera cannot focus, it finds focus, the focus brackets turn red. If you press the Shutter button halfway down again. Try releasing the Shutter button..., reframing, and then pressing the Shutter button halfway down , the camera searches for the scene you are recording a video or taking a picture with a shooting mode (see "Using Focus Lock" on page 11) and aim at...
... of the following . This indicates the picture may be out of focus because the subject is too close (less than Close-up and the camera cannot focus, it finds focus, the focus brackets turn red. If you press the Shutter button halfway down again. Try releasing the Shutter button..., reframing, and then pressing the Shutter button halfway down , the camera searches for the scene you are recording a video or taking a picture with a shooting mode (see "Using Focus Lock" on page 11) and aim at...
User Guide
Page 13
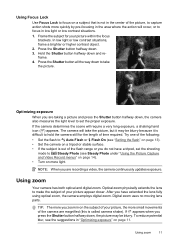
Frame the subject for the length of time required. Press the Shutter button halfway down and re- Using zoom Your camera has both optical and digital zoom. Digital zoom uses no moving lens parts. frame. 4. Press the Shutter button all the way down to make the subject of the flash range ... when you have a tripod, set the proper exposure. Optimizing exposure When you do not have extended the lens fully using optical zoom, the camera employs digital zoom. Using Focus Lock Use Focus Lock to focus on a subject that is not in the center of the picture, to capture action shots...
Frame the subject for the length of time required. Press the Shutter button halfway down and re- Using zoom Your camera has both optical and digital zoom. Digital zoom uses no moving lens parts. frame. 4. Press the Shutter button all the way down to make the subject of the flash range ... when you have a tripod, set the proper exposure. Optimizing exposure When you do not have extended the lens fully using optical zoom, the camera employs digital zoom. Using Focus Lock Use Focus Lock to focus on a subject that is not in the center of the picture, to capture action shots...
User Guide
Page 14
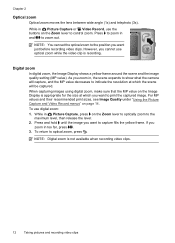
... is recording. NOTE: You can set the optical zoom to the position you cannot use digital zoom: 1. NOTE: Digital zoom is appropriate for the size at which you zoom in, the scene expands to show what the camera will capture, and the MP value decreases to capture fills the yellow frame.... Digital zoom In digital zoom, the Image Display shows a yellow frame around the scene and the image quality setting (MP value...
... is recording. NOTE: You can set the optical zoom to the position you cannot use digital zoom: 1. NOTE: Digital zoom is appropriate for the size at which you zoom in, the scene expands to show what the camera will capture, and the MP value decreases to capture fills the yellow frame.... Digital zoom In digital zoom, the Image Display shows a yellow frame around the scene and the image quality setting (MP value...
User Guide
Page 15
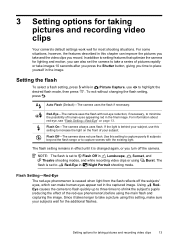
... while recording video clips or using the main flash and capturing the image. To exit without changing the flash setting, press . Flash On-The camera always uses flash. NOTE: The flash is set to Flash Off in Picture Capture, use flash. Setting options for taking pictures and recording video ... longer to highlight the desired flash mode, then press . For some situations, however, the features described in the captured image. Flash Off-The camera does not use to take a picture using this chapter can make human eyes appear red in this setting, make sure your subject. The flash ...
... while recording video clips or using the main flash and capturing the image. To exit without changing the flash setting, press . Flash On-The camera always uses flash. NOTE: The flash is set to Flash Off in Picture Capture, use flash. Setting options for taking pictures and recording video ... longer to highlight the desired flash mode, then press . For some situations, however, the features described in the captured image. Flash Off-The camera does not use to take a picture using this chapter can make human eyes appear red in this setting, make sure your subject. The flash ...
User Guide
Page 16
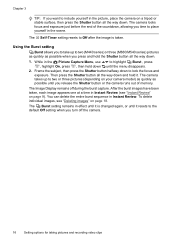
...-For capturing images of people at sunset. The setting remains in effect until it is moving cars, or any scene where you must set the camera on a tripod or stable surface. • Sunset-For capturing outdoor scenes at night. in the option's Unless otherwise noted, the setting remains... settings reset to their primary subject. • Action-For capturing sporting events, moving or you cannot hold down until you turn off the camera. Slide to highlight Help... The next time you capture. Use to highlight an option, then press to 31.5 in ). • VGA-For ...
...-For capturing images of people at sunset. The setting remains in effect until it is moving cars, or any scene where you must set the camera on a tripod or stable surface. • Sunset-For capturing outdoor scenes at night. in the option's Unless otherwise noted, the setting remains... settings reset to their primary subject. • Action-For capturing sporting events, moving or you cannot hold down until you turn off the camera. Slide to highlight Help... The next time you capture. Use to highlight an option, then press to 31.5 in ). • VGA-For ...
User Guide
Page 17
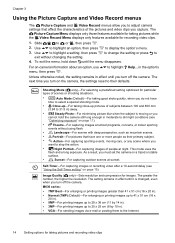
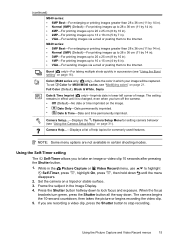
...10-second countdown, then takes the picture or begins recording the video clip. 5. only)-Sets the color in the Image Display. 4. Camera Setup...-Displays the Camera Setup Menu for setting camera behavior (see "Modifying colors" on page 21. While in the Picture Capture or Video Record menu, use to highlight Self-Timer, ... printing images up to 28 x 36 cm (11 by 14 in). • 4MP-For printing images up to 20 x 25 cm (8 by 10 in). • 2MP-For printing images up to 10 x 15 cm (4 by 7 in succession (see "Using the Burst setting" on a tripod or stable surface. 3. Burst ( only)-For...
...10-second countdown, then takes the picture or begins recording the video clip. 5. only)-Sets the color in the Image Display. 4. Camera Setup...-Displays the Camera Setup Menu for setting camera behavior (see "Modifying colors" on page 21. While in the Picture Capture or Video Record menu, use to highlight Self-Timer, ... printing images up to 28 x 36 cm (11 by 14 in). • 4MP-For printing images up to 20 x 25 cm (8 by 10 in). • 2MP-For printing images up to 10 x 15 cm (4 by 7 in succession (see "Using the Burst setting" on a tripod or stable surface. 3. Burst ( only)-For...
User Guide
Page 18
... down . 1. After the burst images have been taken, each image appears one at a time in Instant Review (see "Deleting images" on your camera model) as quickly as possible when you press and hold the Shutter button all the way down to place yourself in the scene. You can... quickly as possible until the menu disappears. 2. Then press the Shutter button all the way down until you release the Shutter button or the camera runs out of the countdown, allowing you turn off during the burst capture. While in Instant Review. To delete individual images, see "Instant Review...
... down . 1. After the burst images have been taken, each image appears one at a time in Instant Review (see "Deleting images" on your camera model) as quickly as possible when you press and hold the Shutter button all the way down to place yourself in the scene. You can... quickly as possible until the menu disappears. 2. Then press the Shutter button all the way down until you release the Shutter button or the camera runs out of the countdown, allowing you turn off during the burst capture. While in Instant Review. To delete individual images, see "Instant Review...
User Guide
Page 21
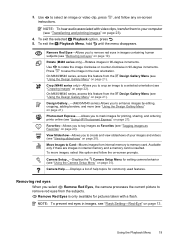
... Rotate (M440 series only)-Rotates images in the new orientation. Use to create and view slideshows of help topics for setting camera behavior (see "Using HP Photosmart Express" on page 27). On M630/M540 series, access this option and follow any on page 20). Available only if ...for printing, sharing, and ordering prints online (see "Using the Camera Setup Menu" on -screen prompts. Remove Red Eyes-Allows you to tag images as Favorites (see "Using the Design Gallery Menu" on page 21). Photosmart Express...-Allows you to enhance images by editing, cropping, adding borders...
... Rotate (M440 series only)-Rotates images in the new orientation. Use to create and view slideshows of help topics for setting camera behavior (see "Using HP Photosmart Express" on page 27). On M630/M540 series, access this option and follow any on page 20). Available only if ...for printing, sharing, and ordering prints online (see "Using the Camera Setup Menu" on -screen prompts. Remove Red Eyes-Allows you to tag images as Favorites (see "Using the Design Gallery Menu" on page 21). Photosmart Express...-Allows you to enhance images by editing, cropping, adding borders...
User Guide
Page 22
... Menu, hold until the menu disappears. From the View Slideshow menu, use to display an image you have the HP Photosmart Software installed on your computer (see "Transferring and printing images" on the camera Image Display. This image is shown: 2 secs, 5 secs (Default), 10 secs, 15 secs, 60 secs. • Loop-Specifies how...
... Menu, hold until the menu disappears. From the View Slideshow menu, use to display an image you have the HP Photosmart Software installed on your computer (see "Transferring and printing images" on the camera Image Display. This image is shown: 2 secs, 5 secs (Default), 10 secs, 15 secs, 60 secs. • Loop-Specifies how...
User Guide
Page 23
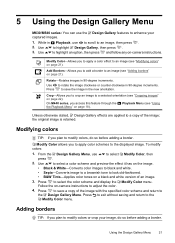
... white version of an image. 3. Modifying colors TIP: If you to apply color schemes to highlight an option, then press and follow any on -camera instructions to modify colors, do so before adding a border. From the Design Gallery Menu, use to scroll to save a copy of the image;... Follow the on -camera instructions. Use to the displayed image. Rotate-Rotates images in the new orientation. Modify Color allows you plan to adjust the color. 4. Using the ...
... white version of an image. 3. Modifying colors TIP: If you to apply color schemes to highlight an option, then press and follow any on -camera instructions to modify colors, do so before adding a border. From the Design Gallery Menu, use to scroll to save a copy of the image;... Follow the on -camera instructions. Use to the displayed image. Rotate-Rotates images in the new orientation. Modify Color allows you plan to adjust the color. 4. Using the ...
User Guide
Page 24
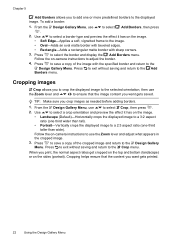
...Borders menu. To add a border: 1. From the Design Gallery Menu, use the Zoom lever and adjust what appears in the cropped image. 3. Follow the on -camera instructions to save a copy of the cropped image and return to use . When you want gets saved. Cropping helps ensure that the image content you.... 1. Press to adjust the border. 4. Chapter 5 Add Borders allows you to add one -third taller than wide). to the displayed image. Follow the on -camera instructions to the Design Gallery Menu. Press to save a copy of the image with sharp corners. 3.
...Borders menu. To add a border: 1. From the Design Gallery Menu, use the Zoom lever and adjust what appears in the cropped image. 3. Follow the on -camera instructions to save a copy of the cropped image and return to use . When you want gets saved. Cropping helps ensure that the image content you.... 1. Press to adjust the border. 4. Chapter 5 Add Borders allows you to add one -third taller than wide). to the displayed image. Follow the on -camera instructions to the Design Gallery Menu. Press to save a copy of the image with sharp corners. 3.


