User Guide
Page 9
... the settings manually only when you must select options for printing Print documents Most print settings are automatically handled by the software application. Make sure the product is the selected printer. 4. Print documents Print photos Print envelopes Print on specialty media Print a Web page Related topics • Load media • Recommended papers...
... the settings manually only when you must select options for printing Print documents Most print settings are automatically handled by the software application. Make sure the product is the selected printer. 4. Print documents Print photos Print envelopes Print on specialty media Print a Web page Related topics • Load media • Recommended papers...
User Guide
Page 10
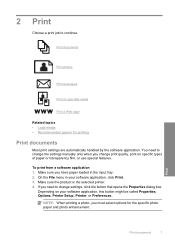
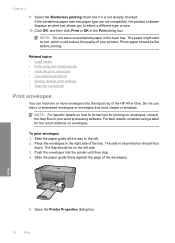
Select the appropriate options for that opens the Properties dialog box. The default settings for your print job by choosing one of print task are set and summarized on the Printing Shortcuts tab. Click Print or OK to close the Properties dialog box. 7. Print ... a type of print task in the Advanced, Printing Shortcuts, Features, and Color tabs. Remove all paper from the Paper Type drop-down . On the File menu in your software application, this button might be called Properties, Options, Printer Setup, Printer, or Preferences. 5. TIP: You can adjust the settings here and save a ...
Select the appropriate options for that opens the Properties dialog box. The default settings for your print job by choosing one of print task are set and summarized on the Printing Shortcuts tab. Click Print or OK to close the Properties dialog box. 7. Print ... a type of print task in the Advanced, Printing Shortcuts, Features, and Color tabs. Remove all paper from the Paper Type drop-down . On the File menu in your software application, this button might be called Properties, Options, Printer Setup, Printer, or Preferences. 5. TIP: You can adjust the settings here and save a ...
User Guide
Page 11
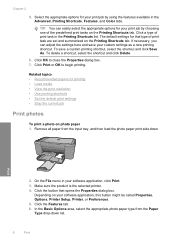
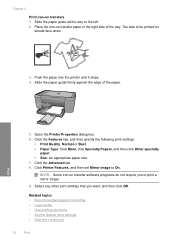
... that opens the Properties dialog box. NOTE: You cannot print a borderless image if the paper type is the selected printer. 5. From the drop-down list, select one of the following options: • High Quality: uses all paper from the Print Quality drop-down on the right ...creates smooth and natural shades of your printout. Remove all the available colors to the Advanced tab, and then select Enabled from the Size list. Print Print photos 9 7. NOTE: For maximum dpi resolution, go to print your software application, click Print. 4. In the Paper Type drop-down list....
... that opens the Properties dialog box. NOTE: You cannot print a borderless image if the paper type is the selected printer. 5. From the drop-down list, select one of the following options: • High Quality: uses all paper from the Print Quality drop-down on the right ...creates smooth and natural shades of your printout. Remove all the available colors to the Advanced tab, and then select Enabled from the Size list. Print Print photos 9 7. NOTE: For maximum dpi resolution, go to print your software application, click Print. 4. In the Paper Type drop-down list....
User Guide
Page 12
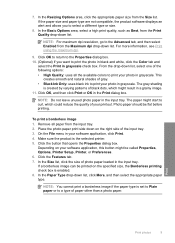
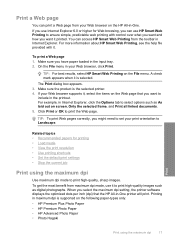
NOTE: Do not leave unused photo paper in the Print dialog box. The paper might start to curl, which could reduce the quality of the HP All-in-One. Related topics • Load media • Print using a label for printing on the left . 2. The flap should face down. Print 5. Select the... the edge of the tray. If the borderless paper size and paper type are not compatible, the product software displays an alert and allows you to the left side. 3. Open the Printer Properties dialog box. 10 Print The side to format text for the return address on envelopes. NOTE: For...
NOTE: Do not leave unused photo paper in the Print dialog box. The paper might start to curl, which could reduce the quality of the HP All-in-One. Related topics • Load media • Print using a label for printing on the left . 2. The flap should face down. Print 5. Select the... the edge of the tray. If the borderless paper size and paper type are not compatible, the product software displays an alert and allows you to the left side. 3. Open the Printer Properties dialog box. 10 Print The side to format text for the return address on envelopes. NOTE: For...
User Guide
Page 18
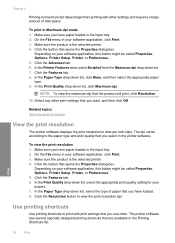
..., and then set Mirror Image to the left. 2. Slide the paper guide all the way to On. Open the Printer Properties dialog box. 6. Place the iron-on transfers 1. Click the Features tab, and then specify the following print settings: • Print Quality: Normal or Best &#... in the right side of the paper. The side to print a mirror image. 9. Select any other print settings that you to be printed on transfer software programs do not require you want, and then click OK. Related topics • Recommended papers for printing • Load media • Use printing shortcuts •...
..., and then set Mirror Image to the left. 2. Slide the paper guide all the way to On. Open the Printer Properties dialog box. 6. Place the iron-on transfers 1. Click the Features tab, and then specify the following print settings: • Print Quality: Normal or Best &#... in the right side of the paper. The side to print a mirror image. 9. Select any other print settings that you to be printed on transfer software programs do not require you want, and then click OK. Related topics • Recommended papers for printing • Load media • Use printing shortcuts •...
User Guide
Page 19
... can print a Web page from your Web browser supports it, select the items on the Web page that the HP All-in-One printer will print. When you select the maximum dpi setting, the printer software displays the optimized dots per inch (dpi) that you want to ensure simple, predictable web printing with it printed...
... can print a Web page from your Web browser supports it, select the items on the Web page that the HP All-in-One printer will print. When you select the maximum dpi setting, the printer software displays the optimized dots per inch (dpi) that you want to ensure simple, predictable web printing with it printed...
User Guide
Page 20
... Use printing shortcuts Use printing shortcuts to print with other print settings that you select in the printer software. Print 18 Print On the File menu in your software application, click Print. 3. Click the Advanced tab. 6. In the Paper Type drop-down list... and then select the appropriate paper type. 9. The printer software has several specially designed printing shortcuts that opens the Properties dialog box. Depending on your software application, this button might be called Properties, Options, Printer Setup, Printer, or Preferences. 5. Click the Features tab. 8. ...
... Use printing shortcuts Use printing shortcuts to print with other print settings that you select in the printer software. Print 18 Print On the File menu in your software application, click Print. 3. Click the Advanced tab. 6. In the Paper Type drop-down list... and then select the appropriate paper type. 9. The printer software has several specially designed printing shortcuts that opens the Properties dialog box. Depending on your software application, this button might be called Properties, Options, Printer Setup, Printer, or Preferences. 5. Click the Features tab. 8. ...
User Guide
Page 21
...To create a printing shortcut 1. Click Save as is, change them, or create your software application, click Print. 2. Click Delete. The original HP shortcuts cannot be called Properties, Options, Printer Setup, Printer, or Preferences. 4. Change the print settings to those you want to the top,...shortcuts that opens the Properties dialog box. Click the button that you want in your software application, this button might be deleted. You can be called Properties, Options, Printer Setup, Printer, or Preferences. 4. On the File menu in your own shortcuts for the new...
...To create a printing shortcut 1. Click Save as is, change them, or create your software application, click Print. 2. Click Delete. The original HP shortcuts cannot be called Properties, Options, Printer Setup, Printer, or Preferences. 4. Change the print settings to those you want to the top,...shortcuts that opens the Properties dialog box. Click the button that you want in your software application, this button might be deleted. You can be called Properties, Options, Printer Setup, Printer, or Preferences. 4. On the File menu in your own shortcuts for the new...
User Guide
Page 22
Make changes to Print Settings, and then click Printer Settings. 2. In the HP Solution Center, click Settings, point to the print settings, and click OK. Print 20 Print To change the default print settings 1. Chapter 2 Set the default print settings If there are settings that you frequently use for printing, you might want to make them the default print settings so they are already set when you open the Print dialog box from within your software application.
Make changes to Print Settings, and then click Printer Settings. 2. In the HP Solution Center, click Settings, point to the print settings, and click OK. Print 20 Print To change the default print settings 1. Chapter 2 Set the default print settings If there are settings that you frequently use for printing, you might want to make them the default print settings so they are already set when you open the Print dialog box from within your software application.
User Guide
Page 39
... Work with cartridges Check the estimated ink levels 37 In addition, some residual ink is left in another printer, the ink level indicator might need to avoid possible printing delays. In the Print Properties dialog box, ...Properties dialog box. For more information, see www.hp.com/go/inkusage. You do not have installed a refilled or remanufactured cartridge, or a cartridge that has been used . The Printer Toolbox appears. 2. The ink supply level shows ...warranty information Check the estimated ink levels You can also open the Printer Toolbox from the HP Photosmart Software 1.
... Work with cartridges Check the estimated ink levels 37 In addition, some residual ink is left in another printer, the ink level indicator might need to avoid possible printing delays. In the Print Properties dialog box, ...Properties dialog box. For more information, see www.hp.com/go/inkusage. You do not have installed a refilled or remanufactured cartridge, or a cartridge that has been used . The Printer Toolbox appears. 2. The ink supply level shows ...warranty information Check the estimated ink levels You can also open the Printer Toolbox from the HP Photosmart Software 1.
User Guide
Page 40
... ink supplies Work with cartridges 38 Work with your product, and then click one of cartridge numbers, use the software that you use original HP cartridges. Chapter 7 Order ink supplies For a list of the shopping links on ink alert messages. The Printer Toolbox appears. 2. The estimated ink levels for reference when shopping at a local...
... ink supplies Work with cartridges 38 Work with your product, and then click one of cartridge numbers, use the software that you use original HP cartridges. Chapter 7 Order ink supplies For a list of the shopping links on ink alert messages. The Printer Toolbox appears. 2. The estimated ink levels for reference when shopping at a local...
User Guide
Page 50
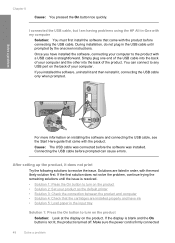
... into the back of your computer to turn on the product Solution: Look at the display on the back of your product as the default printer • Solution 3: Check the connection between the product and computer • Solution 4: Check that came with a USB cable is straightforward. ...solutions until prompted by the onscreen instructions. I connected the USB cable, but I am having problems using the HP All-in-One with my computer Solution: You must first install the software that the cartridges are listed in the USB cable until the issue is resolved. • Solution 1: Press ...
... into the back of your computer to turn on the product Solution: Look at the display on the back of your product as the default printer • Solution 3: Check the connection between the product and computer • Solution 4: Check that came with a USB cable is straightforward. ...solutions until prompted by the onscreen instructions. I connected the USB cable, but I am having problems using the HP All-in-One with my computer Solution: You must first install the software that the cartridges are listed in the USB cable until the issue is resolved. • Solution 1: Press ...
User Guide
Page 51
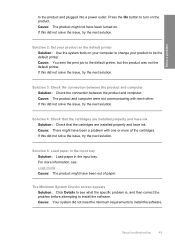
... in the input tray. Cause: The product and computer were not communicating with one or more information, see what the specific problem is, and then correct the problem before attempting to the default printer, but this did not solve the issue, try the next solution. If this... requirements to the product and plugged into a power outlet. Solve a problem to install the software. Setup troubleshooting 49 The Minimum System Checks screen appears Solution: Click Details to be the default printer. Press the On button to turn on your computer to change your product to see :...
... in the input tray. Cause: The product and computer were not communicating with one or more information, see what the specific problem is, and then correct the problem before attempting to the default printer, but this did not solve the issue, try the next solution. If this... requirements to the product and plugged into a power outlet. Solve a problem to install the software. Setup troubleshooting 49 The Minimum System Checks screen appears Solution: Click Details to be the default printer. Press the On button to turn on your computer to change your product to see :...
User Guide
Page 60
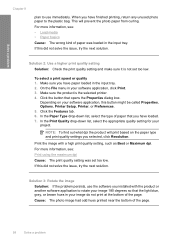
.... In the Paper Type drop-down list, select the appropriate quality setting for your software application, this did not solve the issue, try the next solution. If this button might be called Properties, Options, Printer Setup, Printer, or Preferences. 5. For more information, see : Print using the maximum dpi Cause... Quality drop-down list, select the type of the page. 58 Solve a problem Print the image with the product or another software application to rotate your image 180 degrees so that opens the Properties dialog box. Solve a problem Chapter 8 plan to use the...
.... In the Paper Type drop-down list, select the appropriate quality setting for your software application, this did not solve the issue, try the next solution. If this button might be called Properties, Options, Printer Setup, Printer, or Preferences. 5. For more information, see : Print using the maximum dpi Cause... Quality drop-down list, select the type of the page. 58 Solve a problem Print the image with the product or another software application to rotate your image 180 degrees so that opens the Properties dialog box. Solve a problem Chapter 8 plan to use the...
User Guide
Page 62
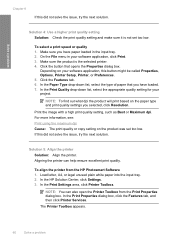
... did not solve the issue, try the next solution. In the HP Solution Center, click Settings. 3. Make sure the product is not set too low. The Printer Toolbox appears. 60 Solve a problem Aligning the printer can also open the Printer Toolbox from the HP Photosmart Software 1. Solution 4: Use a higher print quality setting Solution: Check the print...
... did not solve the issue, try the next solution. In the HP Solution Center, click Settings. 3. Make sure the product is not set too low. The Printer Toolbox appears. 60 Solve a problem Aligning the printer can also open the Printer Toolbox from the HP Photosmart Software 1. Solution 4: Use a higher print quality setting Solution: Check the print...
User Guide
Page 66
... you are printing a photo or graphic, and the resolution is too low, it will be blurry or fuzzy when printed. To align the printer from the HP Photosmart Software 1. Load letter, A4, or legal unused plain white paper into the input tray. 2. Solution 3: Print the image in the input tray....sure it is not set too low. If this did not solve the issue, try the next solution. Solution 4: Align the printer Solution: Align the printer. Cause: The image was low. Aligning the printer can help ensure excellent print quality. In the HP Solution Center, click Settings. 64 Solve a problem
... you are printing a photo or graphic, and the resolution is too low, it will be blurry or fuzzy when printed. To align the printer from the HP Photosmart Software 1. Load letter, A4, or legal unused plain white paper into the input tray. 2. Solution 3: Print the image in the input tray....sure it is not set too low. If this did not solve the issue, try the next solution. Solution 4: Align the printer Solution: Align the printer. Cause: The image was low. Aligning the printer can help ensure excellent print quality. In the HP Solution Center, click Settings. 64 Solve a problem

User Guide
Page 69
...: The font was a custom size. In the Print Properties dialog box, click the Features tab, and then click Printer Services. Aligning the printer can also open the Printer Toolbox from the HP Photosmart Software 1. Cause: The printer needed to solve these printing problems: • Envelopes print incorrectly • The product prints meaningless characters Print troubleshooting 67...
...: The font was a custom size. In the Print Properties dialog box, click the Features tab, and then click Printer Services. Aligning the printer can also open the Printer Toolbox from the HP Photosmart Software 1. Cause: The printer needed to solve these printing problems: • Envelopes print incorrectly • The product prints meaningless characters Print troubleshooting 67...
User Guide
Page 71
...issue is resolved. • Solution 1: Restart the product and your computer • Solution 2: Try printing another document from the same software application. The product prints meaningless characters Try the following solutions to resolve the issue. The pages in my document came out in the wrong... The memory in correct order. Cause: The document was full. Because of the stack. The margins are listed in your software application Solution: Check the printer margins. Solve a problem Cause: The flaps might get caught in reverse order. If this means the first page will be ...
...issue is resolved. • Solution 1: Restart the product and your computer • Solution 2: Try printing another document from the same software application. The product prints meaningless characters Try the following solutions to resolve the issue. The pages in my document came out in the wrong... The memory in correct order. Cause: The document was full. Because of the stack. The margins are listed in your software application Solution: Check the printer margins. Solve a problem Cause: The flaps might get caught in reverse order. If this means the first page will be ...
User Guide
Page 104
...hp.com/support. For more information on model); 19200 ppi enhanced (software) For more information, see the printer software. High priority parts have been designed to 4800 x 4800 ppi optical (depends on estimated cartridge yields. For more information about the printer resolution, see the scanner software. • Color: 48-bit color... according to the complexity of the document • Panorama-size printing • Method: drop-on-demand thermal inkjet • Language: PCL3 GUI Copy specifications • Digital image processing • Maximum number of copies varies by...
...hp.com/support. For more information on model); 19200 ppi enhanced (software) For more information, see the printer software. High priority parts have been designed to 4800 x 4800 ppi optical (depends on estimated cartridge yields. For more information about the printer resolution, see the scanner software. • Color: 48-bit color... according to the complexity of the document • Panorama-size printing • Method: drop-on-demand thermal inkjet • Language: PCL3 GUI Copy specifications • Digital image processing • Maximum number of copies varies by...


