

User Guide
Page 8
...Windows 2000 users 214 Environmental product stewardship program 214 Paper use...215 Plastics...215 Material safety data sheets 215 Recycling program...215 HP inkjet supplies recycling program 215 Energy Star® notice...215 Disposal of waste equipment by users in private households in the European ...in Korea 217 VCCI (Class B) compliance statement for users in Japan 218 Notice to users in Japan about the power cord 218 Noise emission statement for Germany 218 Toxic and hazardous substance table 218 HP Deskjet F4200 All-in-One series declaration of conformity 219 Index...221 5
...Windows 2000 users 214 Environmental product stewardship program 214 Paper use...215 Plastics...215 Material safety data sheets 215 Recycling program...215 HP inkjet supplies recycling program 215 Energy Star® notice...215 Disposal of waste equipment by users in private households in the European ...in Korea 217 VCCI (Class B) compliance statement for users in Japan 218 Notice to users in Japan about the power cord 218 Noise emission statement for Germany 218 Toxic and hazardous substance table 218 HP Deskjet F4200 All-in-One series declaration of conformity 219 Index...221 5
User Guide
Page 15
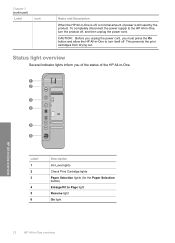
... lights inform you must press the On button and allow the HP All-in-One to turn the product off, and then unplug the power cord. To completely disconnect the power supply to Page light Resume light On light 12 HP All-in-One overview HP All-in-One overview Label 1 2 3 4 5 6 Description Ink Level lights Check Print Cartridge lights...
... lights inform you must press the On button and allow the HP All-in-One to turn the product off, and then unplug the power cord. To completely disconnect the power supply to Page light Resume light On light 12 HP All-in-One overview HP All-in-One overview Label 1 2 3 4 5 6 Description Ink Level lights Check Print Cartridge lights...
User Guide
Page 16
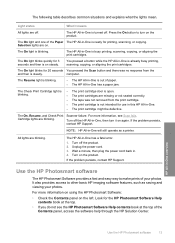
... All lights are blinking. For more information on using the HP Photosmart Software: • Check the Contents panel on again. NOTE: HP All-in -One overview Use the HP Photosmart software 13 Unplug the power cord. 3. Turn on the product. For more information, see the HP Photosmart Software Help contents book at the top of paper. •...
... All lights are blinking. For more information on using the HP Photosmart Software: • Check the Contents panel on again. NOTE: HP All-in -One overview Use the HP Photosmart software 13 Unplug the power cord. 3. Turn on the product. For more information, see the HP Photosmart Software Help contents book at the top of paper. •...
User Guide
Page 70
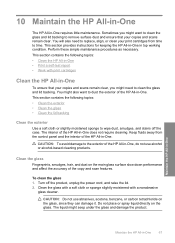
...clean the glass 1. Maintain the HP All-in-One Maintain the HP All-in -One To ensure that your print cartridges from the control panel and the interior of the HP All-in -One. You might want to wipe dust, smudges, and stains off the product, unplug the power cord, and raise the lid. 2.... Turn off the case. Do not place or spray liquid directly on the main glass surface slow down performance and affect the accuracy of the HP All-in -One requires little maintenance. This section contains the following...
...clean the glass 1. Maintain the HP All-in-One Maintain the HP All-in -One To ensure that your print cartridges from the control panel and the interior of the HP All-in -One. You might want to wipe dust, smudges, and stains off the product, unplug the power cord, and raise the lid. 2.... Turn off the case. Do not place or spray liquid directly on the main glass surface slow down performance and affect the accuracy of the HP All-in -One requires little maintenance. This section contains the following...
User Guide
Page 71
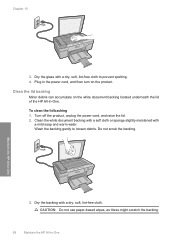
...-based wipes, as these might scratch the backing. 68 Maintain the HP All-in the power cord, and then turn on the white document backing located underneath the lid of the HP All-in -One 3. Turn off the product, unplug the power cord, and raise the lid. 2. Dry the backing with a dry,... soft, lint-free cloth to loosen debris. Do not scrub the backing. Chapter 10 3. Plug in -One Clean the white document backing with ...
...-based wipes, as these might scratch the backing. 68 Maintain the HP All-in the power cord, and then turn on the white document backing located underneath the lid of the HP All-in -One 3. Turn off the product, unplug the power cord, and raise the lid. 2. Dry the backing with a dry,... soft, lint-free cloth to loosen debris. Do not scrub the backing. Chapter 10 3. Plug in -One Clean the white document backing with ...
User Guide
Page 72
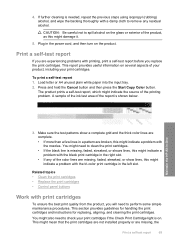
... with a damp cloth to clean the print cartridges. • If the black line is shown below. Maintain the HP All-in a pattern are complete. • If more than a few lines in -One 3. You might need to spill alcohol on the product. A sample of the ink test area of the report is... the best print quality from the product, you will need to remove any of the color lines are missing, faded, streaked, or show lines, this might indicate a problem with the tri-color print cartridge in the power cord, and then turn on the glass or exterior of the product, as this might indicate...
... with a damp cloth to clean the print cartridges. • If the black line is shown below. Maintain the HP All-in a pattern are complete. • If more than a few lines in -One 3. You might need to spill alcohol on the product. A sample of the ink test area of the report is... the best print quality from the product, you will need to remove any of the color lines are missing, faded, streaked, or show lines, this might indicate a problem with the tri-color print cartridge in the power cord, and then turn on the glass or exterior of the product, as this might indicate...
User Guide
Page 79
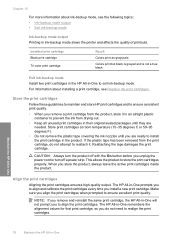
... do not need to reattach it in the product. When you unplug the power cord or turn off a power strip. Align the print cartridges Aligning the print cartridges ensures high-quality output. The HP All-in-One remembers the alignment values for that print cartridge, so you to ensure excellent print... to align the print cartridges. NOTE: If you remove and reinstall the same print cartridge, the HP All-in -One prompts you do not attempt to realign the print cartridges. Colors print but black is grayed and is not a true black. Installed print cartridge Black print cartridge Tri...
... do not need to reattach it in the product. When you unplug the power cord or turn off a power strip. Align the print cartridges Aligning the print cartridges ensures high-quality output. The HP All-in-One remembers the alignment values for that print cartridge, so you to ensure excellent print... to align the print cartridges. NOTE: If you remove and reinstall the same print cartridge, the HP All-in -One prompts you do not attempt to realign the print cartridges. Colors print but black is grayed and is not a true black. Installed print cartridge Black print cartridge Tri...
User Guide
Page 82
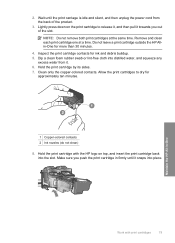
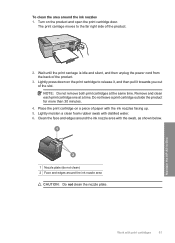
... cartridge outside the HP Allin-One for approximately ten minutes. 1 Copper-colored contacts 2 Ink nozzles (do not clean) 8. Hold the print cartridge by its sides. 7. Hold the print cartridge with print cartridges 79 Maintain the HP All-in firmly until the print carriage is idle and silent, and then unplug the power cord from it towards...
... cartridge outside the HP Allin-One for approximately ten minutes. 1 Copper-colored contacts 2 Ink nozzles (do not clean) 8. Hold the print cartridge by its sides. 7. Hold the print cartridge with print cartridges 79 Maintain the HP All-in firmly until the print carriage is idle and silent, and then unplug the power cord from it towards...
User Guide
Page 83
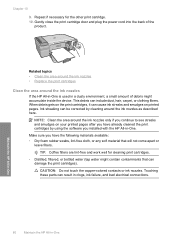
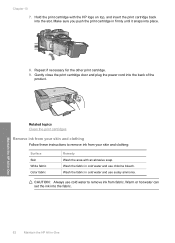
... filtered, or bottled water (tap water might accumulate inside the device. Chapter 10 9. Gently close the print cartridge door and plug the power cord into the back of debris might contain contaminants that will not come apart or leave fibers. Make sure you have the following materials available:... cleaned the print cartridges by cleaning around the ink nozzles If the HP All-in-One is used in -One CAUTION: Do not touch the copper-colored contacts or ink nozzles. Maintain the HP All-in-One 80 Maintain the HP All-in a dusty environment, a small amount of the product. ...
... filtered, or bottled water (tap water might accumulate inside the device. Chapter 10 9. Gently close the print cartridge door and plug the power cord into the back of debris might contain contaminants that will not come apart or leave fibers. Make sure you have the following materials available:... cleaned the print cartridges by cleaning around the ink nozzles If the HP All-in-One is used in -One CAUTION: Do not touch the copper-colored contacts or ink nozzles. Maintain the HP All-in-One 80 Maintain the HP All-in a dusty environment, a small amount of the product. ...
User Guide
Page 84
... the ink nozzle area with the ink nozzles facing up. 5. Maintain the HP All-in-One 1 Nozzle plate (do not clean) 2 Face and edges around the ink nozzles 1. Wait until the print carriage is idle and silent, and then unplug the power cord from the back of the product. 2. The print carriage moves to...
... the ink nozzle area with the ink nozzles facing up. 5. Maintain the HP All-in-One 1 Nozzle plate (do not clean) 2 Face and edges around the ink nozzles 1. Wait until the print carriage is idle and silent, and then unplug the power cord from the back of the product. 2. The print carriage moves to...
User Guide
Page 85
...and use chlorine bleach. Wash the fabric in -One 8. CAUTION: Always use cold water to remove ink from fabric. Hold the print cartridge with an abrasive soap. Warm or hot water can set the ink into the fabric. 82 Maintain the HP All-in firmly until it snaps into place. ...: Surface Skin White fabric Color fabric Remedy Wash the area with the HP logo on top, and insert the print cartridge back into the back of the product. Chapter 10 7. Repeat if necessary for the other print cartridge. 9. Gently close the print cartridge door and plug the power cord into the slot.
...and use chlorine bleach. Wash the fabric in -One 8. CAUTION: Always use cold water to remove ink from fabric. Hold the print cartridge with an abrasive soap. Warm or hot water can set the ink into the fabric. 82 Maintain the HP All-in firmly until it snaps into place. ...: Surface Skin White fabric Color fabric Remedy Wash the area with the HP logo on top, and insert the print cartridge back into the back of the product. Chapter 10 7. Repeat if necessary for the other print cartridge. 9. Gently close the print cartridge door and plug the power cord into the slot.
User Guide
Page 89
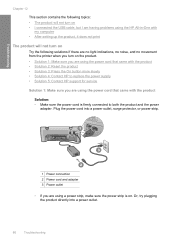
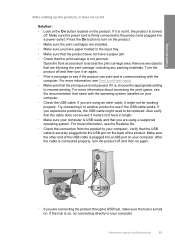
... a power outlet. 86 Troubleshooting Troubleshooting Chapter 12 This section contains the following solutions if there are no light indications, no noise, and no movement from the printer when you are using the HP All-in-One with the product Solution: • Make sure the power cord is firmly connected to both the product and the power...
... a power outlet. 86 Troubleshooting Troubleshooting Chapter 12 This section contains the following solutions if there are no light indications, no noise, and no movement from the printer when you are using the HP All-in-One with the product Solution: • Make sure the power cord is firmly connected to both the product and the power...
User Guide
Page 90
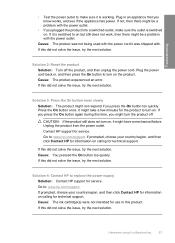
... intended for service. Cause: The product experienced an error. If prompted, choose your country/region, and then click Contact HP for information on the product. Plug the power cord back in an appliance that you might take a few minutes for the product to on calling for technical support. Cause:... a problem with the power outlet. • If you press the On button too quickly. Go to turn the product off the product, and then unplug the power cord. Plug in , and then press the On button to : www.hp.com/support. Unplug the product from the power outlet. If not, ...
... intended for service. Cause: The product experienced an error. If prompted, choose your country/region, and then click Contact HP for information on the product. Plug the power cord back in an appliance that you might take a few minutes for the product to on calling for technical support. Cause:... a problem with the power outlet. • If you press the On button too quickly. Go to turn the product off the product, and then unplug the power cord. Plug in , and then press the On button to : www.hp.com/support. Unplug the product from the power outlet. If not, ...
User Guide
Page 92
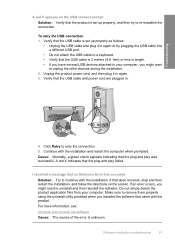
...8226; Check the connection from the product to your computer. Open the front access door to your computer. Hardware setup troubleshooting 89 Make sure the power cord is securely plugged into the USB port on the back of the USB cable is not paused. For more information, see Print a self-test ... into a USB port on your computer. Try connecting it might need to be working properly. Verify that the print queue is plugged into a power outlet. Make sure the other end of the product. Press the On button to turn the product off . For more information about accessing the ...
...8226; Check the connection from the product to your computer. Open the front access door to your computer. Hardware setup troubleshooting 89 Make sure the power cord is securely plugged into the USB port on the back of the USB cable is not paused. For more information, see Print a self-test ... into a USB port on your computer. Try connecting it might need to be working properly. Verify that the print queue is plugged into a power outlet. Make sure the other end of the product. Press the On button to turn the product off . For more information about accessing the ...
User Guide
Page 94
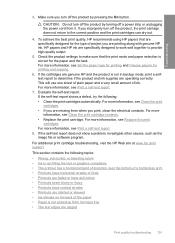
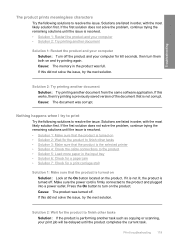
... the software. For more information, see: Uninstall and reinstall the software Cause: The source of the error is unknown. Unplug the product power cord, and then plug it in again or try to re-establish the connection. Continue with the installation. If an error occurs, you might... want to unplug the other devices during the installation. 2. If that the USB cable and power cord are plugged in. 4. Software installation troubleshooting 91 Verify that does not work, stop and then restart the installation, and follow the directions on ...
... the software. For more information, see: Uninstall and reinstall the software Cause: The source of the error is unknown. Unplug the product power cord, and then plug it in again or try to re-establish the connection. Continue with the installation. If an error occurs, you might... want to unplug the other devices during the installation. 2. If that the USB cable and power cord are plugged in. 4. Software installation troubleshooting 91 Verify that does not work, stop and then restart the installation, and follow the directions on ...
User Guide
Page 100
Troubleshooting Try the following tips help maintain HP print cartridges and ensure consistent print quality. • Keep all print cartridges in the original sealed packages until you improperly turn off the product by turning off a power strip or unplugging the power cord from the product. If this is poor right after removing the plastic tape...
Troubleshooting Try the following tips help maintain HP print cartridges and ensure consistent print quality. • Keep all print cartridges in the original sealed packages until you improperly turn off the product by turning off a power strip or unplugging the power cord from the product. If this is poor right after removing the plastic tape...
User Guide
Page 104
... correct position and the print cartridges can dry out. 4. This will use one sheet of plain paper and a very small amount of the paper •... sure you print, clean the electrical contacts. To achieve the best print quality, HP recommends using HP papers that the print mode and paper selection is not picked up from it. For...colors • Ink is not in backup mode, print a selftest report to provide high-quality output. 5. For more information, see Clean the print cartridges. • If you improperly turn off the product by turning off a power strip or unplugging the power cord...
... correct position and the print cartridges can dry out. 4. This will use one sheet of plain paper and a very small amount of the paper •... sure you print, clean the electrical contacts. To achieve the best print quality, HP recommends using HP papers that the print mode and paper selection is not picked up from it. For...colors • Ink is not in backup mode, print a selftest report to provide high-quality output. 5. For more information, see Clean the print cartridges. • If you improperly turn off the product by turning off a power strip or unplugging the power cord...
User Guide
Page 121
... the product. • Shut down the product, restart the computer, and then restart the product. Make sure the power cord is firmly connected to turn on the product. If this did not solve the issue, try one or both of the printer driver has changed to delete the job from printing. In the... HP Solution Center, click the Settings tab. 2. If it has been cancelled. If the print job remains in the print...
... the product. • Shut down the product, restart the computer, and then restart the product. Make sure the power cord is firmly connected to turn on the product. If this did not solve the issue, try one or both of the printer driver has changed to delete the job from printing. In the... HP Solution Center, click the Settings tab. 2. If it has been cancelled. If the print job remains in the print...
User Guide
Page 122
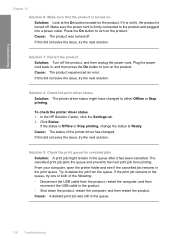
... 60 seconds, then turn on the product. Nothing happens when I try to print Try the following solutions to the product and plugged into a power outlet. If it is not lit, the product is firmly connected to resolve the issue. Press the On button to resolve the issue. Print ...version of the document that the product is not corrupt. If this did not solve the issue, try the next solution. Make sure the power cord is turned off . If this did not solve the issue, try the next solution. Troubleshooting The product prints meaningless characters Try the following solutions...
... 60 seconds, then turn on the product. Nothing happens when I try to print Try the following solutions to the product and plugged into a power outlet. If it is not lit, the product is firmly connected to resolve the issue. Press the On button to resolve the issue. Print ...version of the document that the product is not corrupt. If this did not solve the issue, try the next solution. Make sure the power cord is turned off . If this did not solve the issue, try the next solution. Troubleshooting The product prints meaningless characters Try the following solutions...
User Guide
Page 130
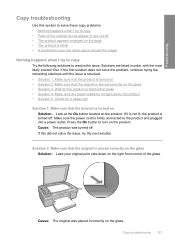
... on the right front corner of the original do not appear or are listed in order, with the most likely solution first. Make sure the power cord is placed correctly on the glass Solution: Load your original print side down on the product. Solution 2: Make sure that the product is turned on...; A borderless copy has white space around the edges Nothing happens when I try the next solution. Press the On button to the product and plugged into a power outlet. Cause: The original was turned off. Solutions are cut off . Copy troubleshooting 127
... on the right front corner of the original do not appear or are listed in order, with the most likely solution first. Make sure the power cord is placed correctly on the glass Solution: Load your original print side down on the product. Solution 2: Make sure that the product is turned on...; A borderless copy has white space around the edges Nothing happens when I try the next solution. Press the On button to the product and plugged into a power outlet. Cause: The original was turned off. Solutions are cut off . Copy troubleshooting 127


