Quick Start Guide
Page 6
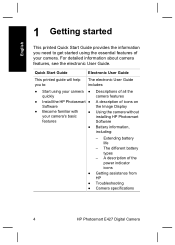
... description of icons on Software the Image Display ● Become familiar with your camera's basic features ● Using the camera without installing HP Photosmart Software ● Battery information, including: - Extending battery life - The different ... camera. English 1 Getting started using your camera ● Descriptions of all the quickly camera features ● Install the HP Photosmart ● A description of the power indicator icons ● Getting assistance from HP ● Troubleshooting ● Camera specifications 4 HP Photosmart E427 Digital Camera
... description of icons on Software the Image Display ● Become familiar with your camera's basic features ● Using the camera without installing HP Photosmart Software ● Battery information, including: - Extending battery life - The different ... camera. English 1 Getting started using your camera ● Descriptions of all the quickly camera features ● Install the HP Photosmart ● A description of the power indicator icons ● Getting assistance from HP ● Troubleshooting ● Camera specifications 4 HP Photosmart E427 Digital Camera
Quick Start Guide
Page 8
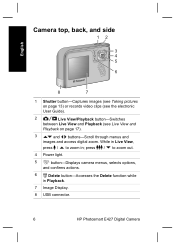
press / to zoom in Playback. 7 Image Display. 8 USB connector. 6 HP Photosmart E427 Digital Camera While in Live View, press / to zoom out. 4 Power light. 5 button-Displays camera menus, selects options, and confirms actions. 6 Delete button-Accesses the Delete function while in ; English Camera top, back, and side 12 3 4 5 6 8 7 1 Shutter button-Captures images (see Taking pictures on page 13.../Playback button-Switches between Live View and Playback (see Live View and Playback on page 17). 3 and buttons-Scroll through menus and images and access digital zoom.
press / to zoom in Playback. 7 Image Display. 8 USB connector. 6 HP Photosmart E427 Digital Camera While in Live View, press / to zoom out. 4 Power light. 5 button-Displays camera menus, selects options, and confirms actions. 6 Delete button-Accesses the Delete function while in ; English Camera top, back, and side 12 3 4 5 6 8 7 1 Shutter button-Captures images (see Taking pictures on page 13.../Playback button-Switches between Live View and Playback (see Live View and Playback on page 17). 3 and buttons-Scroll through menus and images and access digital zoom.
Quick Start Guide
Page 10
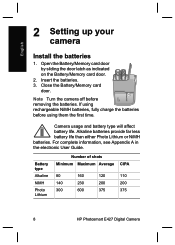
... of shots Minimum Maximum Average CIPA 80 160 120 110 140 230 200 200 300 600 375 375 8 HP Photosmart E427 Digital Camera Note Turn the camera off before using them the first time. English 2 Setting up your camera Install the batteries 1. Insert the batteries. 3. If using rechargeable NiMH batteries, fully charge the batteries before ...Photo Lithium or NiMH batteries. Open the Battery/Memory card door by sliding the door latch as indicated on the Battery/Memory card door. 2. Camera usage and battery type will affect battery life. Close the Battery/Memory card door.
... of shots Minimum Maximum Average CIPA 80 160 120 110 140 230 200 200 300 600 375 375 8 HP Photosmart E427 Digital Camera Note Turn the camera off before using them the first time. English 2 Setting up your camera Install the batteries 1. Insert the batteries. 3. If using rechargeable NiMH batteries, fully charge the batteries before ...Photo Lithium or NiMH batteries. Open the Battery/Memory card door by sliding the door latch as indicated on the Battery/Memory card door. 2. Camera usage and battery type will affect battery life. Close the Battery/Memory card door.
Quick Start Guide
Page 12
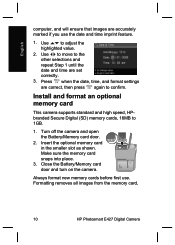
English computer, and will ensure that images are set correctly. 3. Turn off the camera and open the Battery/Memory card door. 2. Always format new memory cards before first use the date and time imprint feature. 1. Use to ...Battery/Memory card door and turn on the camera. Make sure the memory card snaps into place. 3. Use to 1GB. 1. Formatting removes all images from the memory card, 10 HP Photosmart E427 Digital Camera Install and format an optional memory card This camera supports standard and high speed, HPbranded Secure Digital (SD) memory cards, 16MB to adjust...
English computer, and will ensure that images are set correctly. 3. Turn off the camera and open the Battery/Memory card door. 2. Always format new memory cards before first use the date and time imprint feature. 1. Use to ...Battery/Memory card door and turn on the camera. Make sure the memory card snaps into place. 3. Use to 1GB. 1. Formatting removes all images from the memory card, 10 HP Photosmart E427 Digital Camera Install and format an optional memory card This camera supports standard and high speed, HPbranded Secure Digital (SD) memory cards, 16MB to adjust...
Quick Start Guide
Page 14
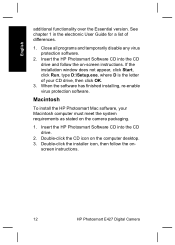
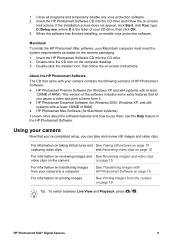
... the CD drive and follow the on -screen instructions. screen instructions. 12 HP Photosmart E427 Digital Camera When the software has finished installing, re-enable virus protection software. Macintosh To install the HP Photosmart Mac software, your CD drive, then click OK. 3. Double-click the installer...letter of differences. 1. Close all programs and temporarily disable any virus protection software. 2. Double-click the CD icon on the camera packaging. 1. See chapter 1 in the electronic User Guide for a list of your Macintosh computer must meet the system requirements as...
... the CD drive and follow the on -screen instructions. screen instructions. 12 HP Photosmart E427 Digital Camera When the software has finished installing, re-enable virus protection software. Macintosh To install the HP Photosmart Mac software, your CD drive, then click OK. 3. Double-click the installer...letter of differences. 1. Close all programs and temporarily disable any virus protection software. 2. Double-click the CD icon on the camera packaging. 1. See chapter 1 in the electronic User Guide for a list of your Macintosh computer must meet the system requirements as...
Quick Start Guide
Page 16
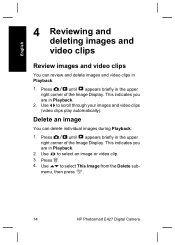
... and video clips Review images and video clips You can delete individual images during Playback: 1. This indicates you are in Playback. 2. menu, then press . 14 HP Photosmart E427 Digital Camera This indicates you are in Playback. 1.
... and video clips Review images and video clips You can delete individual images during Playback: 1. This indicates you are in Playback. 2. menu, then press . 14 HP Photosmart E427 Digital Camera This indicates you are in Playback. 1.
Quick Start Guide
Page 18
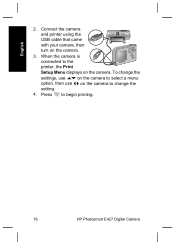
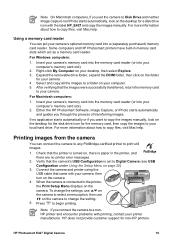
When the camera is connected to the printer, the Print Setup Menu displays on the camera. 3. Press to change the settings, use on the camera to select a menu option, then use on the camera to begin printing. 16 HP Photosmart E427 Digital Camera Connect the camera and printer using the USB cable that came with your camera, then turn on the camera. To change the setting. 4. English 2.
When the camera is connected to the printer, the Print Setup Menu displays on the camera. 3. Press to change the settings, use on the camera to select a menu option, then use on the camera to begin printing. 16 HP Photosmart E427 Digital Camera Connect the camera and printer using the USB cable that came with your camera, then turn on the camera. To change the setting. 4. English 2.
Quick Start Guide
Page 20
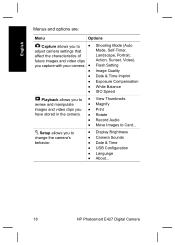
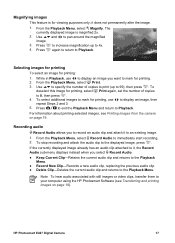
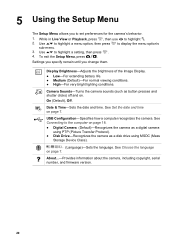
...; Magnify ● Print ● Rotate ● Record Audio ● Move Images to change the camera's behavior. ● Display Brightness ● Camera Sounds ● Date & Time ● USB Configuration ● Language ● About... 18 HP Photosmart E427 Digital Camera Setup allows you capture with your camera. ● ● ● ● ● ● Shooting Mode (Auto Mode, Self-Timer, Landscape...
...; Magnify ● Print ● Rotate ● Record Audio ● Move Images to change the camera's behavior. ● Display Brightness ● Camera Sounds ● Date & Time ● USB Configuration ● Language ● About... 18 HP Photosmart E427 Digital Camera Setup allows you capture with your camera. ● ● ● ● ● ● Shooting Mode (Auto Mode, Self-Timer, Landscape...

Warranty and Regulatory Guide
Page 5
... number should not be within your one-stop source for repairs. • Keep the camera dry. HP E427 Photosmart Warranty 3 Specify the duration of your HP product, you have different options depending on the region where you with the Product name (HP Photosmart E427 Digital Camera) or Product number (L2437A). For European customers only The name and address of the...
... number should not be within your one-stop source for repairs. • Keep the camera dry. HP E427 Photosmart Warranty 3 Specify the duration of your HP product, you have different options depending on the region where you with the Product name (HP Photosmart E427 Digital Camera) or Product number (L2437A). For European customers only The name and address of the...
Warranty and Regulatory Guide
Page 70
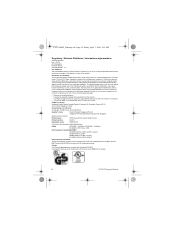
... this product. Cet appareil numérique de la classe B est conforme à la norme NMB-003 du Canada. 68 HP E427 Photosmart Warranty Singapore contact: Hardware Quality Director, Hewlett-Packard Company, 60, Alexandra Terrace, #07-01, The Comtech Singapore 118502 EU declaration... will not occur in accordance with the limits for help. However, there is no guarantee that the product: Product name: HP Photosmart E427 series Digital Camera Product number: L2437A Regulatory model: SNPRB-0603 Conforms to the following measures: • Reorient the receiving antenna. • ...
... this product. Cet appareil numérique de la classe B est conforme à la norme NMB-003 du Canada. 68 HP E427 Photosmart Warranty Singapore contact: Hardware Quality Director, Hewlett-Packard Company, 60, Alexandra Terrace, #07-01, The Comtech Singapore 118502 EU declaration... will not occur in accordance with the limits for help. However, there is no guarantee that the product: Product name: HP Photosmart E427 series Digital Camera Product number: L2437A Regulatory model: SNPRB-0603 Conforms to the following measures: • Reorient the receiving antenna. • ...
User Guide
Page 3
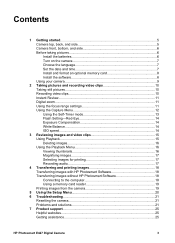
... 8 Install the software 8 Using your camera 9 2 Taking pictures and recording video clips 10 Taking still pictures 10 Recording video clips 10 Instant Review...11 Digital zoom...11 Using the focus range settings...HP Photosmart Software 18 Transferring images without HP Photosmart Software 18 Connecting to the computer 18 Using a memory card reader 19 Printing images from the camera 19 5 Using the Setup Menu 20 6 Troubleshooting 21 Resetting the camera 21 Problems and solutions 21 7 Product support 25 Helpful websites...25 Getting assistance 25 HP Photosmart E427 Digital Camera...
... 8 Install the software 8 Using your camera 9 2 Taking pictures and recording video clips 10 Taking still pictures 10 Recording video clips 10 Instant Review...11 Digital zoom...11 Using the focus range settings...HP Photosmart Software 18 Transferring images without HP Photosmart Software 18 Connecting to the computer 18 Using a memory card reader 19 Printing images from the camera 19 5 Using the Setup Menu 20 6 Troubleshooting 21 Resetting the camera 21 Problems and solutions 21 7 Product support 25 Helpful websites...25 Getting assistance 25 HP Photosmart E427 Digital Camera...

User Guide
Page 5
While in Live View, press / to get familiar with camera controls, set up your digital camera for use, and begin taking pictures. HP Photosmart E427 Digital Camera 5 press / to zoom out (see Digital zoom on page 11). 4 Power light. 5 button-Displays camera menus, selects options, and confirms actions. 6 Delete button-Accesses the Delete function while in Playback (see Taking pictures and...
While in Live View, press / to get familiar with camera controls, set up your digital camera for use, and begin taking pictures. HP Photosmart E427 Digital Camera 5 press / to zoom out (see Digital zoom on page 11). 4 Power light. 5 button-Displays camera menus, selects options, and confirms actions. 6 Delete button-Accesses the Delete function while in Playback (see Taking pictures and...
User Guide
Page 7
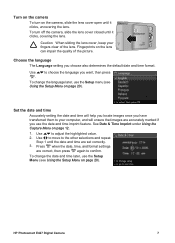
...images are accurately marked if you choose also determines the default date and time format. HP Photosmart E427 Digital Camera 7 Use to move to confirm. See Date & Time Imprint under Using the Capture Menu on the camera, slide the lens cover open until the date and time are correct, then press ... language The Language setting you use the date and time imprint feature. Use to adjust the highlighted value. 2. Turn on the camera To turn off the camera, slide the lens cover closed until it clicks, uncovering the lens. To change the date and time later, use the Setup...
...images are accurately marked if you choose also determines the default date and time format. HP Photosmart E427 Digital Camera 7 Use to move to confirm. See Date & Time Imprint under Using the Capture Menu on the camera, slide the lens cover open until the date and time are correct, then press ... language The Language setting you use the date and time imprint feature. Use to adjust the highlighted value. 2. Turn on the camera To turn off the camera, slide the lens cover closed until it clicks, uncovering the lens. To change the date and time later, use the Setup...
User Guide
Page 9
... disable any virus protection software. 2. If the installation screen does not appear, click Start, click Run, type D:\Setup.exe, where D is the letter of HP Photosmart Software: ● HP Photosmart Premier Software (for Macintosh systems). HP Photosmart E427 Digital Camera 9 Double-click the CD icon on page 19 Tip To switch between Live View and Playback, press . Using your...
... disable any virus protection software. 2. If the installation screen does not appear, click Start, click Run, type D:\Setup.exe, where D is the letter of HP Photosmart Software: ● HP Photosmart Premier Software (for Macintosh systems). HP Photosmart E427 Digital Camera 9 Double-click the CD icon on page 19 Tip To switch between Live View and Playback, press . Using your...
User Guide
Page 11
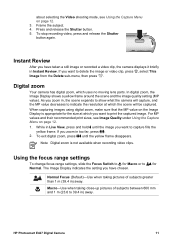
... If you have taken a still image or recorded a video clip, the camera displays it briefly in , the scene expands to show what the camera will be captured. As you zoom in Instant Review. To exit digital zoom, press until the image you want to for the size at which uses... no moving lens parts. While in too far, press . 2. Press and release the Shutter button. 5. HP Photosmart E427 Digital Camera 11 To stop recording video, press and release the Shutter button again. Instant Review After you zoom in Live View, press and hold until ...
... If you have taken a still image or recorded a video clip, the camera displays it briefly in , the scene expands to show what the camera will be captured. As you zoom in Instant Review. To exit digital zoom, press until the image you want to for the size at which uses... no moving lens parts. While in too far, press . 2. Press and release the Shutter button. 5. HP Photosmart E427 Digital Camera 11 To stop recording video, press and release the Shutter button again. Instant Review After you zoom in Live View, press and hold until ...
User Guide
Page 13
...lighting. ● Fluorescent-For indoor scenes with fluorescent lighting. Press and release the Shutter button. The camera begins the 10-second countdown, then takes the still image. HP Photosmart E427 Digital Camera 13 Frame the subject in certain shooting modes. Date & Time Imprint-Imprints date in lower left ...Capture Menu options are about to capture brighter, press to increase the value. ● To make the images you turn off the camera. White Balance-Balances color based on page 14. ● To make the images you are not available in the Image Display....
...lighting. ● Fluorescent-For indoor scenes with fluorescent lighting. Press and release the Shutter button. The camera begins the 10-second countdown, then takes the still image. HP Photosmart E427 Digital Camera 13 Frame the subject in certain shooting modes. Date & Time Imprint-Imprints date in lower left ...Capture Menu options are about to capture brighter, press to increase the value. ● To make the images you turn off the camera. White Balance-Balances color based on page 14. ● To make the images you are not available in the Image Display....
User Guide
Page 15
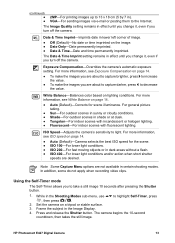
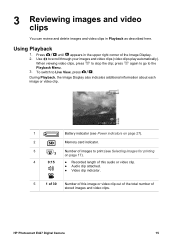
Use to stop the clip; When viewing video clips, press to scroll through your images and video clips (video clips play automatically). HP Photosmart E427 Digital Camera 15 To switch to the Playback Menu. 3. 3 Reviewing images and video clips You can review and delete images and video clips in the upper right ...
Use to stop the clip; When viewing video clips, press to scroll through your images and video clips (video clips play automatically). HP Photosmart E427 Digital Camera 15 To switch to the Playback Menu. 3. 3 Reviewing images and video clips You can review and delete images and video clips in the upper right ...
User Guide
Page 17
... page 18). To deselect this image for viewing purposes only; To stop recording and attach the audio clip to Playback. HP Photosmart E427 Digital Camera 17 Magnifying images This feature is magnified 2x. 2. it , the Record Audio sub-menu displays instead when you select Record Audio. ● Keep Current Clip-...
... page 18). To deselect this image for viewing purposes only; To stop recording and attach the audio clip to Playback. HP Photosmart E427 Digital Camera 17 Magnifying images This feature is magnified 2x. 2. it , the Record Audio sub-menu displays instead when you select Record Audio. ● Keep Current Clip-...
User Guide
Page 19
... Mac help . Check that came with printing, contact your computer's memory card slot). 2. HP Photosmart E427 Digital Camera 19 Using a memory card reader You can connect the camera to any PictBridge-certified printer to begin printing. If no printer error messages. 2. Insert your camera's memory card into the memory card reader (or into a (separately purchased) memory card...
... Mac help . Check that came with printing, contact your computer's memory card slot). 2. HP Photosmart E427 Digital Camera 19 Using a memory card reader You can connect the camera to any PictBridge-certified printer to begin printing. If no printer error messages. 2. Insert your camera's memory card into the memory card reader (or into a (separately purchased) memory card...
User Guide
Page 20
... press . 4. See Set the date and time on page 18. ● Digital Camera (Default)-Recognizes the camera as a digital camera using PTP (Picture Transfer Protocol). ● Disk Drive-Recognizes the camera as button presses and shutter clicks) off and on page 7. About...-Provides information... about the camera, including copyright, serial number, and firmware version. 20 On ...
... press . 4. See Set the date and time on page 18. ● Digital Camera (Default)-Recognizes the camera as a digital camera using PTP (Picture Transfer Protocol). ● Disk Drive-Recognizes the camera as button presses and shutter clicks) off and on page 7. About...-Provides information... about the camera, including copyright, serial number, and firmware version. 20 On ...


