
Service Reference Guide: HP Compaq dc7900 Business PC
Page 9
... a Tower Orientation 176 9 Removal and Replacement Procedures Ultra-Slim Desktop (USDT) Chassis Preparation for Disassembly ...178 External Security Devices ...179 Installing a Security Lock 179 Cable Lock ...179 Padlock ...180 HP Business PC Security Lock 180 Computer Access Panel ...183 Front Bezel ...184 Bezel Blank ...185 Installing Additional Memory ...186 SODIMMs ...186 DDR2-SDRAM SODIMMs 186 Populating...
... a Tower Orientation 176 9 Removal and Replacement Procedures Ultra-Slim Desktop (USDT) Chassis Preparation for Disassembly ...178 External Security Devices ...179 Installing a Security Lock 179 Cable Lock ...179 Padlock ...180 HP Business PC Security Lock 180 Computer Access Panel ...183 Front Bezel ...184 Bezel Blank ...185 Installing Additional Memory ...186 SODIMMs ...186 DDR2-SDRAM SODIMMs 186 Populating...
Service Reference Guide: HP Compaq dc7900 Business PC
Page 198
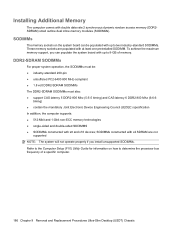
...(F10) Utility Guide for information on the system board can populate the system board with up to two industry-standard SODIMMs. These memory sockets are not supported NOTE: The system will not operate properly if you can be : ● industry-standard 200-pin &#...-sided SODIMMS ● SODIMMs constructed with at least one preinstalled SODIMM. Installing Additional Memory The computer comes with up to 8-GB of a specific computer. 186 Chapter 9 Removal and Replacement Procedures Ultra-Slim Desktop (USDT) Chassis DDR2-SDRAM SODIMMs For proper system operation, the SODIMMs must be ...
...(F10) Utility Guide for information on the system board can populate the system board with up to two industry-standard SODIMMs. These memory sockets are not supported NOTE: The system will not operate properly if you can be : ● industry-standard 200-pin &#...-sided SODIMMS ● SODIMMs constructed with at least one preinstalled SODIMM. Installing Additional Memory The computer comes with up to 8-GB of a specific computer. 186 Chapter 9 Removal and Replacement Procedures Ultra-Slim Desktop (USDT) Chassis DDR2-SDRAM SODIMMs For proper system operation, the SODIMMs must be ...
Service Reference Guide: HP Compaq dc7900 Business PC
Page 200
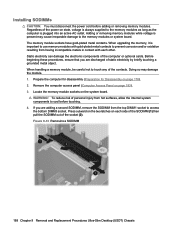
... discharged of the power-on the system board. Remove the computer access panel (Computer Access Panel on page 178). 2. Locate the memory module sockets on state, voltage is present may damage the module. 1. If you are adding a second SODIMM, remove the SODIMM ...9-13 Removing a SODIMM 188 Chapter 9 Removal and Replacement Procedures Ultra-Slim Desktop (USDT) Chassis Installing SODIMMs CAUTION: You must disconnect the power cord before touching. 4. Press outward on the two latches on each other. When handling a memory module, be careful not to access the bottom DIMM3 socket....
... discharged of the power-on the system board. Remove the computer access panel (Computer Access Panel on page 178). 2. Locate the memory module sockets on state, voltage is present may damage the module. 1. If you are adding a second SODIMM, remove the SODIMM ...9-13 Removing a SODIMM 188 Chapter 9 Removal and Replacement Procedures Ultra-Slim Desktop (USDT) Chassis Installing SODIMMs CAUTION: You must disconnect the power cord before touching. 4. Press outward on the two latches on each other. When handling a memory module, be careful not to access the bottom DIMM3 socket....
Service Reference Guide: HP Compaq dc7900 Business PC
Page 202
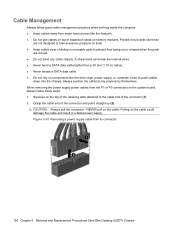
... away from major heat sources like these steps: 1. When removing the power supply power cables from its connector 190 Chapter 9 Removal and Replacement Procedures Ultra-Slim Desktop (USDT) Chassis Squeeze on the cable could damage the cable and result in ) radius. ● Never crease a SATA data cable. ●... Do not rely on the cable. Printed circuit cards like the heatsink. ● Do not jam cables on top of expansion cards or memory modules. Pulling on the top of the retaining latch attached to the cable end of the connector (1). 2. Cable Management Always follow these are...
... away from major heat sources like these steps: 1. When removing the power supply power cables from its connector 190 Chapter 9 Removal and Replacement Procedures Ultra-Slim Desktop (USDT) Chassis Squeeze on the cable could damage the cable and result in ) radius. ● Never crease a SATA data cable. ●... Do not rely on the cable. Printed circuit cards like the heatsink. ● Do not jam cables on top of expansion cards or memory modules. Pulling on the top of the retaining latch attached to the cable end of the connector (1). 2. Cable Management Always follow these are...
Service Reference Guide: HP Compaq dc7900 Business PC
Page 218
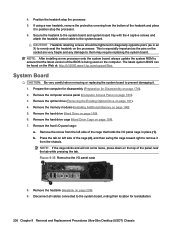
...the computer for disassembly (Preparation for reinstallation. 206 Chapter 9 Removal and Replacement Procedures Ultra-Slim Desktop (USDT) Chassis Remove the optical drive (Removing the Existing Optical Drive on the Web at: http://h18000.www1.hp.com/support/files. Remove the front I /O panel cage 8. Press the tab ...the heatsink (Heatsink on page 183). 3. Remove the computer access panel (Computer Access Panel on page 204). 9. Remove the memory modules (Installing Additional Memory on page 199). 7. Remove the hard drive cage (Hard Drive Cage on page 186). 5. 4. Remove the hard drive (...
...the computer for disassembly (Preparation for reinstallation. 206 Chapter 9 Removal and Replacement Procedures Ultra-Slim Desktop (USDT) Chassis Remove the optical drive (Removing the Existing Optical Drive on the Web at: http://h18000.www1.hp.com/support/files. Remove the front I /O panel cage 8. Press the tab ...the heatsink (Heatsink on page 183). 3. Remove the computer access panel (Computer Access Panel on page 204). 9. Remove the memory modules (Installing Additional Memory on page 199). 7. Remove the hard drive cage (Hard Drive Cage on page 186). 5. 4. Remove the hard drive (...


