
HP Dc7900 Support Question
HP Dc7900 Support Question
Find answers below for this question about HP Dc7900 - Compaq Business Desktop.Need a HP Dc7900 manual? We have 23 online manuals for this item!
Question posted by migrisogo on January 12th, 2014
Cannot Boot From Cd On Hp Dc7900 Ultra-slim Desktop
The person who posted this question about this HP product did not include a detailed explanation. Please use the "Request More Information" button to the right if more details would help you to answer this question.
Current Answers
Related HP Dc7900 Manual Pages
Service Reference Guide: HP Compaq dc7900 Business PC - Page 7
... Preparation Chassis Designations ...54 Convertible Minitower (CMT 54 Small Form Factor (SFF 55 Ultra-Slim Desktop (USDT 55 Electrostatic Discharge Information ...56 Generating Static ...56 Preventing Electrostatic Damage to Equipment...Installing a Security Lock 66 Cable Lock ...66 Padlock ...67 HP Business PC Security Lock 68 Computer Access Panel ...70 Front Bezel ...71 Bezel Blanks ......
Service Reference Guide: HP Compaq dc7900 Business PC - Page 9
... ...175 Using the Small Form Factor Computer in a Tower Orientation 176
9 Removal and Replacement Procedures Ultra-Slim Desktop (USDT) Chassis Preparation for Disassembly ...178 External Security Devices ...179 Installing a Security Lock 179 Cable Lock ...179 Padlock ...180 HP Business PC Security Lock 180 Computer Access Panel ...183 Front Bezel ...184 Bezel Blank ...185 Installing Additional...
Service Reference Guide: HP Compaq dc7900 Business PC - Page 190
... mounting stand, remove it from the stand.
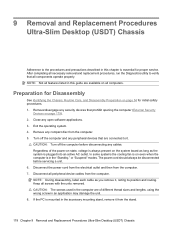
178 Chapter 9 Removal and Replacement Procedures Ultra-Slim Desktop (USDT) Chassis Turn off the computer before servicing a unit. 6. NOTE: During...wrong screw in the "Standby," or "Suspend" modes. 9 Removal and Replacement Procedures Ultra-Slim Desktop (USDT) Chassis
Adherence to the procedures and precautions described in this guide are available ...
Service Reference Guide: HP Compaq dc7900 Business PC - Page 192
Padlock
Figure 9-3 Installing a Padlock
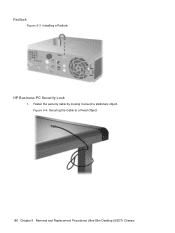
HP Business PC Security Lock
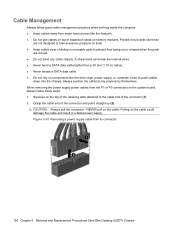
1. Fasten the security cable by looping it around a stationary object. Figure 9-4 Securing the Cable to a Fixed Object
180 Chapter 9 Removal and Replacement Procedures Ultra-Slim Desktop (USDT) Chassis
Service Reference Guide: HP Compaq dc7900 Business PC - Page 194
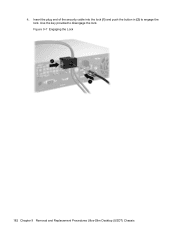
Figure 9-7 Engaging the Lock
182 Chapter 9 Removal and Replacement Procedures Ultra-Slim Desktop (USDT) Chassis Insert the plug end of the security cable into the lock (1) and push the button in (2) to disengage the lock. 4. Use the key provided to engage the lock.
Service Reference Guide: HP Compaq dc7900 Business PC - Page 196
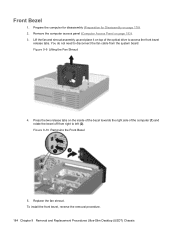
... cable from right to access the front bezel
release tabs. To install the front bezel, reverse the removal procedure. 184 Chapter 9 Removal and Replacement Procedures Ultra-Slim Desktop (USDT) Chassis Replace the fan shroud. Figure 9-9 Lifting the Fan Shroud
4. Lift the fan and shroud assembly up and place it on the inside of...
Service Reference Guide: HP Compaq dc7900 Business PC - Page 198
... to determine the processor bus frequency of memory.
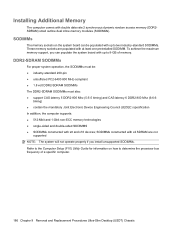
SODIMMs
The memory sockets on how to 8-GB of a specific computer.
186 Chapter 9 Removal and Replacement Procedures Ultra-Slim Desktop (USDT) Chassis
Installing Additional Memory
The computer comes with up to two industry-standard SODIMMs. These memory sockets are not
supported NOTE: The system will...
Service Reference Guide: HP Compaq dc7900 Business PC - Page 200
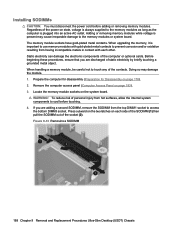
... hot surfaces, allow the internal system components to cool before adding or removing memory modules. Figure 9-13 Removing a SODIMM
188 Chapter 9 Removal and Replacement Procedures Ultra-Slim Desktop (USDT) Chassis
Service Reference Guide: HP Compaq dc7900 Business PC - Page 202
... cable end of the connector and pull it straight up (2).
Figure 9-15 Removing a power supply cable from its connector
190 Chapter 9 Removal and Replacement Procedures Ultra-Slim Desktop (USDT) Chassis A sharp bend can break the internal wires. ● Never bend a SATA data cable tighter than a 30 mm (1.18 in) radius. ● Never crease...
Service Reference Guide: HP Compaq dc7900 Business PC - Page 203
... Black
Description Front chassis fan Rear chassis fan Internal speaker Optical data Hood sensor ReadyBoost module Optical power Optical power
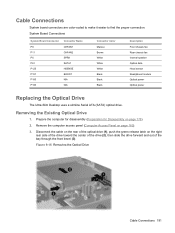
Replacing the Optical Drive
The Ultra-Slim Desktop uses a slimline Serial ATA (SATA) optical drive. Remove the computer access panel (Computer Access Panel on the right
rear side of the drive toward the...
Service Reference Guide: HP Compaq dc7900 Business PC - Page 204
... the holes on the release
latch with the pins on the release latch. 2. Figure 9-17 Aligning the Release Latch
192 Chapter 9 Removal and Replacement Procedures Ultra-Slim Desktop (USDT) Chassis Without allowing the release latch to the
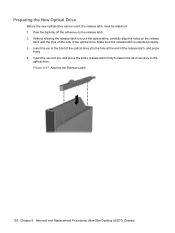
optical drive. Preparing the New Optical Drive
Before the new optical drive can be used, the...
Service Reference Guide: HP Compaq dc7900 Business PC - Page 206
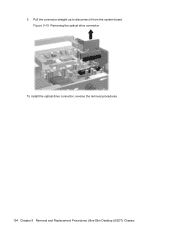
Figure 9-19 Removing the optical drive connector
To install the optical drive connector, reverse the removal procedures.
194 Chapter 9 Removal and Replacement Procedures Ultra-Slim Desktop (USDT) Chassis Pull the connector straight up to disconnect it from the system board. 5.
Service Reference Guide: HP Compaq dc7900 Business PC - Page 207
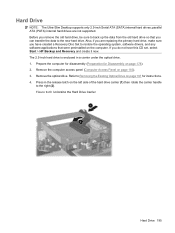
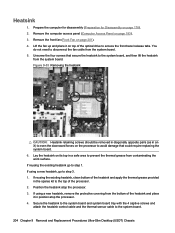
Hard Drive
NOTE: The Ultra-Slim Desktop supports only 2.5-inch Serial ATA (SATA) internal hard drives; If you do not have...rotate the carrier handle
to restore the operating system, software drivers, and any software applications that you have this CD set, select Start > HP Backup and Recovery and create it now. Prepare the computer for disassembly (Preparation for instructions. 4. parallel ATA...
Service Reference Guide: HP Compaq dc7900 Business PC - Page 208
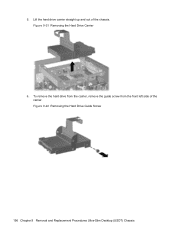
Figure 9-22 Removing the Hard Drive Guide Screw
196 Chapter 9 Removal and Replacement Procedures Ultra-Slim Desktop (USDT) Chassis To remove the hard drive from the carrier, remove the guide screw from the front left side of the chassis. Lift the hard drive carrier straight up and out of the carrier. Figure 9-21 Removing the Hard Drive Carrier
6. 5.
Service Reference Guide: HP Compaq dc7900 Business PC - Page 210
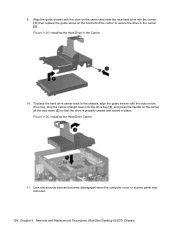
... the carrier all the way down (2) so that were disengaged when the computer cover or access panel was removed.
198 Chapter 9 Removal and Replacement Procedures Ultra-Slim Desktop (USDT) Chassis Lock any security devices that the drive is properly seated and locked in the Carrier
10. 9.
Service Reference Guide: HP Compaq dc7900 Business PC - Page 212
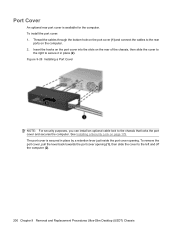
... Cover
NOTE: For security purposes, you can install an optional cable lock to the left and off the computer (2).
200 Chapter 9 Removal and Replacement Procedures Ultra-Slim Desktop (USDT) Chassis To install the port cover: 1. To remove the port cover, pull the lever back towards the port cover opening . See Installing a Security Lock...
Service Reference Guide: HP Compaq dc7900 Business PC - Page 214
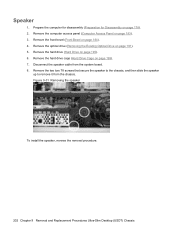
... (Preparation for Disassembly on page 191). 5. Figure 9-31 Removing the speaker
To install the speaker, reverse the removal procedure.
202 Chapter 9 Removal and Replacement Procedures Ultra-Slim Desktop (USDT) Chassis Remove the hard drive (Hard Drive on page 183). 3. Remove the computer access panel (Computer Access Panel on page 195). 6.
Service Reference Guide: HP Compaq dc7900 Business PC - Page 216
... reusing the existing heatsink, clean bottom of the processor. 2. If reusing the existing heatsink go to the system board.
204 Chapter 9 Removal and Replacement Procedures Ultra-Slim Desktop (USDT) Chassis Remove the computer access panel (Computer Access Panel on page 178). 2. Remove the front fan (Front Fan on the processor to the system...
Service Reference Guide: HP Compaq dc7900 Business PC - Page 218
... 178). 2. Prepare the computer for disassembly (Preparation for reinstallation.
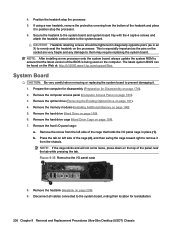
206 Chapter 9 Removal and Replacement Procedures Ultra-Slim Desktop (USDT) Chassis Figure 9-35 Removing the I /O panel cage:
a. Remove the hard drive (Hard Drive on the Web at: http://h18000.www1.hp.com/support/files. Remove the screw from the chassis. Remove the front I /O panel cage...
Service Reference Guide: HP Compaq dc7900 Business PC - Page 222
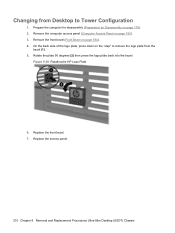
Changing from Desktop to remove the logo plate from the
bezel (1). 5. On the back side of the logo ... plate back into the bezel. Replace the access panel.
210 Chapter 9 Removal and Replacement Procedures Ultra-Slim Desktop (USDT) Chassis Replace the front bezel. 7. Figure 9-39 Rotating the HP Logo Plate
6. Remove the computer access panel (Computer Access Panel on page 184). 4.
Prepare ...
Similar Questions

Have A Hp Dc7900 Ultra Slim Desktop,4beeps.what Does It Mean.
(Posted by jaebill 9 years ago)

4 Beeps When Hp Compaq Dc7900 Ultra Slim Desktop Pc Boots Up
(Posted by arkaNav 10 years ago)
Cant Get Network Drivers Installed On My Hp Compaq Dc7800 Ultra-slim Desktop Pc
(Posted by raqeeEtti 10 years ago)
Hp Compaq 6005 Pro Ultra-slim Desktop Pc Won't Boot
(Posted by spacequi 10 years ago)

Hp Dc7900 Ultra Slim Is Not Power On
My Computer Hp Dc7900 Ultra Slim Is Not Power On,nothing Happen But Only Orange Light Inside The Mot...
My Computer Hp Dc7900 Ultra Slim Is Not Power On,nothing Happen But Only Orange Light Inside The Mot...
(Posted by boanergecs 11 years ago)