Dc7900 Convertible Minitower - HP Compaq Business Desktop
Dc7900 Convertible Minitower

Related Manual Pages


Similar Questions

Hp Compaq Dc7900 Convertible Minitower Beeps 4 Times Wont Turn On
(Posted by kenwSolmi 9 years ago)

How To Flash Hp Compaq Dc7800p Convertible Minitower Pc Bios Rom
(Posted by AJPCka 10 years ago)

Still One More Question On The Hp Compaq Dc7800 Convertible Minitower.
Iam so very greatful for the answer.still there is one problem left.when i try to insert a flash dri...
Iam so very greatful for the answer.still there is one problem left.when i try to insert a flash dri...
(Posted by rashidkamau 12 years ago)
Related Terms
The following terms were also used when searching for Dc7900 Convertible Minitower - HP Compaq Business Desktop:- dc7900 ultra slim
- hp dc7900 sff
- dc7900 sff
- dc7900 small form factor
- hp compaq dc7900 small form factor
- hp dc7900 ultra slim
- dc7900 desktop
- hp dc7900 small form factor
- dc7900 ultra slim desktop
- dc7900 usdt
- hp dc7900 drivers
- dc7900 cmt
- hp dc7900 desktop
- dc7900 pci serial port
- dc7900 bios
- dc7900 drivers
- hp compaq dc7900 ultra slim desktop
- hp dc7900 cmt
- hp dc7900 usdt
- hp dc7900 bios
- hp dc7900 ultra slim desktop
- dc7900 pci serial port driver
- dc7900 memory
- hp dc7900 memory
- dc7900 review
- dc7900 specs
- hp dc7900 pci serial port driver
- dc7900 beep codes
- dc7900 ram
- dc7900 specifications
- hp dc7900 specs
- dc7900 4 beeps
- dc7900 hdmi
- hp dc7900 ram
- hp dc7900 review
- ar724us aba
- ar805us aba
- ar805us#aba
- aq527us aba number
- aq601us aba
- aq601us aba number
- aq601us#aba
- aq645us aba number
- aq764us aba number
- aq857us aba number
- aq869us aba number
- aq950us aba number
- aq951us aba number
- aq961us aba number
- aq961us#aba
- ar031us aba number
- ar048us aba number
- ar221us aba
- ar221us aba number
- ar270us aba number
- ar280us aba number
- ar281us aba number
- ar282us aba
- ar282us aba number
- ar311us aba number
- ar337us aba number
- ar370us aba
- ar370us aba number
- ar393us aba
- ar393us aba number
- ar413us aba number
- ar463us aba number
- ar644us aba number
- ar650us aba number
- ar652us aba number
- ar663us aba number
- ar665us aba number
- ar666us aba number
- ar691us aba number
- ar692us aba number
- ar696us aba number
- ar706us aba number
- ar708us aba number
- ar711us aba number
- ar724us aba hp
- ar724us aba number
- ar727us aba number
- ar783us aba number
- ar792us aba number
- ar805us aba number
- ar846us aba number
- ar860us aba
- ar860us aba number
- ar860us#aba
- ar866us aba number
- ar879us aba number
- ar889us aba number
- ar890us aba number
- ar906us aba number
- ar963us aba number
- ar964us aba number
- ar980us aba number
- ar981us aba number
- as053us aba number
- compaq dc7900
- dc7900
- dc7900 5 beeps
- dc7900 64-bit
- dc7900 audio driver
- dc7900 audio driver windows 7
- dc7900 audio drivers
- dc7900 beep code
- dc7900 bios update
- dc7900 bios update 786g1
- dc7900 cases
- dc7900 cmt what power supply upgrade
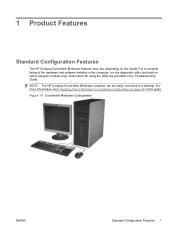
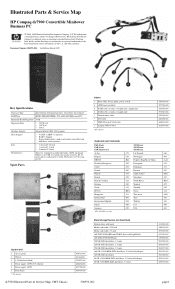
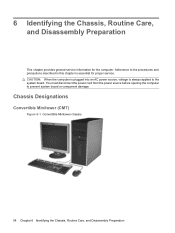
- dc7900 convertible minitower
- dc7900 convertible minitower drivers
- dc7900 core 2 duo e7300
- dc7900 cpu
- dc7900 cpu support
- dc7900 cpu upgrade
- dc7900 desktop computer
- dc7900 desktop manual
- dc7900 desktop pc
- dc7900 desktop pc reviews
- dc7900 desktop review
- dc7900 desktop specifications
- dc7900 desktop specs
- dc7900 displayport
- dc7900 driver
- dc7900 drivers download
- dc7900 drivers small form factor
- dc7900 drivers windows 7
- dc7900 drivers xp
- dc7900 dual monitor support
- dc7900 e8500
- dc7900 graphics card
- dc7900 hackintosh
- dc7900 hard drive
- dc7900 hp
- dc7900 hp memory
- dc7900 manual
- dc7900 max memory
- dc7900 max ram
- dc7900 maximum memory
- dc7900 memory specs
- dc7900 memory upgrade
- dc7900 motherboard
- dc7900 motherboard layout
- dc7900 motherboard specs
- dc7900 mt
- dc7900 network controller
- dc7900 no audio
- dc7900 overclock
- dc7900 pci serial port driver windows 7
- dc7900 pci simple communication controller
- dc7900 pci simple communications controller
- dc7900 power cord
- dc7900 power supply
- dc7900 processor
- dc7900 raid
- dc7900 ram upgrade
- dc7900 reboots
- dc7900 refurbished
- dc7900 release date
- dc7900 restore disk
- dc7900 reviews
- dc7900 serial port driver
- dc7900 sff 64-bit
- dc7900 sff cpu support
- dc7900 sff drivers
- dc7900 sff motherboard
- dc7900 sff specifications
- dc7900 shuts down
- dc7900 simple communications controller
- dc7900 slim drivers
- dc7900 slim pc
- dc7900 small form factor drivers
- dc7900 small form factor specs
- dc7900 sound driver
- dc7900 spdif
- dc7900 spec
- dc7900 specification
- dc7900 support
- dc7900 tower
- dc7900 ultra slim desktop drivers
- dc7900 ultra slim memory
- dc7900 ultra slim power supply
- dc7900 ultra-slim memory
- dc7900 ultra-slim power supply
- dc7900 unknown device
- dc7900 upgrades
- dc7900 usdt drivers
- dc7900 usdt drivers interne speaker
- dc7900 user guide
- dc7900 validating settings
- dc7900 video card
- dc7900 video card upgrade
- dc7900 video drivers
- dc7900 virtualization
- dc7900 what power supply
- dc7900 windows 10
- dc7900 windows 8
- dc7900 windows 8 drivers
- dc7900 xp drivers
- dc7900/dc7800
- dc7900/dc7800/dc5800
- hewlett packard dc7900
- hewlett-packard dc7900
- hp compaq dc7900 convertible minitower
- hp dc7900
- hp dc7900 4 beeps
- hp dc7900 5 beeps
- hp dc7900 audio driver
- hp dc7900 audio drivers
- hp dc7900 beep code
- hp dc7900 beep codes
- hp dc7900 bios update
- hp dc7900 convertible minitower
- hp dc7900 core 2 duo e7300
- hp dc7900 cpu support
- hp dc7900 cpu upgrade
- hp dc7900 desktop computer
- hp dc7900 desktop manual
- hp dc7900 desktop pc
- hp dc7900 desktop pc reviews
- hp dc7900 desktop review
- hp dc7900 desktop specifications
- hp dc7900 desktop specs
- hp dc7900 displayport
- hp dc7900 driver
- hp dc7900 drivers windows 7
- hp dc7900 drivers xp
- hp dc7900 dual monitor support
- hp dc7900 e8500
- hp dc7900 hard drive
- hp dc7900 hdmi
- hp dc7900 manual
- hp dc7900 max ram
- hp dc7900 maximum memory
- hp dc7900 memory specs
- hp dc7900 memory upgrade
- hp dc7900 motherboard
- hp dc7900 motherboard layout
- hp dc7900 motherboard specs
- hp dc7900 pci serial port
- hp dc7900 pci serial port driver windows 7
- hp dc7900 pci simple communication controller
- hp dc7900 power supply
- hp dc7900 raid
- hp dc7900 reboots
- hp dc7900 release date
- hp dc7900 restore disk
- hp dc7900 reviews
- hp dc7900 sff drivers
- hp dc7900 sff motherboard
- hp dc7900 sff specifications
- hp dc7900 shuts down
- hp dc7900 slim pc
- hp dc7900 small form factor specs
- hp dc7900 sound driver
- hp dc7900 spec
- hp dc7900 specification
- hp dc7900 specifications
- hp dc7900 support
- hp dc7900 tower
- hp dc7900 ultra slim power supply
- hp dc7900 ultra-slim power supply
- hp dc7900 upgrades
- hp dc7900 usdt drivers
- hp dc7900 validating settings
- hp dc7900 video card
- hp dc7900 video drivers
- hp dc7900 windows 8