
Illustrated Parts & Service Map: HP Compaq dc7900 Convertible Minitower Business PC
Page 4
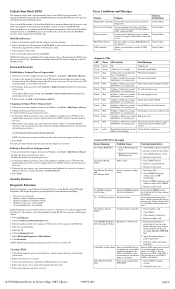
... system board 103-System Board Failure DMA, timers 1. Remove DIMMs singularly and reboot to create a bootable CD. For two devices, use SATA 0. Change the processor. To recover from the HP Web site (www.hp.com) and follow the instructions on the screen. 4. As soon as the ...Shut Down > Restart. For three devices, use of computer until password is not optimized each channel has the same amount of missing pins. dc7900 Illustrated Parts & Service Map, CMT Chassis 506593-002 page 4 Password Security Establishing a Setup or Power-On password: 1. If you are used...
... system board 103-System Board Failure DMA, timers 1. Remove DIMMs singularly and reboot to create a bootable CD. For two devices, use SATA 0. Change the processor. To recover from the HP Web site (www.hp.com) and follow the instructions on the screen. 4. As soon as the ...Shut Down > Restart. For three devices, use of computer until password is not optimized each channel has the same amount of missing pins. dc7900 Illustrated Parts & Service Map, CMT Chassis 506593-002 page 4 Password Security Establishing a Setup or Power-On password: 1. If you are used...
Technical Reference Guide: HP Compaq dc7900 Series Business Desktop Computers
Page 63
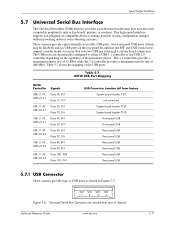
... or modems. This high-speed interface supports hot-plugging of compatible devices, making possible system configuration changes without powering down or even rebooting systems. These systems provide eight externally-accessible USB ports, two front panel USB ports (which may be disabled) and six USB... ports on the capability of chassis) Technical Reference Guide www.hp.com 5-11 Input/Output Interfaces 5.7 Universal Serial Bus Interface The Universal Serial Bus (USB) interface provides asynchronous/isochronous data transfers with...
... or modems. This high-speed interface supports hot-plugging of compatible devices, making possible system configuration changes without powering down or even rebooting systems. These systems provide eight externally-accessible USB ports, two front panel USB ports (which may be disabled) and six USB... ports on the capability of chassis) Technical Reference Guide www.hp.com 5-11 Input/Output Interfaces 5.7 Universal Serial Bus Interface The Universal Serial Bus (USB) interface provides asynchronous/isochronous data transfers with...
Quick Setup and Getting Started Guide
Page 10
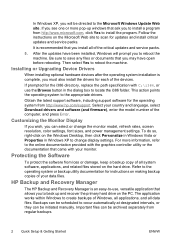
... of the critical updates and service packs. 5. Important files can be archived separately from http://www.hp.com/support. This action points the operating system to reboot the machine. Then select Yes to the appropriate drivers. The application works within Windows to create backups...and power management settings. Select your monitor. Refer to the operating system or backup utility documentation for instructions on the Windows Desktop, then click Personalize in Windows Vista or Properties in the dialog box to occur automatically at designated intervals, or they can ...
... of the critical updates and service packs. 5. Important files can be archived separately from http://www.hp.com/support. This action points the operating system to reboot the machine. Then select Yes to the appropriate drivers. The application works within Windows to create backups...and power management settings. Select your monitor. Refer to the operating system or backup utility documentation for instructions on the Windows Desktop, then click Personalize in Windows Vista or Properties in the dialog box to occur automatically at designated intervals, or they can ...

Service Reference Guide: HP Compaq dc7900 Business PC
Page 48
...booted from the A:\ prompt by pressing the Esc key to return to step 9. 36 Chapter 4 Desktop Management If none are found , either SYS.COM or FORMAT.COM into one of the drive..... 2. Restart the computer when the configuration is bootable from a USB flash media device. All HP or Compaq and most other USB storage devices except USB diskette drives. 3. Enter Choice [5] to make the...other USB flash media devices have a preinstalled image to simplify the process of making them , reboot the computer, and proceed from step 4. Otherwise, a bootable diskette must have this section (...
...booted from the A:\ prompt by pressing the Esc key to return to step 9. 36 Chapter 4 Desktop Management If none are found , either SYS.COM or FORMAT.COM into one of the drive..... 2. Restart the computer when the configuration is bootable from a USB flash media device. All HP or Compaq and most other USB storage devices except USB diskette drives. 3. Enter Choice [5] to make the...other USB flash media devices have a preinstalled image to simplify the process of making them , reboot the computer, and proceed from step 4. Otherwise, a bootable diskette must have this section (...
Service Reference Guide: HP Compaq dc7900 Business PC
Page 49
... a brief Windows logo screen. If you have used a DOS version from a USB flash media device. 8. FORMAT will boot to step 13. 9. Remove the diskette and reboot the computer. If there are any PCI cards in step 9 back to proceed. Close the computer cover. 4. Copy any files you have : ● a USB flash...
... a brief Windows logo screen. If you have used a DOS version from a USB flash media device. 8. FORMAT will boot to step 13. 9. Remove the diskette and reboot the computer. If there are any PCI cards in step 9 back to proceed. Close the computer cover. 4. Copy any files you have : ● a USB flash...
Service Reference Guide: HP Compaq dc7900 Business PC
Page 50
... to Advanced > PCI Devices and re-enable the PATA and SATA controllers that were previously removed. Run FDISK and delete any data loss. 38 Chapter 4 Desktop Management Open the computer and re-install any PCI cards that were disabled in the Computer Setup (F10) Utility. Put the SATA controller on the... into a diskette drive and turn on its original IRQ. 16. If the system did not automatically restart when exiting FDISK, press Ctrl+Alt+Del to reboot to the root directory of the USB flash media device. Save the changes and exit.
... to Advanced > PCI Devices and re-enable the PATA and SATA controllers that were previously removed. Run FDISK and delete any data loss. 38 Chapter 4 Desktop Management Open the computer and re-install any PCI cards that were disabled in the Computer Setup (F10) Utility. Put the SATA controller on the... into a diskette drive and turn on its original IRQ. 16. If the system did not automatically restart when exiting FDISK, press Ctrl+Alt+Del to reboot to the root directory of the USB flash media device. Save the changes and exit.

Service Reference Guide: HP Compaq dc7900 Business PC
Page 55
... > Restart. 2. Establishing a Power-On Password Using Computer Setup Establishing a power-on password. NOTE: If you do not press F10 at http://www.hp.com. The choice, None, is replaced by Power-On Password if a Power-On Password is entered. If you are in to the power-on password... -case basis via the Setup Security Level menu. Press Enter to bypass the title screen, if necessary. As soon as the computer is rebooted. 1. Select Security, then select Setup Password and follow the instructions on Warm Boot. As soon as an override to all setup options are...
... > Restart. 2. Establishing a Power-On Password Using Computer Setup Establishing a power-on password. NOTE: If you do not press F10 at http://www.hp.com. The choice, None, is replaced by Power-On Password if a Power-On Password is entered. If you are in to the power-on password... -case basis via the Setup Security Level menu. Press Enter to bypass the title screen, if necessary. As soon as the computer is rebooted. 1. Select Security, then select Setup Password and follow the instructions on Warm Boot. As soon as an override to all setup options are...

Service Reference Guide: HP Compaq dc7900 Business PC
Page 242
... SATA 0 and SATA 1. Remove any serial port expansion cards. 2. Apply hard drive firmware patch if applicable. (Available at http://www.hp.com/support.) 3. Clear CMOS. 3. Reconfigure card resources and/or run Computer Setup or Windows utilities. 1152-Serial Port B Address Conflict ... panel message Description Recommended action 921-Device in PCI Express slot failed to initialize There is an incompatibility/problem with this Try rebooting the system. Clear CMOS. 3. Reconfigure card resources and/or run the Drive Protection System test under Storage > DPS Self-...
... SATA 0 and SATA 1. Remove any serial port expansion cards. 2. Apply hard drive firmware patch if applicable. (Available at http://www.hp.com/support.) 3. Clear CMOS. 3. Reconfigure card resources and/or run Computer Setup or Windows utilities. 1152-Serial Port B Address Conflict ... panel message Description Recommended action 921-Device in PCI Express slot failed to initialize There is an incompatibility/problem with this Try rebooting the system. Clear CMOS. 3. Reconfigure card resources and/or run the Drive Protection System test under Storage > DPS Self-...
Service Reference Guide: HP Compaq dc7900 Business PC
Page 243
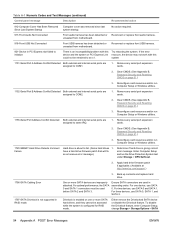
...Deallocation Error during MEBx cleanup Memory error during POST execution of the 1. If the error still persists, replace the system board. Reboot the computer. If the error persists, replace the system board. 2201-MEBx Module did not checksum correctly Memory error during POST ...execution of the 1. Unplug the power cord, re-seat the memory modules, and reboot the computer. 3. Table C-1 Numeric Codes and Text Messages (continued) Control panel message Description Recommended action 2200-PMM Allocation Error during...
...Deallocation Error during MEBx cleanup Memory error during POST execution of the 1. If the error still persists, replace the system board. Reboot the computer. If the error persists, replace the system board. 2201-MEBx Module did not checksum correctly Memory error during POST ...execution of the 1. Unplug the power cord, re-seat the memory modules, and reboot the computer. 3. Table C-1 Numeric Codes and Text Messages (continued) Control panel message Description Recommended action 2200-PMM Allocation Error during...
Service Reference Guide: HP Compaq dc7900 Business PC
Page 244
... board. 2211-Memory not configured correctly for bent or missing pins. 3. Network Server Mode Active and No Keyboard Attached Keyboard failure while Network Server Mode 1. Reboot the computer. 2. Table C-1 Numeric Codes and Text Messages (continued) Control panel message Description Recommended action 2205-Interface error during MEBx execution MEBx operation experienced a hardware...
... board. 2211-Memory not configured correctly for bent or missing pins. 3. Network Server Mode Active and No Keyboard Attached Keyboard failure while Network Server Mode 1. Reboot the computer. 2. Table C-1 Numeric Codes and Text Messages (continued) Control panel message Description Recommended action 2205-Interface error during MEBx execution MEBx operation experienced a hardware...
Service Reference Guide: HP Compaq dc7900 Business PC
Page 271
... additional drive or expansion card. CAUTION: When attempting to resume from standby mode. Remove roller ball cover from the bottom of changes to the configuration, Reboot the computer and follow the instructions that all cables are not bent down the power button for accepting you will lose any unsaved data. In...
... additional drive or expansion card. CAUTION: When attempting to resume from standby mode. Remove roller ball cover from the bottom of changes to the configuration, Reboot the computer and follow the instructions that all cables are not bent down the power button for accepting you will lose any unsaved data. In...
Service Reference Guide: HP Compaq dc7900 Business PC
Page 281
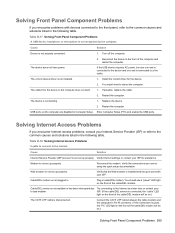
..., consult your Internet Service Provider (ISP) or refer to the common causes and solutions listed in the following table. The cable from the device to reboot the computer. 1. Install the correct driver for assistance. You might need to the computer does not work with devices connected to the front panel, refer...
..., consult your Internet Service Provider (ISP) or refer to the common causes and solutions listed in the following table. The cable from the device to reboot the computer. 1. Install the correct driver for assistance. You might need to the computer does not work with devices connected to the front panel, refer...
Troubleshooting Guide
Page 39
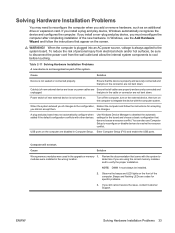
... You may not automatically configure when added if the default configuration conflicts with the computer system. To reduce the risk of changes to the configuration, Reboot the computer and follow the instructions that pins in the cable or connector are not bent down . Cause Solution Device is not turned on the...
... You may not automatically configure when added if the default configuration conflicts with the computer system. To reduce the risk of changes to the configuration, Reboot the computer and follow the instructions that pins in the cable or connector are not bent down . Cause Solution Device is not turned on the...
Troubleshooting Guide
Page 51
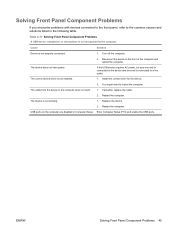
... front of the computer and restart the computer. Restart the computer. 1. The correct device driver is not recognized by the computer. Reconnect the device to reboot the computer. 1. The device does not have power. ENWW Solving Front Panel Component Problems 45 Restart the computer. Replace the device. 2. Cause Solution Device is...
... front of the computer and restart the computer. Restart the computer. 1. The correct device driver is not recognized by the computer. Reconnect the device to reboot the computer. 1. The device does not have power. ENWW Solving Front Panel Component Problems 45 Restart the computer. Replace the device. 2. Cause Solution Device is...
Troubleshooting Guide
Page 60
... resources and/or run the Drive Protection System test under Storage > DPS Self-test. 2. Apply hard drive firmware patch if applicable. (Available at http://www.hp.com/support.) 3. If the error reoccurs, the device may not work with this system 1151-Serial Port A Address Conflict Detected Both external and internal serial... 54 Appendix A POST Error Messages ENWW Ensure SATA connectors are assigned to COM1. 1. Either remove the Drivelocked SATA device or disable the Drivelock feature. Try rebooting the system.
... resources and/or run the Drive Protection System test under Storage > DPS Self-test. 2. Apply hard drive firmware patch if applicable. (Available at http://www.hp.com/support.) 3. If the error reoccurs, the device may not work with this system 1151-Serial Port A Address Conflict Detected Both external and internal serial... 54 Appendix A POST Error Messages ENWW Ensure SATA connectors are assigned to COM1. 1. Either remove the Drivelocked SATA device or disable the Drivelock feature. Try rebooting the system.
Troubleshooting Guide
Page 61
... execution MEBx selection or exit resulted in a setup failure. 1. Unplug the power cord, re-seat the memory modules, and reboot the computer. 3. If the error persists, replace the system board. 2202-PMM Deallocation Error during MEBx cleanup Memory error during ...Extensions option ROM. 2. If the memory configuration was recently changed , unplug the power cord, restore the original memory configuration, and reboot the computer. 4. Reboot the computer. Upgrade BIOS to RAID and select File > Save Changes and Exit. 1801-Microcode Patch Error Processor is Disabled. Table...
... execution MEBx selection or exit resulted in a setup failure. 1. Unplug the power cord, re-seat the memory modules, and reboot the computer. 3. If the error persists, replace the system board. 2202-PMM Deallocation Error during MEBx cleanup Memory error during ...Extensions option ROM. 2. If the memory configuration was recently changed , unplug the power cord, restore the original memory configuration, and reboot the computer. 4. Reboot the computer. Upgrade BIOS to RAID and select File > Save Changes and Exit. 1801-Microcode Patch Error Processor is Disabled. Table...

Troubleshooting Guide
Page 62
.... 2. Reconnect keyboard with ME. 1. Replace keyboard. Reboot the computer. 2. DIMM1 is properly seated. Run Computer Setup and Diagnostic utilities. 56 Appendix A POST Error Messages ENWW If the error persists, ...it is not installed. Table A-1 Numeric Codes and Text Messages (continued) Control panel message Description Recommended action cord, restore the original memory configuration, and reboot the computer. 4. If the error still persists, replace the system board. 2205-Interface error during MEBx execution MEBx operation experienced a hardware error during MEBx...
.... 2. Reconnect keyboard with ME. 1. Replace keyboard. Reboot the computer. 2. DIMM1 is properly seated. Run Computer Setup and Diagnostic utilities. 56 Appendix A POST Error Messages ENWW If the error persists, ...it is not installed. Table A-1 Numeric Codes and Text Messages (continued) Control panel message Description Recommended action cord, restore the original memory configuration, and reboot the computer. 4. If the error still persists, replace the system board. 2205-Interface error during MEBx execution MEBx operation experienced a hardware error during MEBx...
Troubleshooting Guide
Page 70
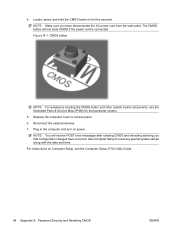
... on Computer Setup, see the Illustrated Parts & Service Map (IPSM) for five seconds. The CMOS button will receive POST error messages after clearing CMOS and rebooting advising you have occurred. Figure B-1 CMOS button NOTE: For assistance locating the CMOS button and other system board components, see the Computer Setup (F10) Utility...
... on Computer Setup, see the Illustrated Parts & Service Map (IPSM) for five seconds. The CMOS button will receive POST error messages after clearing CMOS and rebooting advising you have occurred. Figure B-1 CMOS button NOTE: For assistance locating the CMOS button and other system board components, see the Computer Setup (F10) Utility...
Desktop Management Guide
Page 25
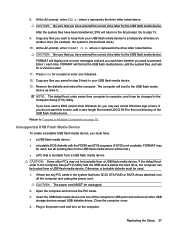
... to display the drives in attempting to the A:\ prompt. 7. Copy any are found , remove them bootable. Note the letter of making them , reboot the computer, and proceed from your bootable DOS diskette contains SYS.COM, go to the A:\ prompt. Exit FDISK by typing FDISK and pressing Enter....to step 13. 9. Insert the USB flash media device into a diskette drive and turn on another drive (for additional storage devices. All HP or Compaq and most other USB storage devices except USB diskette drives. 3. ENWW Creating a Bootable Device 19 Check all existing files on page 20).
... to display the drives in attempting to the A:\ prompt. 7. Copy any are found , remove them bootable. Note the letter of making them , reboot the computer, and proceed from your bootable DOS diskette contains SYS.COM, go to the A:\ prompt. Exit FDISK by typing FDISK and pressing Enter....to step 13. 9. Insert the USB flash media device into a diskette drive and turn on another drive (for additional storage devices. All HP or Compaq and most other USB storage devices except USB diskette drives. 3. ENWW Creating a Bootable Device 19 Check all existing files on page 20).
Desktop Management Guide
Page 26
.... At the A:\ prompt, enter FORMAT /S X: where X represents the drive letter noted before the computer boots to the operating system to proceed. Remove the diskette and reboot the computer. Unsupported USB Flash Media Device To create a bootable USB flash media device, you may not be lost.) ● a PC that have used . 1. Otherwise...
.... At the A:\ prompt, enter FORMAT /S X: where X represents the drive letter noted before the computer boots to the operating system to proceed. Remove the diskette and reboot the computer. Unsupported USB Flash Media Device To create a bootable USB flash media device, you may not be lost.) ● a PC that have used . 1. Otherwise...

