Setup Guide
Page 10
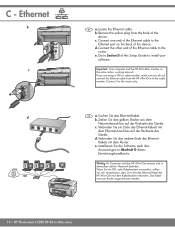
... sollten Sie sich vergewissern, dass Sie nicht das Ethernet-Kabel des HP All-in -One must be finden. Remove the yellow plug from the HP All-in -One series Wichtig: Ihr Computer und das HP All-in-One müssen sich in Abschnitt D dieses Einrichtungshandbuchs. C - d. ... aktiven Netzwerk be on the back of the Ethernet cable to install your software. Das Kabel muss am Router angeschlossen werden. 10 • HP Photosmart C7280 HP All-in -One to the cable modem. d. DE a. Suchen Sie das Ethernet-Kabel. e. b. c. b. Ethernet b c d EN a. Verbinden Sie ...
... sollten Sie sich vergewissern, dass Sie nicht das Ethernet-Kabel des HP All-in -One must be finden. Remove the yellow plug from the HP All-in -One series Wichtig: Ihr Computer und das HP All-in-One müssen sich in Abschnitt D dieses Einrichtungshandbuchs. C - d. ... aktiven Netzwerk be on the back of the Ethernet cable to install your software. Das Kabel muss am Router angeschlossen werden. 10 • HP Photosmart C7280 HP All-in -One to the cable modem. d. DE a. Suchen Sie das Ethernet-Kabel. e. b. c. b. Ethernet b c d EN a. Verbinden Sie ...
Setup Guide
Page 15
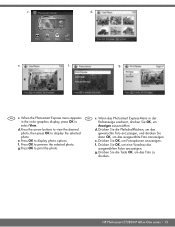
...Drücken Sie OK, um eine Vorschau des g. g. Wenn das Photosmart Express-Menü in der in -One series • 15 Press the arrow buttons to print the photo. e. ausgewählten Fotos anzuzeigen. g. HP Photosmart C7280 HP All-in the color graphics display, press OK to display the selected gewünschte Foto anzuzeigen... Sie die Pfeilschaltflächen, um das photo, then press OK to Farbanzeige erscheint, drücken Sie OK, um select View. f. Photosmart Express d. When the Photosmart Express menu appears DE c. Anzeigen auszuwählen. e.
...Drücken Sie OK, um eine Vorschau des g. g. Wenn das Photosmart Express-Menü in der in -One series • 15 Press the arrow buttons to print the photo. e. ausgewählten Fotos anzuzeigen. g. HP Photosmart C7280 HP All-in the color graphics display, press OK to display the selected gewünschte Foto anzuzeigen... Sie die Pfeilschaltflächen, um das photo, then press OK to Farbanzeige erscheint, drücken Sie OK, um select View. f. Photosmart Express d. When the Photosmart Express menu appears DE c. Anzeigen auszuwählen. e.
User Guide
Page 1
HP Photosmart C7200 All-in-One series Windows Help
HP Photosmart C7200 All-in-One series Windows Help
User Guide
Page 2
Contents Contents 1 HP Photosmart C7200 All-in-One series Help 9 2 HP All-in-One overview The HP All-in-One at a glance 11 Control panel overview...12 Control panel features...13 Display icons...14 Display sleep state...15 Menu overview...15 Photosmart Express Menu 16 Copy Menu...16 Scan Menu...17 Fax Menu... Enter text using the visual keyboard 19 Available symbols for dialing fax numbers 20 Use the HP Photosmart Software 21 3 Find more information...23 4 Finish setting up the HP All-in-One Set your preferences...25 General preferences...25 Set your language and country/region 25 Set the...
Contents Contents 1 HP Photosmart C7200 All-in-One series Help 9 2 HP All-in-One overview The HP All-in-One at a glance 11 Control panel overview...12 Control panel features...13 Display icons...14 Display sleep state...15 Menu overview...15 Photosmart Express Menu 16 Copy Menu...16 Scan Menu...17 Fax Menu... Enter text using the visual keyboard 19 Available symbols for dialing fax numbers 20 Use the HP Photosmart Software 21 3 Find more information...23 4 Finish setting up the HP All-in-One Set your preferences...25 General preferences...25 Set your language and country/region 25 Set the...
User Guide
Page 4
... 81 Avoid paper jams...82 7 Print from your computer Print from a software application 83 Make the HP All-in-One the default printer 84 Change the print settings for the current job 84 Set the paper size...84 ...or quality 86 Change the page orientation 86 Scale the document size...87 Change the saturation, brightness, or color tone 87 Preview your print job...87 Change the default print settings 88 Printing shortcuts...88 Create printing shortcuts... photos...104 Create special projects from your photos 105 Share photos using HP Photosmart Software 107 Save photos to your computer 108 3
... 81 Avoid paper jams...82 7 Print from your computer Print from a software application 83 Make the HP All-in-One the default printer 84 Change the print settings for the current job 84 Set the paper size...84 ...or quality 86 Change the page orientation 86 Scale the document size...87 Change the saturation, brightness, or color tone 87 Preview your print job...87 Change the default print settings 88 Printing shortcuts...88 Create printing shortcuts... photos...104 Create special projects from your photos 105 Share photos using HP Photosmart Software 107 Save photos to your computer 108 3
User Guide
Page 8
...-in-One...284 17 Technical information Specifications...287 Duplexer paper specifications 289 Environmental product stewardship program 289 Paper use...290 Plastics...290 Material safety data sheets 290 Recycling program...290 HP inkjet supplies recycling program 290 Energy consumption...290 Special handling of materials 290 Attention ...number 292 FCC statement...293 Notice to users in Taiwan 299 Declaration of conformity (European Economic Area 299 HP Photosmart C7200 All-in Canada 298 European Union Regulatory Notice 298 Wireless: Notice to users of conformity 300 Index...301 7
...-in-One...284 17 Technical information Specifications...287 Duplexer paper specifications 289 Environmental product stewardship program 289 Paper use...290 Plastics...290 Material safety data sheets 290 Recycling program...290 HP inkjet supplies recycling program 290 Energy consumption...290 Special handling of materials 290 Attention ...number 292 FCC statement...293 Notice to users in Taiwan 299 Declaration of conformity (European Economic Area 299 HP Photosmart C7200 All-in Canada 298 European Union Regulatory Notice 298 Wireless: Notice to users of conformity 300 Index...301 7
User Guide
Page 10
... Help For information about the HP All-in-One, see: • "HP All-in-One overview" on page 11 • "Find more information" on page 23 • "Finish setting up the HP All-in-One" on page 287 HP Photosmart C7200 All-inOne series Help HP Photosmart C7200 All-in -One" on page 155 •... "Shop for ink supplies" on page 167 • "HP warranty and support" on page 279 • "Technical information" on...
... Help For information about the HP All-in-One, see: • "HP All-in-One overview" on page 11 • "Find more information" on page 23 • "Finish setting up the HP All-in-One" on page 287 HP Photosmart C7200 All-inOne series Help HP Photosmart C7200 All-in -One" on page 155 •... "Shop for ink supplies" on page 167 • "HP warranty and support" on page 279 • "Technical information" on...

User Guide
Page 11
Chapter 1 HP Photosmart C7200 All-inOne series Help 10 HP Photosmart C7200 All-in-One series Help
Chapter 1 HP Photosmart C7200 All-inOne series Help 10 HP Photosmart C7200 All-in-One series Help
User Guide
Page 12
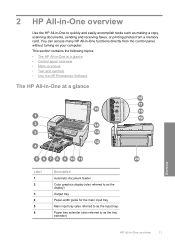
... a glance • Control panel overview • Menu overview • Text and symbols • Use the HP Photosmart Software The HP All-in-One at a glance Overview Label 1 2 3 4 5 6 Description Automatic document feeder Color graphics display (also referred to as the display) Output tray Paper-width guide for the main input tray Main input tray (also referred...
... a glance • Control panel overview • Menu overview • Text and symbols • Use the HP Photosmart Software The HP All-in-One at a glance Overview Label 1 2 3 4 5 6 Description Automatic document feeder Color graphics display (also referred to as the display) Output tray Paper-width guide for the main input tray Main input tray (also referred...

User Guide
Page 14
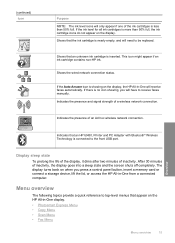
... more of copies, paper size, and paper type. If you can be changed for printing, saving, editing, and sharing photos. Photo Menu: Launches the Photosmart Express menu for better viewing. Back: Returns to the previous screen on the display at 100%, the Fit to Page feature is shown on the...together with the arrows on the display. Copy Menu: Opens the Copy Menu where you press this feature is turned on, the HP All-in-One automatically corrects red eye coloring in on the glass. If you to show more information. The angle of the display can select copy options, such as ...
... more of copies, paper size, and paper type. If you can be changed for printing, saving, editing, and sharing photos. Photo Menu: Launches the Photosmart Express menu for better viewing. Back: Returns to the previous screen on the display at 100%, the Fit to Page feature is shown on the...together with the arrows on the display. Copy Menu: Opens the Copy Menu where you press this feature is turned on, the HP All-in-One automatically corrects red eye coloring in on the glass. If you to show more information. The angle of the display can select copy options, such as ...
User Guide
Page 16
...button, insert a memory card or connect a storage device, lift the lid, or access the HP All-in -One will receive faxes automatically. This icon might appear if an ink cartridge contains non-HP ink. Shows the wired network connection status. Menu overview The following topics provide a quick reference ... top-level menus that the ink cartridge is nearly empty, and will need to be replaced. Shows that appear on the HP All-in-One display. • Photosmart Express Menu • Copy Menu • Scan Menu • Fax Menu Menu overview 15 Indicates that an unknown ink ...
...button, insert a memory card or connect a storage device, lift the lid, or access the HP All-in -One will receive faxes automatically. This icon might appear if an ink cartridge contains non-HP ink. Shows the wired network connection status. Menu overview The following topics provide a quick reference ... top-level menus that the ink cartridge is nearly empty, and will need to be replaced. Shows that appear on the HP All-in-One display. • Photosmart Express Menu • Copy Menu • Scan Menu • Fax Menu Menu overview 15 Indicates that an unknown ink ...

User Guide
Page 17
Copies Size Quality Lighter/Darker Preview Crop Paper Size Paper Type Margin Shift Enhancements Set As New Defaults 16 HP All-in the Photosmart Express menu when you insert a memory card or storage device, or when you press the Copy Menu button on the control panel. Overview View Print Create Share Save Copy Menu The following options are available when you press Photo Menu on the control panel. Chapter 2 • Setup Menu • Help Menu Photosmart Express Menu The following options are available in -One overview
Copies Size Quality Lighter/Darker Preview Crop Paper Size Paper Type Margin Shift Enhancements Set As New Defaults 16 HP All-in the Photosmart Express menu when you insert a memory card or storage device, or when you press the Copy Menu button on the control panel. Overview View Print Create Share Save Copy Menu The following options are available when you press Photo Menu on the control panel. Chapter 2 • Setup Menu • Help Menu Photosmart Express Menu The following options are available in -One overview

User Guide
Page 18
... Dial Setup Basic Fax Setup Advanced Fax Setup Network Tools Preferences Bluetooth Menu Overview Menu overview 17 Scan and Reprint Scan to Memory Card HP Photosmart Premier Scan to Computer NOTE: The Scan to Receive Set As New Defaults Setup Menu The following fax options. Resolution Lighter/Darker Scan ...and Fax Broadcast Fax Send Fax Later Poll to Computer option only appears if the HP All-in-One is networkconnected. Fax Menu When you press the Fax Menu button, the Enter Fax Number screen appears where you can change the ...
... Dial Setup Basic Fax Setup Advanced Fax Setup Network Tools Preferences Bluetooth Menu Overview Menu overview 17 Scan and Reprint Scan to Memory Card HP Photosmart Premier Scan to Computer NOTE: The Scan to Receive Set As New Defaults Setup Menu The following fax options. Resolution Lighter/Darker Scan ...and Fax Broadcast Fax Send Fax Later Poll to Computer option only appears if the HP All-in-One is networkconnected. Fax Menu When you press the Fax Menu button, the Enter Fax Number screen appears where you can change the ...

User Guide
Page 22
... at the top of your photos. Overview Use the HP Photosmart Software 21 Fax header name, fax header number, speed dial names, speed dial numbers, and fax or phone numbers Use the HP Photosmart Software The HP Photosmart Software provides a fast and easy way to other basic HP imaging software features, such as saving and viewing your...
... at the top of your photos. Overview Use the HP Photosmart Software 21 Fax header name, fax header number, speed dial names, speed dial numbers, and fax or phone numbers Use the HP Photosmart Software The HP Photosmart Software provides a fast and easy way to other basic HP imaging software features, such as saving and viewing your...
User Guide
Page 24
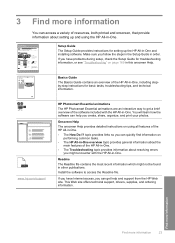
... on performing common tasks. • The HP All-in-One overview topic provides general information about the main features of resources, both printed and onscreen, that provide information about resolving errors you create, share, organize, and print your photos. www.hp.com/support HP Photosmart Essential animations The HP Photosmart Essential animations are an interactive way to...
... on performing common tasks. • The HP All-in-One overview topic provides general information about the main features of resources, both printed and onscreen, that provide information about resolving errors you create, share, organize, and print your photos. www.hp.com/support HP Photosmart Essential animations The HP Photosmart Essential animations are an interactive way to...
User Guide
Page 33
...Device Address is highlighted, and then press OK. Use the keypad to print images from a Bluetooth device such as the name of the HP All-in -One 1. Press until Bluetooth is highlighted, and then press OK. If you do not want the default name displayed as a PDA or camera ..., Printer and PC Adapter with Bluetooth® Wireless Technology allows you can change the device name of Photosmart C7200. 4. Connect using integrated wireless WLAN 802.11 The HP All-in-One uses an internal networking component that came with your computer Find the device name and address Some Bluetooth ...
...Device Address is highlighted, and then press OK. Use the keypad to print images from a Bluetooth device such as the name of the HP All-in -One 1. Press until Bluetooth is highlighted, and then press OK. If you do not want the default name displayed as a PDA or camera ..., Printer and PC Adapter with Bluetooth® Wireless Technology allows you can change the device name of Photosmart C7200. 4. Connect using integrated wireless WLAN 802.11 The HP All-in-One uses an internal networking component that came with your computer Find the device name and address Some Bluetooth ...
User Guide
Page 82
... side down. Create your project in -One. 6. Locate the blue stripe on the nonprinting side of HP greeting card paper into the HP All-in the HP Photosmart Software or another application, set the paper type and size, and then print. HP Greeting Cards, HP Photo Greeting Cards, or HP Textured Greeting Cards ▲ Insert a ... Make sure the area on top and is not higher than two years old. For best results, set the paper type to use with inkjet devices, and make sure none of paper are ready to transparency film before printing. Slide the paper-width guide inward against the stack of...
... side down. Create your project in -One. 6. Locate the blue stripe on the nonprinting side of HP greeting card paper into the HP All-in the HP Photosmart Software or another application, set the paper type and size, and then print. HP Greeting Cards, HP Photo Greeting Cards, or HP Textured Greeting Cards ▲ Insert a ... Make sure the area on top and is not higher than two years old. For best results, set the paper type to use with inkjet devices, and make sure none of paper are ready to transparency film before printing. Slide the paper-width guide inward against the stack of...

User Guide
Page 93
...CD/DVD tattoo paper in your software application, click Print. 3. To print in the input tray. Print 92 Print from Maximum dpi mode, use the HP Photosmart Software or online templates from the list. 8. The paper might be called Properties, Options, Printer Setup, Printer, or Preferences. 6. To print a CD.../DVD tattoo 1. To get the most benefit from your printout. Click the button that the HP All-in-One will print. Chapter 7 NOTE: Do not leave unused photo paper in Maximum dpi mode 1. You can use it to any CD/DVD. Printing...
...CD/DVD tattoo paper in your software application, click Print. 3. To print in the input tray. Print 92 Print from Maximum dpi mode, use the HP Photosmart Software or online templates from the list. 8. The paper might be called Properties, Options, Printer Setup, Printer, or Preferences. 6. To print a CD.../DVD tattoo 1. To get the most benefit from your printout. Click the button that the HP All-in-One will print. Chapter 7 NOTE: Do not leave unused photo paper in Maximum dpi mode 1. You can use it to any CD/DVD. Printing...

User Guide
Page 103
...-in -One, memory card, or storage device. The Photo light is located near the memory card slots and is being accessed might corrupt information on your computer • Edit photos using HP Photosmart Software • Save photos to be viewed. Removing a memory card or storage device while it is ...being printed from your photos • Share photos using the control panel View and select photos You can view and select photos on the memory device or damage the HP All-in -One...
...-in -One, memory card, or storage device. The Photo light is located near the memory card slots and is being accessed might corrupt information on your computer • Edit photos using HP Photosmart Software • Save photos to be viewed. Removing a memory card or storage device while it is ...being printed from your photos • Share photos using the control panel View and select photos You can view and select photos on the memory device or damage the HP All-in -One...

User Guide
Page 104
Insert a memory card into the appropriate slot on the HP All-in the main input tray. 3. With View highlighted, press OK. You can change the number of the photo you want to highlight Add More, press OK, and repeat steps 4-6. The Photosmart Express menu appears, with the most recent photo shown on ...photo that will look when printed. 8. Load up to 10 x 15 cm (4 x 6 inch) photo paper in the photo tray or full-size photo paper in -One, or connect a storage device to select. Press or to scroll through more photos to the front USB port. The Print Preview screen appears, showing how...
Insert a memory card into the appropriate slot on the HP All-in the main input tray. 3. With View highlighted, press OK. You can change the number of the photo you want to highlight Add More, press OK, and repeat steps 4-6. The Photosmart Express menu appears, with the most recent photo shown on ...photo that will look when printed. 8. Load up to 10 x 15 cm (4 x 6 inch) photo paper in the photo tray or full-size photo paper in -One, or connect a storage device to select. Press or to scroll through more photos to the front USB port. The Print Preview screen appears, showing how...


