HP C7280 Support Question
HP C7280 Support Question
Find answers below for this question about HP C7280 - Photosmart All-in-One Color Inkjet.Need a HP C7280 manual? We have 3 online manuals for this item!
Question posted by berniceglaser on June 25th, 2011
New Hp Photosmart C7280all In One Is Great Except From The Time I Bought It At S
Current Answers
Answer #1: Posted by kcmjr on June 26th, 2011 1:19 AM

Member since:
May 5th, 2011 Points: 4,254,255

You can first try to do a cleaning and or head alignment. This may or may not fix things.
The other thing to try is replace the ink cartridge. There may be a defect in the cartridge itself. Buy genuine HP cartridges. The 3rd party and refilled ones will only cause you more issues.
The alignment and cleaning info is on page 161 of the manual:
Align the printer
The HP All-in-One automatically aligns the print head when you install the ink cartridges during the initial setup. The HP All-in-One also aligns the print head during periodic Work with ink cartridges maintenance to ensure excellent print quality. You might want to use this feature when the self-test report shows streaking or white lines through any of the blocks of color.
If you still have print quality problems after aligning the printer, try cleaning the print head.
If print quality problems persist after aligning and cleaning, contact HP support.
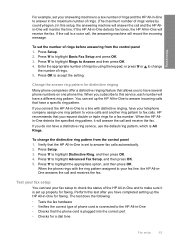
To align the printer from the control panel
1. Load letter, A4, or legal unused plain white paper into the input tray.
2. Press Setup. The Setup menu appears.
3. Press V to highlight Tools, and press OK. The Tools menu appears.
4. Press V to highlight Align Printer, and press OK.
5. The HP All-in-One prints a test page, aligns the print head, and calibrates the printer. Recycle or discard the page. A success or failure message appears.
NOTE: If you have colored paper loaded in the input tray when you align the printer, the alignment will fail. Load unused plain white paper into the input tray, and then try the alignment again.
If the alignment fails again, you might have a defective sensor or ink cartridge. Contact HP support. Go to www.hp.com/support. If prompted, choose your country/region, and then click Contact HP for information on calling for technical support.
6. Press OK to continue.
To align the printer from the HP Photosmart Software
1. Load letter, A4, or legal unused plain white paper into the input tray.
2. In the HP Solution Center, click Settings, point to Print Settings, and then click Printer Toolbox.
NOTE: You can also open the Printer Toolbox from the Print Properties dialog box. In the Print Properties dialog box, click the Services tab, and then click Service this device.
The Printer Toolbox appears.
3. Click the Device Services tab.
4. Click Align the Printer. The HP All-in-One prints a test page, aligns the print head, and calibrates the printer. Recycle or discard the page.
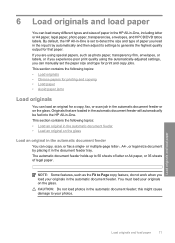
Clean the print head
Use this feature when the self-test report shows streaking or white lines through any of the blocks of color. Do not clean the print head unnecessarily, as this wastes ink and shortens the life of the ink nozzles on the print head.
To clean the print head from the control panel
1. Load letter or A4 unused plain white paper into the input tray.
2. Press Setup.
3. Press V to highlight Tools, and then press OK.
4. Press V to highlight Clean Printhead, and then press OK. The HP All-in-One cleans the print head and prints a page that you can recycle or discard.
To clean the print head from the HP Photosmart Software
1. Load letter, A4, or legal unused plain white paper into the input tray.
2. In the HP Solution Center, click Settings, point to Print Settings, and then click Printer Toolbox.
NOTE: You can also open the Printer Toolbox from the Print Properties dialog box. In the Print Properties dialog box, click the Services tab, and then click Service this device.
The Printer Toolbox appears.
3. Click the Device Services tab.
4. Click Clean the Print Head.
5. Follow the prompts until you are satisfied with the quality of the output, and then click Done.
If print quality still seems poor after you clean the print head, try aligning the printer.
If print quality problems persist after cleaning and aligning, contact HP support.
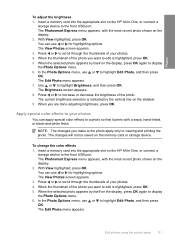
Clean the ink cartridge contacts
Clean the copper-colored ink cartridge contacts if all ink cartridges are installed and a message appears on the display that says a cartridge is missing or damaged. Before cleaning the ink cartridge contacts, remove the ink cartridge and verify that nothing is covering the ink cartridge contacts or the ink cartridge slot, then reinstall the ink cartridge. If you continue to get a message that says a cartridge is missing or damaged, clean the ink cartridge contacts. If you still get this message after cleaning the contacts, you will need a replacement ink cartridge. Remove the affected ink cartridge and look at the end-of-warranty date on the bottom. If it is before the end-of-warranty date, contact HP support to obtain a replacement ink cartridge.
Make sure you have the following materials available:
• Dry foam rubber swabs, lint-free cloth, or any soft material that will not come apart or
leave fibers.
• Distilled, filtered, or bottled water (tap water might contain contaminants that can
damage the ink cartridges).
CAUTION: Do not use platen cleaners or alcohol to clean the ink cartridge contacts. These can damage the ink cartridge or the HP All-in-One.
To clean the ink cartridge contacts
1. Make sure the HP All-in-One is turned on.
2. Lift the ink cartridge door.
3. Squeeze the bottom of the latch below the ink cartridge you want to clean, and then lift the latch.
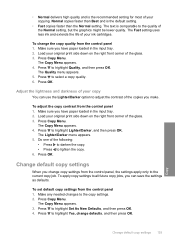
NOTE: Do not remove multiple ink cartridges at the same time. Remove and clean each ink cartridge one at a time. Do not leave an ink cartridge outside the HP All-in-One for more than 30 minutes.
4. Inspect the ink cartridge contacts for ink and debris buildup.
5. Dip a clean foam rubber swab or lint-free cloth into distilled water, and squeeze any excess water from it.
NOTE: Hold the ink cartridge by its handle. Do not touch the copper-colored contacts with your hands or anything other than a foam rubber swab or lint-free cloth.
6. Clean only the copper-colored contacts.
7. Place the ink cartridge back into the empty slot and press down on the gray latch until it clicks into place.
8. Repeat if necessary for the other ink cartridges.
9. Gently close the ink cartridge door.
Licenses & Certifications: Microsoft, Cisco, VMware, Novell, FCC RF & Amateur Radio licensed.
Related HP C7280 Manual Pages
Similar Questions

printer


I want to learn how to download, collate and print a manual on my HP Photosmart eStation printer