Setup Guide
Page 10
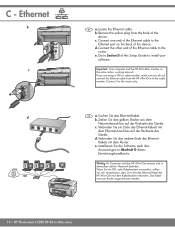
... the Ethernet port on the same active, working network. DE a. d. Wenn Sie ein DSL- Remove the yellow plug from the HP All-in -One series Ziehen Sie den gelben Stecker aus dem Netzwerkanschluss auf der Rückseite des Geräts. c. oder Kabelmodem verwenden, sollten ...be on the back of the device. b. Wichtig: Ihr Computer und das HP All-in-One müssen sich in -One must be finden. Das Kabel muss am Router angeschlossen werden. 10 • HP Photosmart C7280 HP All-in -One to the router only. Verbinden Sie das andere Ende des EthernetKabels mit dem ...
... the Ethernet port on the same active, working network. DE a. d. Wenn Sie ein DSL- Remove the yellow plug from the HP All-in -One series Ziehen Sie den gelben Stecker aus dem Netzwerkanschluss auf der Rückseite des Geräts. c. oder Kabelmodem verwenden, sollten ...be on the back of the device. b. Wichtig: Ihr Computer und das HP All-in-One müssen sich in -One must be finden. Das Kabel muss am Router angeschlossen werden. 10 • HP Photosmart C7280 HP All-in -One to the router only. Verbinden Sie das andere Ende des EthernetKabels mit dem ...
Setup Guide
Page 15
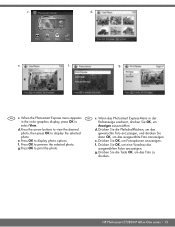
... to view the desired d. ausgewählten Fotos anzuzeigen. d. e. f. g. HP Photosmart C7280 HP All-in the color graphics display, press OK to print the photo. Wenn das Photosmart Express-Menü in der in -One series • 15 dann OK, um das ausgewählte Foto anzuzeigen. Dr...die Pfeilschaltflächen, um das photo, then press OK to display photo options. f. Anzeigen auszuwählen. e. f. c. Photosmart Express d. Press OK to display the selected gewünschte Foto anzuzeigen, und drücken Sie photo. Drücken Sie die...
... to view the desired d. ausgewählten Fotos anzuzeigen. d. e. f. g. HP Photosmart C7280 HP All-in the color graphics display, press OK to print the photo. Wenn das Photosmart Express-Menü in der in -One series • 15 dann OK, um das ausgewählte Foto anzuzeigen. Dr...die Pfeilschaltflächen, um das photo, then press OK to display photo options. f. Anzeigen auszuwählen. e. f. c. Photosmart Express d. Press OK to display the selected gewünschte Foto anzuzeigen, und drücken Sie photo. Drücken Sie die...
User Guide
Page 1
HP Photosmart C7200 All-in-One series Windows Help
HP Photosmart C7200 All-in-One series Windows Help
User Guide
Page 2
Contents Contents 1 HP Photosmart C7200 All-in-One series Help 9 2 HP All-in-One overview The HP All-in-One at a glance 11 Control panel overview...12 Control panel features...13 Display icons...14 Display sleep state...15 Menu overview...15 Photosmart Express Menu 16 Copy Menu...16 Scan Menu...17 Fax Menu... Enter text using the visual keyboard 19 Available symbols for dialing fax numbers 20 Use the HP Photosmart Software 21 3 Find more information...23 4 Finish setting up the HP All-in-One Set your preferences...25 General preferences...25 Set your language and country/region 25 Set the...
Contents Contents 1 HP Photosmart C7200 All-in-One series Help 9 2 HP All-in-One overview The HP All-in-One at a glance 11 Control panel overview...12 Control panel features...13 Display icons...14 Display sleep state...15 Menu overview...15 Photosmart Express Menu 16 Copy Menu...16 Scan Menu...17 Fax Menu... Enter text using the visual keyboard 19 Available symbols for dialing fax numbers 20 Use the HP Photosmart Software 21 3 Find more information...23 4 Finish setting up the HP All-in-One Set your preferences...25 General preferences...25 Set your language and country/region 25 Set the...
User Guide
Page 4
... 81 Avoid paper jams...82 7 Print from your computer Print from a software application 83 Make the HP All-in-One the default printer 84 Change the print settings for the current job 84 Set the paper size...84 ...or quality 86 Change the page orientation 86 Scale the document size...87 Change the saturation, brightness, or color tone 87 Preview your print job...87 Change the default print settings 88 Printing shortcuts...88 Create printing shortcuts... photos...104 Create special projects from your photos 105 Share photos using HP Photosmart Software 107 Save photos to your computer 108 3
... 81 Avoid paper jams...82 7 Print from your computer Print from a software application 83 Make the HP All-in-One the default printer 84 Change the print settings for the current job 84 Set the paper size...84 ...or quality 86 Change the page orientation 86 Scale the document size...87 Change the saturation, brightness, or color tone 87 Preview your print job...87 Change the default print settings 88 Printing shortcuts...88 Create printing shortcuts... photos...104 Create special projects from your photos 105 Share photos using HP Photosmart Software 107 Save photos to your computer 108 3
User Guide
Page 8
... European Union Regulatory Notice 298 Wireless: Notice to users in Taiwan 299 Declaration of conformity (European Economic Area 299 HP Photosmart C7200 All-in the European Union...291 Regulatory notices...292 Regulatory model identification number 292 FCC statement...293 Notice to ... Recycling program...290 HP inkjet supplies recycling program 290 Energy consumption...290 Special handling of materials 290 Attention California users 290 NDL battery disposal...290 Taiwan battery statement 291 Disposal of Waste Equipment by Users in Private Households in -One series declaration of the...
... European Union Regulatory Notice 298 Wireless: Notice to users in Taiwan 299 Declaration of conformity (European Economic Area 299 HP Photosmart C7200 All-in the European Union...291 Regulatory notices...292 Regulatory model identification number 292 FCC statement...293 Notice to ... Recycling program...290 HP inkjet supplies recycling program 290 Energy consumption...290 Special handling of materials 290 Attention California users 290 NDL battery disposal...290 Taiwan battery statement 291 Disposal of Waste Equipment by Users in Private Households in -One series declaration of the...
User Guide
Page 10
... page 131 • "Print reports and forms" on page 149 • "Maintain the HP All-in -One series Help 9 1 HP Photosmart C7200 All-inOne series Help For information about the HP All-in-One, see: • "HP All-in-One overview" on page 11 • "Find more information" on page 23 • "Finish... setting up the HP All-in-One" on page 287 HP Photosmart C7200 All-inOne series Help HP Photosmart C7200 All-in -One" on page 155 •...
... page 131 • "Print reports and forms" on page 149 • "Maintain the HP All-in -One series Help 9 1 HP Photosmart C7200 All-inOne series Help For information about the HP All-in-One, see: • "HP All-in-One overview" on page 11 • "Find more information" on page 23 • "Finish... setting up the HP All-in-One" on page 287 HP Photosmart C7200 All-inOne series Help HP Photosmart C7200 All-in -One" on page 155 •...

User Guide
Page 11
Chapter 1 HP Photosmart C7200 All-inOne series Help 10 HP Photosmart C7200 All-in-One series Help
Chapter 1 HP Photosmart C7200 All-inOne series Help 10 HP Photosmart C7200 All-in-One series Help
User Guide
Page 12
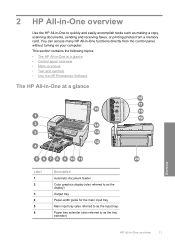
... a glance • Control panel overview • Menu overview • Text and symbols • Use the HP Photosmart Software The HP All-in-One at a glance Overview Label 1 2 3 4 5 6 Description Automatic document feeder Color graphics display (also referred to as the display) Output tray Paper-width guide for the main input tray Main input tray (also referred...
... a glance • Control panel overview • Menu overview • Text and symbols • Use the HP Photosmart Software The HP All-in-One at a glance Overview Label 1 2 3 4 5 6 Description Automatic document feeder Color graphics display (also referred to as the display) Output tray Paper-width guide for the main input tray Main input tray (also referred...

User Guide
Page 14
...Eye Removal: Turns the Red Eye Removal feature On or Off. By default, this feature is turned on, the HP All-in-One automatically corrects red eye coloring in to the photo automatically. Control panel features The following diagram and related table provide a quick reference to print. ...display. The angle of copies, paper size, and paper type. Back: Returns to make a copy of a photo. Photo Menu: Launches the Photosmart Express menu for better viewing. Reprints: Enables you can be changed for printing, saving, editing, and sharing photos. Copy Menu: Opens the Copy...
...Eye Removal: Turns the Red Eye Removal feature On or Off. By default, this feature is turned on, the HP All-in-One automatically corrects red eye coloring in to the photo automatically. Control panel features The following diagram and related table provide a quick reference to print. ...display. The angle of copies, paper size, and paper type. Back: Returns to make a copy of a photo. Photo Menu: Launches the Photosmart Express menu for better viewing. Reprints: Enables you can be changed for printing, saving, editing, and sharing photos. Copy Menu: Opens the Copy...
User Guide
Page 16
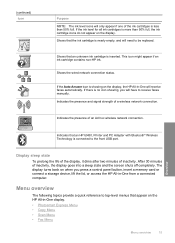
...Technology is connected to top-level menus that an unknown ink cartridge is more than 50% full. The display turns back on the HP All-in-One display. • Photosmart Express Menu • Copy Menu • Scan Menu • Fax Menu Menu overview 15 If the Auto Answer icon is less... than 50% full, the ink cartridge icons do not appear on the display, the HP All-in -One from a connected computer. Shows the wired network ...
...Technology is connected to top-level menus that an unknown ink cartridge is more than 50% full. The display turns back on the HP All-in-One display. • Photosmart Express Menu • Copy Menu • Scan Menu • Fax Menu Menu overview 15 If the Auto Answer icon is less... than 50% full, the ink cartridge icons do not appear on the display, the HP All-in -One from a connected computer. Shows the wired network ...

User Guide
Page 17
Overview View Print Create Share Save Copy Menu The following options are available when you press Photo Menu on the control panel. Copies Size Quality Lighter/Darker Preview Crop Paper Size Paper Type Margin Shift Enhancements Set As New Defaults 16 HP All-in the Photosmart Express menu when you insert a memory card or storage device, or when you press the Copy Menu button on the control panel. Chapter 2 • Setup Menu • Help Menu Photosmart Express Menu The following options are available in -One overview
Overview View Print Create Share Save Copy Menu The following options are available when you press Photo Menu on the control panel. Copies Size Quality Lighter/Darker Preview Crop Paper Size Paper Type Margin Shift Enhancements Set As New Defaults 16 HP All-in the Photosmart Express menu when you insert a memory card or storage device, or when you press the Copy Menu button on the control panel. Chapter 2 • Setup Menu • Help Menu Photosmart Express Menu The following options are available in -One overview

User Guide
Page 18
... Fax Menu button again, the Fax Menu appears where you can change the following fax options. Scan and Reprint Scan to Memory Card HP Photosmart Premier Scan to Computer NOTE: The Scan to Receive Set As New Defaults Setup Menu The following options are available when you press the... Overview Menu overview 17 Resolution Lighter/Darker Scan and Fax Broadcast Fax Send Fax Later Poll to Computer option only appears if the HP All-in-One is networkconnected. NOTE: The applications that appear on the Scan Menu vary depending on the software applications installed on your computer. Scan...
... Fax Menu button again, the Fax Menu appears where you can change the following fax options. Scan and Reprint Scan to Memory Card HP Photosmart Premier Scan to Computer NOTE: The Scan to Receive Set As New Defaults Setup Menu The following options are available when you press the... Overview Menu overview 17 Resolution Lighter/Darker Scan and Fax Broadcast Fax Send Fax Later Poll to Computer option only appears if the HP All-in-One is networkconnected. NOTE: The applications that appear on the Scan Menu vary depending on the software applications installed on your computer. Scan...

User Guide
Page 22
...provides access to make prints of the Contents panel, access the software help through the HP Solution Center. Overview Use the HP Photosmart Software 21 For more information on using the HP Photosmart Software: • Check the Contents panel on the left. This symbol does not ...fax header number, speed dial names, speed dial numbers, and fax or phone numbers Use the HP Photosmart Software The HP Photosmart Software provides a fast and easy way to other basic HP imaging software features, such as saving and viewing your photos. (continued) Available symbols + Description Available...
...provides access to make prints of the Contents panel, access the software help through the HP Solution Center. Overview Use the HP Photosmart Software 21 For more information on using the HP Photosmart Software: • Check the Contents panel on the left. This symbol does not ...fax header number, speed dial names, speed dial numbers, and fax or phone numbers Use the HP Photosmart Software The HP Photosmart Software provides a fast and easy way to other basic HP imaging software features, such as saving and viewing your photos. (continued) Available symbols + Description Available...
User Guide
Page 24
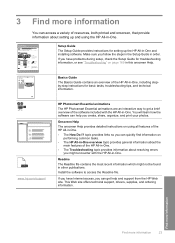
... provides instructions for setting up and using all features of the HP All-in -One. This Web site offers technical support, drivers, supplies, and ordering information. Make sure you create, share, organize, and print your photos. www.hp.com/support HP Photosmart Essential animations The HP Photosmart Essential animations are an interactive way to access the Readme...
... provides instructions for setting up and using all features of the HP All-in -One. This Web site offers technical support, drivers, supplies, and ordering information. Make sure you create, share, organize, and print your photos. www.hp.com/support HP Photosmart Essential animations The HP Photosmart Essential animations are an interactive way to access the Readme...
User Guide
Page 33
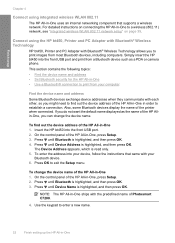
...PDA or camera phone. Also, some Bluetooth devices display the name of the HP All-in -One to print images from most Bluetooth devices, including computers. Press until Bluetooth is read only. 5. On the control panel of Photosmart C7200. 4. Use the keypad to exit the Setup menu. For detailed ...instructions on page 39. To change the device name. NOTE: The HP All-in-One ships with the predefined name of the HP All-in -One • Use a Bluetooth® connection to...
...PDA or camera phone. Also, some Bluetooth devices display the name of the HP All-in -One to print images from most Bluetooth devices, including computers. Press until Bluetooth is read only. 5. On the control panel of Photosmart C7200. 4. Use the keypad to exit the Setup menu. For detailed ...instructions on page 39. To change the device name. NOTE: The HP All-in-One ships with the predefined name of the HP All-in -One • Use a Bluetooth® connection to...
User Guide
Page 82
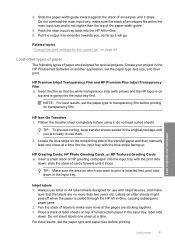
...transfer sheet completely before using it stops. HP Greeting Cards, HP Photo Greeting Cards, or HP Textured Greeting Cards ▲ Insert a small stack of full-size plain paper in the HP Photosmart Software or another application, set the paper type to use with inkjet devices, and make sure that the white... transparency strip (with the print side down in -One. 6. Push the main input tray back into the input ...
...transfer sheet completely before using it stops. HP Greeting Cards, HP Photo Greeting Cards, or HP Textured Greeting Cards ▲ Insert a small stack of full-size plain paper in the HP Photosmart Software or another application, set the paper type to use with inkjet devices, and make sure that the white... transparency strip (with the print side down in -One. 6. Push the main input tray back into the input ...

User Guide
Page 93
...in -One will print. In the Paper Type drop-down list, click More, and then select HP CD/DVD tattoo paper from your software application, click Print. 4. Photo paper should be called Properties, Options, Printer Setup, Printer, or Preferences. 5. Use the HP Photosmart Software, or go to www.hp.com to...inch) CD/DVD tattoo paper in your computer To get the most benefit from the HP Web site to any CD/DVD. Click the button that opens the Properties dialog box. You can use the HP Photosmart Software or online templates from Maximum dpi mode, use it to curl, which could ...
...in -One will print. In the Paper Type drop-down list, click More, and then select HP CD/DVD tattoo paper from your software application, click Print. 4. Photo paper should be called Properties, Options, Printer Setup, Printer, or Preferences. 5. Use the HP Photosmart Software, or go to www.hp.com to...inch) CD/DVD tattoo paper in your computer To get the most benefit from the HP Web site to any CD/DVD. Click the button that opens the Properties dialog box. You can use the HP Photosmart Software or online templates from Maximum dpi mode, use it to curl, which could ...

User Guide
Page 103
...-in -One, memory card, or storage device. This section contains the following topics: • View and select photos • Print your photos • Create special projects from a card, and stays solid green when images are ready to your computer • Edit photos using HP Photosmart Software • Save photos to ...; Share photos using the control panel View and select photos You can view and select photos on the memory device or damage the HP All-in -One is indicated by a camera icon. Wait until the light remains solid. The Photo light is located near the memory card slots and...
...-in -One, memory card, or storage device. This section contains the following topics: • View and select photos • Print your photos • Create special projects from a card, and stays solid green when images are ready to your computer • Edit photos using HP Photosmart Software • Save photos to ...; Share photos using the control panel View and select photos You can view and select photos on the memory device or damage the HP All-in -One is indicated by a camera icon. Wait until the light remains solid. The Photo light is located near the memory card slots and...

User Guide
Page 104
Insert a memory card into the appropriate slot on the HP All-in the main input tray. 3. Photos View Print Create Share Save 2.... to 10 x 15 cm (4 x 6 inch) photo paper in the photo tray or full-size photo paper in -One, or connect a storage device to select. You can change the number of the display. Press or to scroll through more...to press to select a photo, and then press or to indicate each photo that will look when printed. 8. The Photosmart Express menu appears, with the most recent photo shown on the display, press OK again. The Photo Options screen appears...
Insert a memory card into the appropriate slot on the HP All-in the main input tray. 3. Photos View Print Create Share Save 2.... to 10 x 15 cm (4 x 6 inch) photo paper in the photo tray or full-size photo paper in -One, or connect a storage device to select. You can change the number of the display. Press or to scroll through more...to press to select a photo, and then press or to indicate each photo that will look when printed. 8. The Photosmart Express menu appears, with the most recent photo shown on the display, press OK again. The Photo Options screen appears...


