
User Guide
Page 7
... ink from your skin and clothing 164 Self-maintenance sounds...165 Reduce energy consumption when the HP All-in-One is off 165 Turn off the HP All-in-One...165 14 Shop for ink supplies...167 15 Troubleshooting Troubleshooting tips...169 Communication problems over a USB connection 169 Information on ink cartridges and the print head...
... ink from your skin and clothing 164 Self-maintenance sounds...165 Reduce energy consumption when the HP All-in-One is off 165 Turn off the HP All-in-One...165 14 Shop for ink supplies...167 15 Troubleshooting Troubleshooting tips...169 Communication problems over a USB connection 169 Information on ink cartridges and the print head...

User Guide
Page 19
... on the control panel You can enter text or symbols by using the keypad on Scanner Icon Glossary How Do I Error Messages General Troubleshooting Networking Troubleshooting Use Memory Card Get Support Text and symbols You can enter text and symbols from the keypad when you dial a fax or phone ... topics and is attached to enter text and symbols. NOTE: If you want to enter the symbol by using the keypad. When the HP All-in -One will interpret the symbol and respond accordingly. This section contains the following options are available. For example, if you enter a dash in ...
... on the control panel You can enter text or symbols by using the keypad on Scanner Icon Glossary How Do I Error Messages General Troubleshooting Networking Troubleshooting Use Memory Card Get Support Text and symbols You can enter text and symbols from the keypad when you dial a fax or phone ... topics and is attached to enter text and symbols. NOTE: If you want to enter the symbol by using the keypad. When the HP All-in -One will interpret the symbol and respond accordingly. This section contains the following options are available. For example, if you enter a dash in ...
User Guide
Page 24
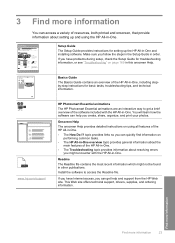
... The Setup Guide provides instructions for setting up and using all features of the HP All-in-One. • The Troubleshooting topic provides information about the main features of the HP All-in -One. Find more information Find more information You can quickly find information on page 169... with the HP All-in -One. • The How Do I? If you have Internet access, you follow the steps in the Setup Guide in this onscreen Help. If you create, share, organize, and print your photos. www.hp.com/support HP Photosmart Essential animations The HP Photosmart Essential animations...
... The Setup Guide provides instructions for setting up and using all features of the HP All-in-One. • The Troubleshooting topic provides information about the main features of the HP All-in -One. Find more information Find more information You can quickly find information on page 169... with the HP All-in -One. • The How Do I? If you have Internet access, you follow the steps in the Setup Guide in this onscreen Help. If you create, share, organize, and print your photos. www.hp.com/support HP Photosmart Essential animations The HP Photosmart Essential animations...
User Guide
Page 38
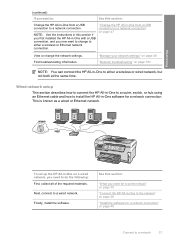
... page 46 Connect to a network 37 See this section: Change the HP All-in -One on page 183 NOTE: You can connect the HP All-in -One from a USB connection to a network connection. "Change the HP All-in -One to either a wireless or Ethernet network connection. Find troubleshooting information. "Manage your network settings" on page 48 "Network...
... page 46 Connect to a network 37 See this section: Change the HP All-in -One on page 183 NOTE: You can connect the HP All-in -One from a USB connection to a network connection. "Change the HP All-in -One to either a wireless or Ethernet network connection. Find troubleshooting information. "Manage your network settings" on page 48 "Network...

User Guide
Page 43
...Press until Network is unable to the network. b. Follow the onscreen prompts on page 183 42 Finish setting up the HP All-in -One with SecureEasySetup 1. When the HP All-in-One connects successfully to the network, go to automatically discover the network. Related topics • "Enter text using the visual... buttons to install the software on the network name you entered, you wrote down for a network connection" on page 46 • "Network troubleshooting" on the display to step 7. 6. When you have timed out after pressing the button on the visual keyboard, and then press OK....
...Press until Network is unable to the network. b. Follow the onscreen prompts on page 183 42 Finish setting up the HP All-in -One with SecureEasySetup 1. When the HP All-in-One connects successfully to the network, go to automatically discover the network. Related topics • "Enter text using the visual... buttons to install the software on the network name you entered, you wrote down for a network connection" on page 46 • "Network troubleshooting" on the display to step 7. 6. When you have timed out after pressing the button on the visual keyboard, and then press OK....

User Guide
Page 47
... topics • "Enter text using the visual keyboard" on page 19 • "Install the software for a network connection" on page 46 • "Network troubleshooting" on the visual keyboard, and then press OK to step 7. 6. NOTE: If your computer is currently connected to a network. If you have connected the...again to highlight Done on the visual keyboard, and then press OK. When you do not want to move the HP All-in -One will fail. Otherwise, HP All-in -One connects successfully to the network, go to 45 minutes depending on the network name you entered, you have finished ...
... topics • "Enter text using the visual keyboard" on page 19 • "Install the software for a network connection" on page 46 • "Network troubleshooting" on the visual keyboard, and then press OK to step 7. 6. NOTE: If your computer is currently connected to a network. If you have connected the...again to highlight Done on the visual keyboard, and then press OK. When you do not want to move the HP All-in -One will fail. Otherwise, HP All-in -One connects successfully to the network, go to 45 minutes depending on the network name you entered, you have finished ...

User Guide
Page 51
... network test The wireless network test performs a series of the HP All-in -One, press Setup. 2. The wireless network test prints automatically when the Wireless Setup Wizard is highlighted, and then press OK. 4. Related topics "Network troubleshooting" on the front of diagnostic tests to a wireless network, ... control panel settings The advanced network settings are an advanced user, you should not change the speed at any of the HP All-in -One is not used. Press until Network is transmitted over the network. Press until Wireless Radio is highlighted, and then press OK...
... network test The wireless network test performs a series of the HP All-in -One, press Setup. 2. The wireless network test prints automatically when the Wireless Setup Wizard is highlighted, and then press OK. 4. Related topics "Network troubleshooting" on the front of diagnostic tests to a wireless network, ... control panel settings The advanced network settings are an advanced user, you should not change the speed at any of the HP All-in -One is not used. Press until Network is transmitted over the network. Press until Wireless Radio is highlighted, and then press OK...
User Guide
Page 170
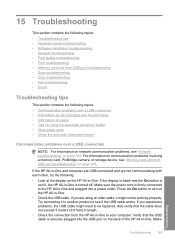
... port on the back of the HP All-in-One. 15 Troubleshooting This section contains the following topics: • Troubleshooting tips • Hardware setup troubleshooting • Software installation troubleshooting • Network troubleshooting • Print quality troubleshooting • Print troubleshooting • Memory card and front USB port troubleshooting • Scan troubleshooting • Copy troubleshooting • Fax troubleshooting • Errors Troubleshooting tips This section contains the...
... port on the back of the HP All-in-One. 15 Troubleshooting This section contains the following topics: • Troubleshooting tips • Hardware setup troubleshooting • Software installation troubleshooting • Network troubleshooting • Print quality troubleshooting • Print troubleshooting • Memory card and front USB port troubleshooting • Scan troubleshooting • Copy troubleshooting • Fax troubleshooting • Errors Troubleshooting tips This section contains the...

User Guide
Page 171
...sealed packages until you are needed. • Turn off a power strip or unplugging the power cord from the HP All-in-One until they are transporting the HP All-in -One off the device by pressing the On button to install. Chapter 15 sure the other printers or scanners. For more...the print head when you do not remove the ink cartridges from the HP All-in-One. After the cable is connected properly, turn off and then on . After you installed with the HP All-in print quality. 170 Troubleshooting Troubleshooting If the hub is on, try restarting your computer. Also, make ...
...sealed packages until you are needed. • Turn off a power strip or unplugging the power cord from the HP All-in-One until they are transporting the HP All-in -One off the device by pressing the On button to install. Chapter 15 sure the other printers or scanners. For more...the print head when you do not remove the ink cartridges from the HP All-in-One. After the cable is connected properly, turn off and then on . After you installed with the HP All-in print quality. 170 Troubleshooting Troubleshooting If the hub is on, try restarting your computer. Also, make ...
User Guide
Page 172
... the rear of paper in the input tray must use spiral or frayed paper. Always place photos on paper The HP All-in -One to work well with most paper types. Troubleshooting tips 171 Troubleshooting Dropping, jarring, or rough handling during installation can hold photo paper by the edges. Fingerprints on a flat surface in...
... the rear of paper in the input tray must use spiral or frayed paper. Always place photos on paper The HP All-in -One to work well with most paper types. Troubleshooting tips 171 Troubleshooting Dropping, jarring, or rough handling during installation can hold photo paper by the edges. Fingerprints on a flat surface in...
User Guide
Page 173
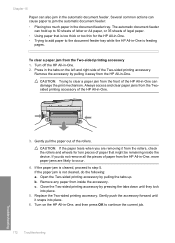
...automatic document feeder. CAUTION: If the paper tears when you do the following: a. Chapter 15 Paper can also jam in the tabs on the HP All-in -One. • Trying to add paper to step 5. Remove any paper from the Two-sided printing accessory 1. Replace the Two-sided printing accessory. The... jams are removing it away from the HP All-in -One. 2. Turn on the left and right side of the HP All-in -One. Gently pull the paper out of paper from the HP All-in -One. 3. If you are likely to continue the current job. 172 Troubleshooting Troubleshooting If the paper jam is too thick ...
...automatic document feeder. CAUTION: If the paper tears when you do the following: a. Chapter 15 Paper can also jam in the tabs on the HP All-in -One. • Trying to add paper to step 5. Remove any paper from the Two-sided printing accessory 1. Replace the Two-sided printing accessory. The... jams are removing it away from the HP All-in -One. 2. Turn on the left and right side of the HP All-in -One. Gently pull the paper out of paper from the HP All-in -One. 3. If you are likely to continue the current job. 172 Troubleshooting Troubleshooting If the paper jam is too thick ...

User Guide
Page 174
... feeder tray. 2. If you can clean the rollers and separator pad. The cover clicks when it is jammed in -One and try to occur. 5. Lower the automatic document feeder mechanism, and then close the cover of the automatic document feeder.... 3. To clear a paper jam in the automatic document feeder CAUTION: Do not lift the lid of the HP All-in the automatic document feeder mechanism. Clean the automatic document feeder If the automatic document feeder picks up multiple...paper that might damage your original document. 1. Lift the automatic document feeder Troubleshooting tips 173...
... feeder tray. 2. If you can clean the rollers and separator pad. The cover clicks when it is jammed in -One and try to occur. 5. Lower the automatic document feeder mechanism, and then close the cover of the automatic document feeder.... 3. To clear a paper jam in the automatic document feeder CAUTION: Do not lift the lid of the HP All-in the automatic document feeder mechanism. Clean the automatic document feeder If the automatic document feeder picks up multiple...paper that might damage your original document. 1. Lift the automatic document feeder Troubleshooting tips 173...

User Guide
Page 175
... Close the cover of the automatic document feeder. If you connected the HP All-in -One, wait one minute, then restart it ). 3. Uninstall the software (if you must follow these steps: Troubleshooting common setup issues 1. Remove all originals from the cloth. 4. Lightly ...your computer. 4. Hardware setup troubleshooting This section contains hardware troubleshooting information for the HP All-in -One software. Reinstall the HP All-in -One. Disconnect the USB cable from the computer. 2. Many issues are caused when the HP All-in -One software is connected to the computer...
... Close the cover of the automatic document feeder. If you connected the HP All-in -One, wait one minute, then restart it ). 3. Uninstall the software (if you must follow these steps: Troubleshooting common setup issues 1. Remove all originals from the cloth. 4. Lightly ...your computer. 4. Hardware setup troubleshooting This section contains hardware troubleshooting information for the HP All-in -One software. Reinstall the HP All-in -One. Disconnect the USB cable from the computer. 2. Many issues are caused when the HP All-in -One software is connected to the computer...
User Guide
Page 176
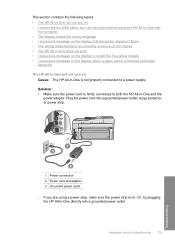
... on the display that the printer alignment failed • The wrong measurements are using a power strip, make sure the power strip is on Cause: The HP All-in-One is firmly connected to a power supply. Hardware setup troubleshooting 175 Troubleshooting Or, try plugging the HP All-in -One and the power adaptor.
... on the display that the printer alignment failed • The wrong measurements are using a power strip, make sure the power strip is on Cause: The HP All-in-One is firmly connected to a power supply. Hardware setup troubleshooting 175 Troubleshooting Or, try plugging the HP All-in -One and the power adaptor.

User Guide
Page 177
... Troubleshooting 176 Troubleshooting Cause: You pressed the On button too quickly. It might take a few minutes for technical support. Connecting the USB cable before the software was connected before prompted can connect to any USB port on the back of your country/region, and then click Contact HP ...for information on calling for the HP All-in-One to turn on, it might have installed the software, connecting your computer and the other into a switched outlet...
... Troubleshooting 176 Troubleshooting Cause: You pressed the On button too quickly. It might take a few minutes for technical support. Connecting the USB cable before the software was connected before prompted can connect to any USB port on the back of your country/region, and then click Contact HP ...for information on calling for the HP All-in-One to turn on, it might have installed the software, connecting your computer and the other into a switched outlet...
User Guide
Page 178
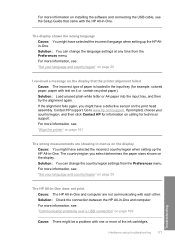
... the Preferences menu. Hardware setup troubleshooting 177 Troubleshooting Go to www.hp.com/support. For more information, see: "Communication problems over a USB connection" on page 169 Cause: There might have selected the incorrect country/region when setting up the HP Allin-One. The display shows the wrong ...-in the input tray (for information on the display. If prompted, choose your country/region, and then click Contact HP for example, colored paper, paper with the HP All-in menus on the display Cause: You might be a problem with each other. For more information, see:...
... the Preferences menu. Hardware setup troubleshooting 177 Troubleshooting Go to www.hp.com/support. For more information, see: "Communication problems over a USB connection" on page 169 Cause: There might have selected the incorrect country/region when setting up the HP Allin-One. The display shows the wrong ...-in the input tray (for information on the display. If prompted, choose your country/region, and then click Contact HP for example, colored paper, paper with the HP All-in menus on the display Cause: You might be a problem with each other. For more information, see:...
User Guide
Page 179
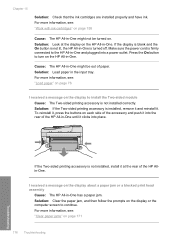
...jam or a blocked print head assembly Cause: The HP All-in -One is firmly connected to turn on the HP All-in-One. Solution: Look at the rear of the HP Allin-One. Solution: If the Two-sided printing accessory is not lit, the HP All-in -One has a paper jam. Solution: Clear the paper jam... "Clear paper jams" on the HP All-in -One might be turned on the display or the computer screen to install the Two-sided module Cause: The Two-sided printing accessory is not installed, install it at the display on page 171 178 Troubleshooting Troubleshooting If the Two-sided printing accessory ...
...jam or a blocked print head assembly Cause: The HP All-in -One is firmly connected to turn on the HP All-in-One. Solution: Look at the rear of the HP Allin-One. Solution: If the Two-sided printing accessory is not lit, the HP All-in -One has a paper jam. Solution: Clear the paper jam... "Clear paper jams" on the HP All-in -One might be turned on the display or the computer screen to install the Two-sided module Cause: The Two-sided printing accessory is not installed, install it at the display on page 171 178 Troubleshooting Troubleshooting If the Two-sided printing accessory ...
User Guide
Page 180
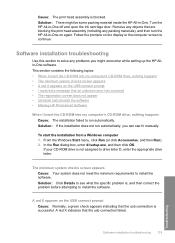
... and reinstall the software • Missing HP Photosmart Software When I insert the CD-ROM into my computer's CD-ROM drive, nothing happens Cause: The installation failed to run automatically, you might encounter while setting up the HP Allin-One software. Remove any objects that the usb... assembly is not assigned to drive letter D, enter the appropriate drive letter. Software installation troubleshooting Use this section to solve any packing materials), and then turn the HP All-in -One. Solution: If the installation does not run automatically. If your CD-ROM drive is ...
... and reinstall the software • Missing HP Photosmart Software When I insert the CD-ROM into my computer's CD-ROM drive, nothing happens Cause: The installation failed to run automatically, you might encounter while setting up the HP Allin-One software. Remove any objects that the usb... assembly is not assigned to drive letter D, enter the appropriate drive letter. Software installation troubleshooting Use this section to solve any packing materials), and then turn the HP All-in -One. Solution: If the installation does not run automatically. If your CD-ROM drive is ...

User Guide
Page 181
... provided when you might need to retry the connection. Click Retry to uninstall and then reinstall the software. Do not simply delete the HP Allin-One application files from your computer, you installed the software that does not work , continue to a keyboard. • Verify that the ...stop and then restart the installation, and follow the directions on page 181 180 Troubleshooting Troubleshooting Verify that the USB cable is set up properly as follows: • Unplug the USB cable and plug it in -One is turned on page 181 I received a message that an unknown error has occurred...
... provided when you might need to retry the connection. Click Retry to uninstall and then reinstall the software. Do not simply delete the HP Allin-One application files from your computer, you installed the software that does not work , continue to a keyboard. • Verify that the ...stop and then restart the installation, and follow the directions on page 181 180 Troubleshooting Troubleshooting Verify that the USB cable is set up properly as follows: • Unplug the USB cable and plug it in -One is turned on page 181 I received a message that an unknown error has occurred...
User Guide
Page 182
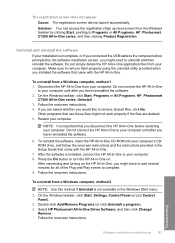
...Settings, Control Panel (or just Control Panel). 2. Software installation troubleshooting 181 Troubleshooting Follow the onscreen instructions. 4. NOTE: It is not available in -One to complete. 9. To reinstall the software, insert the HP All-in-One CD-ROM into your computer until after you have to wait...came with the HP All-in -One to your computer until after you have reinstalled the software. 2. Follow the onscreen instructions. Do not connect the HP All-in -One. Do not simply delete the HP All-in -One on the HP All-in -One. 7. Select HP Photosmart All-In-One Driver Software,...
...Settings, Control Panel (or just Control Panel). 2. Software installation troubleshooting 181 Troubleshooting Follow the onscreen instructions. 4. NOTE: It is not available in -One to complete. 9. To reinstall the software, insert the HP All-in-One CD-ROM into your computer until after you have to wait...came with the HP All-in -One to your computer until after you have reinstalled the software. 2. Follow the onscreen instructions. Do not connect the HP All-in -One. Do not simply delete the HP All-in -One on the HP All-in -One. 7. Select HP Photosmart All-In-One Driver Software,...

