Basic Guide
Page 3
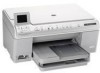
... 1 Network setup Set up the HP All-in-One on a wired (Ethernet) network 2 Set up the HP All-in-One on an integrated wireless (WLAN 802.11) network 4 Set up the HP All-in-One using an ad hoc wireless connection 7 Install the software for a network connection 11 Connect to...HP All-in-One overview The HP All-in-One at a glance 16 Control panel features...17 Find more information...18 Load paper...19 Avoid paper jams...21 Print a photo on photo paper...22 Scan an image...23 Make a copy...23 Replace the ink cartridges...24 3 Troubleshooting and support Uninstall and reinstall the software...
... 1 Network setup Set up the HP All-in-One on a wired (Ethernet) network 2 Set up the HP All-in-One on an integrated wireless (WLAN 802.11) network 4 Set up the HP All-in-One using an ad hoc wireless connection 7 Install the software for a network connection 11 Connect to...HP All-in-One overview The HP All-in-One at a glance 16 Control panel features...17 Find more information...18 Load paper...19 Avoid paper jams...21 Print a photo on photo paper...22 Scan an image...23 Make a copy...23 Replace the ink cartridges...24 3 Troubleshooting and support Uninstall and reinstall the software...
Basic Guide
Page 15
... from the internet. Another common problem is not trusted by your firewall's list of allowed ports. add any firewall dialog boxes that HP software is that appeared when you answered "block" to use. 2. Network setup 3. NOTE: Not all computers on the local subnet, ...computers and devices in queue or printer goes offline • Scan communication errors or scanner busy messages • Unable to trust computers on your computer. If this occurs, check that are having problems such as:...
... from the internet. Another common problem is not trusted by your firewall's list of allowed ports. add any firewall dialog boxes that HP software is that appeared when you answered "block" to use. 2. Network setup 3. NOTE: Not all computers on the local subnet, ...computers and devices in queue or printer goes offline • Scan communication errors or scanner busy messages • Unable to trust computers on your computer. If this occurs, check that are having problems such as:...

Basic Guide
Page 16
... • UDP ports: 427, 137, 161 • TCP port: 9100 Photo card upload • UDP ports: 137, 138, 427 • TCP port: 139 Scanning • UDP port: 427 • TCP ports: 9220, 9500 Product status UDP port: 161 Faxing • UDP port: 427 • TCP port: 9220 Product ...installation UDP port: 427 Manage your HP product and might need to uninstall the firewall software in -One control panel enables you might need to cause interference even after configuring the firewall as the IP address, link speed, ...
... • UDP ports: 427, 137, 161 • TCP port: 9100 Photo card upload • UDP ports: 137, 138, 427 • TCP port: 139 Scanning • UDP port: 427 • TCP ports: 9220, 9500 Product status UDP port: 161 Faxing • UDP port: 427 • TCP port: 9220 Product ...installation UDP port: 427 Manage your HP product and might need to uninstall the firewall software in -One control panel enables you might need to cause interference even after configuring the firewall as the IP address, link speed, ...
Basic Guide
Page 18
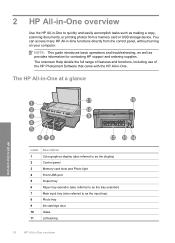
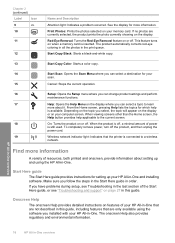
... range of features and functions, including use of the HP Photosmart Software that came with the HP All-in -One to as provides information for contacting HP support and ordering supplies. 2 HP All-in-One overview Use the HP All-in -One. You can access many HP All-in -One overview Label Description 1 Color graphics display (also referred to as the display) 2 Control...
... range of features and functions, including use of the HP Photosmart Software that came with the HP All-in -One to as provides information for contacting HP support and ordering supplies. 2 HP All-in-One overview Use the HP All-in -One. You can access many HP All-in -One overview Label Description 1 Color graphics display (also referred to as the display) 2 Control...
Basic Guide
Page 20
... during setup, see "Troubleshooting and support" on features of power is inserted. HP All-in-One overview 18 HP All-in -One and installing software. Start Copy Black: Starts a black-and-white copy. 13 Start Copy Color: Starts a color copy. 14 Start Scan: Opens the Scan Menu where you installed with your memory card. When the product is off...
... during setup, see "Troubleshooting and support" on features of power is inserted. HP All-in-One overview 18 HP All-in -One and installing software. Start Copy Black: Starts a black-and-white copy. 13 Start Copy Color: Starts a color copy. 14 Start Scan: Opens the Scan Menu where you installed with your memory card. When the product is off...
Basic Guide
Page 25
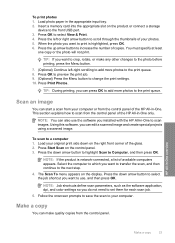
... and then press OK. Press the down arrow button to select the job shortcut you want to scroll through the thumbnails of the HP All-in-One. Make a copy You can make any other changes to the photo before printing, press the Menu button. 7. (Optional) Continue left... NOTE: Job shortcuts define scan parameters, such as the software application, dpi, and color settings so you want to the print queue. HP All-in the appropriate input tray. 2. NOTE: You can edit a scanned image and create special projects using a scanned image. TIP: If you can start a scan from your original print side...
... and then press OK. Press the down arrow button to select the job shortcut you want to scroll through the thumbnails of the HP All-in-One. Make a copy You can make any other changes to the photo before printing, press the Menu button. 7. (Optional) Continue left... NOTE: Job shortcuts define scan parameters, such as the software application, dpi, and color settings so you want to the print queue. HP All-in the appropriate input tray. 2. NOTE: You can edit a scanned image and create special projects using a scanned image. TIP: If you can start a scan from your original print side...

Basic Guide
Page 29
... remove them properly using a USB cable before restarting your computer. Make sure to uninstall and then reinstall the software. Select HP Photosmart All-In-One Driver Software, and then click Change/Remove. NOTE: If the Setup program does not appear, locate the setup.exe file... when you connected the HP All-in -One software is connected to your installation is complete, the HP Digital Imaging Monitor icon appears in -One. Restart your computer. 5. If the HP Solution Center shows the essential icons (Scan Picture and Scan Document), the software has been properly installed....
... remove them properly using a USB cable before restarting your computer. Make sure to uninstall and then reinstall the software. Select HP Photosmart All-In-One Driver Software, and then click Change/Remove. NOTE: If the Setup program does not appear, locate the setup.exe file... when you connected the HP All-in -One software is connected to your installation is complete, the HP Digital Imaging Monitor icon appears in -One. Restart your computer. 5. If the HP Solution Center shows the essential icons (Scan Picture and Scan Document), the software has been properly installed....
Basic Guide
Page 34
... Network Test (using the instructions at the beginning of the product as to scan or print) to see if the firewall software is the network address assigned to the product by accessing the HP Photosmart C6300 Allin-One series home page. (The home page is not connected to a network. ... the product is online and ready If you have the HP Photosmart Software installed, you can access the HP Photosmart C6300 All-in-One series home page After you establish that resides within the HP All-in-One.) To access the HP Photosmart C6300 All-in-One series home page ▲ On your computer, open the...
... Network Test (using the instructions at the beginning of the product as to scan or print) to see if the firewall software is the network address assigned to the product by accessing the HP Photosmart C6300 Allin-One series home page. (The home page is not connected to a network. ... the product is online and ready If you have the HP Photosmart Software installed, you can access the HP Photosmart C6300 All-in-One series home page After you establish that resides within the HP All-in-One.) To access the HP Photosmart C6300 All-in-One series home page ▲ On your computer, open the...
User Guide
Page 4
... state...12 Menu overview...12 Copy Menu...13 Photo Menu...13 Scan Menu...13 Setup Menu...13 Help Menu...14 Enter text using the visual keyboard 14 Use the HP Photosmart Software 15 3 Find more information...17 4 Finish setting up the HP All-in-One Set your preferences...19 Set your language and country/region 19...
... state...12 Menu overview...12 Copy Menu...13 Photo Menu...13 Scan Menu...13 Setup Menu...13 Help Menu...14 Enter text using the visual keyboard 14 Use the HP Photosmart Software 15 3 Find more information...17 4 Finish setting up the HP All-in-One Set your preferences...19 Set your language and country/region 19...
User Guide
Page 7
...on 140 After setting up the product, it does not print 142 Uninstall and reinstall the software 148 Network troubleshooting...149 Wired network setup troubleshooting 149 Wireless setup troubleshooting 153 Paper jams...158 ...Information on paper...159 Print quality troubleshooting 159 Wrong, inaccurate, or bleeding colors 160 Ink is not filling the text or graphics completely 163 The printout has a horizontal band ... digital camera with PictBridge do not print 193 Scan troubleshooting...194 Scan fails...195 Text is incorrect or missing 197 The...
...on 140 After setting up the product, it does not print 142 Uninstall and reinstall the software 148 Network troubleshooting...149 Wired network setup troubleshooting 149 Wireless setup troubleshooting 153 Paper jams...158 ...Information on paper...159 Print quality troubleshooting 159 Wrong, inaccurate, or bleeding colors 160 Ink is not filling the text or graphics completely 163 The printout has a horizontal band ... digital camera with PictBridge do not print 193 Scan troubleshooting...194 Scan fails...195 Text is incorrect or missing 197 The...

User Guide
Page 12
...glance • Control panel overview • Menu overview • Enter text using the visual keyboard • Use the HP Photosmart Software The HP All-in-One at a glance Overview Label Description 1 Color graphics display (also referred to as the display) 2 Control panel 3 Memory card slots and Photo light 4 Front ... The HP All-in-One at a glance 9 2 HP All-in-One overview Use the HP All-in-One to as the tray extender) 7 Main input tray (also referred to print documents or photos from your computer, print photos directly from a memory card or storage device, scan documents ...
...glance • Control panel overview • Menu overview • Enter text using the visual keyboard • Use the HP Photosmart Software The HP All-in-One at a glance Overview Label Description 1 Color graphics display (also referred to as the display) 2 Control panel 3 Memory card slots and Photo light 4 Front ... The HP All-in-One at a glance 9 2 HP All-in-One overview Use the HP All-in-One to as the tray extender) 7 Main input tray (also referred to print documents or photos from your computer, print photos directly from a memory card or storage device, scan documents ...
User Guide
Page 20
... Here guide The Start Here guide provides instructions for basic tasks, troubleshooting tips, and technical information. www.hp.com/support HP Photosmart animations The HP Photosmart animations, located in the relevant sections of resources, both printed and onscreen, that provide information about resolving ...most recent information which might encounter with the HP All-in order. Make sure you follow the steps in the Start Here guide in -One. Install the software to load paper, insert a memory card, replace the ink cartridges, and scan originals. 3 Find more information 17
... Here guide The Start Here guide provides instructions for basic tasks, troubleshooting tips, and technical information. www.hp.com/support HP Photosmart animations The HP Photosmart animations, located in the relevant sections of resources, both printed and onscreen, that provide information about resolving ...most recent information which might encounter with the HP All-in order. Make sure you follow the steps in the Start Here guide in -One. Install the software to load paper, insert a memory card, replace the ink cartridges, and scan originals. 3 Find more information 17
User Guide
Page 53
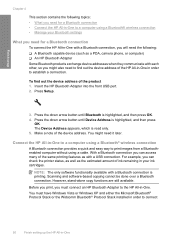
... 4. Make a note of ink remaining in -One to a computer using a Bluetooth® wireless connection A Bluetooth connection provides a quick and easy way to establish a connection. You might also need it later. Scanning and software-based copying cannot be done over a Bluetooth connection.... The Device Address appears, which is printing. Finish setup Chapter 4 This section contains the following topics: • What you need for a Bluetooth connection • Connect the HP All-in-One to a...
... 4. Make a note of ink remaining in -One to a computer using a Bluetooth® wireless connection A Bluetooth connection provides a quick and easy way to establish a connection. You might also need it later. Scanning and software-based copying cannot be done over a Bluetooth connection.... The Device Address appears, which is printing. Finish setup Chapter 4 This section contains the following topics: • What you need for a Bluetooth connection • Connect the HP All-in-One to a...
User Guide
Page 106
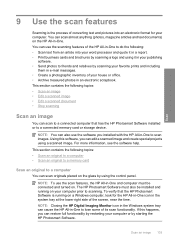
... full functionality by restarting your computer or by starting the HP Photosmart Software. If this software, you installed with the HP All-in-One to scanning. The HP Photosmart Software must be installed and running on your computer. To verify that has the HP Photosmart Software installed or to do the following: • Scan text from an article into an electronic format for the...
... full functionality by restarting your computer or by starting the HP Photosmart Software. If this software, you installed with the HP All-in-One to scanning. The HP Photosmart Software must be installed and running on your computer. To verify that has the HP Photosmart Software installed or to do the following: • Scan text from an article into an electronic format for the...
User Guide
Page 204
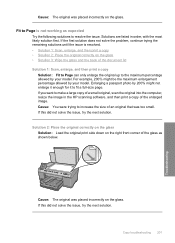
Solutions are listed in the HP scanning software, and then print a copy of an original that was too small. Solution 2: Place ...For example, 200% might not enlarge it enough for it to Page is resolved. • Solution 1: Scan, enlarge, and then print a copy • Solution 2: Place the original correctly on the right front corner of the document ...solve the issue, try the next solution. Cause: You were trying to make a large copy of a small original, scan the original into the computer, resize the image in order, with the most likely solution first. Cause: The original was ...
Solutions are listed in the HP scanning software, and then print a copy of an original that was too small. Solution 2: Place ...For example, 200% might not enlarge it enough for it to Page is resolved. • Solution 1: Scan, enlarge, and then print a copy • Solution 2: Place the original correctly on the right front corner of the document ...solve the issue, try the next solution. Cause: You were trying to make a large copy of a small original, scan the original into the computer, resize the image in order, with the most likely solution first. Cause: The original was ...

User Guide
Page 234
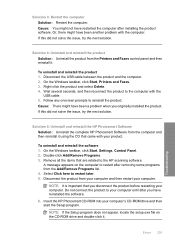
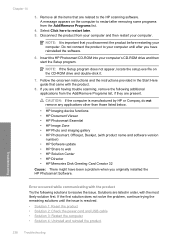
...from the Add/Remove Programs list. 4. Solution 5: Uninstall and reinstall the HP Photosmart Software Solution: Uninstall the complete HP Photosmart Software from the Printers and Faxes control panel and then reinstall it using that are related to the HP scanning software. To uninstall and reinstall the software 1. Errors 231 Troubleshooting Solution 4: Uninstall and reinstall the product Solution: Uninstall... product 1. Follow any onscreen prompts to restart later. On the Windows taskbar, click Start, Settings, Control Panel. 2. Remove all the items that one instead. 8.
...from the Add/Remove Programs list. 4. Solution 5: Uninstall and reinstall the HP Photosmart Software Solution: Uninstall the complete HP Photosmart Software from the Printers and Faxes control panel and then reinstall it using that are related to the HP scanning software. To uninstall and reinstall the software 1. Errors 231 Troubleshooting Solution 4: Uninstall and reinstall the product Solution: Uninstall... product 1. Follow any onscreen prompts to restart later. On the Windows taskbar, click Start, Settings, Control Panel. 2. Remove all the items that one instead. 8.
User Guide
Page 238
...to reinstall the product. Do not connect the product to the computer with your product. Errors 235 Troubleshooting Insert the HP Photosmart CD-ROM into your computer until after you have restarted the computer after removing some programs from the computer and ...USB cable. 5. Disconnect the USB cable between the product and the computer. 2. Follow any onscreen prompts to the HP scanning software. Or, there might not have reinstalled the software. 6. Solution 3: Restart the computer Solution: Restart the computer. Solution 4: Uninstall and reinstall the product Solution: ...
...to reinstall the product. Do not connect the product to the computer with your product. Errors 235 Troubleshooting Insert the HP Photosmart CD-ROM into your computer until after you have restarted the computer after removing some programs from the computer and ...USB cable. 5. Disconnect the USB cable between the product and the computer. 2. Follow any onscreen prompts to the HP scanning software. Or, there might not have reinstalled the software. 6. Solution 3: Restart the computer Solution: Restart the computer. Solution 4: Uninstall and reinstall the product Solution: ...
User Guide
Page 240
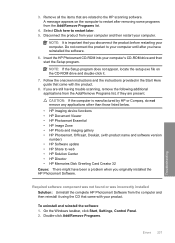
...from the Add/Remove Programs list. 4. Required software component was not found or was incorrectly installed Solution: Uninstall the complete HP Photosmart Software from the Add/Remove Programs list, if they are related to the HP scanning software. On the Windows taskbar, click Start, Settings,... Control Panel. 2. If you disconnect the product before restarting your product. 3. Insert the HP Photosmart CD-ROM ...
...from the Add/Remove Programs list. 4. Required software component was not found or was incorrectly installed Solution: Uninstall the complete HP Photosmart Software from the Add/Remove Programs list, if they are related to the HP scanning software. On the Windows taskbar, click Start, Settings,... Control Panel. 2. If you disconnect the product before restarting your product. 3. Insert the HP Photosmart CD-ROM ...
User Guide
Page 241
... double-click it. 7. Select Click here to the HP scanning software. NOTE: It is resolved. • Solution 1: Reset the product • Solution 2: Check the power cord and USB cable • Solution 3: Restart the computer • Solution 4: Uninstall and reinstall the product 238 Troubleshooting Insert the HP Photosmart CD-ROM into your computer. Remove all the...
... double-click it. 7. Select Click here to the HP scanning software. NOTE: It is resolved. • Solution 1: Reset the product • Solution 2: Check the power cord and USB cable • Solution 3: Restart the computer • Solution 4: Uninstall and reinstall the product 238 Troubleshooting Insert the HP Photosmart CD-ROM into your computer. Remove all the...

User Guide
Page 244
...HP Photosmart CD-ROM into your computer until after installing the product software. Or, there might not have restarted the computer after you have been another problem with the USB cable. 5. NOTE: If the Setup program does not appear, locate the setup.exe file on the computer to the HP scanning software.... Cause: You might have reinstalled the software. 6. Solution 4: Uninstall and reinstall the product Solution: Uninstall the product from your computer and then ...
...HP Photosmart CD-ROM into your computer until after installing the product software. Or, there might not have restarted the computer after you have been another problem with the USB cable. 5. NOTE: If the Setup program does not appear, locate the setup.exe file on the computer to the HP scanning software.... Cause: You might have reinstalled the software. 6. Solution 4: Uninstall and reinstall the product Solution: Uninstall the product from your computer and then ...


