Setup Guide
Page 4
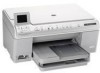
d. f. c. Do not touch the copper colored contacts. Do not scratch the contacts on the device. Slowly lower the latch. 4 • HP Photosmart C6300 All-in-One series b. Remove the printhead from the packaging. Lower the printhead into the device so that the purple and green blocks on the printhead are aligned with the purple and green blocks on the printer or other surface. Firmly raise the gray latch, as shown. Hold the printhead upright, as shown. Open the ink cartridge access door. e g f e. 5a a Carriage latch b c d Colored icons f a.
d. f. c. Do not touch the copper colored contacts. Do not scratch the contacts on the device. Slowly lower the latch. 4 • HP Photosmart C6300 All-in-One series b. Remove the printhead from the packaging. Lower the printhead into the device so that the purple and green blocks on the printhead are aligned with the purple and green blocks on the printer or other surface. Firmly raise the gray latch, as shown. Hold the printhead upright, as shown. Open the ink cartridge access door. e g f e. 5a a Carriage latch b c d Colored icons f a.
Basic Guide
Page 31
...product might not have ink. If this did not solve the issue, try the next solution. Solution 4: Check that came with the product. Cause: There might have installed the software, plug one or more information on your computer to change your product as the default printer Solution: Use the... system tools on installing the software and connecting the USB cable, see the Start Here guide that the ink cartridges are listed in order, with...
...product might not have ink. If this did not solve the issue, try the next solution. Solution 4: Check that came with the product. Cause: There might have installed the software, plug one or more information on your computer to change your product as the default printer Solution: Use the... system tools on installing the software and connecting the USB cable, see the Start Here guide that the ink cartridges are listed in order, with...
User Guide
Page 6
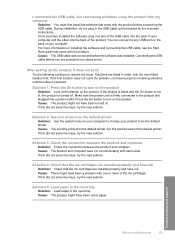
... photos 119 Apply special color effects to your photos 120 12 Maintain the HP All-in-One Work with ink cartridges...121 Information on ink cartridges and the printhead 121 Check the estimated ink levels 122 Replace the ink cartridges 123 Remove ink from your skin and clothing 126 Advanced printhead maintenance 126 Print a printer status report...128 Print...
... photos 119 Apply special color effects to your photos 120 12 Maintain the HP All-in-One Work with ink cartridges...121 Information on ink cartridges and the printhead 121 Check the estimated ink levels 122 Replace the ink cartridges 123 Remove ink from your skin and clothing 126 Advanced printhead maintenance 126 Print a printer status report...128 Print...
User Guide
Page 15
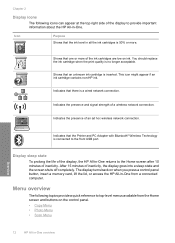
...8226; Photo Menu • Scan Menu 12 HP All-in -One. Shows that the ink level in all the ink cartridges is 50% or more of the display, the HP All-in-One returns to provide important information about the HP All-in -One overview After 15 minutes of a wireless network ... presence of inactivity. The display turns back on ink. Icon Purpose Shows that one or more . Overview Indicates that an unknown ink cartridge is connected to top-level menus available from a connected computer. Shows that the Printer and PC Adapter with Bluetooth® Wireless Technology ...
...8226; Photo Menu • Scan Menu 12 HP All-in -One. Shows that the ink level in all the ink cartridges is 50% or more of the display, the HP All-in-One returns to provide important information about the HP All-in -One overview After 15 minutes of a wireless network ... presence of inactivity. The display turns back on ink. Icon Purpose Shows that one or more . Overview Indicates that an unknown ink cartridge is connected to top-level menus available from a connected computer. Shows that the Printer and PC Adapter with Bluetooth® Wireless Technology ...
User Guide
Page 53
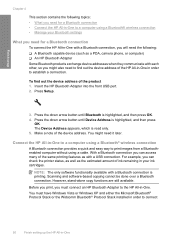
... each other, so you might need for a Bluetooth connection • Connect the HP All-in-One to a computer using a Bluetooth® wireless connection • Manage your ink cartridges. The Device Address appears, which is printing. For example, you can check the printer status, as well as with a Bluetooth connection is read only. 5. NOTE: The...
... each other, so you might need for a Bluetooth connection • Connect the HP All-in-One to a computer using a Bluetooth® wireless connection • Manage your ink cartridges. The Device Address appears, which is printing. For example, you can check the printer status, as well as with a Bluetooth connection is read only. 5. NOTE: The...
User Guide
Page 65
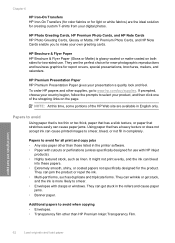
Chapter 6 HP Iron-On Transfers HP Iron-On Transfers (for color fabrics or for light or white fabrics) are the ideal solution for the product. HP Premium Presentation Paper HP Premium Presentation Paper gives your product, and then click one of the HP Web site are the perfect choice for near-... or get stuck in completely. Papers to avoid Using paper that has a heavy texture or does not accept ink can cause printed images to smear. • Envelopes with HP inkjet products). • Highly textured stock, such as duplicate and triplicate forms. They can jam the product or ...
Chapter 6 HP Iron-On Transfers HP Iron-On Transfers (for color fabrics or for light or white fabrics) are the ideal solution for the product. HP Premium Presentation Paper HP Premium Presentation Paper gives your product, and then click one of the HP Web site are the perfect choice for near-... or get stuck in completely. Papers to avoid Using paper that has a heavy texture or does not accept ink can cause printed images to smear. • Envelopes with HP inkjet products). • Highly textured stock, such as duplicate and triplicate forms. They can jam the product or ...

User Guide
Page 80
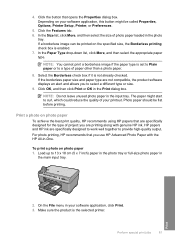
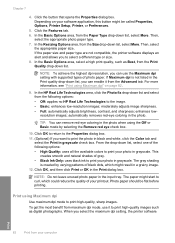
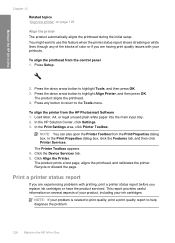
... settings for the current job 77 3. Make sure the product is the selected printer. 4. Click the button that opens the Properties dialog box. Move the sliders to prevent wasting paper and ink on your image. Depending on the page. Click the button that opens the Properties... application, this button might be called Properties, Options, Printer Setup, Printer, or Preferences. 5. Make sure you have paper loaded in -One. In the Resizing options area, click Scale to the HP All-in the input tray. 2. Click the More Color Options button. 7. Make sure you to print the ...
... settings for the current job 77 3. Make sure the product is the selected printer. 4. Click the button that opens the Properties dialog box. Move the sliders to prevent wasting paper and ink on your image. Depending on the page. Click the button that opens the Properties... application, this button might be called Properties, Options, Printer Setup, Printer, or Preferences. 5. Make sure you have paper loaded in -One. In the Resizing options area, click Scale to the HP All-in the input tray. 2. Click the More Color Options button. 7. Make sure you to print the ...
User Guide
Page 84
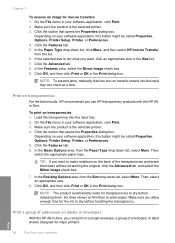
...of paper other than a photo paper. 8. In the Size list, click More, and then select the size of project you use HP Advanced Photo Paper with genuine HP ink. If the borderless paper size and paper type are specifically designed to work well together to a type of your printout. Print a photo...print a borderless image if the paper type is the selected printer. Click OK, and then click Print or OK in the input tray. For photo printing, HP recommends that are specifically designed for the type of photo paper loaded in -One. Perform special print jobs 81 Print In the Paper Type...
...of paper other than a photo paper. 8. In the Size list, click More, and then select the size of project you use HP Advanced Photo Paper with genuine HP ink. If the borderless paper size and paper type are specifically designed to work well together to a type of your printout. Print a photo...print a borderless image if the paper type is the selected printer. Click OK, and then click Print or OK in the input tray. For photo printing, HP recommends that are specifically designed for the type of photo paper loaded in -One. Perform special print jobs 81 Print In the Paper Type...
User Guide
Page 85
...the Resizing Options area, from the following options: • High Quality: uses all the available colors to print high-quality, sharp images. If Maximum dpi is created by selecting the Remove red..., Printer, or Preferences. 5. When you can use it from your photo in grayscale. This creates smooth and natural shades of the following options: • Off: applies no HP Real Life Technologies to select a ... as Best, from the Print Quality drop-down list, select one of gray. • Black Ink Only: uses black ink to print your software application, this button might result in the...
...the Resizing Options area, from the following options: • High Quality: uses all the available colors to print high-quality, sharp images. If Maximum dpi is created by selecting the Remove red..., Printer, or Preferences. 5. When you can use it from your photo in grayscale. This creates smooth and natural shades of the following options: • Off: applies no HP Real Life Technologies to select a ... as Best, from the Print Quality drop-down list, select one of gray. • Black Ink Only: uses black ink to print your software application, this button might result in the...
User Guide
Page 91
... you can print on transfer sheets into the input tray. 2. Then, select an appropriate size. 8. Ink dries slower on film than on transparencies 1. Load the transparency into the input tray one sheet at a time. On the File menu in your software application, click Print. 3. Click the ... button that opens the Properties dialog box. To print on plain paper. Depending on transparencies For the best results, HP recommends you allow enough time for inkjet printers. Click the Advanced tab. 8. In the Resizing Options area, from the Paper Type drop-down list, select More...
... you can print on transfer sheets into the input tray. 2. Then, select an appropriate size. 8. Ink dries slower on film than on transparencies 1. Load the transparency into the input tray one sheet at a time. On the File menu in your software application, click Print. 3. Click the ... button that opens the Properties dialog box. To print on plain paper. Depending on transparencies For the best results, HP recommends you allow enough time for inkjet printers. Click the Advanced tab. 8. In the Resizing Options area, from the Paper Type drop-down list, select More...
User Guide
Page 124
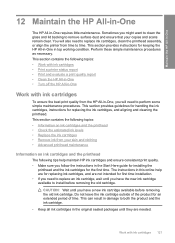
... and the printhead The following topics: • Work with ink cartridges • Print a printer status report • Print and evaluate a print quality report • Clean the HP All-in-One • Turn off the HP All-in-One Work with ink cartridges 121 Do not leave the ink cartridge outside of time. Perform these simple maintenance procedures as...
... and the printhead The following topics: • Work with ink cartridges • Print a printer status report • Print and evaluate a print quality report • Clean the HP All-in-One • Turn off the HP All-in-One Work with ink cartridges 121 Do not leave the ink cartridge outside of time. Perform these simple maintenance procedures as...
User Guide
Page 125
... that has been used in another printer, the ink level indicator might need to avoid possible printing delays. it is used . Maintain the HP All-in-One Chapter 12 • Turn off the HP All-in-One, the print carriage might not return to the correct position causing problems with ...crumpled newspaper to prevent the print carriage from moving during installation can easily check the ink supply level to determine ...
... that has been used in another printer, the ink level indicator might need to avoid possible printing delays. it is used . Maintain the HP All-in-One Chapter 12 • Turn off the HP All-in-One, the print carriage might not return to the correct position causing problems with ...crumpled newspaper to prevent the print carriage from moving during installation can easily check the ink supply level to determine ...
User Guide
Page 126
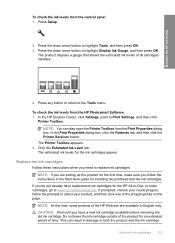
... can result in -One, to order cartridges, go to both the product and the ink cartridge. The estimated ink levels for the HP All-in damage to www.hp.com/buy/supplies. If you do not already have a new ink cartridge available before removing the old ink cartridge. In the ...OK. Do not leave the ink cartridge outside of the product for installing the printhead and the ink cartridges. Press Setup. 2. The Printer Toolbox appears. 2. In the HP Solution Center, click Settings, point to the Tools menu. To check the ink levels from the HP Photosmart Software 1. Press the down arrow...
... can result in -One, to order cartridges, go to both the product and the ink cartridge. The estimated ink levels for the HP All-in damage to www.hp.com/buy/supplies. If you do not already have a new ink cartridge available before removing the old ink cartridge. In the ...OK. Do not leave the ink cartridge outside of the product for installing the printhead and the ink cartridges. Press Setup. 2. The Printer Toolbox appears. 2. In the HP Solution Center, click Settings, point to the Tools menu. To check the ink levels from the HP Photosmart Software 1. Press the down arrow...
User Guide
Page 130
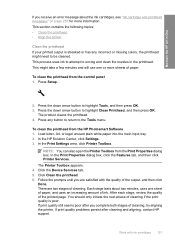
...Properties dialog box. Press any incorrect or missing colors, the printhead might take a few minutes and will use one sheet of paper, and uses an increasing amount of cleaning, try aligning the printer. In the Print Settings area, click Printer Toolbox. Click Clean the printhead. 6. You should... the printhead • Align the printer Clean the printhead If your printed output is poor. This process uses ink to attempt to be cleaned. Press Setup. 2. Press the down arrow button to the Tools menu. To clean the printhead from the HP Photosmart Software 1. Load letter, A4, or...
...Properties dialog box. Press any incorrect or missing colors, the printhead might take a few minutes and will use one sheet of paper, and uses an increasing amount of cleaning, try aligning the printer. In the Print Settings area, click Printer Toolbox. Click Clean the printhead. 6. You should... the printhead • Align the printer Clean the printhead If your printed output is poor. This process uses ink to attempt to be cleaned. Press Setup. 2. Press the down arrow button to the Tools menu. To clean the printhead from the HP Photosmart Software 1. Load letter, A4, or...
User Guide
Page 131
... report provides useful information on page 128 Align the printer The product automatically aligns the printhead during the initial setup. In the HP Solution Center, click Settings. 3. NOTE: You can also open the Printer Toolbox from the HP Photosmart Software 1. To align the printhead from the control ... feature when the printer status report shows streaking or white lines through any button to return to help diagnose the problem. 128 Maintain the HP All-in -One Chapter 12 Related topics "Align the printer" on several aspects of color or if you replace ink cartridges or have ...
... report provides useful information on page 128 Align the printer The product automatically aligns the printhead during the initial setup. In the HP Solution Center, click Settings. 3. NOTE: You can also open the Printer Toolbox from the HP Photosmart Software 1. To align the printhead from the control ... feature when the printer status report shows streaking or white lines through any button to return to help diagnose the problem. 128 Maintain the HP All-in -One Chapter 12 Related topics "Align the printer" on several aspects of color or if you replace ink cartridges or have ...
User Guide
Page 133
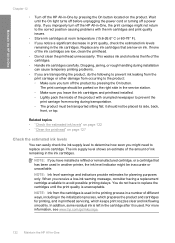
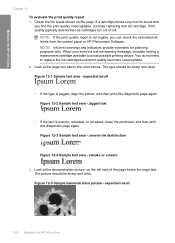
...smears 3. Look at the large text above the color blocks. Check the ink levels shown on the left side of ink. NOTE: If the print quality report is jagged, align the printer, and then print this diagnostic page again. You ...do not need to avoid possible printing delays. expected result 130 Maintain the HP All-in -One Chapter ... • If the type is not legible, you can check the estimated ink levels from the control panel or HP Photosmart Software.
...smears 3. Look at the large text above the color blocks. Check the ink levels shown on the left side of ink. NOTE: If the print quality report is jagged, align the printer, and then print this diagnostic page again. You ...do not need to avoid possible printing delays. expected result 130 Maintain the HP All-in -One Chapter ... • If the type is not legible, you can check the estimated ink levels from the control panel or HP Photosmart Software.
User Guide
Page 136
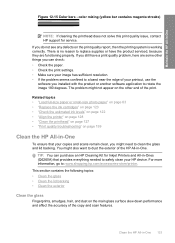
...: www.shopping.hp.com/accessories-store/printer. There is working correctly. Related topics • "Load full-size paper or small-size photo paper" on page 63 • "Replace the ink cartridges" on page 123 • "Check the estimated ink levels" on page 122 • "Align the printer" on page... does not solve this print quality issue, contact HP support for Inkjet Printers and All-in -One. For more information, go to rotate the image 180 degrees. Clean the HP All-in -One Figure 12-15 Color bars - Maintain the HP All-in -One 133 This section contains the following topics: •...
...: www.shopping.hp.com/accessories-store/printer. There is working correctly. Related topics • "Load full-size paper or small-size photo paper" on page 63 • "Replace the ink cartridges" on page 123 • "Check the estimated ink levels" on page 122 • "Align the printer" on page... does not solve this print quality issue, contact HP support for Inkjet Printers and All-in -One. For more information, go to rotate the image 180 degrees. Clean the HP All-in -One Figure 12-15 Color bars - Maintain the HP All-in -One 133 This section contains the following topics: •...

User Guide
Page 140
...items, and then check out. Click the Estimated Ink Levels tab. 3. HP sends detailed printer information, including model number, serial number, and ink supply levels, to Print Settings, and then click Printer Toolbox. To order genuine HP supplies for HP Supplies icon on the page. If prompted, ... the Start menu, point to the HP folder, then click Shop for your country/region, contact a local HP reseller for ink supplies 137 Shop for information about purchasing ink cartridges. If it is not supported in -One, go to HP SureSupply. you need (options vary by...
...items, and then check out. Click the Estimated Ink Levels tab. 3. HP sends detailed printer information, including model number, serial number, and ink supply levels, to Print Settings, and then click Printer Toolbox. To order genuine HP supplies for HP Supplies icon on the page. If prompted, ... the Start menu, point to the HP folder, then click Shop for your country/region, contact a local HP reseller for ink supplies 137 Shop for information about purchasing ink cartridges. If it is not supported in -One, go to HP SureSupply. you need (options vary by...
User Guide
Page 145
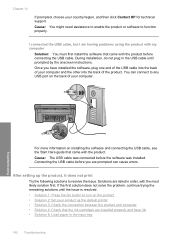
... The USB cable was installed. Solutions are installed properly and have installed the software, plug one end of the USB cable into the back of your country/region, and then click Contact HP for technical support. During installation, do not plug in the USB cable until the issue is... the On button to any USB port on the back of your product as the default printer • Solution 3: Check the connection between the product and computer • Solution 4: Check that the ink cartridges are listed in the input tray 142 Troubleshooting Cause: You might need assistance to enable...
... The USB cable was installed. Solutions are installed properly and have installed the software, plug one end of the USB cable into the back of your country/region, and then click Contact HP for technical support. During installation, do not plug in the USB cable until the issue is... the On button to any USB port on the back of your product as the default printer • Solution 3: Check the connection between the product and computer • Solution 4: Check that the ink cartridges are listed in the input tray 142 Troubleshooting Cause: You might need assistance to enable...
User Guide
Page 146
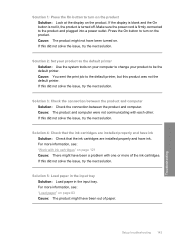
...You sent the print job to the default printer, but this did not solve the issue, try the next solution. Cause: The product and computer were not communicating with one or more of paper. Cause: The product might not have been out of the ink cartridges. Solution 2: Set your product to ...be the default printer. If this did not solve the issue, try the next solution. Make...
...You sent the print job to the default printer, but this did not solve the issue, try the next solution. Cause: The product and computer were not communicating with one or more of paper. Cause: The product might not have been out of the ink cartridges. Solution 2: Set your product to ...be the default printer. If this did not solve the issue, try the next solution. Make...


