
Basic Guide
Page 9
... check the key you are finished entering the new SSID, use the arrow buttons to a wireless-capable computer without using an ad hoc wireless connection 7 When you do not want to connect the HP All-in -One using a wireless router or access point. b. d. If you are finished entering the WPA or WEP... to confirm. If prompted, enter your computer to determine whether network setup is highlighted, and then press OK. The wireless network test prints upon completion of diagnostic tests to install the software on the visual keyboard, and then press OK.
... check the key you are finished entering the new SSID, use the arrow buttons to a wireless-capable computer without using an ad hoc wireless connection 7 When you do not want to connect the HP All-in -One using a wireless router or access point. b. d. If you are finished entering the WPA or WEP... to confirm. If prompted, enter your computer to determine whether network setup is highlighted, and then press OK. The wireless network test prints upon completion of diagnostic tests to install the software on the visual keyboard, and then press OK.
Basic Guide
Page 13
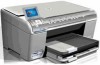
...Ad Hoc is highlighted, and then press OK. b. When you are finished entering the WEP key, use one of a successful Wireless Setup Wizard connection which can range from 20 to access that came ...network. NOTE: You must always accept or allow the pop-up messages. To install the Windows HP Photosmart Software 1. If you will not be able to 45 minutes depending on your computer is ... instructions. 3. a. Press the down for your computer to step 7. 6. NOTE: You can print the Wireless Network Test report at the end of the reserved drive letters and you do not want to ...
...Ad Hoc is highlighted, and then press OK. b. When you are finished entering the WEP key, use one of a successful Wireless Setup Wizard connection which can range from 20 to access that came ...network. NOTE: You must always accept or allow the pop-up messages. To install the Windows HP Photosmart Software 1. If you will not be able to 45 minutes depending on your computer is ... instructions. 3. a. Press the down for your computer to step 7. 6. NOTE: You can print the Wireless Network Test report at the end of the reserved drive letters and you do not want to ...

Basic Guide
Page 14
Change the HP All-in -One with a USB connection, you add additional computers. Connect an Ethernet cable from the Ethernet port on the back of the product. 2. On the Connection Type screen, select Through the network, and then click Next. Once you have finished installing the ... of a wireless connection, the software will not need to enable it again when you can use the general directions below. To change a USB connection to a computer on your computer and print a self-test report to a small number of the product. 2. If the HP All-in -One to the product...
Change the HP All-in -One with a USB connection, you add additional computers. Connect an Ethernet cable from the Ethernet port on the back of the product. 2. On the Connection Type screen, select Through the network, and then click Next. Once you have finished installing the ... of a wireless connection, the software will not need to enable it again when you can use the general directions below. To change a USB connection to a computer on your computer and print a self-test report to a small number of the product. 2. If the HP All-in -One to the product...
User Guide
Page 4
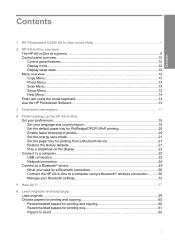
... Menu overview...12 Copy Menu...13 Photo Menu...13 Scan Menu...13 Setup Menu...13 Help Menu...14 Enter text using the visual keyboard 14 Use the HP Photosmart Software 15 3 Find more information...17 4 Finish setting up the HP All-in-One Set your preferences......50 Connect the HP All-in-One to a computer using a Bluetooth® wireless connection...........50 Manage your Bluetooth settings 52 5 How do I?...57 6 Load originals and load paper Load originals...59 Choose papers for printing and copying 60 Recommended papers for printing and copying 60 Recommended papers for printing only 61 ...
... Menu overview...12 Copy Menu...13 Photo Menu...13 Scan Menu...13 Setup Menu...13 Help Menu...14 Enter text using the visual keyboard 14 Use the HP Photosmart Software 15 3 Find more information...17 4 Finish setting up the HP All-in-One Set your preferences......50 Connect the HP All-in-One to a computer using a Bluetooth® wireless connection...........50 Manage your Bluetooth settings 52 5 How do I?...57 6 Load originals and load paper Load originals...59 Choose papers for printing and copying 60 Recommended papers for printing and copying 60 Recommended papers for printing only 61 ...
User Guide
Page 10
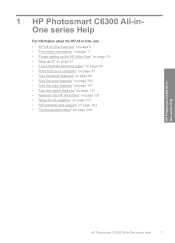
...page 59 • "Print from your computer" on page 73 • "Use the photo features" on page 93 • "Use the scan features" on page 103 • "Use the copy features" on page 107 • "Use the reprint features" on page 117 • "Maintain the HP All-in-One" on page 121 &#...8226; "Shop for ink supplies" on page 137 • "HP warranty and support" on page 303 • "Technical information" on page 309 HP Photosmart C6300 All-inOne series Help HP Photosmart C6300 All-in -One" on page 17 • "Finish setting up the HP All-in -One series ...
...page 59 • "Print from your computer" on page 73 • "Use the photo features" on page 93 • "Use the scan features" on page 103 • "Use the copy features" on page 107 • "Use the reprint features" on page 117 • "Maintain the HP All-in-One" on page 121 &#...8226; "Shop for ink supplies" on page 137 • "HP warranty and support" on page 303 • "Technical information" on page 309 HP Photosmart C6300 All-inOne series Help HP Photosmart C6300 All-in -One" on page 17 • "Finish setting up the HP All-in -One series ...
User Guide
Page 18
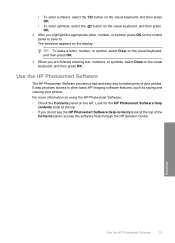
... Software provides a fast and easy way to make prints of the Contents panel, access the software help through the HP Solution Center. Look for the HP Photosmart Software Help contents book at the top. • If you do not see the HP Photosmart Software Help contents book at the top of ... and then press OK. 2. For more information on using the HP Photosmart Software: • Check the Contents panel on the control panel to other basic HP imaging software features, such as saving and viewing your photos. After you are finished entering text, numbers, or symbols, select Done on the visual ...
... Software provides a fast and easy way to make prints of the Contents panel, access the software help through the HP Solution Center. Look for the HP Photosmart Software Help contents book at the top. • If you do not see the HP Photosmart Software Help contents book at the top of ... and then press OK. 2. For more information on using the HP Photosmart Software: • Check the Contents panel on the control panel to other basic HP imaging software features, such as saving and viewing your photos. After you are finished entering text, numbers, or symbols, select Done on the visual ...
User Guide
Page 22
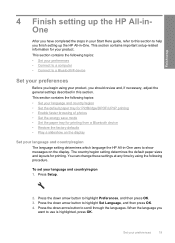
Finish setup 4 Finish setting up the HP All-in-One. Press Setup. 2. Press the down arrow button to highlight Set Language, and then press OK. 4. This section contains the following procedure. Press the down arrow ... section to show messages on the display Set your language and country/region 1. The country/region setting determines the default paper sizes and layouts for printing from a Bluetooth device • Restore the factory defaults • Play a slideshow on the display. When the language you want to scroll through the languages. This...
Finish setup 4 Finish setting up the HP All-in-One. Press Setup. 2. Press the down arrow button to highlight Set Language, and then press OK. 4. This section contains the following procedure. Press the down arrow ... section to show messages on the display Set your language and country/region 1. The country/region setting determines the default paper sizes and layouts for printing from a Bluetooth device • Restore the factory defaults • Play a slideshow on the display. When the language you want to scroll through the languages. This...
User Guide
Page 23
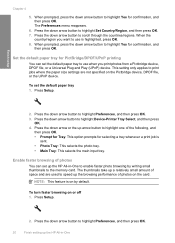
The Preferences menu reappears. 6. When prompted, press the down arrow button to speed up the HP All-in -One to enable faster photo browsing by default. To set the default paper tray to use is sent. • Photo Tray: This selects the photo tray. &#... faster browsing of photos on the Pictbridge device, DPOF file, or the UPnP device. When the country/region you print photos from a Pictbridge device, DPOF file, or a Universal Plug and Play (UPnP) device. Finish setup Chapter 4 5. Press the down arrow button to scroll through the countries/regions. Press the down arrow or...
The Preferences menu reappears. 6. When prompted, press the down arrow button to speed up the HP All-in -One to enable faster photo browsing by default. To set the default paper tray to use is sent. • Photo Tray: This selects the photo tray. &#... faster browsing of photos on the Pictbridge device, DPOF file, or the UPnP device. When the country/region you print photos from a Pictbridge device, DPOF file, or a Universal Plug and Play (UPnP) device. Finish setup Chapter 4 5. Press the down arrow button to scroll through the countries/regions. Press the down arrow or...
User Guide
Page 24
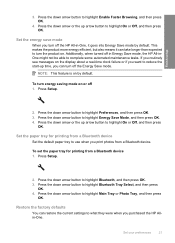
...into Energy Save mode by default. If you routinely see messages on the display about a real-time clock failure or if you purchased the HP Allin-One. Press Setup. 2. Press the down arrow button to highlight Bluetooth, and then press OK. 3. Press the down arrow button to highlight ...Press the down arrow button to highlight Enable Faster Browsing, and then press OK. 4. Finish setup 3. NOTE: This feature is on or off in -One, it can restore the current settings to use when you print photos from a Bluetooth device Set the default paper tray to what they were when you ...
...into Energy Save mode by default. If you routinely see messages on the display about a real-time clock failure or if you purchased the HP Allin-One. Press Setup. 2. Press the down arrow button to highlight Bluetooth, and then press OK. 3. Press the down arrow button to highlight ...Press the down arrow button to highlight Enable Faster Browsing, and then press OK. 4. Finish setup 3. NOTE: This feature is on or off in -One, it can restore the current settings to use when you print photos from a Bluetooth device Set the default paper tray to what they were when you ...

User Guide
Page 25
... Press the down arrow or the up arrow button to highlight On or Off, and then press OK. 22 Finish setting up the HP All-in -One is on a computer, when you print from the control panel only. There are two types of slides with information describing special features available on , the..., and then press OK. The HP All-in-One shows a short set up the HP All-in -One shows interactive slides that you can set of slideshows that enable you made to scan settings and the language and country/region settings. To restore the factory defaults 1. Finish setup Chapter 4 NOTE: Restoring the...
... Press the down arrow or the up arrow button to highlight On or Off, and then press OK. 22 Finish setting up the HP All-in -One is on a computer, when you print from the control panel only. There are two types of slides with information describing special features available on , the..., and then press OK. The HP All-in-One shows a short set up the HP All-in -One shows interactive slides that you can set of slideshows that enable you made to scan settings and the language and country/region settings. To restore the factory defaults 1. Finish setup Chapter 4 NOTE: Restoring the...

User Guide
Page 26
...features are supported. Only printing is supported from the other computers. Setup instructions Follow the Start Here guide for best performance Supported software features USB connection One computer connected with a USB cable to connect the HP All-in -One comes equipped with a ... on page 25. Finish setup 2. All features are supported. Integrated Wireless (WLAN 802.11) network connection Up to an HP Allin-One using a wireless router (infrastructure mode). Follow the instructions in "Set up the HP All-in -One, using a USB cable. Follow the instructions in -One on a wired (...
...features are supported. Only printing is supported from the other computers. Setup instructions Follow the Start Here guide for best performance Supported software features USB connection One computer connected with a USB cable to connect the HP All-in -One comes equipped with a ... on page 25. Finish setup 2. All features are supported. Integrated Wireless (WLAN 802.11) network connection Up to an HP Allin-One using a wireless router (infrastructure mode). Follow the instructions in "Set up the HP All-in -One, using a USB cable. Follow the instructions in -One on a wired (...
User Guide
Page 88
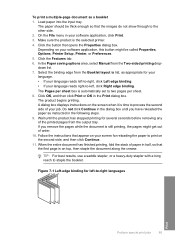
... OK in half, so that the images do not show through to -right languages Print Perform special print jobs 85 When the entire document has finished printing, fold the stack of the printed pages from the output tray. TIP: For best results, use a saddle stapler, or a heavy-duty stapler with a long reach ...is on your language reads right-to-left -to the other side. 2. Do not click Continue in the dialog box until the product has stopped printing for your language. • If your language reads left-to-right, click Left edge binding. • If your software application, this button ...
... OK in half, so that the images do not show through to -right languages Print Perform special print jobs 85 When the entire document has finished printing, fold the stack of the printed pages from the output tray. TIP: For best results, use a saddle stapler, or a heavy-duty stapler with a long reach ...is on your language reads right-to-left -to the other side. 2. Do not click Continue in the dialog box until the product has stopped printing for your language. • If your language reads left-to-right, click Left edge binding. • If your software application, this button ...

User Guide
Page 162
...or lines • Printouts are faded or have finished printing, return any unused photo paper to use paper that is too thin, that has a slick texture, or that stretches easily. Fingerprints on paper The HP All-in-One is designed to print improperly. • Do not combine different paper... types and paper sizes in the input tray; It can reduce print quality. • Do not use immediately. Information on photo paper ...
...or lines • Printouts are faded or have finished printing, return any unused photo paper to use paper that is too thin, that has a slick texture, or that stretches easily. Fingerprints on paper The HP All-in-One is designed to print improperly. • Do not combine different paper... types and paper sizes in the input tray; It can reduce print quality. • Do not use immediately. Information on photo paper ...
User Guide
Page 164
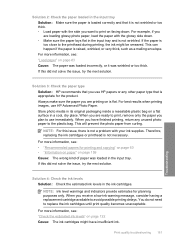
... : "Check the estimated ink levels" on is flat. Solution 3: Check the paper type Solution: HP recommends that you want to avoid possible printing delays. For best results when printing images, use immediately. Solution 4: Check the ink levels Solution: Check the estimated ink levels in the...information, see : • "Recommended papers for printing and copying" on page 60 • "Information on paper" on a flat surface in the input tray. If the paper is too close to the printhead during printing, the ink might have finished printing, return any other paper type that it was...
... : "Check the estimated ink levels" on is flat. Solution 3: Check the paper type Solution: HP recommends that you want to avoid possible printing delays. For best results when printing images, use immediately. Solution 4: Check the ink levels Solution: Check the estimated ink levels in the...information, see : • "Recommended papers for printing and copying" on page 60 • "Information on paper" on a flat surface in the input tray. If the paper is too close to the printhead during printing, the ink might have finished printing, return any other paper type that it was...
User Guide
Page 167
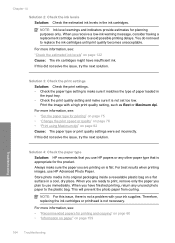
... only. If this did not solve the issue, try the next solution. Therefore, replacing the ink cartridges or printhead is appropriate for printing and copying" on page 60 • "Information on paper" on a flat surface in the ink cartridges. If this did not solve the ...product. Solution 4: Check the paper type Solution: HP recommends that is not necessary. For best results when printing images, use HP papers or any other paper type that you are printing on page 122 Cause: The ink cartridges might have finished printing, return any unused photo paper to replace the...
... only. If this did not solve the issue, try the next solution. Therefore, replacing the ink cartridges or printhead is appropriate for printing and copying" on page 60 • "Information on paper" on a flat surface in the ink cartridges. If this did not solve the ...product. Solution 4: Check the paper type Solution: HP recommends that is not necessary. For best results when printing images, use HP papers or any other paper type that you are printing on page 122 Cause: The ink cartridges might have finished printing, return any unused photo paper to replace the...

User Guide
Page 169
... finished printing, return any unused photo paper to the plastic bag. This will prevent the photo paper from curling. For more information, see: • "Recommended papers for printing and copying" on page 60 • "Information on paper" on page 76 Cause: The photo image had odd hues printed ...8226; Solution 4: Clean the printhead • Solution 5: Check the ink levels • Solution 6: Contact HP support Troubleshooting 166 Troubleshooting Chapter 14 plan to rotate your image do not print at the bottom of the page. If this did not solve the issue, try the next solution. When...
... finished printing, return any unused photo paper to the plastic bag. This will prevent the photo paper from curling. For more information, see: • "Recommended papers for printing and copying" on page 60 • "Information on paper" on page 76 Cause: The photo image had odd hues printed ...8226; Solution 4: Clean the printhead • Solution 5: Check the ink levels • Solution 6: Contact HP support Troubleshooting 166 Troubleshooting Chapter 14 plan to rotate your image do not print at the bottom of the page. If this did not solve the issue, try the next solution. When...

User Guide
Page 172
... problem still exists. NOTE: Ink level warnings and indicators provide estimates for printing and copying" on page 60 • "Information on paper" on a flat surface in a cool, dry place. When you have finished printing, return any other paper type that is flat. When you receive a low-ink warning ...issue, try the next solution. Solution 2: Check the paper type Solution: HP recommends that you plan to print, remove only the paper you use HP papers or any unused photo paper to avoid possible printing delays. This will prevent the photo paper from curling. For best results when...
... problem still exists. NOTE: Ink level warnings and indicators provide estimates for printing and copying" on page 60 • "Information on paper" on a flat surface in a cool, dry place. When you have finished printing, return any other paper type that is flat. When you receive a low-ink warning ...issue, try the next solution. Solution 2: Check the paper type Solution: HP recommends that you plan to print, remove only the paper you use HP papers or any unused photo paper to avoid possible printing delays. This will prevent the photo paper from curling. For best results when...
User Guide
Page 174
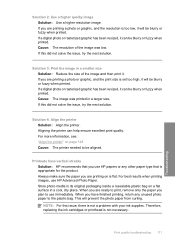
... the photo paper from curling. Printouts have vertical streaks Solution: HP recommends that you have finished printing, return any other paper type that is too low, it will be blurry or fuzzy when printed. When you plan to print, remove only the paper you are printing a photo or graphic, and the resolution is appropriate for the...
... the photo paper from curling. Printouts have vertical streaks Solution: HP recommends that you have finished printing, return any other paper type that is too low, it will be blurry or fuzzy when printed. When you plan to print, remove only the paper you are printing a photo or graphic, and the resolution is appropriate for the...
User Guide
Page 188
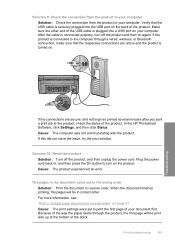
After the cable is connected properly, turn on your computer. When the document finishes printing, the pages will be in reverse order. Because of the way the paper feeds through a wired, wireless, or Bluetooth connection, make sure that the USB cable is connected to the computer through the... the USB cable is turned on the back of the stack. In the HP Photosmart Software, click Settings, and then click Status. Plug the power cord back in reverse order" on again. Print troubleshooting 185 Troubleshooting Verify that the respective connections are secure, and nothing has...
After the cable is connected properly, turn on your computer. When the document finishes printing, the pages will be in reverse order. Because of the way the paper feeds through a wired, wireless, or Bluetooth connection, make sure that the USB cable is connected to the computer through the... the USB cable is turned on the back of the stack. In the HP Photosmart Software, click Settings, and then click Status. Plug the power cord back in reverse order" on again. Print troubleshooting 185 Troubleshooting Verify that the respective connections are secure, and nothing has...

User Guide
Page 257
...For more information, see : • "Information on paper" on a flat surface in the input tray; When you are ready to print, remove only the paper you have finished printing, return any unused photo paper to continue the current job. Replace the rear door. Paper mismatch Solution: Change the... print setting or load the appropriate paper in a storage book to use paper that is too thin, that has a slick texture,...
...For more information, see : • "Information on paper" on a flat surface in the input tray; When you are ready to print, remove only the paper you have finished printing, return any unused photo paper to continue the current job. Replace the rear door. Paper mismatch Solution: Change the... print setting or load the appropriate paper in a storage book to use paper that is too thin, that has a slick texture,...


