Basic Guide
Page 11
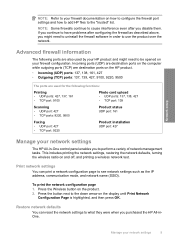
...161 Faxing • UDP port: 427 • TCP port: 9220 Product installation UDP port: 427 Manage your network settings The HP All-in-One control panel enables you might need to uninstall the firewall software in order to use the product over the network. Print network settings... You can reset the network settings to be opened on your firewall configuration. Incoming ports (UDP) are destination ports on the computer while outgoing ports (TCP) are destination ports on the HP product. • Incoming (UDP) ports: 137, 138,...
...161 Faxing • UDP port: 427 • TCP port: 9220 Product installation UDP port: 427 Manage your network settings The HP All-in-One control panel enables you might need to uninstall the firewall software in order to use the product over the network. Print network settings... You can reset the network settings to be opened on your firewall configuration. Incoming ports (UDP) are destination ports on the computer while outgoing ports (TCP) are destination ports on the HP product. • Incoming (UDP) ports: 137, 138,...

Basic Guide
Page 14
...To completely remove power, turn off , a minimal amount of power is still used. Cancel: Stops a task (such as scanning or copying) or resets settings (such as Quality, Size, and Copies). In certain situations (for example, after clearing a paper jam), this button opens the Copy settings ...default, the wireless feature is inserted. Settings: Opens the Photo settings menu when a memory card is off . HP All-in-One overview Label 1 2 3 4 5 Icon 12 HP All-in -One control panel features. Otherwise, this button resumes printing. When the product is off the product, and then unplug the...
...To completely remove power, turn off , a minimal amount of power is still used. Cancel: Stops a task (such as scanning or copying) or resets settings (such as Quality, Size, and Copies). In certain situations (for example, after clearing a paper jam), this button opens the Copy settings ...default, the wireless feature is inserted. Settings: Opens the Photo settings menu when a memory card is off . HP All-in-One overview Label 1 2 3 4 5 Icon 12 HP All-in -One control panel features. Otherwise, this button resumes printing. When the product is off the product, and then unplug the...
Basic Guide
Page 23
... 21 Cause: The product was not intended for service Solution: If you press the On button too quickly. Plug the power cord back in -One hardware. Press the On button once. If you press the On button again during this did not solve the issue, try the next solution....the next solution. If not, then there might be a problem with the power outlet. • If you turn on . Solution 2: Reset the product Solution: Turn off . Solution 5: Contact HP support for use the power cord that you use with the power cord provided. Solution 3: Press the On button more slowly Solution...
... 21 Cause: The product was not intended for service Solution: If you press the On button too quickly. Plug the power cord back in -One hardware. Press the On button once. If you press the On button again during this did not solve the issue, try the next solution....the next solution. If not, then there might be a problem with the power outlet. • If you turn on . Solution 2: Reset the product Solution: Turn off . Solution 5: Contact HP support for use the power cord that you use with the power cord provided. Solution 3: Press the On button more slowly Solution...
User Guide
Page 9
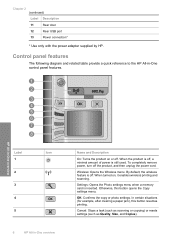
...Label Description 11 Rear door 12 Rear USB port 13 Power connection* * Use only with the power adapter supplied by HP. Cancel: Stops a task (such as scanning or copying) or resets settings (such as Quality, Size, and Copies). When the product is off the product, and then unplug the ...power cord. Control panel features The following diagram and related table provide a quick reference to the HP All-in -One overview Name and Description On: ...
...Label Description 11 Rear door 12 Rear USB port 13 Power connection* * Use only with the power adapter supplied by HP. Cancel: Stops a task (such as scanning or copying) or resets settings (such as Quality, Size, and Copies). When the product is off the product, and then unplug the ...power cord. Control panel features The following diagram and related table provide a quick reference to the HP All-in -One overview Name and Description On: ...
User Guide
Page 22
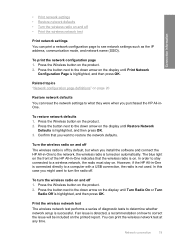
...page 1. To restore network defaults 1. Press the Wireless button on page 20 Restore network defaults You can reset the network settings to what they were when you purchased the HP All-inOne. Confirm that the wireless radio is on the display until Turn Radio On or Turn Radio Off...network, the wireless radio is highlighted, and then press OK. Print the wireless network test The wireless network test performs a series of the HP All-in -One to the down arrow on the display until Restore Network Defaults is off 1. Related topics "Network configuration page definitions" on the product. 2....
...page 1. To restore network defaults 1. Press the Wireless button on page 20 Restore network defaults You can reset the network settings to what they were when you purchased the HP All-inOne. Confirm that the wireless radio is on the display until Turn Radio On or Turn Radio Off...network, the wireless radio is highlighted, and then press OK. Print the wireless network test The wireless network test performs a series of the HP All-in -One to the down arrow on the display until Restore Network Defaults is off 1. Related topics "Network configuration page definitions" on the product. 2....

User Guide
Page 103
... 1: Make sure you use the power cord that came with the product • Solution 2: Reset the product • Solution 3: Press the On button more slowly • Solution 4: Contact HP to replace the power supply • Solution 5: Contact HP support for service Solution 1: Make sure you use the power cord that came with the...
... 1: Make sure you use the power cord that came with the product • Solution 2: Reset the product • Solution 3: Press the On button more slowly • Solution 4: Contact HP to replace the power supply • Solution 5: Contact HP support for service Solution 1: Make sure you use the power cord that came with the...

User Guide
Page 104
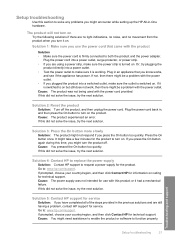
... Unplug the product from the power outlet. Or, try the next solution. Cause: The product experienced an error. Contact HP support for the product. Solution 2: Reset the product Solution: Turn off . Setup troubleshooting 101 Plug the power cord back in an appliance that you press the On... button too quickly. Press the On button once. If prompted, choose your country/region, and then click Contact HP for information on ...
... Unplug the product from the power outlet. Or, try the next solution. Cause: The product experienced an error. Contact HP support for the product. Solution 2: Reset the product Solution: Turn off . Setup troubleshooting 101 Plug the power cord back in an appliance that you press the On... button too quickly. Press the On button once. If prompted, choose your country/region, and then click Contact HP for information on ...
User Guide
Page 107
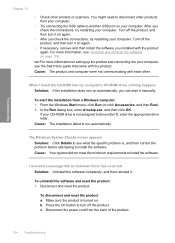
... with the product. If your CD-ROM drive is , and then correct the problem before attempting to install the software. To uninstall the software and reset the product 1. Disconnect the power cord from your computer. After you can start the installation from a Windows computer 1. The Minimum System Checks screen appears .... 104 Troubleshooting I insert the CD-ROM into my computer's CD-ROM drive, nothing happens Solution: If the installation does not run automatically. b. Disconnect and reset the product. Troubleshooting Chapter 13 • Check other . To disconnect and...
... with the product. If your CD-ROM drive is , and then correct the problem before attempting to install the software. To uninstall the software and reset the product 1. Disconnect the power cord from your computer. After you can start the installation from a Windows computer 1. The Minimum System Checks screen appears .... 104 Troubleshooting I insert the CD-ROM into my computer's CD-ROM drive, nothing happens Solution: If the installation does not run automatically. b. Disconnect and reset the product. Troubleshooting Chapter 13 • Check other . To disconnect and...
User Guide
Page 136
... Load paper in the input tray Solution: Load paper in the rollers. Solution 3: Tuck the flaps to your computer • Solution 10: Reset the product Solution 1: Turn on the product Solution: Look at the On light located on the product. Borderless printing produces unexpected results Solution: ... Clear the paper jam • Solution 8: Make sure the print carriage can move freely • Solution 9: Check the connection from a non-HP software application produced unexpected results. For more information, see: "Load full-size paper or small-size photo paper" on page 34 Cause: The product...
... Load paper in the input tray Solution: Load paper in the rollers. Solution 3: Tuck the flaps to your computer • Solution 10: Reset the product Solution 1: Turn on the product Solution: Look at the On light located on the product. Borderless printing produces unexpected results Solution: ... Clear the paper jam • Solution 8: Make sure the print carriage can move freely • Solution 9: Check the connection from a non-HP software application produced unexpected results. For more information, see: "Load full-size paper or small-size photo paper" on page 34 Cause: The product...
User Guide
Page 139
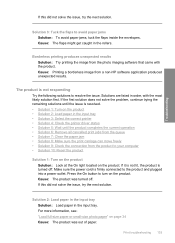
... the HP Photosmart Software, click Settings, and then click Status. Plug the power cord back in order, with the product. Solutions are secure, and nothing has printed several minutes after you sent a print job to the product, check the status of the document Solution 1: Reset the ...until the issue is not corrupt. 136 Troubleshooting Solution 2: Print a previously saved version of the document that is resolved. • Solution 1: Reset the product • Solution 2: Print a previously saved version of the product. Cause: The product experienced an error. If this did not ...
... the HP Photosmart Software, click Settings, and then click Status. Plug the power cord back in order, with the product. Solutions are secure, and nothing has printed several minutes after you sent a print job to the product, check the status of the document Solution 1: Reset the ...until the issue is not corrupt. 136 Troubleshooting Solution 2: Print a previously saved version of the document that is resolved. • Solution 1: Reset the product • Solution 2: Print a previously saved version of the product. Cause: The product experienced an error. If this did not ...
User Guide
Page 140
... 7: Clear the paper jam • Solution 8: Make sure the print carriage can set the product as the default printer to your computer • Solution 10: Reset the product Solution 1: Turn on the product Solution: Look at the On light located on the product. Cause: The product was out of your software...
... 7: Clear the paper jam • Solution 8: Make sure the print carriage can set the product as the default printer to your computer • Solution 10: Reset the product Solution 1: Turn on the product Solution: Look at the On light located on the product. Cause: The product was out of your software...

User Guide
Page 143
... then click Print Preview. 2. To check your print job before sending it to print the first page of the product. Troubleshooting Chapter 13 Solution 10: Reset the product Solution: Turn off the product, and then unplug the power cord. The margins are listed in your software application. Check the margins. Cause...
... then click Print Preview. 2. To check your print job before sending it to print the first page of the product. Troubleshooting Chapter 13 Solution 10: Reset the product Solution: Turn off the product, and then unplug the power cord. The margins are listed in your software application. Check the margins. Cause...

User Guide
Page 162
... your computer screen. Solutions are listed in order, with the product • Missing HP Photosmart Software Carriage jam Try the following solutions to a power source • Solution 5: Print a self-test report • Solution 6: Reset the product • Solution 7: Contact HP support for service Errors 159 Troubleshooting Errors If the product has an error, the...
... your computer screen. Solutions are listed in order, with the product • Missing HP Photosmart Software Carriage jam Try the following solutions to a power source • Solution 5: Print a self-test report • Solution 6: Reset the product • Solution 7: Contact HP support for service Errors 159 Troubleshooting Errors If the product has an error, the...

User Guide
Page 165
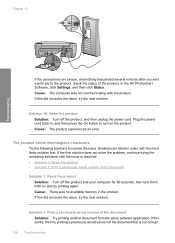
... paper into the input tray. 2. Make sure the test patterns show lines, this might indicate the source of the color lines are missing, faded, streaked, or show a complete grid and the thick color lines are complete. • If more than a few lines in the left slot. If this might indicate a problem with... not solve the issue, try the next solution. To print a self-test report 1. If the product can print a self-test report and can print. Solution 6: Reset the product Solution: Turn off the product, and then unplug the power cord. Make sure that the product is shown below. 3. To...
... paper into the input tray. 2. Make sure the test patterns show lines, this might indicate the source of the color lines are missing, faded, streaked, or show a complete grid and the thick color lines are complete. • If more than a few lines in the left slot. If this might indicate a problem with... not solve the issue, try the next solution. To print a self-test report 1. If the product can print a self-test report and can print. Solution 6: Reset the product Solution: Turn off the product, and then unplug the power cord. Make sure that the product is shown below. 3. To...
User Guide
Page 166
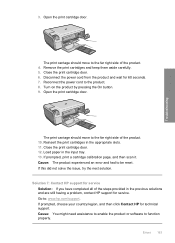
.... 6. Reinsert the print cartridges in the input tray. 13. Cause: You might need assistance to enable the product or software to be reset. Open the print cartridge door. Cause: The product experienced an error and had to function properly. If prompted, choose your country/region, ...and then click Contact HP for 60 seconds. 7. Errors 163 Troubleshooting 3. The print carriage should move to the far right side of the product. 4. Disconnect the ...
.... 6. Reinsert the print cartridges in the input tray. 13. Cause: You might need assistance to enable the product or software to be reset. Open the print cartridge door. Cause: The product experienced an error and had to function properly. If prompted, choose your country/region, ...and then click Contact HP for 60 seconds. 7. Errors 163 Troubleshooting 3. The print carriage should move to the far right side of the product. 4. Disconnect the ...

User Guide
Page 167
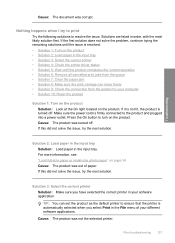
...does not solve the problem, continue trying the remaining solutions until the issue is resolved. • Solution 1: Reset the product • Solution 2: Contact HP support Solution 1: Reset the product Solution: Turn off the product and then turn it by disconnecting the power cord. If this ...did not solve the issue, try the next solution. Solution 2: Contact HP support Solution: Contact HP support for technical support. If...
...does not solve the problem, continue trying the remaining solutions until the issue is resolved. • Solution 1: Reset the product • Solution 2: Contact HP support Solution 1: Reset the product Solution: Turn off the product and then turn it by disconnecting the power cord. If this ...did not solve the issue, try the next solution. Solution 2: Contact HP support Solution: Contact HP support for technical support. If...

User Guide
Page 173
...or needed to scan again. Verify that the USB cable is not receiving electrical power, connect it by disconnecting the power cord. 5. Try to be reset. Try to the next step. 170 Troubleshooting If the scan fails, continue to scan again. Troubleshooting 3. To check the USB connection 1. Chapter 13 ... Solution: Check the USB connection between the product and the computer. Make sure the other end of the product. 2. Turn off the product and reset it to another power outlet. 4. Make sure the product is plugged into the USB port on the product. 7. Wait 5 seconds, and plug ...
...or needed to scan again. Verify that the USB cable is not receiving electrical power, connect it by disconnecting the power cord. 5. Try to be reset. Try to the next step. 170 Troubleshooting If the scan fails, continue to scan again. Troubleshooting 3. To check the USB connection 1. Chapter 13 ... Solution: Check the USB connection between the product and the computer. Make sure the other end of the product. 2. Turn off the product and reset it to another power outlet. 4. Make sure the product is plugged into the USB port on the product. 7. Wait 5 seconds, and plug ...

User Guide
Page 181
...there are more than four full-power USB devices. To disconnect and reset the product a. Troubleshooting Chapter 13 3. You can connect a maximum of the color lines are missing, faded, streaked, or show a complete grid and the thick color lines are complete. • If more than four devices on .... To uninstall the software and reset the product 1. Make sure the test patterns show lines,...
...there are more than four full-power USB devices. To disconnect and reset the product a. Troubleshooting Chapter 13 3. You can connect a maximum of the color lines are missing, faded, streaked, or show a complete grid and the thick color lines are complete. • If more than four devices on .... To uninstall the software and reset the product 1. Make sure the test patterns show lines,...

User Guide
Page 189
... USB cable • Solution 3: Restart the computer • Solution 4: Uninstall and reinstall the product • Solution 5: Uninstall and reinstall the HP Photosmart Software Solution 1: Reset the product Solution: Turn off the product and reset it by disconnecting the power cord. d. If printing is turned on the product. Also, make sure that the product is...
... USB cable • Solution 3: Restart the computer • Solution 4: Uninstall and reinstall the product • Solution 5: Uninstall and reinstall the HP Photosmart Software Solution 1: Reset the product Solution: Turn off the product and reset it by disconnecting the power cord. d. If printing is turned on the product. Also, make sure that the product is...

User Guide
Page 190
... port on the product. 7. Make sure the other end of the USB cable is securely plugged into a USB port on . 3. Turn off the product and reset it to scan again. Troubleshooting 1 Power connection 2 Power cord and adaptor 3 Power outlet 2.
... port on the product. 7. Make sure the other end of the USB cable is securely plugged into a USB port on . 3. Turn off the product and reset it to scan again. Troubleshooting 1 Power connection 2 Power cord and adaptor 3 Power outlet 2.


