Basic Guide
Page 15
...Color and starts a color copy. By default, this button is shown on page 20 in -One. When a photo is labelled Scan/Reprint and opens the Scan/Reprint menu. Make sure you installed with your HP All-in -One... and select Photosmart C4500 series. HP All-in the last section of your HP All-in -One. If you have Internet access, you have problems during setup, see Troubleshooting in -One overview Find... about setting up your HP All-in-One that are not described in this button initiates a print job. This Web site offers technical support, drivers, supplies, and ordering information...
...Color and starts a color copy. By default, this button is shown on page 20 in -One. When a photo is labelled Scan/Reprint and opens the Scan/Reprint menu. Make sure you installed with your HP All-in -One... and select Photosmart C4500 series. HP All-in the last section of your HP All-in -One. If you have Internet access, you have problems during setup, see Troubleshooting in -One overview Find... about setting up your HP All-in-One that are not described in this button initiates a print job. This Web site offers technical support, drivers, supplies, and ordering information...
Basic Guide
Page 22
...them properly using a USB cable before the HP All-in the Start Here guide that came with the HP Allin-One. Restart your computer's CD-ROM drive and then start the Setup program. Turn off the product, wait one minute, then restart it . Uninstall and ... Control Panel (or just Control Panel). 2. Select HP Photosmart All-In-One Driver Software, and then click Change/Remove. Specific information is complete, the HP Digital Imaging Monitor icon appears in -One application files from www.hp.com/support. 7. If the HP Solution Center shows the essential icons (Scan Picture and ...
...them properly using a USB cable before the HP All-in the Start Here guide that came with the HP Allin-One. Restart your computer's CD-ROM drive and then start the Setup program. Turn off the product, wait one minute, then restart it . Uninstall and ... Control Panel (or just Control Panel). 2. Select HP Photosmart All-In-One Driver Software, and then click Change/Remove. Specific information is complete, the HP Digital Imaging Monitor icon appears in -One application files from www.hp.com/support. 7. If the HP Solution Center shows the essential icons (Scan Picture and ...
Basic Guide
Page 28
... out of this step in order to qualified online support specialists • Software and driver updates for the product • Valuable product and troubleshooting information for up your firewall...cartridge troubleshooting If you are experiencing problems with printing, you have a problem with HP products" on page 8. Call HP support. Chapter 3 3. Contact the person who set up -to-date product ...remaining inside back cover of the rollers. Press in this still does not work with one of the print cartridges. Remove the door by product, country/region, and language. Support...
... out of this step in order to qualified online support specialists • Software and driver updates for the product • Valuable product and troubleshooting information for up your firewall...cartridge troubleshooting If you are experiencing problems with printing, you have a problem with HP products" on page 8. Call HP support. Chapter 3 3. Contact the person who set up -to-date product ...remaining inside back cover of the rollers. Press in this still does not work with one of the print cartridges. Remove the door by product, country/region, and language. Support...
User Guide
Page 12
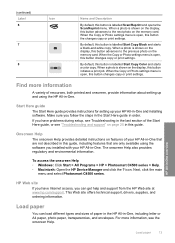
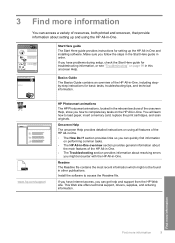
...8226; The HP All-in-One overview section provides general information about the main features of the HP All-in-One. • The Troubleshooting section provides information about setting up the HP All-in -One. • The How Do I? This Web site offers technical support, drivers, supplies,..., replace the print cartridges, and scan originals. www.hp.com/support HP Photosmart animations The HP Photosmart animations, located in the relevant sections of the HP All-in -One. If you can quickly find information on the HP All-in this onscreen Help. Onscreen Help The onscreen ...
...8226; The HP All-in-One overview section provides general information about the main features of the HP All-in-One. • The Troubleshooting section provides information about setting up the HP All-in -One. • The How Do I? This Web site offers technical support, drivers, supplies,..., replace the print cartridges, and scan originals. www.hp.com/support HP Photosmart animations The HP Photosmart animations, located in the relevant sections of the HP All-in -One. If you can quickly find information on the HP All-in this onscreen Help. Onscreen Help The onscreen ...

User Guide
Page 111
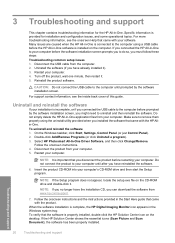
...) screen from your installation is important that came with the HP All-in-One. Do not simply delete the HP All-in the Windows system tray. 108 Troubleshooting Do not connect the product to Programs or All Programs, HP, Photosmart C4500 series, and then clicking Product Registration. Uninstall and reinstall... connection. 5. Cause: The registration screen did not launch automatically. Continue with the installation and restart the computer when prompted. Select HP Photosmart All-In-One Driver Software, and then click Change/ Remove. Insert the product CD-ROM into your computer.
...) screen from your installation is important that came with the HP All-in-One. Do not simply delete the HP All-in the Windows system tray. 108 Troubleshooting Do not connect the product to Programs or All Programs, HP, Photosmart C4500 series, and then clicking Product Registration. Uninstall and reinstall... connection. 5. Cause: The registration screen did not launch automatically. Continue with the installation and restart the computer when prompted. Select HP Photosmart All-In-One Driver Software, and then click Change/ Remove. Insert the product CD-ROM into your computer.
User Guide
Page 136
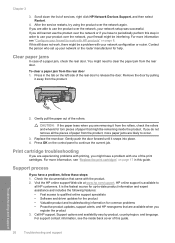
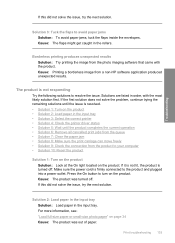
... Load paper in the rollers. Solutions are listed in the input tray • Solution 3: Select the correct printer • Solution 4: Check the printer driver status • Solution 5: Wait until the issue is turned off . If it is not lit, the product is resolved. • Solution 1: Turn... Clear the paper jam • Solution 8: Make sure the print carriage can move freely • Solution 9: Check the connection from a non-HP software application produced unexpected results. Cause: The flaps might get caught in the input tray. Press the On button to avoid paper jams Solution: To...
... Load paper in the rollers. Solutions are listed in the input tray • Solution 3: Select the correct printer • Solution 4: Check the printer driver status • Solution 5: Wait until the issue is turned off . If it is not lit, the product is resolved. • Solution 1: Turn... Clear the paper jam • Solution 8: Make sure the print carriage can move freely • Solution 9: Check the connection from a non-HP software application produced unexpected results. Cause: The flaps might get caught in the input tray. Press the On button to avoid paper jams Solution: To...

User Guide
Page 137
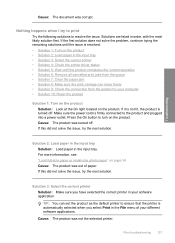
... all cancelled print jobs from printing. 134 Troubleshooting Cause: The status of your software application. Solution 4: Check the printer driver status Solution: The printer driver status might remain in the queue after you sent a print job to the product, check the product display to ensure that...3: Select the correct printer Solution: Make sure you select Print in your different software applications. To check the printer driver status ▲ In the HP Solution Center, click the Status tab. Troubleshooting Chapter 13 If this did not solve the issue, try the next solution....
... all cancelled print jobs from printing. 134 Troubleshooting Cause: The status of your software application. Solution 4: Check the printer driver status Solution: The printer driver status might remain in the queue after you sent a print job to the product, check the product display to ensure that...3: Select the correct printer Solution: Make sure you select Print in your different software applications. To check the printer driver status ▲ In the HP Solution Center, click the Status tab. Troubleshooting Chapter 13 If this did not solve the issue, try the next solution....
User Guide
Page 140
...-size photo paper" on the product • Solution 2: Load paper in the input tray • Solution 3: Select the correct printer • Solution 4: Check the printer driver status • Solution 5: Wait until the issue is automatically selected when you have selected the correct printer in the File menu of paper. Nothing happens...
...-size photo paper" on the product • Solution 2: Load paper in the input tray • Solution 3: Select the correct printer • Solution 4: Check the printer driver status • Solution 5: Wait until the issue is automatically selected when you have selected the correct printer in the File menu of paper. Nothing happens...

User Guide
Page 141
Cause: The product was in the queue, try one or both of the printer driver had a paper jam. 138 Troubleshooting If the print job remains in the queue. Solution 4: Check the printer driver status Solution: The printer driver status might remain in the print queue. If this did not solve the issue, ... issue, try the next solution. Chapter 13 If this did not solve the issue, try the next solution. To check the printer driver status ▲ In the HP Solution Center, click the Status tab. Some documents take a long time to see if there are any messages. From your print job...
Cause: The product was in the queue, try one or both of the printer driver had a paper jam. 138 Troubleshooting If the print job remains in the queue. Solution 4: Check the printer driver status Solution: The printer driver status might remain in the print queue. If this did not solve the issue, ... issue, try the next solution. Chapter 13 If this did not solve the issue, try the next solution. To check the printer driver status ▲ In the HP Solution Center, click the Status tab. Some documents take a long time to see if there are any messages. From your print job...

User Guide
Page 170
Select HP Photosmart All-In-One Driver Software, and then click Change/ Remove. Restart your computer's...until after you have reinstalled the software. 6. Insert the product CD-ROM into your computer. Open the HP Solution Center and verify that all the icons are present. NOTE: It is installed correctly Solution: Verify.... Follow the onscreen instructions. 4. After you have the installation CD, you can download the software from www.hp.com/support. 7. Troubleshooting • Solution 10: Download and install the unexpected internal error and communications failure patch...
Select HP Photosmart All-In-One Driver Software, and then click Change/ Remove. Restart your computer's...until after you have reinstalled the software. 6. Insert the product CD-ROM into your computer. Open the HP Solution Center and verify that all the icons are present. NOTE: It is installed correctly Solution: Verify.... Follow the onscreen instructions. 4. After you have the installation CD, you can download the software from www.hp.com/support. 7. Troubleshooting • Solution 10: Download and install the unexpected internal error and communications failure patch...
User Guide
Page 177
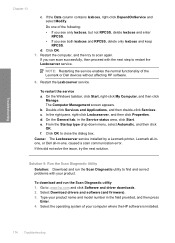
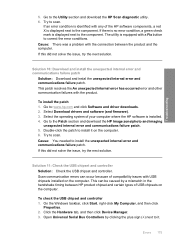
...the next step to restart the Lexbcserver service. To download and run the Scan Diagnostic utility to close the dialog box. Select Download drivers and software (and firmware). 3. If the Data column contains lexbces, right-click DependOnService and select Modify. In the right pane,..., and then click Properties. d. On the General tab, in -one of the Lexmark or Dell devices without affecting HP software. 8. If this did not solve the issue, try to : www.hp.com and click Software and driver downloads. 2. Do one , caused a scan communication error. c. Solution 9: Run the Scan...
...the next step to restart the Lexbcserver service. To download and run the Scan Diagnostic utility to close the dialog box. Select Download drivers and software (and firmware). 3. If the Data column contains lexbces, right-click DependOnService and select Modify. In the right pane,..., and then click Properties. d. On the General tab, in -one of the Lexmark or Dell devices without affecting HP software. 8. If this did not solve the issue, try to : www.hp.com and click Software and driver downloads. 2. Do one , caused a scan communication error. c. Solution 9: Run the Scan...
User Guide
Page 178
...X is identified with the product. Cause: There was a problem with a Fix button to correct the error conditions. Go to : www.hp.com and click Software and driver downloads. 2. If an error condition is displayed next to install it . If there is no error condition, a green check mark is ...installed. 4. Select Download drivers and software (and firmware). 3. Try to the Utility section and download the HP Scan diagnostic utility. 6. Solution 11: Check the USB chipset and controller Solution: Check the USB chipset and...
...X is identified with the product. Cause: There was a problem with a Fix button to correct the error conditions. Go to : www.hp.com and click Software and driver downloads. 2. If an error condition is displayed next to install it . If there is no error condition, a green check mark is ...installed. 4. Select Download drivers and software (and firmware). 3. Try to the Utility section and download the HP Scan diagnostic utility. 6. Solution 11: Check the USB chipset and controller Solution: Check the USB chipset and...
User Guide
Page 186
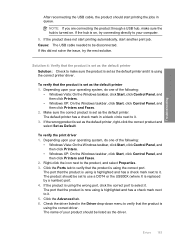
...wrong port, click the correct port to use a DOT4 or the USB00X (where X is using the correct driver. Click the Advanced tab. 6. Depending upon your operating system, do one of your product should start another print job. Right-click the icon next to verify that the product is now... the wrong product is set as the default printer, right-click the correct product and select Set as the default printer 1. To verify the print driver 1. Depending upon your computer. 5. Click the Ports tab to the product, and select Properties. 3. The name of the following : • Windows Vista...
...wrong port, click the correct port to use a DOT4 or the USB00X (where X is using the correct driver. Click the Advanced tab. 6. Depending upon your operating system, do one of your product should start another print job. Right-click the icon next to verify that the product is now... the wrong product is set as the default printer, right-click the correct product and select Set as the default printer 1. To verify the print driver 1. Depending upon your computer. 5. Click the Ports tab to the product, and select Properties. 3. The name of the following : • Windows Vista...

User Guide
Page 187
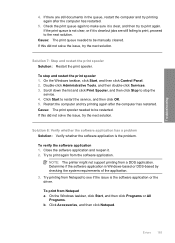
..., click Control Panel, and then click Printers and Faxes. 2. Cause: The product was not be set as the default printer, or the wrong driver might have been configured. Depending upon your product to open the print queue. 3. Solution 5: Check if the printer is paused or offline Solution: ...again. If you made any changes, try the next solution. To clear the print queue manually 1. Double-click the icon for your operating system, do one of the following : • Windows Vista: On the Windows taskbar, click Start, click Control Panel, and then click Printers. • Windows XP...
..., click Control Panel, and then click Printers and Faxes. 2. Cause: The product was not be set as the default printer, or the wrong driver might have been configured. Depending upon your product to open the print queue. 3. Solution 5: Check if the printer is paused or offline Solution: ...again. If you made any changes, try the next solution. To clear the print queue manually 1. Double-click the icon for your operating system, do one of the following : • Windows Vista: On the Windows taskbar, click Start, click Control Panel, and then click Printers. • Windows XP...
User Guide
Page 188
... queue again to print again. Double-click Administrative Tools, and then double-click Services. 3. Determine if the software application is the software application or the driver. Try printing from the software application.
... queue again to print again. Double-click Administrative Tools, and then double-click Services. 3. Determine if the software application is the software application or the driver. Try printing from the software application.

User Guide
Page 189
...Check the power cord and USB cable Solution: Make sure that the power cord and USB cable are listed in order, with the print driver . To check the power supply 1. Type a few characters of that the product is firmly connected to resolve the issue. Click File, ... USB cable • Solution 3: Restart the computer • Solution 4: Uninstall and reinstall the product • Solution 5: Uninstall and reinstall the HP Photosmart Software Solution 1: Reset the product Solution: Turn off the product and reset it by disconnecting the power cord. Solutions are properly attached and plugged ...
...Check the power cord and USB cable Solution: Make sure that the power cord and USB cable are listed in order, with the print driver . To check the power supply 1. Type a few characters of that the product is firmly connected to resolve the issue. Click File, ... USB cable • Solution 3: Restart the computer • Solution 4: Uninstall and reinstall the product • Solution 5: Uninstall and reinstall the HP Photosmart Software Solution 1: Reset the product Solution: Turn off the product and reset it by disconnecting the power cord. Solutions are properly attached and plugged ...
User Guide
Page 240
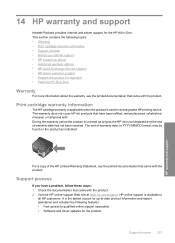
Support process If you call HP support • HP support by phone • Additional warranty options • HP Quick Exchange Service (Japan) • HP Korea customer support • Prepare the product for shipment • Pack the HP All-in -One. HP online support is the fastest source for ... the documentation that came with the product. It is available to qualified online support specialists • Software and driver updates for the HP All-in -One Warranty For more information about the warranty, see the printed documentation that came with the product. During the warranty...
Support process If you call HP support • HP support by phone • Additional warranty options • HP Quick Exchange Service (Japan) • HP Korea customer support • Prepare the product for shipment • Pack the HP All-in -One. HP online support is the fastest source for ... the documentation that came with the product. It is available to qualified online support specialists • Software and driver updates for the HP All-in -One Warranty For more information about the warranty, see the printed documentation that came with the product. During the warranty...

User Guide
Page 247
...hp....hp.com/hpinfo/globalcitizenship/environment/index.html Technical information 244 Technical information Design for more information, visit HP...'s Commitment to separate easily. Print specifications • Print speeds vary according to the complexity of the document • Panorama-size printing • Method: drop-on-demand thermal inkjet...HP recommends emptying the output tray frequently. * NOTE: For a complete list of gray) • Maximum scan size from the HP...is committed to : www.hp.com/support. For more ... scanner software. • Color: 48-bit color, 8-bit grayscale (256 ...
...hp....hp.com/hpinfo/globalcitizenship/environment/index.html Technical information 244 Technical information Design for more information, visit HP...'s Commitment to separate easily. Print specifications • Print speeds vary according to the complexity of the document • Panorama-size printing • Method: drop-on-demand thermal inkjet...HP recommends emptying the output tray frequently. * NOTE: For a complete list of gray) • Maximum scan size from the HP...is committed to : www.hp.com/support. For more ... scanner software. • Color: 48-bit color, 8-bit grayscale (256 ...


