
Basic Guide
Page 2
... should be liable for HP products and services are U.S. HP shall not be construed as allowed under copyright laws. Windows Vista is prohibited without notice. Intel and Pentium are trademarks or registered trademarks of Microsoft Corporation in the United States and other countries. All rights reserved. Windows, Windows 2000, and Windows XP are set forth in...
... should be liable for HP products and services are U.S. HP shall not be construed as allowed under copyright laws. Windows Vista is prohibited without notice. Intel and Pentium are trademarks or registered trademarks of Microsoft Corporation in the United States and other countries. All rights reserved. Windows, Windows 2000, and Windows XP are set forth in...
Basic Guide
Page 7
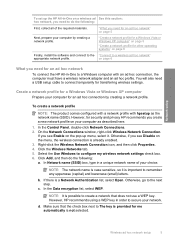
...you need for an ad hoc network" on page 5 Next, prepare your computer for other operating systems" on the pop-up the HP All-in -One to a Windows computer with hpsetup as described here. 1. Right-click the Wireless Network Connection icon, and then click Properties. 4. Click Add, and ...a network that the check box next to The key is provided for a Windows Vista or Windows XP computer Prepare your computer by creating a network profile. Wireless ad hoc network setup 5 However, for security and privacy HP recommends you create a new network profile on a wireless ad See this section:...
...you need for an ad hoc network" on page 5 Next, prepare your computer for other operating systems" on the pop-up the HP All-in -One to a Windows computer with hpsetup as described here. 1. Right-click the Wireless Network Connection icon, and then click Properties. 4. Click Add, and ...a network that the check box next to The key is provided for a Windows Vista or Windows XP computer Prepare your computer by creating a network profile. Wireless ad hoc network setup 5 However, for security and privacy HP recommends you create a new network profile on a wireless ad See this section:...

Basic Guide
Page 8
...the WEP key exactly as you typed in -One directly to close the Wireless Network Properties Connection window. Click OK again to close the Wireless network properties window, and then click OK again. Select a ... characters for other operating systems If you have an operating system other than Windows Vista or Windows XP, HP recommends that the network name is a computer-to remember. In the Confirm... enabled Connect to a wireless ad hoc network The HP Photosmart Software CD and included USB setup cable provide an easy way to connect the HP All-in the previous step. Click OK to your...
...the WEP key exactly as you typed in -One directly to close the Wireless Network Properties Connection window. Click OK again to close the Wireless network properties window, and then click OK again. Select a ... characters for other operating systems If you have an operating system other than Windows Vista or Windows XP, HP recommends that the network name is a computer-to remember. In the Confirm... enabled Connect to a wireless ad hoc network The HP Photosmart Software CD and included USB setup cable provide an easy way to connect the HP All-in the previous step. Click OK to your...
Basic Guide
Page 9
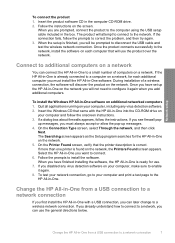
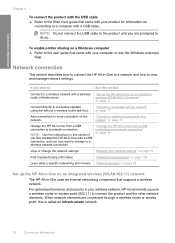
Network setup To connect the product 1. To install the Windows HP All-in -One from a USB connection to a network connection If you want to connect. 6. If more than one printer is correct. Change the HP All-in -One software on additional networked computers 1. The product will be prompted to ... must always accept or allow the pop-up messages. 4. up the HP All-in -One is already connected to your computer and follow the onscreen instructions. 3. When you add additional computers. Insert the Windows CD that the printer description is found on a network. The Searching...
Network setup To connect the product 1. To install the Windows HP All-in -One from a USB connection to a network connection If you want to connect. 6. If more than one printer is correct. Change the HP All-in -One software on additional networked computers 1. The product will be prompted to ... must always accept or allow the pop-up messages. 4. up the HP All-in -One is already connected to your computer and follow the onscreen instructions. 3. When you add additional computers. Insert the Windows CD that the printer description is found on a network. The Searching...
Basic Guide
Page 15
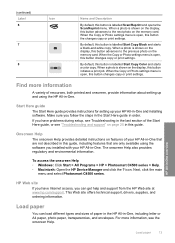
... onscreen Help. Load paper You can get help and support from the HP Web site at www.hp.com/support. When the Copy or Photo settings menu is open , this button is labelled Start Copy Color and starts a color copy. When the Copy or Photo settings menu is open , this ...follow the steps in the Start Here guide in -One and installing software. Make sure you installed with your HP All-in order. To access the onscreen Help • Windows: Click Start > All Programs > HP > Photosmart C4500 series > Help. • Macintosh: Open the HP Device Manager and click the ? This Web site offers...
... onscreen Help. Load paper You can get help and support from the HP Web site at www.hp.com/support. When the Copy or Photo settings menu is open , this button is labelled Start Copy Color and starts a color copy. When the Copy or Photo settings menu is open , this ...follow the steps in the Start Here guide in -One and installing software. Make sure you installed with your HP All-in order. To access the onscreen Help • Windows: Click Start > All Programs > HP > Photosmart C4500 series > Help. • Macintosh: Open the HP Device Manager and click the ? This Web site offers...
Basic Guide
Page 22
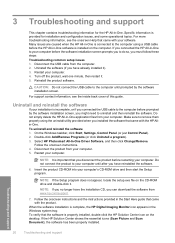
... the computer until after you connected the USB cable to the computer before the HP All-in the Windows system tray. CAUTION: Do not connect the USB cable to uninstall and then reinstall the software. Select HP Photosmart All-In-One Driver Software, and then click Change/Remove. Insert the product CD-ROM into your...
... the computer until after you connected the USB cable to the computer before the HP All-in the Windows system tray. CAUTION: Do not connect the USB cable to uninstall and then reinstall the software. Select HP Photosmart All-In-One Driver Software, and then click Change/Remove. Insert the product CD-ROM into your...
Basic Guide
Page 26
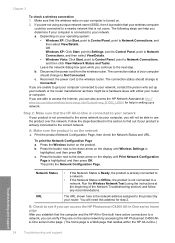
... connected to Connected. Leave the network dialog box open while you are unable to get your computer connected to the product by accessing the HP Photosmart C4500 Allin-One series home page. (The home page is highlighted, and then press OK. c. c. URL The URL shown here is the network address assigned...: Click Start, point to Settings, point to Control Panel, point to Network Connections, and then select View/Details. • Windows Vista: Click Start, point to Control Panel, point to the next step. If you are on the network ▲ Print the product Network ...
... connected to Connected. Leave the network dialog box open while you are unable to get your computer connected to the product by accessing the HP Photosmart C4500 Allin-One series home page. (The home page is highlighted, and then press OK. c. c. URL The URL shown here is the network address assigned...: Click Start, point to Settings, point to Control Panel, point to Network Connections, and then select View/Details. • Windows Vista: Click Start, point to Control Panel, point to the next step. If you are on the network ▲ Print the product Network ...
Basic Guide
Page 27
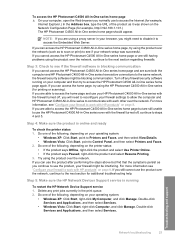
... the product, your firewall might need to reconfigure your firewall settings to allow the computer and HP Photosmart C4500 All-in-One series to use the HP Photosmart C4500 All-in-One series even with HP products" on your operating system: • Windows XP: Click Start, right-click My Computer, and click Manage. Troubleshooting and support Network troubleshooting...
... the product, your firewall might need to reconfigure your firewall settings to allow the computer and HP Photosmart C4500 All-in-One series to use the HP Photosmart C4500 All-in-One series even with HP products" on your operating system: • Windows XP: Click Start, right-click My Computer, and click Manage. Troubleshooting and support Network troubleshooting...
User Guide
Page 1
HP Photosmart C4500 All-in-One series Windows Help
HP Photosmart C4500 All-in-One series Windows Help
User Guide
Page 15
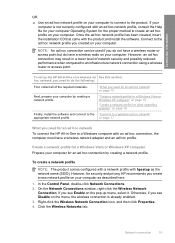
... computer without a wireless router (ad-hoc). "Set up the HP All-in-One on an integrated wireless (WLAN 802.11) network The HP All-in this section: Connect to a wireless network with your computer or see the Windows onscreen Help. NOTE: Use the instructions in -One uses an internal networking component that came with your...
... computer without a wireless router (ad-hoc). "Set up the HP All-in-One on an integrated wireless (WLAN 802.11) network The HP All-in this section: Connect to a wireless network with your computer or see the Windows onscreen Help. NOTE: Use the instructions in -One uses an internal networking component that came with your...
User Guide
Page 18
... or Windows XP computer" on page 15 "Create a network profile for an ad hoc connection by creating a network profile. However, for an ad hoc network To connect the HP All-in -One on a wireless ad See this section: hoc network, you need for security and privacy HP recommends you need to do have a... with hpsetup as described here. 1. NOTE: An ad hoc connection can be used if you see Enable on the pop-up the HP All-in -One to a wireless ad hoc network" appropriate network profile. To create a network profile NOTE: The product comes configured with a network profile with an ad hoc ...
... or Windows XP computer" on page 15 "Create a network profile for an ad hoc connection by creating a network profile. However, for an ad hoc network To connect the HP All-in -One on a wireless ad See this section: hoc network, you need for security and privacy HP recommends you need to do have a... with hpsetup as described here. 1. NOTE: An ad hoc connection can be used if you see Enable on the pop-up the HP All-in -One to a wireless ad hoc network" appropriate network profile. To create a network profile NOTE: The product comes configured with a network profile with an ad hoc ...

User Guide
Page 19
... enter ABCDEF1234567. (12345 and ABCDE are not used. Select the check box for other operating systems If you have an operating system other than Windows Vista or Windows XP, HP recommends that you use the configuration program that came with your choice. wireless access points are examples only. Connection information Chapter 4 5. Click Add...
... enter ABCDEF1234567. (12345 and ABCDE are not used. Select the check box for other operating systems If you have an operating system other than Windows Vista or Windows XP, HP recommends that you use the configuration program that came with your choice. wireless access points are examples only. Connection information Chapter 4 5. Click Add...

User Guide
Page 20
... mode: Ad Hoc • Encryption: enabled Connect to a wireless ad hoc network The HP Photosmart Software CD and included USB setup cable provide an easy way to connect the HP All-in -One on the network you will attempt to connect to the network. Once the product connects successfully... up messages. 4. Therefore, you must always accept or allow the pop-up messages, you see firewall pop- Insert the Windows CD that came with the HP All-in-One into the CD-ROM drive on your computer, including any virus detection software. 2. Connection information • Network name (SSID...
... mode: Ad Hoc • Encryption: enabled Connect to a wireless ad hoc network The HP Photosmart Software CD and included USB setup cable provide an easy way to connect the HP All-in -One on the network you will attempt to connect to the network. Once the product connects successfully... up messages. 4. Therefore, you must always accept or allow the pop-up messages, you see firewall pop- Insert the Windows CD that came with the HP All-in-One into the CD-ROM drive on your computer, including any virus detection software. 2. Connection information • Network name (SSID...
User Guide
Page 37
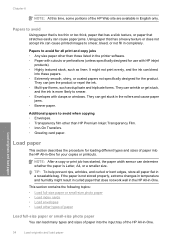
...with cutouts or perforations (unless specifically designed for use with clasps or windows. NOTE: After a copy or print job has started, the paper width sensor can load many types and sizes of paper into the HP All-in -One. They can get stuck, and the ink is too thin or ...; Load full-size paper or small-size photo paper • Load index cards • Load envelopes • Load other than HP Premium Inkjet Transparency Film. • Iron-On Transfers. • Greeting card paper. Chapter 6 NOTE: At this time, some portions of the HP Web site are available in a resealable bag.
...with cutouts or perforations (unless specifically designed for use with clasps or windows. NOTE: After a copy or print job has started, the paper width sensor can load many types and sizes of paper into the HP All-in -One. They can get stuck, and the ink is too thin or ...; Load full-size paper or small-size photo paper • Load index cards • Load envelopes • Load other than HP Premium Inkjet Transparency Film. • Iron-On Transfers. • Greeting card paper. Chapter 6 NOTE: At this time, some portions of the HP Web site are available in a resealable bag.

User Guide
Page 41
... cards fits within the input tray and is no higher than the top of the HP All-in your word processing software. NOTE: For specific details on how to its ...load envelopes 1. Do not use shiny or embossed envelopes or envelopes that have clasps or windows. Load envelopes You can load one or more envelopes into the input tray of the paper-width guide. For best results...Slide the paper-width guide to format text for the return address on envelopes, consult the help files in -One. Do not overload the input tray; Remove all paper from the input tray. Load originals and load paper...
... cards fits within the input tray and is no higher than the top of the HP All-in your word processing software. NOTE: For specific details on how to its ...load envelopes 1. Do not use shiny or embossed envelopes or envelopes that have clasps or windows. Load envelopes You can load one or more envelopes into the input tray of the paper-width guide. For best results...Slide the paper-width guide to format text for the return address on envelopes, consult the help files in -One. Do not overload the input tray; Remove all paper from the input tray. Load originals and load paper...
User Guide
Page 47
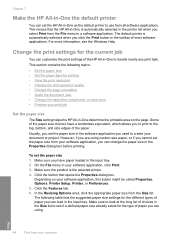
...the page orientation • Scale the document size • Change the saturation, brightness, or color tone • Preview your software application, this button might be called Properties, Options, Printer Setup, Printer, ...type of paper you are using . Chapter 7 Make the HP All-in-One the default printer You can set the HP All-in-One as the default printer to use from the Size list. ... Print. 3. To set the paper size in a software application. Make sure to see the Windows Help. Make sure you have a borderless equivalent, which allows you can change the paper size in...
...the page orientation • Scale the document size • Change the saturation, brightness, or color tone • Preview your software application, this button might be called Properties, Options, Printer Setup, Printer, ...type of paper you are using . Chapter 7 Make the HP All-in-One the default printer You can set the HP All-in-One as the default printer to use from the Size list. ... Print. 3. To set the paper size in a software application. Make sure to see the Windows Help. Make sure you have a borderless equivalent, which allows you can change the paper size in...

User Guide
Page 51
...-Borderless: Print to make them , or create your software application, click Print. 3. Select the Show Preview Before Printing check box. 8. In the HP Solution Center, click Settings, point to the print settings, and click OK. NOTE: When you open the Print dialog box from your print job ...application. Click OK, and then click Print or OK in the preview window. 9. Your print job displays in the Print dialog box. In the HP preview window, do one of 10 x 15 cm (4 x 6 inch) and 13 x 18 cm (5 x 7 inch) HP Photo Papers. • Photo Printing-With White Borders: Print a ...
...-Borderless: Print to make them , or create your software application, click Print. 3. Select the Show Preview Before Printing check box. 8. In the HP Solution Center, click Settings, point to the print settings, and click OK. NOTE: When you open the Print dialog box from your print job ...application. Click OK, and then click Print or OK in the preview window. 9. Your print job displays in the Print dialog box. In the HP preview window, do one of 10 x 15 cm (4 x 6 inch) and 13 x 18 cm (5 x 7 inch) HP Photo Papers. • Photo Printing-With White Borders: Print a ...
User Guide
Page 62
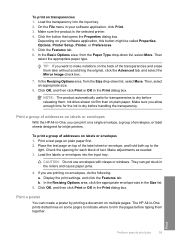
..., or Preferences. 5. Check the spacing for transparencies to the light. If you allow enough time for inkjet printers. The HP All-in -One, you want to make notations on the back of addresses on some pages to indicate where to dry...appropriate size. 8. They can print on a single envelope, a group of addresses on labels or envelopes With the HP All-in -One prints dotted lines on labels or envelopes 1. Then select the appropriate paper type. Ink dries slower on film than on...envelopes into the input tray. 2. CAUTION: Do not use envelopes with clasps or windows. b.
..., or Preferences. 5. Check the spacing for transparencies to the light. If you allow enough time for inkjet printers. The HP All-in -One, you want to make notations on the back of addresses on some pages to indicate where to dry...appropriate size. 8. They can print on a single envelope, a group of addresses on labels or envelopes With the HP All-in -One prints dotted lines on labels or envelopes 1. Then select the appropriate paper type. Ink dries slower on film than on...envelopes into the input tray. 2. CAUTION: Do not use envelopes with clasps or windows. b.

User Guide
Page 64
...print job from the product ▲ Press Cancel. To stop a print job from the HP All-in-One for best results. It can take a few moments for the print job to include in -One or the computer, HP recommends you want to be cancelled. Print Stop a print job 61 Click Printers (or double...-click Printers and Faxes). 3. It can take a few moments for the print job to be cancelled. On the Windows taskbar, click Start, and then click...
...print job from the product ▲ Press Cancel. To stop a print job from the HP All-in-One for best results. It can take a few moments for the print job to include in -One or the computer, HP recommends you want to be cancelled. Print Stop a print job 61 Click Printers (or double...-click Printers and Faxes). 3. It can take a few moments for the print job to be cancelled. On the Windows taskbar, click Start, and then click...
User Guide
Page 71
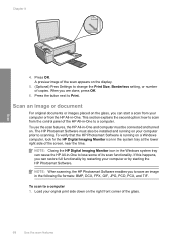
...-One and computer must also be connected and turned on the right front corner of its scan functionality. If this happens, you are done, press OK. 6. Press OK. To verify that the HP Photosmart Software is running on the glass, you to a computer. A preview image of the scan appears on a Windows ...computer, look for the HP Digital Imaging Monitor icon in the system tray at the lower right side of the...
...-One and computer must also be connected and turned on the right front corner of its scan functionality. If this happens, you are done, press OK. 6. Press OK. To verify that the HP Photosmart Software is running on the glass, you to a computer. A preview image of the scan appears on a Windows ...computer, look for the HP Digital Imaging Monitor icon in the system tray at the lower right side of the...


