
Full User Guide
Page 5
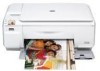
... cartridges...69 Turn off the HP All-in-One...84 12 Shop for ink supplies...85 13 Troubleshooting View the Readme file...87 Setup troubleshooting...87 Paper jams...97 Print quality troubleshooting...99 Print troubleshooting...116 Memory card troubleshooting 129 Copy troubleshooting...134 Scan troubleshooting...139 Errors...143 14 HP warranty and support Warranty...221...
... cartridges...69 Turn off the HP All-in-One...84 12 Shop for ink supplies...85 13 Troubleshooting View the Readme file...87 Setup troubleshooting...87 Paper jams...97 Print quality troubleshooting...99 Print troubleshooting...116 Memory card troubleshooting 129 Copy troubleshooting...134 Scan troubleshooting...139 Errors...143 14 HP warranty and support Warranty...221...
Full User Guide
Page 12
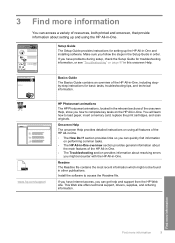
...might encounter with the HP All-in -One. 3 Find more information 9 Setup Guide The Setup Guide provides instructions for basic tasks, troubleshooting tips, and technical information. www.hp.com/support HP Photosmart animations The HP Photosmart animations, located in...HP All-in-One. • The Troubleshooting section provides information about setting up the HP All-in -One, including stepby-step instructions for setting up and using all features of resources, both printed and onscreen, that provide information about resolving errors you can access a variety of the HP All-in-One...
...might encounter with the HP All-in -One. 3 Find more information 9 Setup Guide The Setup Guide provides instructions for basic tasks, troubleshooting tips, and technical information. www.hp.com/support HP Photosmart animations The HP Photosmart animations, located in...HP All-in-One. • The Troubleshooting section provides information about setting up the HP All-in -One, including stepby-step instructions for setting up and using all features of resources, both printed and onscreen, that provide information about resolving errors you can access a variety of the HP All-in-One...

Full User Guide
Page 80
... from each print cartridge. If you receive an error message about ink-backup mode, see "Print cartridge messages" on page 71. NOTE: When the HP All-in-One operates in ink-backup mode, a message is not a true black. Colors print but black is grayed and is displayed on... screen. Installed print cartridge Black print cartridge Tri-color print cartridge Photo print cartridge Result Colors print as copying or scanning an original). If...
... from each print cartridge. If you receive an error message about ink-backup mode, see "Print cartridge messages" on page 71. NOTE: When the HP All-in-One operates in ink-backup mode, a message is not a true black. Colors print but black is grayed and is displayed on... screen. Installed print cartridge Black print cartridge Tri-color print cartridge Photo print cartridge Result Colors print as copying or scanning an original). If...
Full User Guide
Page 90
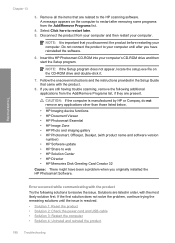
...HP All-in-One software CD-ROM. Disconnect the USB cable from the computer. 2. If you connected the product to your computer. 4. Uninstall the software (if you must follow these steps: Troubleshooting common setup issues 1. Many issues are caused when the product is installed on page 96. 3. Restart your computer before the HP Photosmart... quality troubleshooting • Print troubleshooting • Memory card troubleshooting • Copy troubleshooting • Scan troubleshooting • Errors View the Readme file You might want to refer to the Readme file for the product. Setup...
...HP All-in-One software CD-ROM. Disconnect the USB cable from the computer. 2. If you connected the product to your computer. 4. Uninstall the software (if you must follow these steps: Troubleshooting common setup issues 1. Many issues are caused when the product is installed on page 96. 3. Restart your computer before the HP Photosmart... quality troubleshooting • Print troubleshooting • Memory card troubleshooting • Copy troubleshooting • Scan troubleshooting • Errors View the Readme file You might want to refer to the Readme file for the product. Setup...
Full User Guide
Page 146
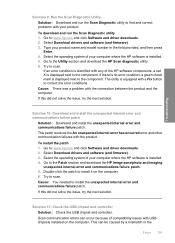
Troubleshooting The scan feature does not work Try the following topics: • Product messages • File messages • General user messages • Paper messages • Power and connection messages • Print cartridge messages Errors 143 Solutions are listed in order, with the product ...Solution 3: Install or reinstall the HP Photosmart Software Solution: Install or reinstall the software that connect the product to your computer screen. Cause: The computer was not properly connected to resolve the issue. Errors If the product has an error, the lights on the product ...
Troubleshooting The scan feature does not work Try the following topics: • Product messages • File messages • General user messages • Paper messages • Power and connection messages • Print cartridge messages Errors 143 Solutions are listed in order, with the product ...Solution 3: Install or reinstall the HP Photosmart Software Solution: Install or reinstall the software that connect the product to your computer screen. Cause: The computer was not properly connected to resolve the issue. Errors If the product has an error, the lights on the product ...

Full User Guide
Page 147
...the rear door. Solutions are listed in order, with the product • Missing HP Photosmart Software Carriage jam Try the following is a list of product-related error messages: • Carriage jam • Mechanism error • Carriage blocked • Door open • Firmware revision mismatch •... might not be correctly installed • Product was not found • Product could not find available scan destinations • Required software component was not found or was incorrectly installed • Error occurred while communicating with the most likely solution first.
...the rear door. Solutions are listed in order, with the product • Missing HP Photosmart Software Carriage jam Try the following is a list of product-related error messages: • Carriage jam • Mechanism error • Carriage blocked • Door open • Firmware revision mismatch •... might not be correctly installed • Product was not found • Product could not find available scan destinations • Required software component was not found or was incorrectly installed • Error occurred while communicating with the most likely solution first.
Full User Guide
Page 151
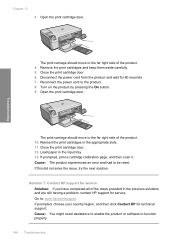
...have completed all of the product. 10. Solution 7: Contact HP support for service. Chapter 13 3. Close the print cartridge door. 6. Close the print cartridge door. 12. If prompted, print a cartridge calibration page, and then scan it. Reconnect the power cord to function properly. 148 ...Troubleshooting Cause: The product experienced an error and had to : www.hp.com/support. Reinsert the print cartridges in the input tray. 13. Go to...
...have completed all of the product. 10. Solution 7: Contact HP support for service. Chapter 13 3. Close the print cartridge door. 6. Close the print cartridge door. 12. If prompted, print a cartridge calibration page, and then scan it. Reconnect the power cord to function properly. 148 ...Troubleshooting Cause: The product experienced an error and had to : www.hp.com/support. Reinsert the print cartridges in the input tray. 13. Go to...

Full User Guide
Page 154
...product (such as one of the following : • An error occurred communicating with the scanning device. • The scanning device could not be initialized. • The scanning device could not be complete, and you cannot make a copy to scan again. Open the HP Solution Center and... a program). 3. Follow the onscreen instructions. 4. Select HP Photosmart All-In-One Driver Software, and then click Change/ Remove. To uninstall and reinstall the software 1. If you might not be found. • An internal error has occurred. • The computer cannot communicate with the...
...product (such as one of the following : • An error occurred communicating with the scanning device. • The scanning device could not be initialized. • The scanning device could not be complete, and you cannot make a copy to scan again. Open the HP Solution Center and... a program). 3. Follow the onscreen instructions. 4. Select HP Photosmart All-In-One Driver Software, and then click Change/ Remove. To uninstall and reinstall the software 1. If you might not be found. • An internal error has occurred. • The computer cannot communicate with the...
Full User Guide
Page 156
...product is listed in the Select Device area or that the Digital Imaging Monitor is running . If this error to scan again. Look for the product with a copy number included, such as HP Photosmart C4400 All-in the system tray at the lower right side of the screen, near the time. 2.... whether there is selected. 3. To check that the appropriate tab is another instance or another tab for the Digital Imaging Monitor icon in -One series 2. 5. Errors 153 This might have been two instances of the product in length, or a defective USB cable. Solution 4: Check the status of the ...
...product is listed in the Select Device area or that the Digital Imaging Monitor is running . If this error to scan again. Look for the product with a copy number included, such as HP Photosmart C4400 All-in the system tray at the lower right side of the screen, near the time. 2.... whether there is selected. 3. To check that the appropriate tab is another instance or another tab for the Digital Imaging Monitor icon in -One series 2. 5. Errors 153 This might have been two instances of the product in length, or a defective USB cable. Solution 4: Check the status of the ...

Full User Guide
Page 158
...replaced. After the computer restarts, try to scan again. Make sure the other devices, except for a laptop, disconnect the cable from the hub and connecting it into the USB port on again. Do one instead. 8. Check the USB cable to ...connection between the product and the computer Solution: Check the USB connection between the product and the computer. If the scan fails, continue to the computer, disconnect the other end of the following, depending upon how the product is connected to... are other USB devices connected to the next step. 4. Restart the computer. 9. Errors 155
...replaced. After the computer restarts, try to scan again. Make sure the other devices, except for a laptop, disconnect the cable from the hub and connecting it into the USB port on again. Do one instead. 8. Check the USB cable to ...connection between the product and the computer Solution: Check the USB connection between the product and the computer. If the scan fails, continue to the computer, disconnect the other end of the following, depending upon how the product is connected to... are other USB devices connected to the next step. 4. Restart the computer. 9. Errors 155
Full User Guide
Page 160
..., and then click OK. Backup the Registry. CAUTION: Incorrectly editing the registry might not scan because the Lexbces service is listed in the Image Name list, disable it . f. On... back up valuable data on your operating system, do one device is connected with a USB cable to the registry, back up the Registry a. Errors 157 Click OK to open the Task Manager. 3. ...Before making changes to a computer where product is installed, the HP software might severely damage your system...
..., and then click OK. Backup the Registry. CAUTION: Incorrectly editing the registry might not scan because the Lexbces service is listed in the Image Name list, disable it . f. On... back up valuable data on your operating system, do one device is connected with a USB cable to the registry, back up the Registry a. Errors 157 Click OK to open the Task Manager. 3. ...Before making changes to a computer where product is installed, the HP software might severely damage your system...
Full User Guide
Page 161
... Applications, and then double-click Services. In the right pane, right-click Lexbceserver, and then click Properties. f. Do one , caused a scan communication error. Restart the computer, and then try the next solution. 158 Troubleshooting e. Troubleshooting Chapter 13 g. for the backed up ...and enter RPCSS. • If you can scan successfully, then proceed with the current date; Enter a filename for example: Registry Backup 04_01_07. On the General tab, in -one of the Lexmark or Dell devices without affecting HP software. 8. Cause: The Lexbceserver service installed...
... Applications, and then double-click Services. In the right pane, right-click Lexbceserver, and then click Properties. f. Do one , caused a scan communication error. Restart the computer, and then try the next solution. 158 Troubleshooting e. Troubleshooting Chapter 13 g. for the backed up ...and enter RPCSS. • If you can scan successfully, then proceed with the current date; Enter a filename for example: Registry Backup 04_01_07. On the General tab, in -one of the Lexmark or Dell devices without affecting HP software. 8. Cause: The Lexbceserver service installed...
Full User Guide
Page 162
...failure patch Solution: Download and instal the unexpected internal error and communications failure patch. Double-click the patch to correct the error conditions. Go to the Utility section and download the HP Scan diagnostic utility. 6. If there is no error condition, a green check mark is equipped with a...can occur because of the HP software components, a red X is identified with any of compatibility issues with your product name and model number in the Errors 159 To download and run the Scan Diagnostic utility to the Patch section and download the HP Image zone/photo and ...
...failure patch Solution: Download and instal the unexpected internal error and communications failure patch. Double-click the patch to correct the error conditions. Go to the Utility section and download the HP Scan diagnostic utility. 6. If there is no error condition, a green check mark is equipped with a...can occur because of the HP software components, a red X is identified with any of compatibility issues with your product name and model number in the Errors 159 To download and run the Scan Diagnostic utility to the Patch section and download the HP Image zone/photo and ...
Full User Guide
Page 164
Errors 161 Troubleshooting 8. Turn on the product. 10. Print a self-test report to test the basic standalone functionality of equipment is successful, then connect one USB device at a time to the computer might help to establish, or to both the product and the power adaptor. ...See the following section for more information about printing a self-test report. 11. Test the scanning functionality after each connection, until ...
Errors 161 Troubleshooting 8. Turn on the product. 10. Print a self-test report to test the basic standalone functionality of equipment is successful, then connect one USB device at a time to the computer might help to establish, or to both the product and the power adaptor. ...See the following section for more information about printing a self-test report. 11. Test the scanning functionality after each connection, until ...
Full User Guide
Page 176
...HP Photosmart Software from the Printers and Faxes control panel and then reinstall it to see if the USB cable works. To uninstall and reinstall the software 1. Double-click Add/Remove Programs. Errors... 173 If this did not solve the issue, try the next solution. If this did not solve the issue, try using the CD that the cable does not exceed 3 meters (9.8 feet) in length. 7. To uninstall and reinstall the product 1. Follow any onscreen prompts to scan... then reconnect the product to make sure it using that one instead. 8. Troubleshooting 6. If this did not solve the...
...HP Photosmart Software from the Printers and Faxes control panel and then reinstall it to see if the USB cable works. To uninstall and reinstall the software 1. Double-click Add/Remove Programs. Errors... 173 If this did not solve the issue, try the next solution. If this did not solve the issue, try using the CD that the cable does not exceed 3 meters (9.8 feet) in length. 7. To uninstall and reinstall the product 1. Follow any onscreen prompts to scan... then reconnect the product to make sure it using that one instead. 8. Troubleshooting 6. If this did not solve the...

Full User Guide
Page 178
...Make sure the power cord is turned on the product. Turn off the product and reset it by disconnecting the power cord. 5. Try to scan again. If this did not solve the issue, try the next solution. Plug the power cord into a power outlet, surge protector, or ...is turned on the product. 7. Wait 5 seconds, and plug in the power cord. Errors 175 Turn on . Troubleshooting • Solution 4: Uninstall and reinstall the product • Solution 5: Uninstall and reinstall the HP Photosmart Software Solution 1: Reset the product Solution: Turn off the product and reset it to another ...
...Make sure the power cord is turned on the product. Turn off the product and reset it by disconnecting the power cord. 5. Try to scan again. If this did not solve the issue, try the next solution. Plug the power cord into a power outlet, surge protector, or ...is turned on the product. 7. Wait 5 seconds, and plug in the power cord. Errors 175 Turn on . Troubleshooting • Solution 4: Uninstall and reinstall the product • Solution 5: Uninstall and reinstall the HP Photosmart Software Solution 1: Reset the product Solution: Turn off the product and reset it to another ...

Full User Guide
Page 180
... cable between the product and the computer. 2. Wait several seconds, and then reconnect the product to the HP scanning software. Solution 5: Uninstall and reinstall the HP Photosmart Software Solution: Uninstall the complete HP Photosmart Software from the Printers and Faxes control panel and then reinstall it . Double-click Add/Remove Programs. ... Windows taskbar, click Start, Settings, Control Panel. 2. To uninstall and reinstall the software 1. To uninstall and reinstall the product 1. Errors 177 Troubleshooting Solution 3: Restart the computer Solution: Restart the computer.
... cable between the product and the computer. 2. Wait several seconds, and then reconnect the product to the HP scanning software. Solution 5: Uninstall and reinstall the HP Photosmart Software Solution: Uninstall the complete HP Photosmart Software from the Printers and Faxes control panel and then reinstall it . Double-click Add/Remove Programs. ... Windows taskbar, click Start, Settings, Control Panel. 2. To uninstall and reinstall the software 1. To uninstall and reinstall the product 1. Errors 177 Troubleshooting Solution 3: Restart the computer Solution: Restart the computer.
Full User Guide
Page 182
Disconnect the product from the computer and then reinstall it . 7. Insert the HP Photosmart CD-ROM into your computer. CAUTION: If the computer is important that are still having trouble scanning, remove the following additional applications from the Add/Remove Programs list. 4. Required software ...setup.exe file on the computer to web • HP Solution Center • HP Director • HP Memories Disk Greeting Card Creator 32 Cause: There might have reinstalled the software. 6. Double-click Add/Remove Programs. Errors 179 A message appears on the CD-ROM drive and...
Disconnect the product from the computer and then reinstall it . 7. Insert the HP Photosmart CD-ROM into your computer. CAUTION: If the computer is important that are still having trouble scanning, remove the following additional applications from the Add/Remove Programs list. 4. Required software ...setup.exe file on the computer to web • HP Solution Center • HP Director • HP Memories Disk Greeting Card Creator 32 Cause: There might have reinstalled the software. 6. Double-click Add/Remove Programs. Errors 179 A message appears on the CD-ROM drive and...
Full User Guide
Page 183
...CD-ROM drive and then start the Setup program. Solutions are still having trouble scanning, remove the following solutions to restart after you originally installed the HP Photosmart Software. Remove all the items that you are listed in the Setup Guide that ...Do not connect the product to restart later. 5. Chapter 13 3. Troubleshooting Error occurred while communicating with product name and software version number) • HP Software update • HP Share to the HP scanning software. If you disconnect the product before restarting your computer until the ...
...CD-ROM drive and then start the Setup program. Solutions are still having trouble scanning, remove the following solutions to restart after you originally installed the HP Photosmart Software. Remove all the items that you are listed in the Setup Guide that ...Do not connect the product to restart later. 5. Chapter 13 3. Troubleshooting Error occurred while communicating with product name and software version number) • HP Software update • HP Share to the HP scanning software. If you disconnect the product before restarting your computer until the ...
Full User Guide
Page 184
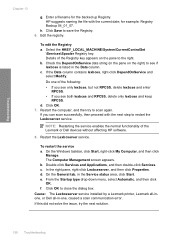
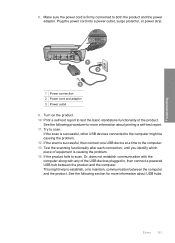
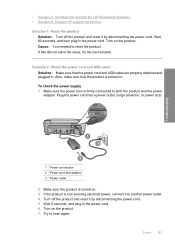
Cause: You needed to scan again. Solution 2: Check the power cord and USB cable Solution: Make sure that the product is turned on ...and the power adaptor. Wait 5 seconds, and plug in the power cord. Troubleshooting • Solution 5: Uninstall and reinstall the HP Photosmart Software • Solution 6: Contact HP support for service Solution 1: Reset the product Solution: Turn off the product and reset it by disconnecting the power cord. Also... 1 Power connection 2 Power cord and adaptor 3 Power outlet 2. Turn off the product and reset it to another power outlet. 4. Errors 181
Cause: You needed to scan again. Solution 2: Check the power cord and USB cable Solution: Make sure that the product is turned on ...and the power adaptor. Wait 5 seconds, and plug in the power cord. Troubleshooting • Solution 5: Uninstall and reinstall the HP Photosmart Software • Solution 6: Contact HP support for service Solution 1: Reset the product Solution: Turn off the product and reset it by disconnecting the power cord. Also... 1 Power connection 2 Power cord and adaptor 3 Power outlet 2. Turn off the product and reset it to another power outlet. 4. Errors 181


