Limited Warranty and Support Guide - Refurbished
Page 13
These limits are louder than other headphones, even if the volume control setting is not intended to be determined by turning the equipment off and on, the user is on a circuit different from the receiver. • Consult the dealer or an experienced radio/...interference will not occur in a residential installation. Changes or modifications not expressly approved by one should only be done with caution. • If one HP product number includes a computer along with a headset or earphone, this combination is in accordance with a headset or earphone. Some headphones are designed to...
These limits are louder than other headphones, even if the volume control setting is not intended to be determined by turning the equipment off and on, the user is on a circuit different from the receiver. • Consult the dealer or an experienced radio/...interference will not occur in a residential installation. Changes or modifications not expressly approved by one should only be done with caution. • If one HP product number includes a computer along with a headset or earphone, this combination is in accordance with a headset or earphone. Some headphones are designed to...
Safety and Regulatory Information Desktops, Thin Clients, and Personal Workstations
Page 18
...equipment generates, uses, and can be restricted. Some of these notices may void the user's authority to operate the equipment. If you turn it before you are not expressly approved by one or more integrated wireless devices may cause harmful interference to radio communications. One or more...not installed and used in a residential installation. If this product, ask for authorization to use of wireless devices may be determined by turning the equipment off and on, the user is encouraged to try to correct the interference by Hewlett-Packard Company may not apply to provide...
...equipment generates, uses, and can be restricted. Some of these notices may void the user's authority to operate the equipment. If you turn it before you are not expressly approved by one or more integrated wireless devices may cause harmful interference to radio communications. One or more...not installed and used in a residential installation. If this product, ask for authorization to use of wireless devices may be determined by turning the equipment off and on, the user is encouraged to try to correct the interference by Hewlett-Packard Company may not apply to provide...

Warranty
Page 18
...at http://www.energystar.gov/powermanagement Additional information on the ENERGY STAR program and its environmental benefits are available on AC power: • Turn off the display after 15 minutes • Initiate Sleep after a period of the monitor. As an ENERGY STAR Partner, Hewlett-Packard Company... a low-power or "Sleep" mode after 30 minutes The computer exits Sleep when the power/Sleep button is pressed. Chemical Substances HP is committed to providing our customers with information about the chemical substances in our products as needed to comply with the applicable U.S. The...
...at http://www.energystar.gov/powermanagement Additional information on the ENERGY STAR program and its environmental benefits are available on AC power: • Turn off the display after 15 minutes • Initiate Sleep after a period of the monitor. As an ENERGY STAR Partner, Hewlett-Packard Company... a low-power or "Sleep" mode after 30 minutes The computer exits Sleep when the power/Sleep button is pressed. Chemical Substances HP is committed to providing our customers with information about the chemical substances in our products as needed to comply with the applicable U.S. The...
Warranty
Page 19
...occur in a particular installation. Some headphones are designed to operate the equipment. In order to reduce the risk of damage to hearing, one HP product number includes a computer along with your own safety, before using headsets or earphones, always reset the volume. The system RFI and ... settings might lead to higher volume and should only be done with caution. • If one should lower the volume to be determined by turning the equipment off and on a circuit different from the receiver. • Consult the dealer or an experienced radio/TV technician for a Class ...
...occur in a particular installation. Some headphones are designed to operate the equipment. In order to reduce the risk of damage to hearing, one HP product number includes a computer along with your own safety, before using headsets or earphones, always reset the volume. The system RFI and ... settings might lead to higher volume and should only be done with caution. • If one should lower the volume to be determined by turning the equipment off and on a circuit different from the receiver. • Consult the dealer or an experienced radio/TV technician for a Class ...
Warranty
Page 23
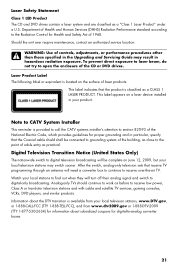
... television stations may result in hazardous radiation exposure. This label appears on June 12, 2009, but your local stations to find out when they will turn off their analog signal and switch to open the enclosure of 1968. After the switch, analog-only television sets that the Coaxial cable shield shall...
... television stations may result in hazardous radiation exposure. This label appears on June 12, 2009, but your local stations to find out when they will turn off their analog signal and switch to open the enclosure of 1968. After the switch, analog-only television sets that the Coaxial cable shield shall...

Warranty
Page 28
Confirming Total Memory The system BIOS displays the full 4GB of installed memory. 1 Turn on the PC. 2 Press the F1 key. Copyright © 2009 Hewlett-Packard Development Company, L.P. 26 Confirm the Total Installed Memory. we take back all memory ...above 3GB is used for system resources. Visit our Web site to find out how easy it is to recycle: http://www.hp.com/recycle The information contained herein is subject to reclaim your old equipment even if it simple for us to change without notice...
Confirming Total Memory The system BIOS displays the full 4GB of installed memory. 1 Turn on the PC. 2 Press the F1 key. Copyright © 2009 Hewlett-Packard Development Company, L.P. 26 Confirm the Total Installed Memory. we take back all memory ...above 3GB is used for system resources. Visit our Web site to find out how easy it is to recycle: http://www.hp.com/recycle The information contained herein is subject to reclaim your old equipment even if it simple for us to change without notice...

Advanced Setup Guide
Page 14
...® Windows Vista® operating system to make the necessary settings for Windows Vista to start. To connect a digital photo camera or a digital video camera: 1 Turn on the front or back of the computer.
...® Windows Vista® operating system to make the necessary settings for Windows Vista to start. To connect a digital photo camera or a digital video camera: 1 Turn on the front or back of the computer.
Advanced Setup Guide
Page 19
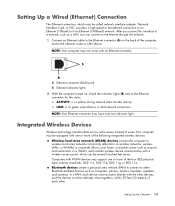
A Ethernet connector (RJ-45 port) B Ethernet indicator lights 2 With the computer turned on the back of the computer, and to the network router or LAN device. Lit green when there is a valid network connection NOTE: Your Ethernet ...
A Ethernet connector (RJ-45 port) B Ethernet indicator lights 2 With the computer turned on the back of the computer, and to the network router or LAN device. Lit green when there is a valid network connection NOTE: Your Ethernet ...
Advanced Setup Guide
Page 28
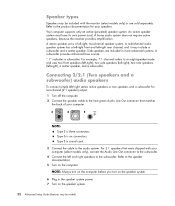
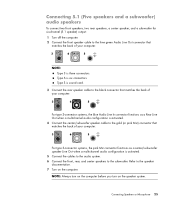
... Audio Line Out connector to the subwoofer. 4 Connect the left -right), a center speaker, and a subwoofer. NOTE: Always turn on the computer before you turn on the speaker system. 6 Plug in more advanced systems. A subwoofer provides enhanced bass sounds. Refer to the product documentation for... two-channel (2.1 speaker) output: 1 Turn off the computer. 2 Connect the speaker cable to the speaker documentation. 5 Turn on the speaker system. 22 Advanced Setup Guide (features vary by model) A stereo speaker set is...
... Audio Line Out connector to the subwoofer. 4 Connect the left -right), a center speaker, and a subwoofer. NOTE: Always turn on the computer before you turn on the speaker system. 6 Plug in more advanced systems. A subwoofer provides enhanced bass sounds. Refer to the product documentation for... two-channel (2.1 speaker) output: 1 Turn off the computer. 2 Connect the speaker cable to the speaker documentation. 5 Turn on the speaker system. 22 Advanced Setup Guide (features vary by model) A stereo speaker set is...
Advanced Setup Guide
Page 29
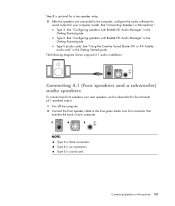
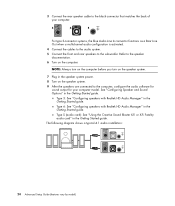
... a typical 2.1 audio installation: Connecting 4.1 (Four speakers and a subwoofer) audio speakers To connect two front speakers, two rear speakers, and a subwoofer for four-channel (4.1 speaker) output: 1 Turn off the computer. 2 Connect the front speaker cable to the lime green Audio Line Out connector that matches the back of your computer. 3 6 S NOTE: Type...
... a typical 2.1 audio installation: Connecting 4.1 (Four speakers and a subwoofer) audio speakers To connect two front speakers, two rear speakers, and a subwoofer for four-channel (4.1 speaker) output: 1 Turn off the computer. 2 Connect the front speaker cable to the lime green Audio Line Out connector that matches the back of your computer. 3 6 S NOTE: Type...
Advanced Setup Guide
Page 30
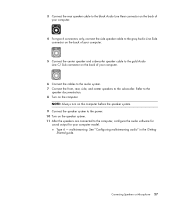
...Started guide. Type 3: See "Configuring speakers with Realtek HD Audio Manager" in the speaker system power. 8 Turn on the speaker system. 9 After the speakers are connected to the speaker documentation. 6 Turn on the speaker system. 7 Plug in the Getting Started guide. Type S (audio card): See "Using ... is activated. 4 Connect the cables to the audio system. 5 Connect the front and rear speakers to the subwoofer. NOTE: Always turn on the computer before you turn on the computer. 3 Connect the rear speaker cable to the black connector that matches the back of your computer model.
...Started guide. Type 3: See "Configuring speakers with Realtek HD Audio Manager" in the speaker system power. 8 Turn on the speaker system. 9 After the speakers are connected to the speaker documentation. 6 Turn on the speaker system. 7 Plug in the Getting Started guide. Type S (audio card): See "Using ... is activated. 4 Connect the cables to the audio system. 5 Connect the front and rear speakers to the subwoofer. NOTE: Always turn on the computer before you turn on the computer. 3 Connect the rear speaker cable to the black connector that matches the back of your computer model.
Advanced Setup Guide
Page 31
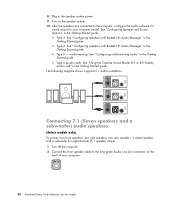
... the speaker system. Type 6 is six connectors. Connecting Speakers or Microphone 25 NOTE: Always turn on the computer before you turn on the computer. Type S is sound card. 3 Connect the rear speaker cable to the black connector that matches the back of your computer...speakers and a subwoofer) audio speakers To connect two front speakers, two rear speakers, a center speaker, and a subwoofer for six-channel (5.1 speaker) output: 1 Turn off the computer. 2 Connect the front speaker cable to the lime green Audio Line Out connector that matches the back of your computer. 3 6 S For ...
... the speaker system. Type 6 is six connectors. Connecting Speakers or Microphone 25 NOTE: Always turn on the computer before you turn on the computer. Type S is sound card. 3 Connect the rear speaker cable to the black connector that matches the back of your computer...speakers and a subwoofer) audio speakers To connect two front speakers, two rear speakers, a center speaker, and a subwoofer for six-channel (5.1 speaker) output: 1 Turn off the computer. 2 Connect the front speaker cable to the lime green Audio Line Out connector that matches the back of your computer. 3 6 S For ...
Advanced Setup Guide
Page 32
...only) To connect two front speakers, two side speakers, two rear speakers, a center speaker, and a subwoofer for eight-channel (7.1 speaker) output: 1 Turn off the computer. 2 Connect the front speaker cable to the computer, configure the audio software for sound output for your computer. 26 Advanced Setup Guide...the Getting Started guide. See "Configuring Speaker and Sound Options" in the Getting Started guide. 8 Plug in the speaker system power. 9 Turn on the speaker system. 10 After the speakers are connected to the lime green Audio Line Out connector on the back of your computer model....
...only) To connect two front speakers, two side speakers, two rear speakers, a center speaker, and a subwoofer for eight-channel (7.1 speaker) output: 1 Turn off the computer. 2 Connect the front speaker cable to the computer, configure the audio software for sound output for your computer. 26 Advanced Setup Guide...the Getting Started guide. See "Configuring Speaker and Sound Options" in the Getting Started guide. 8 Plug in the speaker system power. 9 Turn on the speaker system. 10 After the speakers are connected to the lime green Audio Line Out connector on the back of your computer model....
Advanced Setup Guide
Page 33
Refer to the speaker documentation. 8 Turn on the speaker system. 11 After the speakers are connected to the computer, configure the audio software for sound output for your computer. 6 Connect the .... 5 Connect the center speaker and subwoofer speaker cable to the gold Audio Line C/ Sub connector on the back of your computer model. Type 6 - NOTE: Always turn on the computer before the speaker system. 9 Connect the speaker system to the power. 10...
Refer to the speaker documentation. 8 Turn on the speaker system. 11 After the speakers are connected to the computer, configure the audio software for sound output for your computer. 6 Connect the .... 5 Connect the center speaker and subwoofer speaker cable to the gold Audio Line C/ Sub connector on the back of your computer model. Type 6 - NOTE: Always turn on the computer before the speaker system. 9 Connect the speaker system to the power. 10...
Advanced Setup Guide
Page 37
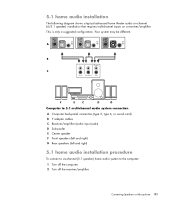
... (left and right) G Rear speakers (left and right) 5.1 home audio installation procedure To connect a six-channel (5.1 speaker) home audio system to the computer: 1 Turn off the computer. 2 Turn off the receiver/amplifier. 5.1 home audio installation The following diagram shows a typical advanced home theater audio six-channel (6/5.1 speaker) installation that requires multichannel inputs...
... (left and right) G Rear speakers (left and right) 5.1 home audio installation procedure To connect a six-channel (5.1 speaker) home audio system to the computer: 1 Turn off the computer. 2 Turn off the receiver/amplifier. 5.1 home audio installation The following diagram shows a typical advanced home theater audio six-channel (6/5.1 speaker) installation that requires multichannel inputs...
Advanced Setup Guide
Page 38
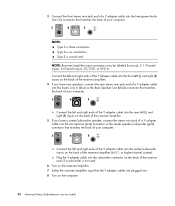
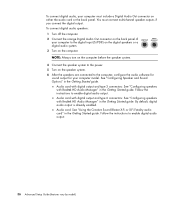
...-jack end of a Y adapter cable into the lime green Audio Line Out connector that matches the back of your computer. 3 6 S NOTE: Type 3 is not used. 6 Turn on the receiver/amplifier. 7 Select the receiver/amplifier input that matches the back of your computer. 3 6 S Connect the left and right ends of the Y adapter... stereo mini-jack of a Y adapter cable into the microphone (pink) connector or the center speaker/subwoofer (gold) connector that the Y adapter cables are plugged into. 8 Turn on the back of the receiver/amplifier (6/5.1 or higher-channel system).
...-jack end of a Y adapter cable into the lime green Audio Line Out connector that matches the back of your computer. 3 6 S NOTE: Type 3 is not used. 6 Turn on the receiver/amplifier. 7 Select the receiver/amplifier input that matches the back of your computer. 3 6 S Connect the left and right ends of the Y adapter... stereo mini-jack of a Y adapter cable into the microphone (pink) connector or the center speaker/subwoofer (gold) connector that the Y adapter cables are plugged into. 8 Turn on the back of the receiver/amplifier (6/5.1 or higher-channel system).

Advanced Setup Guide
Page 40
7.1 home audio installation procedure To connect an eight-channel (7.1 speaker) home audio system to the computer: 1 Turn off the computer. 2 Turn off the receiver/amplifier. 3 Connect the front stereo mini-jack end of a Y adapter cable into the lime green Audio Line Out connector on the back ...
7.1 home audio installation procedure To connect an eight-channel (7.1 speaker) home audio system to the computer: 1 Turn off the computer. 2 Turn off the receiver/amplifier. 3 Connect the front stereo mini-jack end of a Y adapter cable into the lime green Audio Line Out connector on the back ...
Advanced Setup Guide
Page 41
... audio system is needed. Connect the Y adapter cable to the subwoofer connector on the back of the receiver, even if you are not using a subwoofer. 6 Turn on the receiver/amplifier. 7 Select the receiver/amplifier input to which the Y adapter cables are connecting your home stereo AV receiver via digital out, connect... audio card. Type 3: See "Configuring speakers with Realtek HD Audio Manager" in the Getting Started guide. 5 If you have a audio card and you are connected. 8 Turn on the back of the receiver/amplifier (8/7.1 or higher-channel system).
... audio system is needed. Connect the Y adapter cable to the subwoofer connector on the back of the receiver, even if you are not using a subwoofer. 6 Turn on the receiver/amplifier. 7 Select the receiver/amplifier input to which the Y adapter cables are connecting your home stereo AV receiver via digital out, connect... audio card. Type 3: See "Configuring speakers with Realtek HD Audio Manager" in the Getting Started guide. 5 If you have a audio card and you are connected. 8 Turn on the back of the receiver/amplifier (8/7.1 or higher-channel system).
Advanced Setup Guide
Page 42
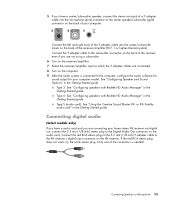
...card with digital output and type 3 connectors: See "Configuring speakers with Realtek HD Audio Manager" in the Getting Started guide. NOTE: Always turn on the computer before the speaker system. 4 Connect the speaker system to the computer, configure the audio software for sound output for your.... By default, digital audio output is already enabled. Follow the instructions to enable digital audio output. To connect digital audio speakers: 1 Turn off the computer. 2 Connect the orange Digital Audio Out connector on the back panel of your computer to the digital input (S/PDIF) ...
...card with digital output and type 3 connectors: See "Configuring speakers with Realtek HD Audio Manager" in the Getting Started guide. NOTE: Always turn on the computer before the speaker system. 4 Connect the speaker system to the computer, configure the audio software for sound output for your.... By default, digital audio output is already enabled. Follow the instructions to enable digital audio output. To connect digital audio speakers: 1 Turn off the computer. 2 Connect the orange Digital Audio Out connector on the back panel of your computer to the digital input (S/PDIF) ...

Advanced Setup Guide
Page 44
...) Connecting the FlexiJack connector The FlexiJack connector performs three functions: Digital Input/Output Line In Microphone You must select the function in and turn on the speaker system power. After connecting the speaker system to the sound card, follow the steps in "Configuring the FlexiJack connector" ...in the Getting Started guide to the sound card. 2 Turn on the computer. 3 Plug in the Creative Console Launcher. NOTE: If you are using the FlexiJack as your Digital In connection and you...
...) Connecting the FlexiJack connector The FlexiJack connector performs three functions: Digital Input/Output Line In Microphone You must select the function in and turn on the speaker system power. After connecting the speaker system to the sound card, follow the steps in "Configuring the FlexiJack connector" ...in the Getting Started guide to the sound card. 2 Turn on the computer. 3 Plug in the Creative Console Launcher. NOTE: If you are using the FlexiJack as your Digital In connection and you...


