
Hardware Reference Guide - HP Compaq 6005 Pro Microtower Model
Page 8
Table 1-1 Front Panel Components 1 5.25-inch Optical Drives1 6 Optical Drive Eject Buttons 2 Optical Drive Activity Lights 7 3.5-inch Media Card Reader (optional)2 3 Hard Drive Activity Light 8 Dual-State Power Button 4 Microphone/Headphone Connector 9 Power On Light 5 USB (Universal Serial Bus) 2.0 Ports 10 Headphone Connector NOTE: When a device is plugged into the Microphone/Headphone Connector, a dialog box will pop up asking if you want to interpret the code. 1 Some models have bezel blanks covering one or both of the 5.25-inch drive bays. 2 Some models have...
Table 1-1 Front Panel Components 1 5.25-inch Optical Drives1 6 Optical Drive Eject Buttons 2 Optical Drive Activity Lights 7 3.5-inch Media Card Reader (optional)2 3 Hard Drive Activity Light 8 Dual-State Power Button 4 Microphone/Headphone Connector 9 Power On Light 5 USB (Universal Serial Bus) 2.0 Ports 10 Headphone Connector NOTE: When a device is plugged into the Microphone/Headphone Connector, a dialog box will pop up asking if you want to interpret the code. 1 Some models have bezel blanks covering one or both of the 5.25-inch drive bays. 2 Some models have...

Hardware Reference Guide - HP Compaq 6005 Pro Microtower Model
Page 10
... settings may need to be changed in Computer Setup to use the connector for powered audio devices (green) 7 PS/2 Keyboard Connector (purple) 3 PS/2 Mouse Connector (green) 8 VGA Monitor Connector 4 Serial Connector 9 DisplayPort Monitor Connector 5 RJ-45 Network Connector 10 Universal Serial Bus (USB) NOTE: Arrangement and number of connectors may vary by double-clicking the Realtek HD Audio Manager icon in the Windows taskbar. You can reconfigure the connector at the same time only if an ATI graphics card is plugged into the PCI, PCI...
... settings may need to be changed in Computer Setup to use the connector for powered audio devices (green) 7 PS/2 Keyboard Connector (purple) 3 PS/2 Mouse Connector (green) 8 VGA Monitor Connector 4 Serial Connector 9 DisplayPort Monitor Connector 5 RJ-45 Network Connector 10 Universal Serial Bus (USB) NOTE: Arrangement and number of connectors may vary by double-clicking the Realtek HD Audio Manager icon in the Windows taskbar. You can reconfigure the connector at the same time only if an ATI graphics card is plugged into the PCI, PCI...

Hardware Reference Guide - HP Compaq 6005 Pro Microtower Model
Page 61
... connector 4 locks cable lock 47 front bezel 50 HP Business PC Security Lock 48 padlock 48 ENWW M media card reader features 3 installing 29 removing 26 memory installing 13 populating sockets 14 specifications 13 microphone connector 2 monitor connector DisplayPort 4 VGA 4 mouse connector 4 N network connector 4 O optical drive cleaning 54 installing 29 precautions 54 removing 26 P PCI card 17, 19 PCI Express card 17, 19 power supply 42 product ID location 7 R rear panel components 4 removable hard drive replacing 37 removing battery 44 bezel blanks 12 computer access panel 9 expansion card...
... connector 4 locks cable lock 47 front bezel 50 HP Business PC Security Lock 48 padlock 48 ENWW M media card reader features 3 installing 29 removing 26 memory installing 13 populating sockets 14 specifications 13 microphone connector 2 monitor connector DisplayPort 4 VGA 4 mouse connector 4 N network connector 4 O optical drive cleaning 54 installing 29 precautions 54 removing 26 P PCI card 17, 19 PCI Express card 17, 19 power supply 42 product ID location 7 R rear panel components 4 removable hard drive replacing 37 removing battery 44 bezel blanks 12 computer access panel 9 expansion card...
Illustrated Parts & Service Map: HP Compaq 6005 Pro Microtower Business PC
Page 1
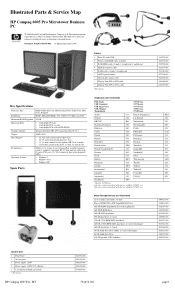
... 3.5-inch internal hard disk drive bays • (1) 3.5-inch external bay for optional HP 22-in-1 media card reader, pocket media drive, or other 3.5-inch device USB 2.0 (10, 4 front, 6 rear), DisplayPort, parallel (optional), serial (1 standard, 1 optional), RJ-45, front and rear audio jacks (2 each), PS/2 ports (2), VGA connector, dual color diagnostic LEDs • Windows 7 • Windows Vista • Windows XP Spare Parts Cables 1 Front I/O with USB 2 Power switch/LED cable assembly 3 SATA HDD cable, 18 inch, 1 straight end, 1 angled end 4 Hard drive power cable * SATA cable, 14 inch...
... 3.5-inch internal hard disk drive bays • (1) 3.5-inch external bay for optional HP 22-in-1 media card reader, pocket media drive, or other 3.5-inch device USB 2.0 (10, 4 front, 6 rear), DisplayPort, parallel (optional), serial (1 standard, 1 optional), RJ-45, front and rear audio jacks (2 each), PS/2 ports (2), VGA connector, dual color diagnostic LEDs • Windows 7 • Windows Vista • Windows XP Spare Parts Cables 1 Front I/O with USB 2 Power switch/LED cable assembly 3 SATA HDD cable, 18 inch, 1 straight end, 1 angled end 4 Hard drive power cable * SATA cable, 14 inch...
Illustrated Parts & Service Map: HP Compaq 6005 Pro Microtower Business PC
Page 2
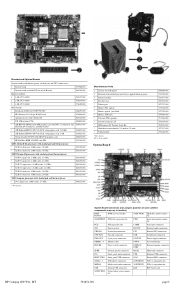
...-001 HP Compaq 6005 Pro, MT System Board Connectors and Jumpers (position of some untitled components may vary in location) ROM RCVRY ROM recovery header SATS PWR1 Hard drive power connector X16PCIEXP PCIe x16 expansion slot PWR 6-pin main power connector PCI1 PCI expansion slot COMB Serial port connector XU1 Processor slot IN/OUT External audio connectors CHFAN1 System fan connector PS2 External PS2 connectors CPU FAN Fan sink connector PAR Parallel port connector PWR CPU 4-pin power connector PS STAT Power supply connector DIMM1 - 4 Memory slots PSWD Password...
...-001 HP Compaq 6005 Pro, MT System Board Connectors and Jumpers (position of some untitled components may vary in location) ROM RCVRY ROM recovery header SATS PWR1 Hard drive power connector X16PCIEXP PCIe x16 expansion slot PWR 6-pin main power connector PCI1 PCI expansion slot COMB Serial port connector XU1 Processor slot IN/OUT External audio connectors CHFAN1 System fan connector PS2 External PS2 connectors CPU FAN Fan sink connector PAR Parallel port connector PWR CPU 4-pin power connector PS STAT Power supply connector DIMM1 - 4 Memory slots PSWD Password...
Illustrated Parts & Service Map: HP Compaq 6005 Pro Microtower Business PC
Page 3
...Changes and Exit - ATAPI Zip or LS-120 drive, hard disk, CD-ROM drive • Drive Emulation Type Options • Translation Mode (ATA disks only) • Translation Parameters (ATA disks only) • SATA Default Values Storage Options: Removable Media Boot, eSATA Port, Max eSATA Speed, SATA Emulation DPS Self-Test - Allows you to Removable Media & Restore from OS on pins 1 and 2, then repeat steps 6 - 8. Smart Cover (some models) - Enables/disables all installed BIOS-controlled storage devices. • Emulation Type - Allows you to set , the setup password can access...
...Changes and Exit - ATAPI Zip or LS-120 drive, hard disk, CD-ROM drive • Drive Emulation Type Options • Translation Mode (ATA disks only) • Translation Parameters (ATA disks only) • SATA Default Values Storage Options: Removable Media Boot, eSATA Port, Max eSATA Speed, SATA Emulation DPS Self-Test - Allows you to Removable Media & Restore from OS on pins 1 and 2, then repeat steps 6 - 8. Smart Cover (some models) - Enables/disables all installed BIOS-controlled storage devices. • Emulation Type - Allows you to set , the setup password can access...
Illustrated Parts & Service Map: HP Compaq 6005 Pro Microtower Business PC
Page 4
... memory added, test using HP-only memory. 4. Verify proper memory type. 3. Clear CMOS. 917-Front Audio Not Connected Front audio harness has been detached or unseated from the system and reinstall memory modules. Unplug power cord, reseat memory, reboot computer. 3. Reboot the computer. 2. Run Computer Setup and Diagnostic Third-party graphics card utilities. Reconnect keyboard with Unit Error computer turned off . 2. Reconnect keyboard with computer turned off . 2. Apply hard drive firmware patch if applicable. 3. Ensure SATA connectors are correctly installed...
... memory added, test using HP-only memory. 4. Verify proper memory type. 3. Clear CMOS. 917-Front Audio Not Connected Front audio harness has been detached or unseated from the system and reinstall memory modules. Unplug power cord, reseat memory, reboot computer. 3. Reboot the computer. 2. Run Computer Setup and Diagnostic Third-party graphics card utilities. Reconnect keyboard with Unit Error computer turned off . 2. Reconnect keyboard with computer turned off . 2. Apply hard drive firmware patch if applicable. 3. Ensure SATA connectors are correctly installed...
Quick Setup and Getting Started Guide
Page 10
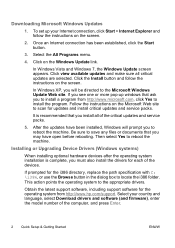
..., replace the path specification with C: \i386, or use the Browse button in the dialog box to the appropriate drivers. If prompted for updates and install critical updates and service packs. This action points the operating system to locate the i386 folder. Select your Internet connection, click Start > Internet Explorer and follow the instructions on the Microsoft Web site to reboot the machine. Click on the screen. 2. To set up windows that...
..., replace the path specification with C: \i386, or use the Browse button in the dialog box to the appropriate drivers. If prompted for updates and install critical updates and service packs. This action points the operating system to locate the i386 folder. Select your Internet connection, click Start > Internet Explorer and follow the instructions on the Microsoft Web site to reboot the machine. Click on the screen. 2. To set up windows that...
Quick Setup and Getting Started Guide
Page 15
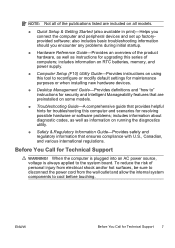
... for Technical Support 7 ENWW Before You Call for Technical Support WARNING! includes information about diagnostic codes, as well as instructions for maintenance purposes or when installing new hardware devices. ● Desktop Management Guide-Provides definitions and "how to the system board. includes information on RTC batteries, memory, and power supply. ● Computer Setup (F10) Utility Guide-Provides instructions on using this tool to reconfigure or modify default settings for upgrading this computer and scenarios for resolving possible hardware or software problems;
... for Technical Support 7 ENWW Before You Call for Technical Support WARNING! includes information about diagnostic codes, as well as instructions for maintenance purposes or when installing new hardware devices. ● Desktop Management Guide-Provides definitions and "how to the system board. includes information on RTC batteries, memory, and power supply. ● Computer Setup (F10) Utility Guide-Provides instructions on using this tool to reconfigure or modify default settings for upgrading this computer and scenarios for resolving possible hardware or software problems;

Troubleshooting Guide
Page 16
... running. Add more memory. Defragment hard drive. Add more memory. Make sure the external speakers are properly connected and powered on the hard drive. Cannot remove computer cover or access panel. Leave a 10.2-cm (4-inch) clearance on the rear of the computer and above the monitor to increase the volume. rear of forgotten password, power loss, or computer malfunction. You will need the FailSafe Key in the task tray. To prevent these 10 Chapter 2 Troubleshooting Without Diagnostics...
... running. Add more memory. Defragment hard drive. Add more memory. Make sure the external speakers are properly connected and powered on the hard drive. Cannot remove computer cover or access panel. Leave a 10.2-cm (4-inch) clearance on the rear of the computer and above the monitor to increase the volume. rear of forgotten password, power loss, or computer malfunction. You will need the FailSafe Key in the task tray. To prevent these 10 Chapter 2 Troubleshooting Without Diagnostics...

Troubleshooting Guide
Page 26
... System board failure (ROM detected failure prior to isolate the faulty module. 3. Monitor does not function properly when used with HP memory. 4. On systems with energy saver features. Replace the system board. energy saver features enabled. 20 Chapter 2 Troubleshooting Without Diagnostics ENWW For systems with integrated graphics, replace the system board. For systems with a graphics card: 1. The integrated graphics can be enabled after installing a PCI Express graphics card. Replace the graphics card. 3. Table 2-5 Solving Display Problems (continued...
... System board failure (ROM detected failure prior to isolate the faulty module. 3. Monitor does not function properly when used with HP memory. 4. On systems with energy saver features. Replace the system board. energy saver features enabled. 20 Chapter 2 Troubleshooting Without Diagnostics ENWW For systems with integrated graphics, replace the system board. For systems with a graphics card: 1. The integrated graphics can be enabled after installing a PCI Express graphics card. Replace the graphics card. 3. Table 2-5 Solving Display Problems (continued...
Troubleshooting Guide
Page 35
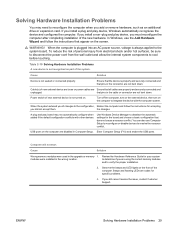
... new hardware. Review the Hardware Reference Guide for specific problems. 3. In Windows, use Computer Setup to reconfigure or disable devices to cool before touching. Table 2-10 Solving Hardware Installation Problems A new device is always applied to deselect the automatic settings for accepting you add or remove hardware, such as part of changes to the configuration, Reboot the computer and follow the instructions that does not cause a resource conflict. Beeps and flashing LEDs are not bent down . Power switch of the computer. A plug...
... new hardware. Review the Hardware Reference Guide for specific problems. 3. In Windows, use Computer Setup to reconfigure or disable devices to cool before touching. Table 2-10 Solving Hardware Installation Problems A new device is always applied to deselect the automatic settings for accepting you add or remove hardware, such as part of changes to the configuration, Reboot the computer and follow the instructions that does not cause a resource conflict. Beeps and flashing LEDs are not bent down . Power switch of the computer. A plug...

Troubleshooting Guide
Page 38
... cable is supposed to the incorrect connector. Network controller interrupt is not properly loaded. Under the Computer Setup Advanced menu, change the resource settings for the board. 32 Chapter 2 Troubleshooting Without Diagnostics ENWW NOTE: The network status light is securely attached to the correct device. Network controller is not configured for the board. Run Computer Setup and enable network controller. 2. System cannot autosense the network. Reinstall network drivers. Diagnostics reports a failure. There is a problem with an expansion board...
... cable is supposed to the incorrect connector. Network controller interrupt is not properly loaded. Under the Computer Setup Advanced menu, change the resource settings for the board. 32 Chapter 2 Troubleshooting Without Diagnostics ENWW NOTE: The network status light is securely attached to the correct device. Network controller is not configured for the board. Run Computer Setup and enable network controller. 2. System cannot autosense the network. Reinstall network drivers. Diagnostics reports a failure. There is a problem with an expansion board...

Troubleshooting Guide
Page 40
... memory, HP does not support mixing ECC and non-ECC memory. Solution Use the Device Manager to determine the memory requirements. This socket must unplug the computer power cord before attempting to reseat, install, or remove a DIMM module. Integrated graphics may not be set up correctly. the computer. Memory count during POST is not installed in the DIMM1 socket. No action required. 34 Chapter 2 Troubleshooting Without Diagnostics...
... memory, HP does not support mixing ECC and non-ECC memory. Solution Use the Device Manager to determine the memory requirements. This socket must unplug the computer power cord before attempting to reseat, install, or remove a DIMM module. Integrated graphics may not be set up correctly. the computer. Memory count during POST is not installed in the DIMM1 socket. No action required. 34 Chapter 2 Troubleshooting Without Diagnostics...

Troubleshooting Guide
Page 52
... be used for Option ROMs Recently added PCI expansion card contains 1. Remove expansion boards. 3. If a PCI expansion card was recently added, remove it to a PXE server. 162-System Options Not Set Configuration incorrect. Internal PXE option ROM is displayed on page 55.) 5. Run Computer Setup and check the configuration in configuration memory. Reset the date and time under Control Panel (Computer Setup can also be a problem with them. If the problem persists, replace the RTC battery. See the Hardware Reference Guide 46 Appendix A POST Error Messages...
... be used for Option ROMs Recently added PCI expansion card contains 1. Remove expansion boards. 3. If a PCI expansion card was recently added, remove it to a PXE server. 162-System Options Not Set Configuration incorrect. Internal PXE option ROM is displayed on page 55.) 5. Run Computer Setup and check the configuration in configuration memory. Reset the date and time under Control Panel (Computer Setup can also be a problem with them. If the problem persists, replace the RTC battery. See the Hardware Reference Guide 46 Appendix A POST Error Messages...

Troubleshooting Guide
Page 53
...battery replacement. 163-Time & Date Not Set CMOS jumper may not be properly installed. changes. 164-Memory Size Error Memory configuration incorrect. 1. If third-party memory has been added, test using HP-only memory. 4. Verify proper memory module type. 201-Memory Error RAM failure. 1. Ensure memory modules are installed properly. 3. Replace DIMM with computer turned off. 2. added, remove it to save the memory boot (memory added or removed). Check connector for memory support information. 301-Keyboard Error Keyboard failure. 1. ENWW POST Numeric Codes...
...battery replacement. 163-Time & Date Not Set CMOS jumper may not be properly installed. changes. 164-Memory Size Error Memory configuration incorrect. 1. If third-party memory has been added, test using HP-only memory. 4. Verify proper memory module type. 201-Memory Error RAM failure. 1. Ensure memory modules are installed properly. 3. Replace DIMM with computer turned off. 2. added, remove it to save the memory boot (memory added or removed). Check connector for memory support information. 301-Keyboard Error Keyboard failure. 1. ENWW POST Numeric Codes...

Troubleshooting Guide
Page 55
...-test. 2. Back up contents and replace hard drive. 1796-SATA Cabling Error One or more SATA devices are assigned to fail. (Some hard drives 1. For one device, use SATA 0 and SATA 1. ENWW POST Numeric Codes and Text Messages 49 Reconfigure card resources and/or run Computer Setup or Windows utilities. 1152-Serial Port B Address Conflict Detected Both external and internal serial ports are used before SATA 2 and SATA 3. Apply hard drive firmware patch if applicable. (Available at http://www.hp.com/support.) 3. Reconnect or replace front USB...
...-test. 2. Back up contents and replace hard drive. 1796-SATA Cabling Error One or more SATA devices are assigned to fail. (Some hard drives 1. For one device, use SATA 0 and SATA 1. ENWW POST Numeric Codes and Text Messages 49 Reconfigure card resources and/or run Computer Setup or Windows utilities. 1152-Serial Port B Address Conflict Detected Both external and internal serial ports are used before SATA 2 and SATA 3. Apply hard drive firmware patch if applicable. (Available at http://www.hp.com/support.) 3. Reconnect or replace front USB...

Troubleshooting Guide
Page 63
... & Regulatory Information guide for information on and setup passwords. Back up is plugged in the Management Engine BIOS Extension (MEBx), including the password. Remove the computer cover or access panel. Clearing and Resetting the CMOS The computer's configuration memory (CMOS) stores information about the computer's configuration. Static electricity can result in damage to back up the CMOS settings. The CMOS button resets CMOS but does not clear the power-on backing up the computer CMOS settings before touching...
... & Regulatory Information guide for information on and setup passwords. Back up is plugged in the Management Engine BIOS Extension (MEBx), including the password. Remove the computer cover or access panel. Clearing and Resetting the CMOS The computer's configuration memory (CMOS) stores information about the computer's configuration. Static electricity can result in damage to back up the CMOS settings. The CMOS button resets CMOS but does not clear the power-on backing up the computer CMOS settings before touching...

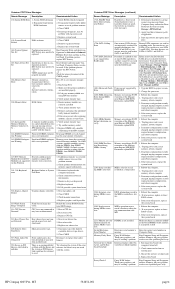
HP Enterprise/Mid-Market Desktop PC Power Supply Architecture
Page 2
... various power supply architectures used by Intel. Intel® ATX12V Standard Most PC industry standards are the key interface between power supplies, motherboards, and chassis that allows components from the Technical Reference Guide for side-band signals to control the fan speeds. The 24-pin Main Power Connector and 4-pin 12V Power Connector are centered on the direction we believe the industry is moving in this connector is rarely used . 2 The primary power supply...
... various power supply architectures used by Intel. Intel® ATX12V Standard Most PC industry standards are the key interface between power supplies, motherboards, and chassis that allows components from the Technical Reference Guide for side-band signals to control the fan speeds. The 24-pin Main Power Connector and 4-pin 12V Power Connector are centered on the direction we believe the industry is moving in this connector is rarely used . 2 The primary power supply...

Computer Setup (F10) Utility Guide - HP Compaq 6005 Pro Models
Page 19
... set to use . Some remote consoles print remotely-entered characters which may involve having the local client boot a remote image provided by the installed system memory. ● Integrated Video (enable/disable). The BIOS contains an embedded NIC option ROM to allow users to Removable Media on some models) (enable/disable) (does not affect external speakers) ● NIC PXE Option ROM Download (enable/disable). Management Operations Allows you first perform the Save to Removable Media command with the option ROM disabled, users will be unable to emulate a diskette drive...
... set to use . Some remote consoles print remotely-entered characters which may involve having the local client boot a remote image provided by the installed system memory. ● Integrated Video (enable/disable). The BIOS contains an embedded NIC option ROM to allow users to Removable Media on some models) (enable/disable) (does not affect external speakers) ● NIC PXE Option ROM Download (enable/disable). Management Operations Allows you first perform the Save to Removable Media command with the option ROM disabled, users will be unable to emulate a diskette drive...


