Manual
Page 9
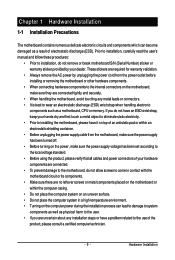
...; Do not place the computer system in a high-temperature environment. • Turning on the power, make sure the power supply has been turned off. • Before turning on the computer power during the installation process can become damaged as a result of electrostatic discharge (ESD). These stickers... it on top of an antistatic pad or within an electrostatic shielding container. • Before unplugging the power supply cable from the motherboard, make sure the power supply voltage has been set according to the local voltage standard. • Before using the product, please verify...
...; Do not place the computer system in a high-temperature environment. • Turning on the power, make sure the power supply has been turned off. • Before turning on the computer power during the installation process can become damaged as a result of electrostatic discharge (ESD). These stickers... it on top of an antistatic pad or within an electrostatic shielding container. • Before unplugging the power supply cable from the motherboard, make sure the power supply voltage has been set according to the local voltage standard. • Before using the product, please verify...
Manual
Page 19
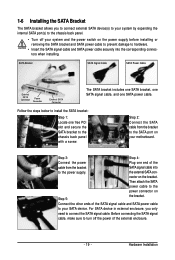
... to prevent damage to hardware. • Insert the SATA signal cable and SATA power cable securely into to the power supply. Then attach the SATA power cable to the SATA port on Step 5: the bracket. Connect the other ends of the external enclosure. - 19 - Before ...connectors when installing. Follow the steps below to install the SATA bracket: Step 1: Locate one SATA power cable. SATA Bracket SATA Signal Cable SATA Power Cable External SATA Connector Power Connector External SATA Connector The SATA bracket includes one SATA bracket, one SATA signal cable, and one...
... to prevent damage to hardware. • Insert the SATA signal cable and SATA power cable securely into to the power supply. Then attach the SATA power cable to the SATA port on Step 5: the bracket. Connect the other ends of the external enclosure. - 19 - Before ...connectors when installing. Follow the steps below to install the SATA bracket: Step 1: Locate one SATA power cable. SATA Bracket SATA Signal Cable SATA Power Cable External SATA Connector Power Connector External SATA Connector The SATA bracket includes one SATA bracket, one SATA signal cable, and one...

Manual
Page 24
...power connector, the power supply can supply enough stable power to an unstable or unbootable system. • The power connectors are properly installed. The power connector possesses a foolproof design. When using a power supply providing a 2x2 12V and a 2x10 power connector. 8 4 5 1 ATX_12V_2X ATX_12V_2X: Pin No. If a power supply is used that can withstand high power...12V 12 24 1 13 ATX GA-EP45-DQ6 Motherboard ATX: Pin No. 1 2 3 4 5 6 7 8 9 10 11 12 Definition Pin No. 3.3V 13 3.3V 14 GND 15 +5V 16 GND 17 +5V 18 GND 19 Power Good 20 5V SB(stand by ...
...power connector, the power supply can supply enough stable power to an unstable or unbootable system. • The power connectors are properly installed. The power connector possesses a foolproof design. When using a power supply providing a 2x2 12V and a 2x10 power connector. 8 4 5 1 ATX_12V_2X ATX_12V_2X: Pin No. If a power supply is used that can withstand high power...12V 12 24 1 13 ATX GA-EP45-DQ6 Motherboard ATX: Pin No. 1 2 3 4 5 6 7 8 9 10 11 12 Definition Pin No. 3.3V 13 3.3V 14 GND 15 +5V 16 GND 17 +5V 18 GND 19 Power Good 20 5V SB(stand by ...
Manual
Page 35
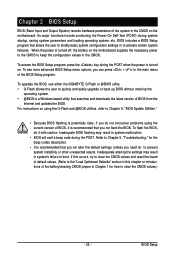
To upgrade the BIOS, use either the GIGABYTE Q-Flash or @BIOS utility. • Q-Flash allows the user to prevent system instability... BIOS flashing may result in system malfunction. • BIOS will emit a beep code during the POST when the power is recommended that allows the user to modify basic system configuration settings or to Chapter 4, "BIOS Update Utilities." ... that you not alter the default settings (unless you can press + in the CMOS on the motherboard supplies the necessary power to the CMOS to clear the CMOS values.) - 35 - BIOS includes a BIOS Setup program that ...
To upgrade the BIOS, use either the GIGABYTE Q-Flash or @BIOS utility. • Q-Flash allows the user to prevent system instability... BIOS flashing may result in system malfunction. • BIOS will emit a beep code during the POST when the power is recommended that allows the user to modify basic system configuration settings or to Chapter 4, "BIOS Update Utilities." ... that you not alter the default settings (unless you can press + in the CMOS on the motherboard supplies the necessary power to the CMOS to clear the CMOS values.) - 35 - BIOS includes a BIOS Setup program that ...
Manual
Page 55
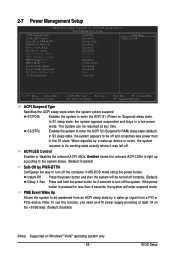
... disables the onboard ACPI LEDs. Note: To use this function, you need an ATX power supply providing at any time. 2-7 Power Management Setup CMOS Setup Utility-Copyright (C) 1984-2008 Award Software Power Management Setup ACPI Suspend Type ACPI LED Control Soft-Off by PWR-BTTN PME Event Wake... from an ACPI sleep state by Alarm x Date (of Month) Alarm x Time (hh:mm:ss) Alarm HPET Support (Note) HPET Mode (Note) Power On By Mouse Power On By Keyboard x KB Power ON Password AC Back Function [S3(STR)] [Enabled] [Instant-Off] [Enabled] [Enabled] [Disabled] Everyday 0 : 0 : 0 [Enabled] [32-bit...
... disables the onboard ACPI LEDs. Note: To use this function, you need an ATX power supply providing at any time. 2-7 Power Management Setup CMOS Setup Utility-Copyright (C) 1984-2008 Award Software Power Management Setup ACPI Suspend Type ACPI LED Control Soft-Off by PWR-BTTN PME Event Wake... from an ACPI sleep state by Alarm x Date (of Month) Alarm x Time (hh:mm:ss) Alarm HPET Support (Note) HPET Mode (Note) Power On By Mouse Power On By Keyboard x KB Power ON Password AC Back Function [S3(STR)] [Enabled] [Instant-Off] [Enabled] [Enabled] [Disabled] Everyday 0 : 0 : 0 [Enabled] [32-bit...

Manual
Page 56
...Windows® Vista®. (Default: 32-bit mode) Power On By Mouse Allows the system to be powered on the system. Power On By Keyboard Allows the system to accept. When prompted for your Windows® Vista® operating system. GA-EP45-DQ6 Motherboard - 56 - Note: To use this function. ... Event Timer (HPET) for Windows® Vista® operating system. (Default: Enabled) HPET Mode (Note) Allows you need an ATX power supply providing at which the system will be turned on by a PS/2 mouse wake-up event. Disabled Disables this function, you to select the...
...Windows® Vista®. (Default: 32-bit mode) Power On By Mouse Allows the system to be powered on the system. Power On By Keyboard Allows the system to accept. When prompted for your Windows® Vista® operating system. GA-EP45-DQ6 Motherboard - 56 - Note: To use this function. ... Event Timer (HPET) for Windows® Vista® operating system. (Default: Enabled) HPET Mode (Note) Allows you need an ATX power supply providing at which the system will be turned on by a PS/2 mouse wake-up event. Disabled Disables this function, you to select the...
Manual
Page 87
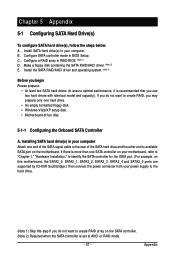
... the hard drive. (Note 1) Skip this motherboard, the SATA2_0, SATA2_1, SATA2_2, SATA2_3, SATA2_4 and SATA2_5 ports are supported by ICH10R Southbridge.) Then connect the power connector from your power supply to create RAID array on the motherboard. Configure SATA controller mode in RAID BIOS. (Note 1) D. C . Appendix Chapter 5 Appendix 5-1 Configuring SATA Hard Drive(s) To...
... the hard drive. (Note 1) Skip this motherboard, the SATA2_0, SATA2_1, SATA2_2, SATA2_3, SATA2_4 and SATA2_5 ports are supported by ICH10R Southbridge.) Then connect the power connector from your power supply to create RAID array on the motherboard. Configure SATA controller mode in RAID BIOS. (Note 1) D. C . Appendix Chapter 5 Appendix 5-1 Configuring SATA Hard Drive(s) To...
Manual
Page 107
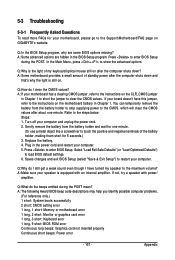
... wait for your speaker is still on the CLR_CMOS jumper in Chapter 1. Gently remove the battery from the battery holder to stop supplying power to the Support\Motherboard\FAQ page on GIGABYTE's website. If not, try a speaker with an internal amplifier. Select "Load Fail-Safe Defaults" (or "Load Optimized Defaults") to enter BIOS...
... wait for your speaker is still on the CLR_CMOS jumper in Chapter 1. Gently remove the battery from the battery holder to stop supplying power to the Support\Motherboard\FAQ page on GIGABYTE's website. If not, try a speaker with an internal amplifier. Select "Load Fail-Safe Defaults" (or "Load Optimized Defaults") to enter BIOS...
Manual
Page 109
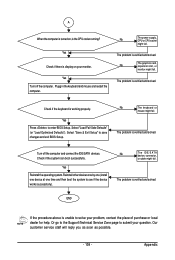
... and restart the computer. No The keyboard or mouse might fail. Appendix Yes Turn off the computer and connect the IDE/SATA devices. No The power supply, CPU or CPU socket might fail. Check if the keyboard is display on , is verified and solved. The problem is the CPU cooler running? A When...
... and restart the computer. No The keyboard or mouse might fail. Appendix Yes Turn off the computer and connect the IDE/SATA devices. No The power supply, CPU or CPU socket might fail. Check if the keyboard is display on , is verified and solved. The problem is the CPU cooler running? A When...


