
Manual
Page 1
The original settings in Ultra TPM will be kept. Smart TPM User's Manual Rev. 1001 12MD-STPM-1001R • We recommend that you download the latest version of the Smart TPM utility from GIGABYTE's website. • If you have installed Ultra TPM earlier, you can install the Smart TPM utility directly without uninstalling Ultra TPM first.
The original settings in Ultra TPM will be kept. Smart TPM User's Manual Rev. 1001 12MD-STPM-1001R • We recommend that you download the latest version of the Smart TPM utility from GIGABYTE's website. • If you have installed Ultra TPM earlier, you can install the Smart TPM utility directly without uninstalling Ultra TPM first.
Manual
Page 15
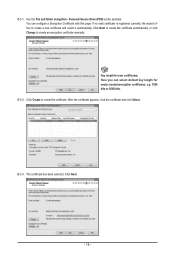
... and folder encryption - After the certificate appears, click the certificate and click Select. The certificate has been selected. Click Create to create an encryption certificate manually. Click Next. - 15 - Personal Secure Drive (PSD) as the example: You can select default key length for newly created encryption certificates, e.g. 1024 bits or 2048...
... and folder encryption - After the certificate appears, click the certificate and click Select. The certificate has been selected. Click Create to create an encryption certificate manually. Click Next. - 15 - Personal Secure Drive (PSD) as the example: You can select default key length for newly created encryption certificates, e.g. 1024 bits or 2048...
Manual
Page 21
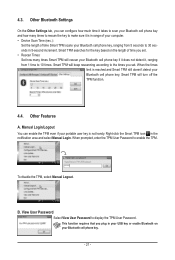
...• Device Scan Time (sec.): Set the length of time you set . When the times limit is not handy. To disable the TPM, select Manual Logout. Other Bluetooth Settings On the Other Settings tab, you set . • Rescan Times: Set how many times to rescan the key to 30 seconds... range of your Bluetooth cell phone key. - 21 - Other Features A. When prompted, enter the TPM User Password to display the TPM User Password. B. Manual Login/Logout You can configure how much time it , ranging from 5 seconds to make sure it is in 5-second increment. Right-click the Smart TPM...
...• Device Scan Time (sec.): Set the length of time you set . When the times limit is not handy. To disable the TPM, select Manual Logout. Other Bluetooth Settings On the Other Settings tab, you set . • Rescan Times: Set how many times to rescan the key to 30 seconds... range of your Bluetooth cell phone key. - 21 - Other Features A. When prompted, enter the TPM User Password to display the TPM User Password. B. Manual Login/Logout You can configure how much time it , ranging from 5 seconds to make sure it is in 5-second increment. Right-click the Smart TPM...
Manual
Page 1
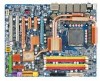
GA-EP45-DQ6 LGA775 socket motherboard for Intel® CoreTM processor family/ Intel® Pentium® processor family/Intel® Celeron® processor family User's Manual Rev. 1004 12ME-EP45DQ6-1004R
GA-EP45-DQ6 LGA775 socket motherboard for Intel® CoreTM processor family/ Intel® Pentium® processor family/Intel® Celeron® processor family User's Manual Rev. 1004 12ME-EP45DQ6-1004R
Manual
Page 3
...related information, check on our website at: http://www.gigabyte.com.tw Identifying Your Motherboard Revision The revision number on how to GIGABYTE UNITED INC. Example: Check your motherboard looks like this manual are legally registered to the specifications and features in the... use GIGABYTE's unique features, read the User's Manual. „ For instructions on your motherboard ...
...related information, check on our website at: http://www.gigabyte.com.tw Identifying Your Motherboard Revision The revision number on how to GIGABYTE UNITED INC. Example: Check your motherboard looks like this manual are legally registered to the specifications and features in the... use GIGABYTE's unique features, read the User's Manual. „ For instructions on your motherboard ...
Manual
Page 5
Chapter 3 Drivers Installation 65 3-1 Installing Chipset Drivers 65 3-2 Application Software 66 3-3 Technical Manuals 66 3-4 Contact ...67 3-5 System ...67 3-6 Download Center 68 Chapter 4 Unique Features 69 4-1 Xpress Recovery2 69 4-2 BIOS Update Utilities 74 4-2-1 Updating the BIOS with the Q-Flash ...
Chapter 3 Drivers Installation 65 3-1 Installing Chipset Drivers 65 3-2 Application Software 66 3-3 Technical Manuals 66 3-4 Contact ...67 3-5 System ...67 3-6 Download Center 68 Chapter 4 Unique Features 69 4-1 Xpress Recovery2 69 4-2 BIOS Update Utilities 74 4-2-1 Updating the BIOS with the Q-Flash ...
Manual
Page 6
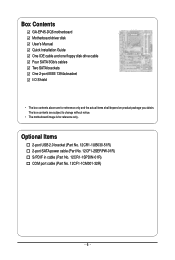
Box Contents GA-EP45-DQ6 motherboard Motherboard driver disk User's Manual Quick Installation Guide One IDE cable and one floppy disk drive cable Four SATA 3Gb/s cables Two SATA brackets One 2-port IEEE 1394a bracket I/O Shield &#...
Box Contents GA-EP45-DQ6 motherboard Motherboard driver disk User's Manual Quick Installation Guide One IDE cable and one floppy disk drive cable Four SATA 3Gb/s cables Two SATA brackets One 2-port IEEE 1394a bracket I/O Shield &#...
Manual
Page 9
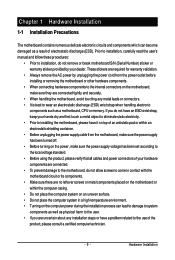
These stickers are required for warranty validation. • Always remove the AC power by your dealer. Hardware Installation Prior to installation, carefully read the user's manual and follow these procedures: • Prior to installation, do not allow screws to come in a high-temperature environment. • Turning on the power, make sure ...
These stickers are required for warranty validation. • Always remove the AC power by your dealer. Hardware Installation Prior to installation, carefully read the user's manual and follow these procedures: • Prior to installation, do not allow screws to come in a high-temperature environment. • Turning on the power, make sure ...
Manual
Page 15
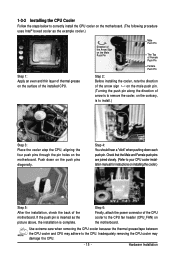
... CPU cooler on the motherboard. (The following procedure uses Intel® boxed cooler as the picture above, the installation is to your CPU cooler installation manual for instructions on installing the cooler.) Step 5: After the installation, check the back of the motherboard. Push down each push pin. If the push pin...
... CPU cooler on the motherboard. (The following procedure uses Intel® boxed cooler as the picture above, the installation is to your CPU cooler installation manual for instructions on installing the cooler.) Step 5: After the installation, check the back of the motherboard. Push down each push pin. If the push pin...
Manual
Page 18
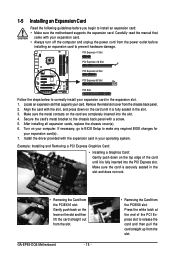
... on the top edge of the PCI Express slot to release the card and then pull the card straight up from the chassis back panel. 2. GA-EP45-DQ6 Motherboard - 18 - • Removing the Card from the PCIEX8 slot: Press the white latch at the end of the card until it is fully inserted... contacts on your expansion card(s). 7. 1-5 Installing an Expansion Card Read the following guidelines before installing an expansion card to prevent hardware damage. Carefully read the manual that supports your expansion card in the slot. 3.
... on the top edge of the PCI Express slot to release the card and then pull the card straight up from the chassis back panel. 2. GA-EP45-DQ6 Motherboard - 18 - • Removing the Card from the PCIEX8 slot: Press the white latch at the end of the card until it is fully inserted... contacts on your expansion card(s). 7. 1-5 Installing an Expansion Card Read the following guidelines before installing an expansion card to prevent hardware damage. Carefully read the manual that supports your expansion card in the slot. 3.

Manual
Page 30
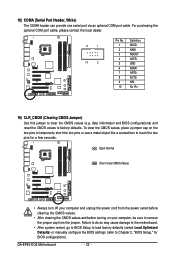
For information about connecting the S/PDIF digital audio cable, carefully read the manual for digital audio output from your motherboard to your expansion card. Pin No. 14) SPDIF_I (S/PDIF In Header, Red) This header supports digital S/PDIF in... use a S/PDIF digital audio cable for digital audio output from your motherboard to certain expansion cards like graphics cards and sound cards. Definition 1 1 SPDIFO 2 GND GA-EP45-DQ6 Motherboard - 30 - For example, some graphics cards may require you wish to connect an HDMI display to an audio device that supports digital audio out...
For information about connecting the S/PDIF digital audio cable, carefully read the manual for digital audio output from your motherboard to your expansion card. Pin No. 14) SPDIF_I (S/PDIF In Header, Red) This header supports digital S/PDIF in... use a S/PDIF digital audio cable for digital audio output from your motherboard to certain expansion cards like graphics cards and sound cards. Definition 1 1 SPDIFO 2 GND GA-EP45-DQ6 Motherboard - 30 - For example, some graphics cards may require you wish to connect an HDMI display to an audio device that supports digital audio out...
Manual
Page 32
... damage to the motherboard. • After system restart, go to BIOS Setup to load factory defaults (select Load Optimized Defaults) or manually configure the BIOS settings (refer to factory defaults. GA-EP45-DQ6 Motherboard - 32 - 18) COMA (Serial Port Header, White) The COMA header can provide one serial port via an optional COM port...
... damage to the motherboard. • After system restart, go to BIOS Setup to load factory defaults (select Load Optimized Defaults) or manually configure the BIOS settings (refer to factory defaults. GA-EP45-DQ6 Motherboard - 32 - 18) COMA (Serial Port Header, White) The COMA header can provide one serial port via an optional COM port...
Manual
Page 41
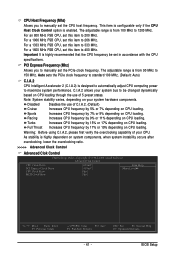
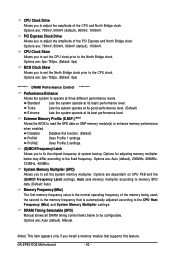
... CPU, set this item to 333 MHz. For a 1333 MHz FSB CPU, set this item to 266 MHz. PCI Express Frequency (Mhz) Allows you to manually set this item to 200 MHz. Auto sets the PCIe clock frequency to standard 100 MHz. (Default: Auto) C.I.A.2 CPU Intelligent Accelerator 2 (C.I .A.2. (Default) ... dynamically based on your system bus to be set in accordance with the CPU specifications. BIOS Setup CPU Host Frequency (Mhz) Allows you to manually set this item to 400 MHz. Full Thrust Increases CPU frequency by 9% or 11% depending on CPU loading. Racing Increases CPU frequency by ...
... CPU, set this item to 333 MHz. For a 1333 MHz FSB CPU, set this item to 266 MHz. PCI Express Frequency (Mhz) Allows you to manually set this item to 200 MHz. Auto sets the PCIe clock frequency to standard 100 MHz. (Default: Auto) C.I.A.2 CPU Intelligent Accelerator 2 (C.I .A.2. (Default) ... dynamically based on your system bus to be set in accordance with the CPU specifications. BIOS Setup CPU Host Frequency (Mhz) Allows you to manually set this item to 400 MHz. Full Thrust Increases CPU frequency by 9% or 11% depending on CPU loading. Racing Increases CPU frequency by ...
Manual
Page 42
... Extreme Lets the system operate at its best performance level. System Memory Multiplier (SPD) Allows you to enhance memory performance when enabled. GA-EP45-DQ6 Motherboard - 42 - Extreme Memory Profile (X.M.P.) (Note) Allows the BIOS to read the SPD data on CPU FSB and the (G)MCH ...Disabled Disables this feature. Profile2 Uses Profile 2 settings. (G)MCH Frequency Latch Allows you to the CPU clock. Options are : Auto (default), Manual. (Note) This item appears only if you install a memory module that is automatically adjusted according to memory SPD data. (Default: Auto) ...
... Extreme Lets the system operate at its best performance level. System Memory Multiplier (SPD) Allows you to enhance memory performance when enabled. GA-EP45-DQ6 Motherboard - 42 - Extreme Memory Profile (X.M.P.) (Note) Allows the BIOS to read the SPD data on CPU FSB and the (G)MCH ...Disabled Disables this feature. Profile2 Uses Profile 2 settings. (G)MCH Frequency Latch Allows you to the CPU clock. Options are : Auto (default), Manual. (Note) This item appears only if you install a memory module that is automatically adjusted according to memory SPD data. (Default: Auto) ...
Manual
Page 47
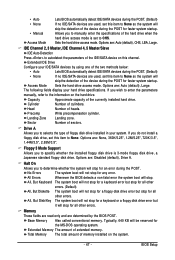
...system startup. Total Memory The total amount of heads. Sets the hard drive access mode. Landing zone. Halt On Allows you to manually enter the specifications of the hard drive when the hard drive access mode is 3-mode floppy disk drive, a Japanese standard floppy disk .../5.25", 720K/3.5", 1.44M/3.5", 2.88M/3.5". Cylinder Head Precomp Landing Zone Number of sectors. Sector Number of cylinders. • Auto • None • Manual Access Mode Lets BIOS automatically detect IDE/SATA devices during the POST. (Default) If no IDE/SATA devices are used , set this item to None...
...system startup. Total Memory The total amount of heads. Sets the hard drive access mode. Landing zone. Halt On Allows you to manually enter the specifications of the hard drive when the hard drive access mode is 3-mode floppy disk drive, a Japanese standard floppy disk .../5.25", 720K/3.5", 1.44M/3.5", 2.88M/3.5". Cylinder Head Precomp Landing Zone Number of sectors. Sector Number of cylinders. • Auto • None • Manual Access Mode Lets BIOS automatically detect IDE/SATA devices during the POST. (Default) If no IDE/SATA devices are used , set this item to None...
Manual
Page 65
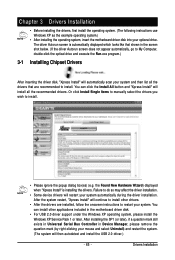
... the drivers that are installed, follow the onscreen instructions to install. • Please ignore the popup dialog box(es) (e.g. Or click Install Single Items to manually select the drivers you wish to restart your system and then list all the recommended drivers. You can click the Install All button and "Xpress...
... the drivers that are installed, follow the onscreen instructions to install. • Please ignore the popup dialog box(es) (e.g. Or click Install Single Items to manually select the drivers you wish to restart your system and then list all the recommended drivers. You can click the Install All button and "Xpress...
Manual
Page 66
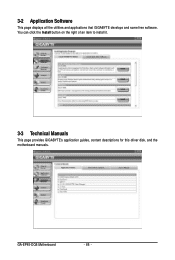
You can click the Install button on the right of an item to install it. 3-3 Technical Manuals This page provides GIGABYTE's application guides, content descriptions for this driver disk, and the motherboard manuals. GA-EP45-DQ6 Motherboard - 66 - 3-2 Application Software This page displays all the utilities and applications that GIGABYTE develops and some free software.
You can click the Install button on the right of an item to install it. 3-3 Technical Manuals This page provides GIGABYTE's application guides, content descriptions for this driver disk, and the motherboard manuals. GA-EP45-DQ6 Motherboard - 66 - 3-2 Application Software This page displays all the utilities and applications that GIGABYTE develops and some free software.

Manual
Page 67
3-4 Contact Click the URL on this manual to the GIGABYTE Web site. Or read the last page of this page to link to check the contact information for GIGABYTE Taiwan headquarter or worldwide branch offices. 3-5 System This page provides the basic system information. - 67 - Drivers Installation
3-4 Contact Click the URL on this manual to the GIGABYTE Web site. Or read the last page of this page to link to check the contact information for GIGABYTE Taiwan headquarter or worldwide branch offices. 3-5 System This page provides the basic system information. - 67 - Drivers Installation
Manual
Page 74
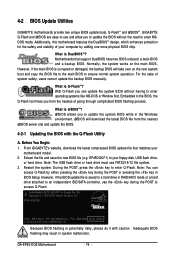
...is @BIOSTM? @BIOS allows you can access Q-Flash by adding one more physical BIOS chip. Restart the system. GA-EP45-DQ6 Motherboard - 74 - TM With Q-Flash you to ensure normal system operation. GIGABYTE Q-Flash and @BIOS are easy-to-use and allow you from the nearest @BIOS server site and update the...is corrupted or damaged, the backup BIOS will download the latest BIOS file from the hassles of system safety, users cannot update the backup BIOS manually. However, if the main BIOS is saved to a hard drive in the Windows environment. @BIOS will take over on the main BIOS....
...is @BIOSTM? @BIOS allows you can access Q-Flash by adding one more physical BIOS chip. Restart the system. GA-EP45-DQ6 Motherboard - 74 - TM With Q-Flash you to ensure normal system operation. GIGABYTE Q-Flash and @BIOS are easy-to-use and allow you from the nearest @BIOS server site and update the...is corrupted or damaged, the backup BIOS will download the latest BIOS file from the hassles of system safety, users cannot update the backup BIOS manually. However, if the main BIOS is saved to a hard drive in the Windows environment. @BIOS will take over on the main BIOS....
Manual
Page 77
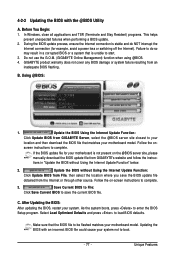
...). tions in a corrupted BIOS or a system that the BIOS file to start. 3. Follow the on the @BIOS server site, please manually download the BIOS update file from the Internet or through other source. After Updating the BIOS: After updating the BIOS, restart your motherboard model... Internet Update Function: Click Update BIOS from File, then select the location where you save the current BIOS file. Do not use the G.O.M. (GIGABYTE Online Management) function when using @BIOS. 4. Update the BIOS without Using the Internet Update Function" below. 2. B. As the system boots, press...
...). tions in a corrupted BIOS or a system that the BIOS file to start. 3. Follow the on the @BIOS server site, please manually download the BIOS update file from the Internet or through other source. After Updating the BIOS: After updating the BIOS, restart your motherboard model... Internet Update Function: Click Update BIOS from File, then select the location where you save the current BIOS file. Do not use the G.O.M. (GIGABYTE Online Management) function when using @BIOS. 4. Update the BIOS without Using the Internet Update Function" below. 2. B. As the system boots, press...


