Start Here - Installation Guide
Page 1
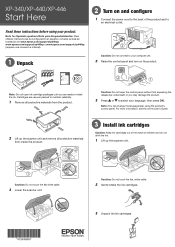
... Caution: Do not touch the flat , white cable. 2 Gently shake the ink cartridges. 3 Unpack the ink cartridges. XP-340/XP-440/XP-446 Start Here Read these instructions before using the product's control panel. Note for Spanish speakers/Nota para hispanohablantes: Para obtener instrucciones ...de instalación en www.epson.com/support/xp340sp, www.epson.com/support/xp440sp o www.epson.com/support/xp446sp (requiere una conexión a Internet). 1 Unpack 2 Turn on the product. For more information, see the online User's Guide. 2 Lift up the scanner unit. Note: You can change...
... Caution: Do not touch the flat , white cable. 2 Gently shake the ink cartridges. 3 Unpack the ink cartridges. XP-340/XP-440/XP-446 Start Here Read these instructions before using the product's control panel. Note for Spanish speakers/Nota para hispanohablantes: Para obtener instrucciones ...de instalación en www.epson.com/support/xp340sp, www.epson.com/support/xp440sp o www.epson.com/support/xp446sp (requiere una conexión a Internet). 1 Unpack 2 Turn on the product. For more information, see the online User's Guide. 2 Lift up the scanner unit. Note: You can change...
Start Here - Installation Guide
Page 2
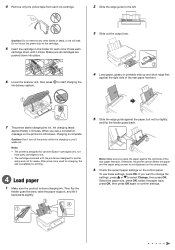
...for each color. to confirm settings. Note: • The printer is done charging ink. Ink charging takes approximately 4 minutes. To use with Epson® cartridges only, not third-party cartridges or ink. • The cartridges included with the printer are pushed down until it backwards slightly. 5... feed slot. 7 The printer starts charging the ink. Press each cartridge down into place. 3 Slide out the output tray. 6 Lower the scanner unit, then press ink delivery system. When you want to change the settings, press or to the left. Otherwise, the printer cannot detect the...
...for each color. to confirm settings. Note: • The printer is done charging ink. Ink charging takes approximately 4 minutes. To use with Epson® cartridges only, not third-party cartridges or ink. • The cartridges included with the printer are pushed down until it backwards slightly. 5... feed slot. 7 The printer starts charging the ink. Press each cartridge down into place. 3 Slide out the output tray. 6 Lower the scanner unit, then press ink delivery system. When you want to change the settings, press or to the left. Otherwise, the printer cannot detect the...
Users Guide
Page 4
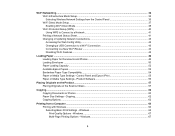
...64 Selecting Basic Print Settings - Windows 64 Print Quality Options - Product Software 56 Placing Originals on the Product ...57 Placing Originals on the Scanner Glass 57 Copying ...60 Copying Documents or Photos...60 Paper Size Settings - Copying...62 Copying Options...62 Printing from the Control Panel 35 Wi-...Wi-Fi Features ...44 Loading Paper ...46 Loading Paper for Documents and Photos 46 Loading Envelopes ...50 Paper Loading Capacity ...52 Available Epson Papers ...53 Borderless Paper Type Compatibility 54 Paper or Media Type Settings - Windows 67 4 Control Panel and...
...64 Selecting Basic Print Settings - Windows 64 Print Quality Options - Product Software 56 Placing Originals on the Product ...57 Placing Originals on the Scanner Glass 57 Copying ...60 Copying Documents or Photos...60 Paper Size Settings - Copying...62 Copying Options...62 Printing from the Control Panel 35 Wi-...Wi-Fi Features ...44 Loading Paper ...46 Loading Paper for Documents and Photos 46 Loading Envelopes ...50 Paper Loading Capacity ...52 Available Epson Papers ...53 Borderless Paper Type Compatibility 54 Paper or Media Type Settings - Windows 67 4 Control Panel and...

Users Guide
Page 17
6 Edge guide 1 Document cover 2 Scanner glass 3 Control panel 4 Control panel release bar (beneath) 5 Memory card slot 6 Memory card access light Parent topic: Product Parts Locations 17
6 Edge guide 1 Document cover 2 Scanner glass 3 Control panel 4 Control panel release bar (beneath) 5 Memory card slot 6 Memory card access light Parent topic: Product Parts Locations 17
Users Guide
Page 23
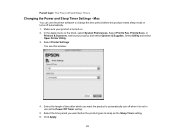
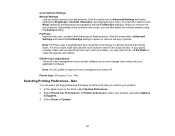
.... Click Apply. 23 Make sure your product, and select Options & Supplies. Select Utility and select Open Printer Utility. 3. Select Print & Fax, Print & Scan, or Printers & Scanners, select your product is not in use the printer software to change the time period before the product goes to automatically turn off automatically. 1. Select...
.... Click Apply. 23 Make sure your product, and select Options & Supplies. Select Utility and select Open Printer Utility. 3. Select Print & Fax, Print & Scan, or Printers & Scanners, select your product is not in use the printer software to change the time period before the product goes to automatically turn off automatically. 1. Select...

Users Guide
Page 57
Placing Originals on the Scanner Glass Placing Originals on the Scanner Glass You can place originals up to avoid damaging it. Open the document cover. 57 Caution: Do not place anything on the scanner glass: Letter (8.5 × 11 inches [216 × 279 mm]) or A4 (8.3 × 11.7 inches [210 × 297 mm]). 1. Placing Originals on the Product Follow the instructions here to place your product or use its cover as a writing surface to this size on top of your original documents or photos on the product.
Placing Originals on the Scanner Glass Placing Originals on the Scanner Glass You can place originals up to avoid damaging it. Open the document cover. 57 Caution: Do not place anything on the scanner glass: Letter (8.5 × 11 inches [216 × 279 mm]) or A4 (8.3 × 11.7 inches [210 × 297 mm]). 1. Placing Originals on the Product Follow the instructions here to place your product or use its cover as a writing surface to this size on top of your original documents or photos on the product.

Users Guide
Page 58
Just make sure they are at least 0.2 inch (4.5 mm) away from the edge of the scanner glass and at least 0.8 inch (20 mm) away from the edges to the edges of the indicated corner. Note: You can place multiple originals on the scanner glass with the top facing into the corner. 2. Manually position your original away from each other. Note: The edges of the scanner glass. Place your original may be cropped by 0.06 inch (1.5 mm) from the edge of your original facedown on the scanner glass. Slide the original to prevent cropping. 58
Just make sure they are at least 0.2 inch (4.5 mm) away from the edge of the scanner glass and at least 0.8 inch (20 mm) away from the edges to the edges of the indicated corner. Note: You can place multiple originals on the scanner glass with the top facing into the corner. 2. Manually position your original away from each other. Note: The edges of the scanner glass. Place your original may be cropped by 0.06 inch (1.5 mm) from the edge of your original facedown on the scanner glass. Slide the original to prevent cropping. 58

Users Guide
Page 62
... Media Type Settings - Note: Not all options or settings may be available, depending on the Scanner Glass Related topics Loading Paper Paper Size Settings - When you are ready to use for your copies. Control Panel and Epson iPrint Copying Options Related tasks Placing Originals on other copying settings. 62 Copying Select the...
... Media Type Settings - Note: Not all options or settings may be available, depending on the Scanner Glass Related topics Loading Paper Paper Size Settings - When you are ready to use for your copies. Control Panel and Epson iPrint Copying Options Related tasks Placing Originals on other copying settings. 62 Copying Select the...
Users Guide
Page 91
... remove redeye in the subject's face. Parent topic: Managing Color - You can manage color using the Gamma setting. Select Print & Fax, Print & Scan, or Printers & Scanners, select your photo includes a face with an intentional color cast, such as a statue, you can also adjust the midtone density using only your application software...
... remove redeye in the subject's face. Parent topic: Managing Color - You can manage color using the Gamma setting. Select Print & Fax, Print & Scan, or Printers & Scanners, select your photo includes a face with an intentional color cast, such as a statue, you can also adjust the midtone density using only your application software...

Users Guide
Page 97
... the Apps screen and select Event Manager. • Windows (other versions): Click or Start, and select All Programs or Programs. Select EPSON > Epson Scan 2 > Epson Scan 2. 97 Open the Scanner (Windows) or Select Scanner (Mac) drop-down list and select the scan button settings you want to view or change the default scan settings your...
... the Apps screen and select Event Manager. • Windows (other versions): Click or Start, and select All Programs or Programs. Select EPSON > Epson Scan 2 > Epson Scan 2. 97 Open the Scanner (Windows) or Select Scanner (Mac) drop-down list and select the scan button settings you want to view or change the default scan settings your...

Users Guide
Page 125
... PDF You can scan a document and save the text in a searchable PDF. Select Options from the Image Format list. Start Epson Scan 2. 3. Select your scanner software programs individually, be sure to scan, if necessary. 5. You see the Image Format Options window. 125 Saving Scanned Documents ...as the Image Format setting. 6. Load your scanner software as instructed on the Start Here sheet. In a searchable PDF, text is installed automatically when you want to perform OCR. 1. Note...
... PDF You can scan a document and save the text in a searchable PDF. Select Options from the Image Format list. Start Epson Scan 2. 3. Select your scanner software programs individually, be sure to scan, if necessary. 5. You see the Image Format Options window. 125 Saving Scanned Documents ...as the Image Format setting. 6. Load your scanner software as instructed on the Start Here sheet. In a searchable PDF, text is installed automatically when you want to perform OCR. 1. Note...

Users Guide
Page 126
The scanned image is selected as a searchable PDF. Parent topic: Scanning Related tasks Placing Originals on the Scanner Glass Scanning in the document text is saved as the Text Language setting. 9. Click Scan. 7. Select the Text tab. 8. Click OK. 10. Make sure the language used in Epson Scan 2 126 Confirm the File Name setting and select a Folder setting for your document. 11.
The scanned image is selected as a searchable PDF. Parent topic: Scanning Related tasks Placing Originals on the Scanner Glass Scanning in the document text is saved as the Text Language setting. 9. Click Scan. 7. Select the Text tab. 8. Click OK. 10. Make sure the language used in Epson Scan 2 126 Confirm the File Name setting and select a Folder setting for your document. 11.
Users Guide
Page 145
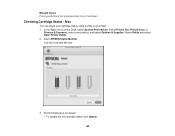
In the Apple menu or the Dock, select System Preferences. Select EPSON Status Monitor. Select Utility and select Open Printer Utility. 2. Related topics Printing with Black Ink and Expended Color Cartridges Checking Cartridge Status - Select Print & Fax, Print & Scan, or Printers & Scanners, select your Mac. 1. Do the following as necessary: • To update the ink cartridge status, click Update. 145 Mac You can check your cartridge status using a utility on your product, and select Options & Supplies. You see a window like this: 3.
In the Apple menu or the Dock, select System Preferences. Select EPSON Status Monitor. Select Utility and select Open Printer Utility. 2. Related topics Printing with Black Ink and Expended Color Cartridges Checking Cartridge Status - Select Print & Fax, Print & Scan, or Printers & Scanners, select your Mac. 1. Do the following as necessary: • To update the ink cartridge status, click Update. 145 Mac You can check your cartridge status using a utility on your product, and select Options & Supplies. You see a window like this: 3.

Users Guide
Page 148
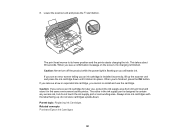
Squeeze the tab on the cartridge and lift the cartridge straight up the scanner unit. Note: Dispose of used cartridge apart or try to remove it . 148 Lift up to refill it . 2. Caution: Do not move the print head by hand; Do not take the used cartridges carefully. otherwise, you may damage your product. Do not touch the flat white cable inside the printer. 3.
Squeeze the tab on the cartridge and lift the cartridge straight up the scanner unit. Note: Dispose of used cartridge apart or try to remove it . 148 Lift up to refill it . 2. Caution: Do not move the print head by hand; Do not take the used cartridges carefully. otherwise, you may damage your product. Do not touch the flat white cable inside the printer. 3.
Users Guide
Page 151
... later use the cartridge. Parent topic: Replacing Ink Cartridges Related concepts Purchase Epson Ink Cartridges 151 This takes about 90 seconds. Always store ink cartridges with the label facing up the scanner unit and press the ink cartridge down . Lower the scanner unit and press the start button. Caution: Never turn off the...
... later use the cartridge. Parent topic: Replacing Ink Cartridges Related concepts Purchase Epson Ink Cartridges 151 This takes about 90 seconds. Always store ink cartridges with the label facing up the scanner unit and press the ink cartridge down . Lower the scanner unit and press the start button. Caution: Never turn off the...
Users Guide
Page 152
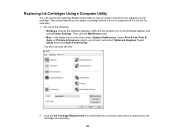
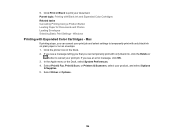
Select Print & Fax, Print & Scan, or Printers & Scanners, select your ink cartridges as necessary. 152 Click the Ink Cartridge Replacement icon and follow the on -screen instructions for example). 1. Replacing Ink Cartridges Using a ...
Select Print & Fax, Print & Scan, or Printers & Scanners, select your ink cartridges as necessary. 152 Click the Ink Cartridge Replacement icon and follow the on -screen instructions for example). 1. Replacing Ink Cartridges Using a ...
Users Guide
Page 154
... with only black ink on plain paper or on an envelope. 1. Parent topic: Printing with Expended Color Cartridges - Select Print & Fax, Print & Scan, or Printers & Scanners, select your document. Select Driver or Options. 154 9. In the Apple menu or the Dock, select System Preferences. 4.
... with only black ink on plain paper or on an envelope. 1. Parent topic: Printing with Expended Color Cartridges - Select Print & Fax, Print & Scan, or Printers & Scanners, select your document. Select Driver or Options. 154 9. In the Apple menu or the Dock, select System Preferences. 4.

Users Guide
Page 160
... of the following: • Windows: Access the Windows Desktop and right-click the product icon in the product. 3. Select Print & Fax, Print & Scan, or Printers & Scanners, select your Windows or Mac computer. 1. Related topics Loading Paper Checking the Nozzles Using a Computer Utility You can check the print head nozzles using a utility...
... of the following: • Windows: Access the Windows Desktop and right-click the product icon in the product. 3. Select Print & Fax, Print & Scan, or Printers & Scanners, select your Windows or Mac computer. 1. Related topics Loading Paper Checking the Nozzles Using a Computer Utility You can check the print head nozzles using a utility...

Users Guide
Page 164
... product icon in the Windows taskbar. • Mac: In the Apple menu or the Dock, select System Preferences. Select Print & Fax, Print & Scan, or Printers & Scanners, select your product, and select Options & Supplies. Select Utility and select Open Printer Utility. 4. Caution: Never turn off the product during a cleaning cycle or you...
... product icon in the Windows taskbar. • Mac: In the Apple menu or the Dock, select System Preferences. Select Print & Fax, Print & Scan, or Printers & Scanners, select your product, and select Options & Supplies. Select Utility and select Open Printer Utility. 4. Caution: Never turn off the product during a cleaning cycle or you...

Users Guide
Page 168
When you are printing a head alignment pattern. 168 Select Print & Fax, Print & Scan, or Printers & Scanners, select your Windows or Mac computer. 1. Load a few sheets of the following: • Windows: Access the Windows Desktop and right-click the product icon in ...
When you are printing a head alignment pattern. 168 Select Print & Fax, Print & Scan, or Printers & Scanners, select your Windows or Mac computer. 1. Load a few sheets of the following: • Windows: Access the Windows Desktop and right-click the product icon in ...


