
Product Brochure
Page 1
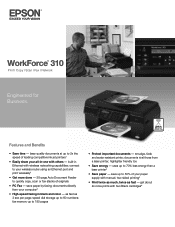
... Get more prints with manual, two-sided printing5 • Print twice as much, twice as 3 sec per page; WorkForce® 310 Print | Copy | Scan | Fax | Network Engineered for Business. as fast as fast - smudge, fade and water resistant prints; get about 2x more done... save paper by faxing documents directly from a laser printer; Features and Benefits • Save time - laser quality documents at up to 2x the speed of originals • PC Fax - speed dial storage up to 60 numbers; documents rival those from your all-in-one with wireless networking...
... Get more prints with manual, two-sided printing5 • Print twice as much, twice as 3 sec per page; WorkForce® 310 Print | Copy | Scan | Fax | Network Engineered for Business. as fast as fast - smudge, fade and water resistant prints; get about 2x more done... save paper by faxing documents directly from a laser printer; Features and Benefits • Save time - laser quality documents at up to 2x the speed of originals • PC Fax - speed dial storage up to 60 numbers; documents rival those from your all-in-one with wireless networking...
Product Brochure
Page 2
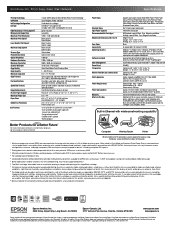
...is used for priming the printer. CPD-30676 6/09 See www.epson.com/printspeed for convenient and reasonable recycling options at $179 or less as required by ISO/IEC 24711 and 24712. Copyright 2009 Epson America, Inc. and Canada WorkForce 310 all -in . Wireless .... Performance may be lower when printing infrequently or predominantly with one , instruction manual, CD-ROM with drivers and bonus software, power cord, telephone cord, 5 DURABrite Ultra Ink cartridges; WorkForce 310 Print | Copy | Scan | Fax | Network Printing Technology 4-color (CMYK) drop-on-demand ...
...is used for priming the printer. CPD-30676 6/09 See www.epson.com/printspeed for convenient and reasonable recycling options at $179 or less as required by ISO/IEC 24711 and 24712. Copyright 2009 Epson America, Inc. and Canada WorkForce 310 all -in . Wireless .... Performance may be lower when printing infrequently or predominantly with one , instruction manual, CD-ROM with drivers and bonus software, power cord, telephone cord, 5 DURABrite Ultra Ink cartridges; WorkForce 310 Print | Copy | Scan | Fax | Network Printing Technology 4-color (CMYK) drop-on-demand ...
Quick Guide
Page 1
Epson WorkForce® 310 Series Quick Guide Installing on a Network Basic Printing, Copying, Scanning, and Faxing Maintaining Your All-in-One Solving Problems
Epson WorkForce® 310 Series Quick Guide Installing on a Network Basic Printing, Copying, Scanning, and Faxing Maintaining Your All-in-One Solving Problems
Quick Guide
Page 2
...WorkForce 310 Series on a Network 5 Connect an Ethernet Network Cable 5 Install Software 6 Loading Paper 14 Using Special Papers 15 Placing Originals for Copying, Scanning, or Faxing 17 Using the Scanner Glass 17 Using the Automatic Document Feeder 18 Copying a Document or Photo 20 Copying a Document 20 Copying a Photo 21 Faxing... a Document 22 Connecting a Phone or Answering Machine 22 Setting Up Fax Features 24 Sending a Fax From the Control Panel 28 Sending a Fax From Windows 29 Receiving Faxes 31 Printing From Your Computer 32 ...
...WorkForce 310 Series on a Network 5 Connect an Ethernet Network Cable 5 Install Software 6 Loading Paper 14 Using Special Papers 15 Placing Originals for Copying, Scanning, or Faxing 17 Using the Scanner Glass 17 Using the Automatic Document Feeder 18 Copying a Document or Photo 20 Copying a Document 20 Copying a Photo 21 Faxing... a Document 22 Connecting a Phone or Answering Machine 22 Setting Up Fax Features 24 Sending a Fax From the Control Panel 28 Sending a Fax From Windows 29 Receiving Faxes 31 Printing From Your Computer 32 ...
Quick Guide
Page 4
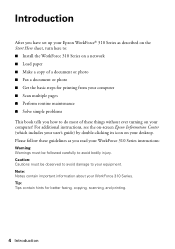
...to avoid damage to your equipment. Note: Notes contain important information about your desktop. Introduction After you have set up your Epson WorkForce® 310 Series as you how to do most of these guidelines as described on the Start Here sheet, turn here to: ■ Install... the WorkForce 310 Series on a network ■ Load paper ■ Make a copy of a document or photo ■ Fax a document or photo ■ Get the basic steps for better faxing, copying, scanning, and printing. 4 Introduction Tip: Tips contain hints...
...to avoid damage to your equipment. Note: Notes contain important information about your desktop. Introduction After you have set up your Epson WorkForce® 310 Series as you how to do most of these guidelines as described on the Start Here sheet, turn here to: ■ Install... the WorkForce 310 Series on a network ■ Load paper ■ Make a copy of a document or photo ■ Fax a document or photo ■ Get the basic steps for better faxing, copying, scanning, and printing. 4 Introduction Tip: Tips contain hints...

Quick Guide
Page 11
... software and finish the installation. 5. Install Software 11 When installation is complete, restart your printed documentation and on-screen Epson Information Center for details. See your computer. Do one of the following: ■ To set up your Fax Header information, select Yes, click Next, then continue with step 3. ■ To set up your...
... software and finish the installation. 5. Install Software 11 When installation is complete, restart your printed documentation and on-screen Epson Information Center for details. See your computer. Do one of the following: ■ To set up your Fax Header information, select Yes, click Next, then continue with step 3. ■ To set up your...

Quick Guide
Page 17
... on the scanner glass to make color or black-and-white copies. 1. If you copy, scan, or fax, place your computer, you don't move the original(s). 1/4 inch (5 mm) Placing Originals for Copying, Scanning, or Faxing Before you 're scanning 3 × 5- Using the Scanner Glass You can place up to two at least...
... on the scanner glass to make color or black-and-white copies. 1. If you copy, scan, or fax, place your computer, you don't move the original(s). 1/4 inch (5 mm) Placing Originals for Copying, Scanning, or Faxing Before you 're scanning 3 × 5- Using the Scanner Glass You can place up to two at least...

Quick Guide
Page 18
Slide the edge guide outward. 4. Fan the originals, then tap them on a flat surface to 30 letter-size (or A4) sheets or 10 legal-size sheets in the Automatic Document Feeder (ADF). 1. Insert the originals face-up to even the edges. 2. Using the Automatic Document Feeder You can place up . 18 Placing Originals for Copying, Scanning, or Faxing Open the ADF paper support. 3.
Slide the edge guide outward. 4. Fan the originals, then tap them on a flat surface to 30 letter-size (or A4) sheets or 10 legal-size sheets in the Automatic Document Feeder (ADF). 1. Insert the originals face-up to even the edges. 2. Using the Automatic Document Feeder You can place up . 18 Placing Originals for Copying, Scanning, or Faxing Open the ADF paper support. 3.
Quick Guide
Page 22
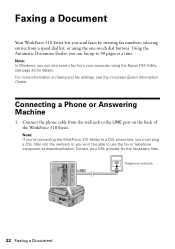
... filter into the wall jack or you send faxes by entering fax numbers, selecting entries from a speed dial list, or using the Epson FAX Utility, see the on the back of the WorkForce 310 Series. Telephone wall jack 22 Faxing a Document Faxing a Document Your WorkForce 310 Series lets you won't be able to use...can also send a fax from the wall jack to 30 pages at a time. For more information on faxing and fax settings, see page 29 for the necessary filter. Connect the phone cable from your DSL provider for details. Contact your computer using the one-touch dial buttons. Using...
... filter into the wall jack or you send faxes by entering fax numbers, selecting entries from a speed dial list, or using the Epson FAX Utility, see the on the back of the WorkForce 310 Series. Telephone wall jack 22 Faxing a Document Faxing a Document Your WorkForce 310 Series lets you won't be able to use...can also send a fax from the wall jack to 30 pages at a time. For more information on faxing and fax settings, see page 29 for the necessary filter. Connect the phone cable from your DSL provider for details. Contact your computer using the one-touch dial buttons. Using...

Quick Guide
Page 23
.... port for the answering machine to the telephone or answering machine, and connect the other party is picked up and the WorkForce 310 Series will be connected to the EXT. Connect one end of rings, then press OK. port, the call when a phone is a caller, the phone can be used...on the fourth ring, you pick up on the answering machine. Telephone wall jack If your answering machine is a fax and you hang up . If a fax call is set the WorkForce 310 Series to pick up the phone without having a phone or answering machine connected to select the number of the cable ...
.... port for the answering machine to the telephone or answering machine, and connect the other party is picked up and the WorkForce 310 Series will be connected to the EXT. Connect one end of rings, then press OK. port, the call when a phone is a caller, the phone can be used...on the fourth ring, you pick up on the answering machine. Telephone wall jack If your answering machine is a fax and you hang up . If a fax call is set the WorkForce 310 Series to pick up the phone without having a phone or answering machine connected to select the number of the cable ...

Quick Guide
Page 24
... to enter your name and phone number in the fax header before sending faxes so that recipients can enter up fax features using the Epson FAX Utility (Windows only), see page 25). Setting Up Fax Features Before sending faxes, you leave the WorkForce 310 Series unplugged for instructions on -screen Epson Information Center. Press u or d to select Header, then press...
... to enter your name and phone number in the fax header before sending faxes so that recipients can enter up fax features using the Epson FAX Utility (Windows only), see page 25). Setting Up Fax Features Before sending faxes, you leave the WorkForce 310 Series unplugged for instructions on -screen Epson Information Center. Press u or d to select Header, then press...
Quick Guide
Page 25
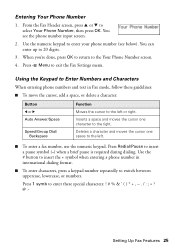
... Function Moves the cursor to enter your phone number (see the phone number input screen. 2. Inserts a space and moves the cursor one space to the left or right. Press 1 symb to the Your Phone Number screen. 4. You see below). Deletes a character and moves the... cursor one character to switch between uppercase, lowercase, or numbers. Press x Menu to insert a pause symbol (-) when a brief pause is required during dialing. Press Redial/Pause to exit the Fax Settings menu. Using the Keypad to Enter Numbers and Characters ...
... Function Moves the cursor to enter your phone number (see the phone number input screen. 2. Inserts a space and moves the cursor one space to the left or right. Press 1 symb to the Your Phone Number screen. 4. You see below). Deletes a character and moves the... cursor one character to switch between uppercase, lowercase, or numbers. Press x Menu to insert a pause symbol (-) when a brief pause is required during dialing. Press Redial/Pause to exit the Fax Settings menu. Using the Keypad to Enter Numbers and Characters ...
Quick Guide
Page 26
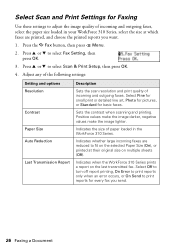
... Reduction Last Transmission Report Description Sets the scan resolution and print quality of incoming and outgoing faxes. Indicates when the WorkForce 310 Series prints a report on the last transmitted fax. Indicates the size of paper loaded in your WorkForce 310 Series, select the size at their original size on multiple sheets (Off). Select Fine for small...
... Reduction Last Transmission Report Description Sets the scan resolution and print quality of incoming and outgoing faxes. Indicates when the WorkForce 310 Series prints a report on the last transmitted fax. Indicates the size of paper loaded in your WorkForce 310 Series, select the size at their original size on multiple sheets (Off). Select Fine for small...
Quick Guide
Page 27
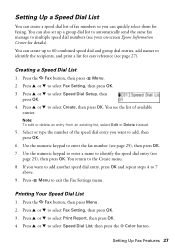
... or type the number of the speed dial entry you want to add another speed dial entry, press OK and repeat steps 4 to enter the fax number (see page 25), then press OK. 7. Press u or d to add, then press OK. 6. If you want to select Speed Dial List, then...Color button. Printing Your Speed Dial List 1. You see your on-screen Epson Information Center for details). Use the numeric keypad to 7 above. 9. You return to select Fax Setting, then press OK. 3. Press u or d to the Create menu. 8. Setting Up Fax Features 27 You can create up a group dial list to automatically send...
... or type the number of the speed dial entry you want to add another speed dial entry, press OK and repeat steps 4 to enter the fax number (see page 25), then press OK. 7. Press u or d to add, then press OK. 6. If you want to select Speed Dial List, then...Color button. Printing Your Speed Dial List 1. You see your on-screen Epson Information Center for details). Use the numeric keypad to 7 above. 9. You return to select Fax Setting, then press OK. 3. Press u or d to the Create menu. 8. Setting Up Fax Features 27 You can create up a group dial list to automatically send...

Quick Guide
Page 28
...this screen after one minute. Use the numeric keypad to fax another page, press 2. Note: If the recipient's fax machine prints only in black and white, your fax is automatically sent ... document is automatically scanned and faxed. ■ If you placed your document on the scanner glass, you see a redialing message and the WorkForce 310 Series redials after the first ...Epson FAX Utility, see page 29 for faxing (see page 29. 4. To cancel faxing, press y Stop/Clear Settings at any time. 28 Faxing a Document You can send a fax from your fax. Press the x B&W or x Color button to fax...
...this screen after one minute. Use the numeric keypad to fax another page, press 2. Note: If the recipient's fax machine prints only in black and white, your fax is automatically sent ... document is automatically scanned and faxed. ■ If you placed your document on the scanner glass, you see a redialing message and the WorkForce 310 Series redials after the first ...Epson FAX Utility, see page 29 for faxing (see page 29. 4. To cancel faxing, press y Stop/Clear Settings at any time. 28 Faxing a Document You can send a fax from your fax. Press the x B&W or x Color button to fax...
Quick Guide
Page 29
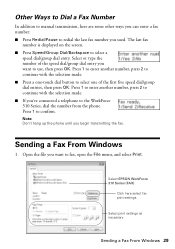
... continue with the selection made . ■ Press a one-touch dial button to select one of the speed dial/group dial entry you 've connected a telephone to confirm. Sending a Fax From Windows 1. Press 1 to the WorkForce 310 Series, dial the number from the phone. Select EPSON WorkForce 310 Series (FAX) Click here select fax print settings Select print settings as necessary...
... continue with the selection made . ■ Press a one-touch dial button to select one of the speed dial/group dial entry you 've connected a telephone to confirm. Sending a Fax From Windows 1. Press 1 to the WorkForce 310 Series, dial the number from the phone. Select EPSON WorkForce 310 Series (FAX) Click here select fax print settings Select print settings as necessary...
Quick Guide
Page 30
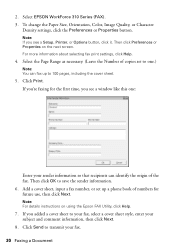
..., then click Next. 8. Select EPSON WorkForce 310 Series (FAX). 3. For more information about selecting fax print settings, click Help. 4. Click Send to your fax, select a cover sheet style, enter your fax. 30 Faxing a Document 2. Then click Preferences or Properties on using the Epson FAX Utility, click Help. 7. Select...input a fax number, or set to one : Enter your sender information so that recipients can identify the origin of numbers for the first time, you see a window like this one .) Note: You can fax up a phone book of the fax. Note: If you see a Setup, Printer, or ...
..., then click Next. 8. Select EPSON WorkForce 310 Series (FAX). 3. For more information about selecting fax print settings, click Help. 4. Click Send to your fax, select a cover sheet style, enter your fax. 30 Faxing a Document 2. Then click Preferences or Properties on using the Epson FAX Utility, click Help. 7. Select...input a fax number, or set to one : Enter your sender information so that recipients can identify the origin of numbers for the first time, you see a window like this one .) Note: You can fax up a phone book of the fax. Note: If you see a Setup, Printer, or ...
Quick Guide
Page 31
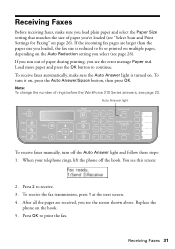
... of rings before the WorkForce 310 Series answers, see this screen: 2. You see page 23. To receive faxes automatically, make sure you load plain paper and select the Paper Size setting that matches the size of paper you see the screen shown above. Auto Answer light To receive faxes manually, turn it on... all the pages are larger than the paper size you see the error message Paper out. If the incoming fax pages are received, you 've loaded (see "Select Scan and Print Settings for Faxing" on . Load more paper and press the OK button to receive. 3. Replace the phone on the Auto...
... of rings before the WorkForce 310 Series answers, see this screen: 2. You see page 23. To receive faxes automatically, make sure you load plain paper and select the Paper Size setting that matches the size of paper you see the screen shown above. Auto Answer light To receive faxes manually, turn it on... all the pages are larger than the paper size you see the error message Paper out. If the incoming fax pages are received, you 've loaded (see "Select Scan and Print Settings for Faxing" on . Load more paper and press the OK button to receive. 3. Replace the phone on the Auto...
Quick Guide
Page 41
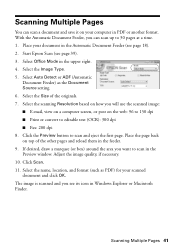
...: 96 to 150 dpi ■ Print or convert to editable text (OCR): 300 dpi ■ Fax: 200 dpi 8. Select the name, location, and format (such as the Document Source setting. 6. Scanning Multiple Pages 41 Start Epson Scan (see page 18). 2. With the Automatic Document Feeder, you want to scan in the Automatic...
...: 96 to 150 dpi ■ Print or convert to editable text (OCR): 300 dpi ■ Fax: 200 dpi 8. Select the name, location, and format (such as the Document Source setting. 6. Scanning Multiple Pages 41 Start Epson Scan (see page 18). 2. With the Automatic Document Feeder, you want to scan in the Automatic...
Quick Guide
Page 49
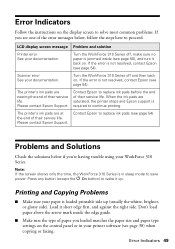
LCD display screen message Problem and solution Printer error See your documentation. Turn the WorkForce 310 Series off and then back on the control panel or in sleep mode to save power. If the error is not resolved, contact Epson (see page 54). Problems and Solutions Check the solutions ...error See your documentation. Please contact Epson Support. Load it back on the display screen to replace ink pads (see one of their service life. the end of paper you 're having trouble using your printer software (see page 38) when copying or faxing. Don't load paper above the...
LCD display screen message Problem and solution Printer error See your documentation. Turn the WorkForce 310 Series off and then back on the control panel or in sleep mode to save power. If the error is not resolved, contact Epson (see page 54). Problems and Solutions Check the solutions ...error See your documentation. Please contact Epson Support. Load it back on the display screen to replace ink pads (see one of their service life. the end of paper you 're having trouble using your printer software (see page 38) when copying or faxing. Don't load paper above the...


