
Quick Guide
Page 1
Epson WorkForce® 310 Series Quick Guide Installing on a Network Basic Printing, Copying, Scanning, and Faxing Maintaining Your All-in-One Solving Problems
Epson WorkForce® 310 Series Quick Guide Installing on a Network Basic Printing, Copying, Scanning, and Faxing Maintaining Your All-in-One Solving Problems
Quick Guide
Page 2
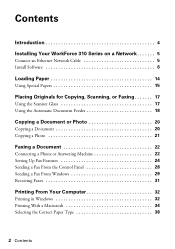
Contents Introduction 4 Installing Your WorkForce 310 Series on a Network 5 Connect an Ethernet Network Cable 5 Install Software 6 Loading Paper 14 Using Special Papers 15 Placing Originals for Copying, Scanning, or Faxing 17 Using ...
Contents Introduction 4 Installing Your WorkForce 310 Series on a Network 5 Connect an Ethernet Network Cable 5 Install Software 6 Loading Paper 14 Using Special Papers 15 Placing Originals for Copying, Scanning, or Faxing 17 Using ...
Quick Guide
Page 3
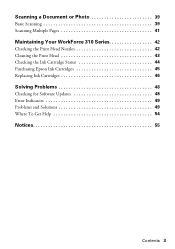
Scanning a Document or Photo 39 Basic Scanning 39 Scanning Multiple Pages 41 Maintaining Your WorkForce 310 Series 42 Checking the Print Head Nozzles 42 Cleaning the Print Head 43 Checking the Ink Cartridge Status 44 Purchasing Epson Ink Cartridges 45 Replacing Ink Cartridges 46 Solving Problems 48 Checking for Software Updates 48 Error Indicators 49 Problems and Solutions 49 Where To Get Help 54 Notices 55 Contents 3
Scanning a Document or Photo 39 Basic Scanning 39 Scanning Multiple Pages 41 Maintaining Your WorkForce 310 Series 42 Checking the Print Head Nozzles 42 Cleaning the Print Head 43 Checking the Ink Cartridge Status 44 Purchasing Epson Ink Cartridges 45 Replacing Ink Cartridges 46 Solving Problems 48 Checking for Software Updates 48 Error Indicators 49 Problems and Solutions 49 Where To Get Help 54 Notices 55 Contents 3
Quick Guide
Page 4
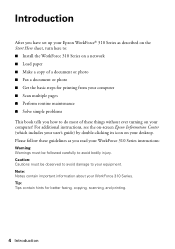
...routine maintenance ■ Solve simple problems This book tells you read your WorkForce 310 Series instructions: Warning: Warnings must be followed carefully to your equipment. For additional instructions, see the on-screen Epson Information Center (which includes your user's guide) by double-clicking its icon... on your computer! Introduction After you have set up your Epson WorkForce® 310 Series as you how to do most of these guidelines as described on the Start Here sheet, turn here to: ■ Install the WorkForce 310 Series on a network ■ Load paper ■ Make a ...
...routine maintenance ■ Solve simple problems This book tells you read your WorkForce 310 Series instructions: Warning: Warnings must be followed carefully to your equipment. For additional instructions, see the on-screen Epson Information Center (which includes your user's guide) by double-clicking its icon... on your computer! Introduction After you have set up your Epson WorkForce® 310 Series as you how to do most of these guidelines as described on the Start Here sheet, turn here to: ■ Install the WorkForce 310 Series on a network ■ Load paper ■ Make a ...
Quick Guide
Page 5
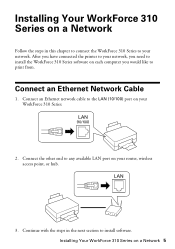
... access point, or hub. 3. Continue with the steps in this chapter to connect the WorkForce 310 Series to your network, you need to install the WorkForce 310 Series software on each computer you have connected the printer to install software. Installing Your WorkForce 310 Series on a Network Follow the steps in the next section to your network. Connect an Ethernet...
... access point, or hub. 3. Continue with the steps in this chapter to connect the WorkForce 310 Series to your network, you need to install the WorkForce 310 Series software on each computer you have connected the printer to install software. Installing Your WorkForce 310 Series on a Network Follow the steps in the next section to your network. Connect an Ethernet...
Quick Guide
Page 6
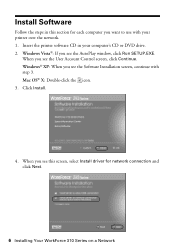
Mac OS® X: Double-click the icon. 3. Install Software Follow the steps in your printer over the network. 1. Insert the printer software CD in this screen, select Install driver for each computer you want to use with step 3. Click Install. 4. Windows® XP: When you see ... Vista®: If you see the AutoPlay window, click Run SETUP.EXE. When you see this section for network connection and click Next. 6 Installing Your WorkForce 310 Series on a Network When you see the User Account Control screen, click Continue.
Mac OS® X: Double-click the icon. 3. Install Software Follow the steps in your printer over the network. 1. Insert the printer software CD in this screen, select Install driver for each computer you want to use with step 3. Click Install. 4. Windows® XP: When you see ... Vista®: If you see the AutoPlay window, click Run SETUP.EXE. When you see this section for network connection and click Next. 6 Installing Your WorkForce 310 Series on a Network When you see the User Account Control screen, click Continue.
Quick Guide
Page 8
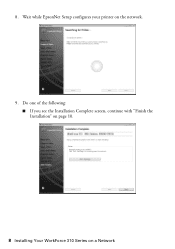
Do one of the following: ■ If you see the Installation Complete screen, continue with "Finish the Installation" on page 10. 8 Installing Your WorkForce 310 Series on the network. 9. 8. Wait while EpsonNet Setup configures your printer on a Network
Do one of the following: ■ If you see the Installation Complete screen, continue with "Finish the Installation" on page 10. 8 Installing Your WorkForce 310 Series on the network. 9. 8. Wait while EpsonNet Setup configures your printer on a Network
Quick Guide
Page 10
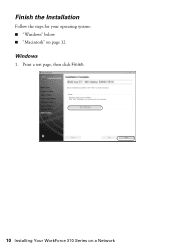
Finish the Installation Follow the steps for your operating system: ■ "Windows" below ■ "Macintosh" on a Network Print a test page, then click Finish. 10 Installing Your WorkForce 310 Series on page 12 Windows 1.
Finish the Installation Follow the steps for your operating system: ■ "Windows" below ■ "Macintosh" on a Network Print a test page, then click Finish. 10 Installing Your WorkForce 310 Series on page 12 Windows 1.

Quick Guide
Page 12
Click Finish. 2. When you see this screen, click Add Printer. 3. Note: It may take up to find the EPSON TCPIP printer on the network. 12 Installing Your WorkForce 310 Series on a Network Follow the steps on the right side of the screen to add your computer to 90 seconds for your EPSON TCPIP printer, then click Next. Macintosh 1.
Click Finish. 2. When you see this screen, click Add Printer. 3. Note: It may take up to find the EPSON TCPIP printer on the network. 12 Installing Your WorkForce 310 Series on a Network Follow the steps on the right side of the screen to add your computer to 90 seconds for your EPSON TCPIP printer, then click Next. Macintosh 1.
Quick Guide
Page 22
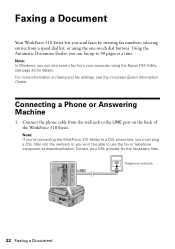
... Contact your computer using the one-touch dial buttons. Connect the phone cable from your DSL provider for details. Using the Automatic Document Feeder, you can also send a fax from the wall jack to the LINE port on -screen Epson Information Center. For more information...or telephone equipment as described below. Faxing a Document Your WorkForce 310 Series lets you send faxes by entering fax numbers, selecting entries from a speed dial list, or using the Epson FAX Utility, see the on the back of the WorkForce 310 Series. Telephone wall jack 22 Faxing a Document Note: In ...
... Contact your computer using the one-touch dial buttons. Connect the phone cable from your DSL provider for details. Using the Automatic Document Feeder, you can also send a fax from the wall jack to the LINE port on -screen Epson Information Center. For more information...or telephone equipment as described below. Faxing a Document Your WorkForce 310 Series lets you send faxes by entering fax numbers, selecting entries from a speed dial list, or using the Epson FAX Utility, see the on the back of the WorkForce 310 Series. Telephone wall jack 22 Faxing a Document Note: In ...

Quick Guide
Page 23
... or later: 1. Press u or d to Answer, then press OK. 5. If the other end to the EXT. port, the call is set the WorkForce 310 Series to the EXT. Press u or d to exit the Fax Settings menu. Press x Menu to select Communication, then press OK. 4. Select more than the... number of the WorkForce 310 Series. Note: A phone or answering machine must be connected to pick up on the fourth ring, you hang up . Connect one end of rings, then press OK. Connecting a Phone or Answering Machine 23 port for...
... or later: 1. Press u or d to Answer, then press OK. 5. If the other end to the EXT. port, the call is set the WorkForce 310 Series to the EXT. Press u or d to exit the Fax Settings menu. Press x Menu to select Communication, then press OK. 4. Select more than the... number of the WorkForce 310 Series. Note: A phone or answering machine must be connected to pick up on the fourth ring, you hang up . Connect one end of rings, then press OK. Connecting a Phone or Answering Machine 23 port for...

Quick Guide
Page 24
..., you should enter your name and phone number in the fax header before sending faxes so that recipients can enter up fax features using the Epson FAX Utility (Windows only), see page 25). Note: If you 're done, press OK to return to select Fax Header, then press OK. 5. Entering... OK. 3. Press u or d to the Fax Header screen. 24 Faxing a Document When you leave the WorkForce 310 Series unplugged for instructions on setting the date and time. See the Start Here sheet or on -screen Epson Information Center. You can identify the origin of time, the date and time settings may get lost...
..., you should enter your name and phone number in the fax header before sending faxes so that recipients can enter up fax features using the Epson FAX Utility (Windows only), see page 25). Note: If you 're done, press OK to return to select Fax Header, then press OK. 5. Entering... OK. 3. Press u or d to the Fax Header screen. 24 Faxing a Document When you leave the WorkForce 310 Series unplugged for instructions on setting the date and time. See the Start Here sheet or on -screen Epson Information Center. You can identify the origin of time, the date and time settings may get lost...
Quick Guide
Page 26
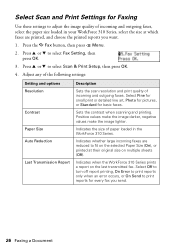
...the K Fax button, then press x Menu. 2. Positive values make the image darker, negative values make the image lighter. Indicates when the WorkForce 310 Series prints a report on multiple sheets (Off). Select Fine for small print or detailed line art, Photo for pictures, or Standard for basic ...Faxing Use these settings to adjust the image quality of incoming and outgoing faxes, select the paper size loaded in the WorkForce 310 Series. Adjust any of the following settings: Setting and options Resolution Contrast Paper Size Auto Reduction Last Transmission Report Description Sets the...
...the K Fax button, then press x Menu. 2. Positive values make the image darker, negative values make the image lighter. Indicates when the WorkForce 310 Series prints a report on multiple sheets (Off). Select Fine for small print or detailed line art, Photo for pictures, or Standard for basic ...Faxing Use these settings to adjust the image quality of incoming and outgoing faxes, select the paper size loaded in the WorkForce 310 Series. Adjust any of the following settings: Setting and options Resolution Contrast Paper Size Auto Reduction Last Transmission Report Description Sets the...

Quick Guide
Page 28
...entering a fax number, as necessary. 5. Use the numeric keypad to continue. Note: To dial the number using the Epson FAX Utility, see page 29 for faxing (see this screen after one minute. To cancel faxing, press y Stop/Clear Settings at any time. 28 Faxing a Document If you can enter ...up to fax another page, press 2. Your document is faxed. ■ If the fax number is busy, you see a redialing message and the WorkForce 310 Series redials after the ...
...entering a fax number, as necessary. 5. Use the numeric keypad to continue. Note: To dial the number using the Epson FAX Utility, see page 29 for faxing (see this screen after one minute. To cancel faxing, press y Stop/Clear Settings at any time. 28 Faxing a Document If you can enter ...up to fax another page, press 2. Your document is faxed. ■ If the fax number is busy, you see a redialing message and the WorkForce 310 Series redials after the ...
Quick Guide
Page 29
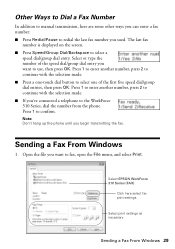
.... ■ Press Speed/Group Dial/Backspace to confirm. Press 1 to enter another number, press 2 to continue with the selection made . ■ Press a one-touch dial button to select one of the speed dial/group dial entry you want to use, then press OK. Open the file you want to fax, open the... phone until you begin transmitting the fax. Select or type the number of the first five speed dial/group dial entries, then press OK. Select EPSON WorkForce 310 Series (FAX) Click here select fax print settings Select print settings as necessary Sending a Fax From Windows 29
.... ■ Press Speed/Group Dial/Backspace to confirm. Press 1 to enter another number, press 2 to continue with the selection made . ■ Press a one-touch dial button to select one of the speed dial/group dial entry you want to use, then press OK. Open the file you want to fax, open the... phone until you begin transmitting the fax. Select or type the number of the first five speed dial/group dial entries, then press OK. Select EPSON WorkForce 310 Series (FAX) Click here select fax print settings Select print settings as necessary Sending a Fax From Windows 29
Quick Guide
Page 30
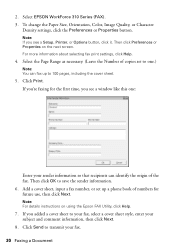
... up to 100 pages, including the cover sheet. 5. Click Print. Click Send to one : Enter your sender information so that recipients can fax up a phone book of the fax. Select EPSON WorkForce 310 Series (FAX). 3. Then click Preferences or Properties on using the Epson FAX Utility, click Help. 7. If you're faxing for future use, then... the sender information. 6. Then click OK to your fax, select a cover sheet style, enter your fax. 30 Faxing a Document If you see a window like this one .) Note: You can identify the origin of numbers for the first time, you see a Setup...
... up to 100 pages, including the cover sheet. 5. Click Print. Click Send to one : Enter your sender information so that recipients can fax up a phone book of the fax. Select EPSON WorkForce 310 Series (FAX). 3. Then click Preferences or Properties on using the Epson FAX Utility, click Help. 7. If you're faxing for future use, then... the sender information. 6. Then click OK to your fax, select a cover sheet style, enter your fax. 30 Faxing a Document If you see a window like this one .) Note: You can identify the origin of numbers for the first time, you see a Setup...
Quick Guide
Page 31
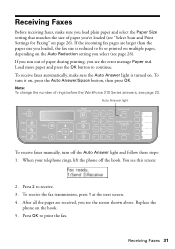
..., make sure you load plain paper and select the Paper Size setting that matches the size of paper you run out of rings before the WorkForce 310 Series answers, see the error message Paper out. If you 've loaded (see the screen shown above. Note: To change the number of paper during printing...
..., make sure you load plain paper and select the Paper Size setting that matches the size of paper you run out of rings before the WorkForce 310 Series answers, see the error message Paper out. If you 've loaded (see the screen shown above. Note: To change the number of paper during printing...
Quick Guide
Page 32
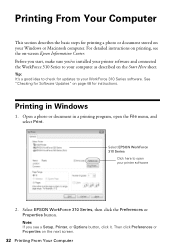
... for printing a photo or document stored on your printer software 2. Select EPSON WorkForce 310 Series Click here to open the File menu, and select Print. Tip: It's a good idea to check for updates to your WorkForce 310 Series software. Note: If you 've installed your printer software and connected the WorkForce 310 Series to your computer as described on the next screen...
... for printing a photo or document stored on your printer software 2. Select EPSON WorkForce 310 Series Click here to open the File menu, and select Print. Tip: It's a good idea to check for updates to your WorkForce 310 Series software. Note: If you 've installed your printer software and connected the WorkForce 310 Series to your computer as described on the next screen...
Quick Guide
Page 39
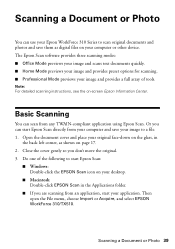
... or Photo 39 Do one of tools. Open the document cover and place your original face-down on the glass, in the Applications folder. ■ If you can start Epson Scan directly from any TWAIN-compliant application using Epson Scan. Scanning a Document or Photo You can use your Epson WorkForce 310 Series to scan original documents and...
... or Photo 39 Do one of tools. Open the document cover and place your original face-down on the glass, in the Applications folder. ■ If you can start Epson Scan directly from any TWAIN-compliant application using Epson Scan. Scanning a Document or Photo You can use your Epson WorkForce 310 Series to scan original documents and...
Quick Guide
Page 42
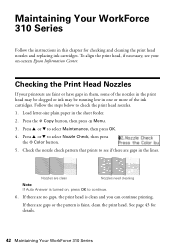
... check pattern that prints to see your printouts are no gaps, the print head is turned on -screen Epson Information Center. If there are gaps in one or more of the ink cartridges. Maintaining Your WorkForce 310 Series Follow the instructions in the sheet feeder. 2. Press the r Copy button, then press x Menu. 3. Checking the Print...
... check pattern that prints to see your printouts are no gaps, the print head is turned on -screen Epson Information Center. If there are gaps in one or more of the ink cartridges. Maintaining Your WorkForce 310 Series Follow the instructions in the sheet feeder. 2. Press the r Copy button, then press x Menu. 3. Checking the Print...


