
Epson Scan ICM Updater v1.20 (PSB.2008.07.001)
Page 1
... download from www.Adobe.com) on the Configuration button. Click on a computer that fixes a problem with using ICM color profiles in a few seconds. • Open Epson Scan. EPSON PRODUCT SUPPORT BULLETIN Date: PSB #: Reference: Product(s): Subject: 07/08/2008 Originator: RY PSB.2008.07.001 Authorization...Change: ICM module updater for Windows XP/XP x64 / Vista (32bit & 64bit) This bulletin was created to inform you can now choose your preferred profile. Installation: • Download epson12688.exe from the Epson Scan ICM pull-down menu (under Color tab in the Configuration menu...
... download from www.Adobe.com) on the Configuration button. Click on a computer that fixes a problem with using ICM color profiles in a few seconds. • Open Epson Scan. EPSON PRODUCT SUPPORT BULLETIN Date: PSB #: Reference: Product(s): Subject: 07/08/2008 Originator: RY PSB.2008.07.001 Authorization...Change: ICM module updater for Windows XP/XP x64 / Vista (32bit & 64bit) This bulletin was created to inform you can now choose your preferred profile. Installation: • Download epson12688.exe from the Epson Scan ICM pull-down menu (under Color tab in the Configuration menu...

Basics
Page 49
...information database. Using EPSON Print CD 49 Insert the tray into the RX700. 5. Make sure the arrow marks are aligned. Note: Follow the instructions on your computer, you first open the EPSON Print CD folder and select EPSON Print CD. Start EPSON Print CD. ■ Windows: Click Start >... Programs or All Programs > EPSON Print CD > EPSON Print CD. ...
...information database. Using EPSON Print CD 49 Insert the tray into the RX700. 5. Make sure the arrow marks are aligned. Note: Follow the instructions on your computer, you first open the EPSON Print CD folder and select EPSON Print CD. Start EPSON Print CD. ■ Windows: Click Start >... Programs or All Programs > EPSON Print CD > EPSON Print CD. ...

Basics
Page 50
...To modify the template or enhance your images are stored, select the one of the following : Windows Macintosh 3. When you see thumbnail images of the available editing features. Note: In Windows, if you have already chosen a background, you finish making adjustments, click OK. ■ ...the files in the folder. You can adjust the brightness, contrast, and gamma, or apply mosaic, blur, or special color effects, as follows: ■ Windows: Click the Image Adjustment button, then click the Image Adjustment tab. You see a different screen. Click the background icon.
...To modify the template or enhance your images are stored, select the one of the following : Windows Macintosh 3. When you see thumbnail images of the available editing features. Note: In Windows, if you have already chosen a background, you finish making adjustments, click OK. ■ ...the files in the folder. You can adjust the brightness, contrast, and gamma, or apply mosaic, blur, or special color effects, as follows: ■ Windows: Click the Image Adjustment button, then click the Image Adjustment tab. You see a different screen. Click the background icon.

Basics
Page 51
...EPSON Print CD 51 To add text, do one of text, click the text in the main window, then drag the red "handle" up or down. Then adjust it . Enter your file. To curve a single line of the following: ■ Windows: Click the text button. You can also use options in the window... to format it using the other handles that appear. 7. In the Text Settings window,...and click OK. (To open the window again, double-click any of text.) ■ Macintosh: Click the text button. Windows Macintosh 6. 5. When you're ...
...EPSON Print CD 51 To add text, do one of text, click the text in the main window, then drag the red "handle" up or down. Then adjust it . Enter your file. To curve a single line of the following: ■ Windows: Click the text button. You can also use options in the window... to format it using the other handles that appear. 7. In the Text Settings window,...and click OK. (To open the window again, double-click any of text.) ■ Macintosh: Click the text button. Windows Macintosh 6. 5. When you're ...
Basics
Page 52
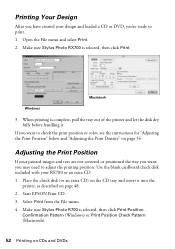
Make sure Stylus Photo RX700 is complete, pull the tray out of the printer and let the ... and text are not centered or positioned the way you want to print. 1. Make sure Stylus Photo R700 is selected, then click Print Position Confirmation Pattern (Windows) or Print Position Check Pattern (Macintosh). 52 Printing on page 48. 2. Place the check... printing position. Start EPSON Print CD. 3. Open the File menu and select Print. 2. Printing Your Design After you have created your design and loaded a CD or DVD, you're ready to check the print position or color, see the instructions ...
Make sure Stylus Photo RX700 is complete, pull the tray out of the printer and let the ... and text are not centered or positioned the way you want to print. 1. Make sure Stylus Photo R700 is selected, then click Print Position Confirmation Pattern (Windows) or Print Position Check Pattern (Macintosh). 52 Printing on page 48. 2. Place the check... printing position. Start EPSON Print CD. 3. Open the File menu and select Print. 2. Printing Your Design After you have created your design and loaded a CD or DVD, you're ready to check the print position or color, see the instructions ...

Basics
Page 53
... (distances labeled A and B as shown). The confirmation pattern is checked. Enter the B distance in the Height (Top) or Top Space box. Using EPSON Print CD 53 Remove the position check disk or CD and measure the distance from the edge of the hole to save the measurements. You...'ll need a metric ruler with millimeters for these measurements. 7. You see a screen like this: Windows Macintosh Enter measurements here Enter measurements here 8. Input the A distance in the Width (Right) or Right Space box. 9. Open the File menu and ...
... (distances labeled A and B as shown). The confirmation pattern is checked. Enter the B distance in the Height (Top) or Top Space box. Using EPSON Print CD 53 Remove the position check disk or CD and measure the distance from the edge of the hole to save the measurements. You...'ll need a metric ruler with millimeters for these measurements. 7. You see a screen like this: Windows Macintosh Enter measurements here Enter measurements here 8. Input the A distance in the Width (Right) or Right Space box. 9. Open the File menu and ...

Basics
Page 54
... least 24 hours. Make sure Stylus Photo R700 is printed in EPSON Print CD to adjust the density for printing, as necessary. 1. You can also use the Brightness and Contrast settings in a different location. 7. Follow these instructions to print a color saturation check pattern and make the Print Color Correction (Windows) or Color Correction (Macintosh) setting lighter or...
... least 24 hours. Make sure Stylus Photo R700 is printed in EPSON Print CD to adjust the density for printing, as necessary. 1. You can also use the Brightness and Contrast settings in a different location. 7. Follow these instructions to print a color saturation check pattern and make the Print Color Correction (Windows) or Color Correction (Macintosh) setting lighter or...

Basics
Page 65
... This lets you 'll be copying to the card, make sure you can choose any supported program or option to the card.) 3. Make sure your Stylus Photo RX700 is set to allow writing to open, view, or print your computer, or vice versa. Insert a memory card as described on the Start Here sheet... you see a screen like this feature with Windows 98 or Me, make sure the card's write-protect tab, if it without losing your memory card and reuse it has one, is turned on your originals. If you don't have a computer, you 've installed your Stylus Photo RX700 software as a Zip® drive, CD ...
... This lets you 'll be copying to the card, make sure you can choose any supported program or option to the card.) 3. Make sure your Stylus Photo RX700 is set to allow writing to open, view, or print your computer, or vice versa. Insert a memory card as described on the Start Here sheet... you see a screen like this feature with Windows 98 or Me, make sure the card's write-protect tab, if it without losing your memory card and reuse it has one, is turned on your originals. If you don't have a computer, you 've installed your Stylus Photo RX700 software as a Zip® drive, CD ...

Basics
Page 68
... Safely Remove USB Mass Storage Device. When you may lose data on the card. On a Macintosh, drag the memory card icon from the RX700. 2. Note: In Windows 98 or Me, you would to print from your computer before unplugging the USB cable from your desktop to remove any memory cards from... , or you see page 27). Removing a Memory Card Once you 're using Windows XP or 2000, click the Unplug or Eject Hardware icon on page 66. 3. If you 're finished copying photos from , then press OK. 4. In Windows 2000, click Stop USB Mass Storage Device. 1. Remove the card by pulling it ...
... Safely Remove USB Mass Storage Device. When you may lose data on the card. On a Macintosh, drag the memory card icon from the RX700. 2. Note: In Windows 98 or Me, you would to print from your computer before unplugging the USB cable from your desktop to remove any memory cards from... , or you see page 27). Removing a Memory Card Once you 're using Windows XP or 2000, click the Unplug or Eject Hardware icon on page 66. 3. If you 're finished copying photos from , then press OK. 4. In Windows 2000, click Stop USB Mass Storage Device. 1. Remove the card by pulling it ...

Basics
Page 74
... use a magnifying glass or loupe. 6. Press OK to return to print the alignment pattern. 5. Aligning the Print Head If your printer settings window for each one. 8. Press OK when done. 9. or Help button on your printouts have vertical lines that head alignment is turned on running... streaking (light or dark vertical lines). You may need to align the print head. Make sure the Stylus Photo RX700 is complete. Press OK again to the Setup menu. 74 Maintaining Your RX700 For each section (#1 through #4), circle the box with the least amount of plain letter-size paper in...
... use a magnifying glass or loupe. 6. Press OK to return to print the alignment pattern. 5. Aligning the Print Head If your printer settings window for each one. 8. Press OK when done. 9. or Help button on your printouts have vertical lines that head alignment is turned on running... streaking (light or dark vertical lines). You may need to align the print head. Make sure the Stylus Photo RX700 is complete. Press OK again to the Setup menu. 74 Maintaining Your RX700 For each section (#1 through #4), circle the box with the least amount of plain letter-size paper in...

Basics
Page 76
...memory card, you see page 15). Close other programs, including screen savers and virus protectors, and install again. ■ In Windows, make sure that your system administrator for details. ■ If you can crop your computer meets the system requirements listed in the...Make sure the paper and layout options are set correctly. ■ If you're scanning and printing a photo, you may be incorrectly installed. You cancelled software installation or connected the Stylus Photo RX700 before installing the software. Your Epson software may not have software installation privileges.
...memory card, you see page 15). Close other programs, including screen savers and virus protectors, and install again. ■ In Windows, make sure that your system administrator for details. ■ If you can crop your computer meets the system requirements listed in the...Make sure the paper and layout options are set correctly. ■ If you're scanning and printing a photo, you may be incorrectly installed. You cancelled software installation or connected the Stylus Photo RX700 before installing the software. Your Epson software may not have software installation privileges.

Basics
Page 77
...having problems printing from your paper is positioned on the right side of your computer. If the Stylus Photo RX700 is turned on page 72. If the check page prints, make sure your application, or as the Windows default printer. ■ Run a nozzle check as described on but nothing prints, check the ... to set up your system's memory (RAM). If you're printing a high-resolution photo, you need to: ■ Clear space on a network, you need to your computer. You may not be cropped because Epson photo paper does not have the same proportions as 35-mm slides. ■ If you'...
...having problems printing from your paper is positioned on the right side of your computer. If the Stylus Photo RX700 is turned on page 72. If the check page prints, make sure your application, or as the Windows default printer. ■ Run a nozzle check as described on but nothing prints, check the ... to set up your system's memory (RAM). If you're printing a high-resolution photo, you need to: ■ Clear space on a network, you need to your computer. You may not be cropped because Epson photo paper does not have the same proportions as 35-mm slides. ■ If you'...

Basics
Page 79
...you 're printing from a computer, make sure Grayscale is off (Windows) or Color ink is faint or has gaps. ■ Clean the print head; You see misaligned vertical lines in the rear sheet feeder. see page 32). ■ If the RX700 runs out of paper during a print job, load additional sheets as... selected Draft as the Quality setting. ■ If you're printing with Epson paper, load it at a higher resolution, or try printing it face-up in your next copy may be incorrect. ■ If you're printing photos from a digital camera, check the Auto Correct and Filter settings to make ...
...you 're printing from a computer, make sure Grayscale is off (Windows) or Color ink is faint or has gaps. ■ Clean the print head; You see misaligned vertical lines in the rear sheet feeder. see page 32). ■ If the RX700 runs out of paper during a print job, load additional sheets as... selected Draft as the Quality setting. ■ If you're printing with Epson paper, load it at a higher resolution, or try printing it face-up in your next copy may be incorrect. ■ If you're printing photos from a digital camera, check the Auto Correct and Filter settings to make ...

Basics
Page 81
Make sure you 're scanning a large photo or at a high resolution, your Stylus Photo RX700 in the Windows Control Panel but you cannot scan, check the following: ■ Make sure the USB cable is still not clean, use a small amount of the RX700. Then follow the instructions on -screen Reference Guide. If you're using a USB hub...
Make sure you 're scanning a large photo or at a high resolution, your Stylus Photo RX700 in the Windows Control Panel but you cannot scan, check the following: ■ Make sure the USB cable is still not clean, use a small amount of the RX700. Then follow the instructions on -screen Reference Guide. If you're using a USB hub...

Basics
Page 96
...17 Restoring color, 25 to 26 Restoring default settings, 37 S Safety instructions, 70, 85 to 87 Saturation, 36 Saving files from memory cards, 65 to 67 photos on computer,...RX700 display problems, 82 safety instructions, 87 Setup problems, 75 to 76 Sharpness, 36 Sleep mode, 82 Slides printing from, 19 to 24 printing problems, 77 scanning problems, 81 scanning to memory card, 63 to 64 Slideshow, 34 Slow printing or copying, 77 Smears, 78 Software ArcSoft PhotoImpression, 84 EPSON... options, 34 W Warranty, 90 to 91 Windows, ejecting memory cards, 68 Z Zip drive, 65 to 68 Zoom In/Out, copying, ...
...17 Restoring color, 25 to 26 Restoring default settings, 37 S Safety instructions, 70, 85 to 87 Saturation, 36 Saving files from memory cards, 65 to 67 photos on computer,...RX700 display problems, 82 safety instructions, 87 Setup problems, 75 to 76 Sharpness, 36 Sleep mode, 82 Slides printing from, 19 to 24 printing problems, 77 scanning problems, 81 scanning to memory card, 63 to 64 Slideshow, 34 Slow printing or copying, 77 Smears, 78 Software ArcSoft PhotoImpression, 84 EPSON... options, 34 W Warranty, 90 to 91 Windows, ejecting memory cards, 68 Z Zip drive, 65 to 68 Zoom In/Out, copying, ...

Product Information Guide
Page 3
...) RGB color filters on the type of paper, the print quality may be smeared. Universal Serial Bus Mass Storage class Bulk-only Transport Revision 1.0 480 Mbps (high speed device) NRZI USB Series B 6.6 feet (2 meters) or less 5/05 Epson Stylus Photo RX700 - 3...(2.5 mm) Top (A): 0.12 inch (3.0 mm) Left (B-L): 0.2 inch (5.0 mm) Right (B-R): 0.2 inch (5.0 mm) Bottom (C): 0.79 inch (20 mm) for Windows® and 0.12 inch (3.0 mm) for Printing Devices version 1.1; Interface Standard Bit rate Data encoding Connector Recommended cable length Based on Universal Serial Bus Specifications...
...) RGB color filters on the type of paper, the print quality may be smeared. Universal Serial Bus Mass Storage class Bulk-only Transport Revision 1.0 480 Mbps (high speed device) NRZI USB Series B 6.6 feet (2 meters) or less 5/05 Epson Stylus Photo RX700 - 3...(2.5 mm) Top (A): 0.12 inch (3.0 mm) Left (B-L): 0.2 inch (5.0 mm) Right (B-R): 0.2 inch (5.0 mm) Bottom (C): 0.79 inch (20 mm) for Windows® and 0.12 inch (3.0 mm) for Printing Devices version 1.1; Interface Standard Bit rate Data encoding Connector Recommended cable length Based on Universal Serial Bus Specifications...

Product Information Guide
Page 14
... see if any dried ink to soften-and try cleaning the print head again. You see the File Save Settings window: Cleaning the Print Head Nozzles If printouts are unexpectedly light, colors are missing, or you 're done. Press the Setup button. (If you printed. Examine the nozzle check pattern... to scan directly to a file on -screen steps to clean the print head nozzles. Epson Stylus Photo RX700 Scanning to a File With EPSON Scan Follow these steps to clean the print head so it can also open EPSON Scan from the Mode list (see any improvement after cleaning three or four times, turn ...
... see if any dried ink to soften-and try cleaning the print head again. You see the File Save Settings window: Cleaning the Print Head Nozzles If printouts are unexpectedly light, colors are missing, or you 're done. Press the Setup button. (If you printed. Examine the nozzle check pattern... to scan directly to a file on -screen steps to clean the print head nozzles. Epson Stylus Photo RX700 Scanning to a File With EPSON Scan Follow these steps to clean the print head so it can also open EPSON Scan from the Mode list (see any improvement after cleaning three or four times, turn ...

Start Here Card
Page 4
...loading paper in your CD, click Cancel. You can't install your software that way. 2 Insert your RX700 software CD-ROM in the rear sheet feeder. 5 Install Software and Connect to Your Computer The software works with Windows® 98SE, Me, 2000, and XP, and Macintosh® OS X 10.2.x to do with ...your CD-ROM or DVD drive. Note: See your Basics book for Windows), or the steps on your RX700. 3 Slide the edge guide against the left side of the paper. 4 Extend the output tray. Windows 1 Make sure the RX700 is not connected to your computer, then turn on the back of these screens...
...loading paper in your CD, click Cancel. You can't install your software that way. 2 Insert your RX700 software CD-ROM in the rear sheet feeder. 5 Install Software and Connect to Your Computer The software works with Windows® 98SE, Me, 2000, and XP, and Macintosh® OS X 10.2.x to do with ...your CD-ROM or DVD drive. Note: See your Basics book for Windows), or the steps on your RX700. 3 Slide the edge guide against the left side of the paper. 4 Extend the output tray. Windows 1 Make sure the RX700 is not connected to your computer, then turn on the back of these screens...

Start Here Card
Page 5
..., click Install. You see this screen, do the following: Windows XP: Click Start > My Computer. My Computer. Note: It will take several minutes to install the software. click the Epson installer icon. Then double-click the Epson CD-ROM icon. Then click Next to install optional software.... screen to install the software. Then double- 4 Read the license agreement, then click Agree. Windows 98/Me/2000: Double-click click the Epson CD-ROM icon. Macintosh 1 Insert your RX700 software CD-ROM into any available USB port on -screen Reference Guide for instructions. Then double-...
..., click Install. You see this screen, do the following: Windows XP: Click Start > My Computer. My Computer. Note: It will take several minutes to install the software. click the Epson installer icon. Then double-click the Epson CD-ROM icon. Then click Next to install optional software.... screen to install the software. Then double- 4 Read the license agreement, then click Agree. Windows 98/Me/2000: Double-click click the Epson CD-ROM icon. Macintosh 1 Insert your RX700 software CD-ROM into any available USB port on -screen Reference Guide for instructions. Then double-...


