Printer Basics
Page 6
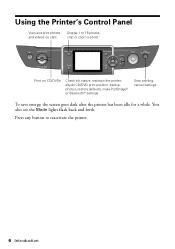
Press any button to 16 photos; restore defaults; make PictBridge® or Bluetooth® settings Stop printing; adjust CD/DVD print position; backup photos; maintain the printer; You also see the Mode lights flash back and forth. crop or zoom a photo Print on card Display 1 to reactivate the printer. 6 Introduction cancel settings To save energy, the screen goes dark after the printer has been idle for a while. Using the Printer's Control Panel View and print photos and videos on CD/DVDs Check ink status;
Press any button to 16 photos; restore defaults; make PictBridge® or Bluetooth® settings Stop printing; adjust CD/DVD print position; backup photos; maintain the printer; You also see the Mode lights flash back and forth. crop or zoom a photo Print on card Display 1 to reactivate the printer. 6 Introduction cancel settings To save energy, the screen goes dark after the printer has been idle for a while. Using the Printer's Control Panel View and print photos and videos on CD/DVDs Check ink status;
Printer Basics
Page 11
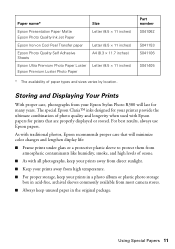
...photo album or plastic photo storage box in acid-free, archival sleeves commonly available from atmospheric contaminants like humidity, smoke, and high levels of paper types and sizes varies by location. As with Epson papers for prints that will minimize color changes and lengthen display...S041405 Storing and Displaying Your Prints With proper care, photographs from your Epson Stylus Photo R380 will last for your printer provide the ultimate combination of photo quality and longevity when used with traditional photos, Epson recommends proper care that are properly displayed or stored. ...
...photo album or plastic photo storage box in acid-free, archival sleeves commonly available from atmospheric contaminants like humidity, smoke, and high levels of paper types and sizes varies by location. As with Epson papers for prints that will minimize color changes and lengthen display...S041405 Storing and Displaying Your Prints With proper care, photographs from your Epson Stylus Photo R380 will last for your printer provide the ultimate combination of photo quality and longevity when used with traditional photos, Epson recommends proper care that are properly displayed or stored. ...

Printer Basics
Page 16
...or replay the show of your camera's memory card in Memory Card mode and you have inserted your photos, or display sixteen photos at a time, press the Display/Crop button again. 3. Press l or r to choose the photo you want more than one . ■ If you want to print, press OK. Press OK...Press l or r to step 5 on page 17. If you want to start displaying your photos, select Slide Show. 4. When you see page 13). Printing Photos Before you begin, make sure the printer is in the appropriate card slot (see a photo you want to select View and Print, then press OK. Press l or r...
...or replay the show of your camera's memory card in Memory Card mode and you have inserted your photos, or display sixteen photos at a time, press the Display/Crop button again. 3. Press l or r to choose the photo you want more than one . ■ If you want to print, press OK. Press OK...Press l or r to step 5 on page 17. If you want to start displaying your photos, select Slide Show. 4. When you see page 13). Printing Photos Before you begin, make sure the printer is in the appropriate card slot (see a photo you want to select View and Print, then press OK. Press l or r...
Printer Basics
Page 26
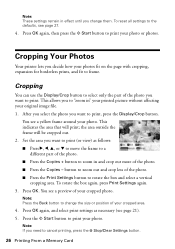
...need to "zoom in and crop out more of the photo. ■ Press the Print Settings button to print, press the Display/Crop button. button to print (or view) as necessary (see page 27. 4. You see a yellow frame around your photo or photos. Note: If you want to zoom out and crop ...box again, press Print Settings again. 3. Set the area you decide how your cropped area. 4. Note: Press the Back button to print. Cropping Your Photos Your printer lets you want to change them. This allows you want to rotate the box and select a vertical cropping area. After you select the...
...need to "zoom in and crop out more of the photo. ■ Press the Print Settings button to print, press the Display/Crop button. button to print (or view) as necessary (see page 27. 4. You see a yellow frame around your photo or photos. Note: If you want to zoom out and crop ...box again, press Print Settings again. 3. Set the area you decide how your cropped area. 4. Note: Press the Back button to print. Cropping Your Photos Your printer lets you want to change them. This allows you want to rotate the box and select a vertical cropping area. After you select the...
Printer Basics
Page 29
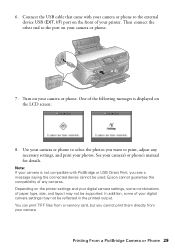
...Then connect the other end to print, adjust any cameras. Epson cannot guarantee the compatibility of the following messages is not compatible with your camera or phone. Depending on the printer settings and your photos. See your camera. You can print TIFF files from ...photos you see a message saying the connected device cannot be used. I/F) port on your digital camera settings may not be reflected in the printed output. In addition, some combinations of your camera is displayed on your camera or phone to the external device USB (EXT. 6. Note: If your printer...
...Then connect the other end to print, adjust any cameras. Epson cannot guarantee the compatibility of the following messages is not compatible with your camera or phone. Depending on the printer settings and your photos. See your camera. You can print TIFF files from ...photos you see a message saying the connected device cannot be used. I/F) port on your digital camera settings may not be reflected in the printed output. In addition, some combinations of your camera is displayed on your camera or phone to the external device USB (EXT. 6. Note: If your printer...
Printer Basics
Page 35
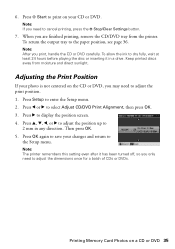
...or DVD carefully. Keep printed discs away from the printer. Then press OK. 5. Printing Memory Card Photos on your changes and return to save your CD or DVD. Press r to select Adjust CD/DVD Print Alignment, then press OK. 3. Press l or r to display the position screen. 4. Note: After you are ...tray from moisture and direct sunlight. Adjusting the Print Position If your photo is not centered on the CD or DVD, you only need to adjust the dimensions once for a batch of CDs or DVDs. Note: The printer remembers this setting even after it in any direction. To return ...
...or DVD carefully. Keep printed discs away from the printer. Then press OK. 5. Printing Memory Card Photos on your changes and return to save your CD or DVD. Press r to select Adjust CD/DVD Print Alignment, then press OK. 3. Press l or r to display the position screen. 4. Note: After you are ...tray from moisture and direct sunlight. Adjusting the Print Position If your photo is not centered on the CD or DVD, you only need to adjust the dimensions once for a batch of CDs or DVDs. Note: The printer remembers this setting even after it in any direction. To return ...
Printer Basics
Page 47
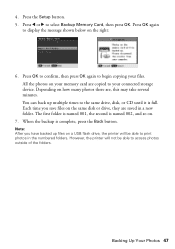
Press l or r to your files. All the photos on a USB flash drive, the printer will not be able to print photos in a new folder. Note: After you save files on how many photos there are saved in the numbered folders. 4. However, the printer will be able to the same drive, disk, or CD until ...minutes. Each time you have backed up multiple times to access photos outside of the folders. When the backup is named 002, and so on the right: 6. Press the Setup button. 5. Press OK to confirm, then press OK again to display the message shown below on . 7. Press OK again to ...
Press l or r to your files. All the photos on a USB flash drive, the printer will not be able to print photos in a new folder. Note: After you save files on how many photos there are saved in the numbered folders. 4. However, the printer will be able to the same drive, disk, or CD until ...minutes. Each time you have backed up multiple times to access photos outside of the folders. When the backup is named 002, and so on the right: 6. Press the Setup button. 5. Press OK to confirm, then press OK again to display the message shown below on . 7. Press OK again to ...
Printer Basics
Page 69
...Aligning print head, 50 to 51 All photos, printing, 17 ArcSoft PhotoImpression, 62 B Backing up photos, 46 to 47 Black & White, 25 Borderless expansion, 27 Brightness, 25 Buttons, 6 C Camera connecting to printer, 29 printing from, 28 to 29 ...Color management, turning off, 40, 43 ColorSync, 43 Contrast, 25 Control panel, 6 Cropping, 26 to 27 D Date printing, 22, 23 printing photos by, 18 Declaration of Conformity, 66 Default settings, 27 Density, 25 Digital camera, printing from, 28 to 29 Display/Crop button, 6 Displaying prints, 11 DPOF, 20 DVDs, see also CDs E Enhancing photos, 25 Epson...
...Aligning print head, 50 to 51 All photos, printing, 17 ArcSoft PhotoImpression, 62 B Backing up photos, 46 to 47 Black & White, 25 Borderless expansion, 27 Brightness, 25 Buttons, 6 C Camera connecting to printer, 29 printing from, 28 to 29 ...Color management, turning off, 40, 43 ColorSync, 43 Contrast, 25 Control panel, 6 Cropping, 26 to 27 D Date printing, 22, 23 printing photos by, 18 Declaration of Conformity, 66 Default settings, 27 Density, 25 Digital camera, printing from, 28 to 29 Display/Crop button, 6 Displaying prints, 11 DPOF, 20 DVDs, see also CDs E Enhancing photos, 25 Epson...
Product Information Guide
Page 1
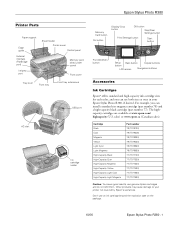
...Epson Stylus Photo R380 Printer Parts Paper support Edge guide External interface (PictBridge port) Infrared port Sheet feeder Printer cover Control panel Memory card slots (under cover) Front cover Tray lever Front tray Front tray extensions AC inlet USB port Ink cartridge holder Memory Card button On button Display... LCD screen Navigation buttons Accessories Ink Cartridges Epson® offers standard and high-capacity ink cartridge sizes for each color, and you can use both sizes at www.epson.com/ highcapacity (U.S. sales) or www.epson.ca (Canadian sales). For example, you...
...Epson Stylus Photo R380 Printer Parts Paper support Edge guide External interface (PictBridge port) Infrared port Sheet feeder Printer cover Control panel Memory card slots (under cover) Front cover Tray lever Front tray Front tray extensions AC inlet USB port Ink cartridge holder Memory Card button On button Display... LCD screen Navigation buttons Accessories Ink Cartridges Epson® offers standard and high-capacity ink cartridge sizes for each color, and you can use both sizes at www.epson.com/ highcapacity (U.S. sales) or www.epson.ca (Canadian sales). For example, you...
Product Information Guide
Page 8
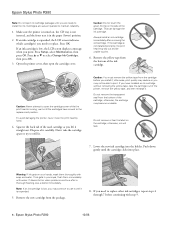
...Caution: Never attempt to open the cartridge cover while the print head is low, the LCD screen displays a message when you lift it is in your hands, wash them immediately with step 9. 8 ... from the cartridge before continuing with water. If you have moved to the replacement position. Epson Stylus Photo R380 10/06 Dispose of the cartridge; otherwise, ink will leak. 7. Do not remove the.... Caution: Do not touch the green IC chip on the cartridge; To avoid damaging the printer, never move the print head by hand. 4. Remove the yellow tape from the bottom of...
...Caution: Never attempt to open the cartridge cover while the print head is low, the LCD screen displays a message when you lift it is in your hands, wash them immediately with step 9. 8 ... from the cartridge before continuing with water. If you have moved to the replacement position. Epson Stylus Photo R380 10/06 Dispose of the cartridge; otherwise, ink will leak. 7. Do not remove the.... Caution: Do not touch the green IC chip on the cartridge; To avoid damaging the printer, never move the print head by hand. 4. Remove the yellow tape from the bottom of...
Product Information Guide
Page 9
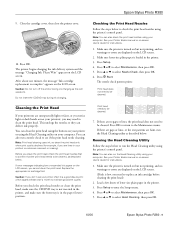
...clean the print head. Press u or d to select Head Cleaning, then press OK. 10/06 Epson Stylus Photo R380 - 9 Press Setup to select Maintenance, then press OK. 5. Press l or r to enter the Setup menu. 4. See your Printer Basics manual or on the LCD screen, you check the print head nozzles or clean the print...Charging Ink. If error messages indicating low or expended ink appear on -screen User's Guide for example, if you don't use your printout or colors are displayed on your computer. Note: You can deliver ink properly. If there are gaps or lines, or the test patterns are...
...clean the print head. Press u or d to select Head Cleaning, then press OK. 10/06 Epson Stylus Photo R380 - 9 Press Setup to select Maintenance, then press OK. 5. Press l or r to enter the Setup menu. 4. See your Printer Basics manual or on the LCD screen, you check the print head nozzles or clean the print...Charging Ink. If error messages indicating low or expended ink appear on -screen User's Guide for example, if you don't use your printout or colors are displayed on your computer. Note: You can deliver ink properly. If there are gaps or lines, or the test patterns are...
Product Information Guide
Page 10
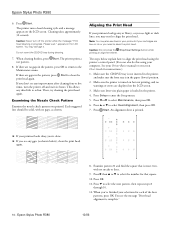
...lines in the pattern, press Start to the Maintenance menu. Press r then u or d to align the print head using the printer's control panel. (You can also do this using your Printer Basics manual or on but not printing, and no warnings or errors are no streaks or lines. 9. Press OK. 11. ...grainy or blurry, or you see any dried ink to clean the print head. Make sure letter-size plain paper is complete." 10/06 Epson Stylus Photo R380 8. If there are displayed on ink or you see light or dark lines, you 've finished your cartridges are low on the LCD screen. 3. Caution: Do ...
...lines in the pattern, press Start to the Maintenance menu. Press r then u or d to align the print head using the printer's control panel. (You can also do this using your Printer Basics manual or on but not printing, and no warnings or errors are no streaks or lines. 9. Press OK. 11. ...grainy or blurry, or you see any dried ink to clean the print head. Make sure letter-size plain paper is complete." 10/06 Epson Stylus Photo R380 8. If there are displayed on ink or you see light or dark lines, you 've finished your cartridges are low on the LCD screen. 3. Caution: Do ...


