
Technical Brief (Ink Jet Printers)
Page 3
... produces fast, high-quality, color-accurate output. Epson disclaims any and all three elements are present and used herein are designed in various patterns so you never have to swap an ink cartridge to primarily print photos with Epson printers there are specifically designed to change. ©2006 Epson America, Inc. Ink Jet Printer Technical Brief Page 3 Fine...
... produces fast, high-quality, color-accurate output. Epson disclaims any and all three elements are present and used herein are designed in various patterns so you never have to swap an ink cartridge to primarily print photos with Epson printers there are specifically designed to change. ©2006 Epson America, Inc. Ink Jet Printer Technical Brief Page 3 Fine...
Printer Basics
Page 4
Maintaining Your Printer 48 Checking the Print Head Nozzles 48 Cleaning the Print Head 49 Aligning the Print Head 50 Replacing Ink Cartridges 51 Solving Problems 57 LCD Screen Messages 57 Problems and Solutions 59 Where To Get Help 62 Notices 63 Index 69 4
Maintaining Your Printer 48 Checking the Print Head Nozzles 48 Cleaning the Print Head 49 Aligning the Print Head 50 Replacing Ink Cartridges 51 Solving Problems 57 LCD Screen Messages 57 Problems and Solutions 59 Where To Get Help 62 Notices 63 Index 69 4
Printer Basics
Page 48
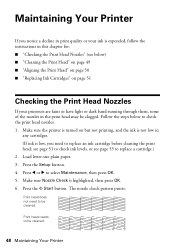
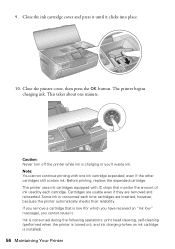
... band running through them, some of the nozzles in any cartridges. (If ink is low, you need to be cleaned: Print head needs to be clogged. Make sure the printer is turned on page 51 Checking the Print Head Nozzles If your ink is expended, follow the instructions in this chapter for: ...not low in the print head may be cleaned: 48 Maintaining Your Printer Follow the steps below ) ■ "Cleaning the Print Head" on page 49 ■ "Aligning the Print Head" on page 50 ■ "Replacing Ink Cartridges" on but not printing, and the ink is highlighted, then press OK. 6. Press l or r to ...
... band running through them, some of the nozzles in any cartridges. (If ink is low, you need to be cleaned: Print head needs to be clogged. Make sure the printer is turned on page 51 Checking the Print Head Nozzles If your ink is expended, follow the instructions in this chapter for: ...not low in the print head may be cleaned: 48 Maintaining Your Printer Follow the steps below ) ■ "Cleaning the Print Head" on page 49 ■ "Aligning the Print Head" on page 50 ■ "Replacing Ink Cartridges" on but not printing, and the ink is highlighted, then press OK. 6. Press l or r to ...
Printer Basics
Page 49
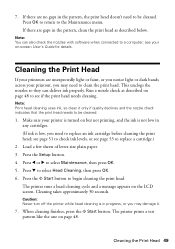
...on page 48 to see page 53 to replace a cartridge.) 2. Cleaning the Print Head If your printouts are gaps in any cartridges. (If ink is turned on page 48. Run a nozzle check as described below. Caution: Never turn off the printer while head cleaning is in the pattern, the print ... or dark bands across your printer is low, you need to the Maintenance menu. Note: Print head cleaning uses ink, so clean it . 7. Press d to be cleaned. Cleaning the Print Head 49 see page 51 to replace an ink cartridge before cleaning the print head; The printer runs a head cleaning cycle ...
...on page 48 to see page 53 to replace a cartridge.) 2. Cleaning the Print Head If your printouts are gaps in any cartridges. (If ink is turned on page 48. Run a nozzle check as described below. Caution: Never turn off the printer while head cleaning is in the pattern, the print ... or dark bands across your printer is low, you need to the Maintenance menu. Note: Print head cleaning uses ink, so clean it . 7. Press d to be cleaned. Cleaning the Print Head 49 see page 51 to replace an ink cartridge before cleaning the print head; The printer runs a head cleaning cycle ...
Printer Basics
Page 51
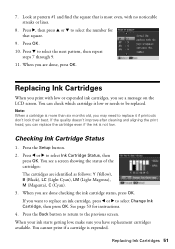
... showing the status of the cartridges: The cartridges are done, press OK. Replacing Ink Cartridges 51 Replacing Ink Cartridges When you are done checking the ink cartridge status, press OK. When you print with no noticeable streaks or lines. 8. You cannot print if a cartridge is low or needs to select Ink Cartridge Status, then press OK. Checking Ink Cartridge Status 1. Press d to the...
... showing the status of the cartridges: The cartridges are done, press OK. Replacing Ink Cartridges 51 Replacing Ink Cartridges When you are done checking the ink cartridge status, press OK. When you print with no noticeable streaks or lines. 8. You cannot print if a cartridge is low or needs to select Ink Cartridge Status, then press OK. Checking Ink Cartridge Status 1. Press d to the...

Printer Basics
Page 52
... on the package. You can still use a 77 magenta cartridge, for each color in your printer. Or you can purchase genuine Epson ink and paper from an Epson authorized reseller. sales) or www.epson.ca (Canadian sales). 52 Maintaining Your Printer Purchasing Ink Cartridges Epson offers two different capacity cartridges for example.) Try the high capacity 77 cartridges available at www.epsonstore.com (U.S.
... on the package. You can still use a 77 magenta cartridge, for each color in your printer. Or you can purchase genuine Epson ink and paper from an Epson authorized reseller. sales) or www.epson.ca (Canadian sales). 52 Maintaining Your Printer Purchasing Ink Cartridges Epson offers two different capacity cartridges for example.) Try the high capacity 77 cartridges available at www.epsonstore.com (U.S.
Printer Basics
Page 53
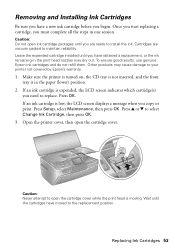
... the printer cover, then open ink cartridge packages until the cartridges have moved to select Change Ink Cartridge, then press OK. 3. Removing and Installing Ink Cartridges Be sure you have obtained a replacement, or the ink remaining in the print head nozzles may cause damage to your printer not covered by Epson's warranty. 1. Caution: Do not open the cartridge cover. If an ink cartridge is...
... the printer cover, then open ink cartridge packages until the cartridges have moved to select Change Ink Cartridge, then press OK. 3. Removing and Installing Ink Cartridges Be sure you have obtained a replacement, or the ink remaining in the print head nozzles may cause damage to your printer not covered by Epson's warranty. 1. Caution: Do not open the cartridge cover. If an ink cartridge is...
Printer Basics
Page 54
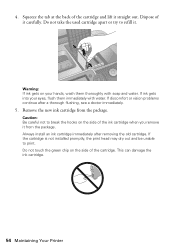
... to break the hooks on the side of the ink cartridge when you remove it straight out. Caution: Be careful not to print. This can damage the ink cartridge. 54 Maintaining Your Printer Always install an ink cartridge immediately after a thorough flushing, see a doctor immediately. 5. Dispose of the cartridge and lift it from the package. Squeeze the tab...
... to break the hooks on the side of the ink cartridge when you remove it straight out. Caution: Be careful not to print. This can damage the ink cartridge. 54 Maintaining Your Printer Always install an ink cartridge immediately after a thorough flushing, see a doctor immediately. 5. Dispose of the cartridge and lift it from the package. Squeeze the tab...
Printer Basics
Page 55
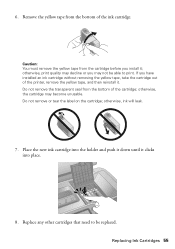
... you may become unusable. Do not remove the transparent seal from the bottom of the ink cartridge. Remove the yellow tape from the cartridge before you have installed an ink cartridge without removing the yellow tape, take the cartridge out of the printer, remove the yellow tape, and then reinstall it clicks into the holder and push...
... you may become unusable. Do not remove the transparent seal from the bottom of the ink cartridge. Remove the yellow tape from the cartridge before you have installed an ink cartridge without removing the yellow tape, take the cartridge out of the printer, remove the yellow tape, and then reinstall it clicks into the holder and push...
Printer Basics
Page 56
... button. This takes about one ink cartridge expended, even if the other cartridges still contain ink. Caution: Never turn off the printer while ink is installed). 56 Maintaining Your Printer Before printing, replace the expended cartridge. If you remove a cartridge that monitor the amount of ink used by each time cartridges are removed and reinserted. Some ink is low (for which you...
... button. This takes about one ink cartridge expended, even if the other cartridges still contain ink. Caution: Never turn off the printer while ink is installed). 56 Maintaining Your Printer Before printing, replace the expended cartridge. If you remove a cartridge that monitor the amount of ink used by each time cartridges are removed and reinserted. Some ink is low (for which you...
Printer Basics
Page 57
..., make sure you still see this error message, contact Epson as described on page 62 LCD Screen Messages Message A printer error has occurred. Make sure the ink cartridges are installed correctly. Solving Problems 57 Waste ink pad in the printer is too complex to replace it. Contact Epson as described on . See these sections: ■ "LCD Screen...
..., make sure you still see this error message, contact Epson as described on page 62 LCD Screen Messages Message A printer error has occurred. Make sure the ink cartridges are installed correctly. Solving Problems 57 Waste ink pad in the printer is too complex to replace it. Contact Epson as described on . See these sections: ■ "LCD Screen...
Printer Basics
Page 59
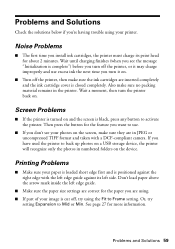
...edge guide against its print head for more information. See page 27 for about 2 minutes. Noise Problems ■ The first time you install ink cartridges, the printer must charge its left edge guide. ■ Make sure the paper size settings are correct for the paper you are using. ■ ...Problems and Solutions Check the solutions below if you have used the printer to back up photos on a USB storage device, the printer will recognize only the photos in numbered folders on the device. Screen Problems ■ If the printer is turned on and the screen is complete") before you turn ...
...edge guide against its print head for more information. See page 27 for about 2 minutes. Noise Problems ■ The first time you install ink cartridges, the printer must charge its left edge guide. ■ Make sure the paper size settings are correct for the paper you are using. ■ ...Problems and Solutions Check the solutions below if you have used the printer to back up photos on a USB storage device, the printer will recognize only the photos in numbered folders on the device. Screen Problems ■ If the printer is turned on and the screen is complete") before you turn ...
Printer Basics
Page 61
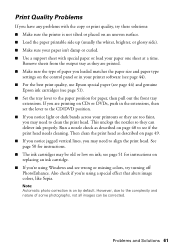
...head as described on ink; See page 50 for instructions. ■ The ink cartridges may need to see wrong or missing colors, try these solutions: ■ Make sure the printer is on page ...Problems and Solutions 61 Note: Automatic photo correction is not tilted or placed on replacing an ink cartridge. ■ If you're using a special effect that alters image colors, like Sepia. Run a nozzle check...CDs or DVDs, push in your printer software (see page 44). ■ For the best print quality, use Epson special paper (see page 44) and genuine Epson ink cartridges (see page 51 for paper, ...
...head as described on ink; See page 50 for instructions. ■ The ink cartridges may need to see wrong or missing colors, try these solutions: ■ Make sure the printer is on page ...Problems and Solutions 61 Note: Automatic photo correction is not tilted or placed on replacing an ink cartridge. ■ If you're using a special effect that alters image colors, like Sepia. Run a nozzle check...CDs or DVDs, push in your printer software (see page 44). ■ For the best print quality, use Epson special paper (see page 44) and genuine Epson ink cartridges (see page 51 for paper, ...
Printer Basics
Page 64
... can dehydrate the print head and may prevent the printer from printing. ■ If you handle used ink cartridges; If the liquid crystal solution gets on page 62. However, each time the cartridge is inserted, some ink is damaged, contact Epson as the printer. Do not touch the ink cartridge ink supply port or surrounding area. ■ The IC chip...
... can dehydrate the print head and may prevent the printer from printing. ■ If you handle used ink cartridges; If the liquid crystal solution gets on page 62. However, each time the cartridge is inserted, some ink is damaged, contact Epson as the printer. Do not touch the ink cartridge ink supply port or surrounding area. ■ The IC chip...
Printer Basics
Page 67
... days of receipt of the replacement printer in the event that the Epson printer covered by this warranty. This warranty does not cover any color change or fading of prints or reimbursement of materials or services required for a period of original purchase. This warranty does not cover ribbons, ink cartridges or third party parts, components, or...
... days of receipt of the replacement printer in the event that the Epson printer covered by this warranty. This warranty does not cover any color change or fading of prints or reimbursement of materials or services required for a period of original purchase. This warranty does not cover ribbons, ink cartridges or third party parts, components, or...
Printer Basics
Page 70
... position, 32 paper position, 36 H Help, Epson, 62 I Image formats, 13 Image quality problems, 61 Image quality settings, 25 Infrared printing, 30 Ink cartridges replacing, 51 to 56 safety instructions, 64 Inserting... screen messages, 57 to 58 safety instructions, 64 Loading paper, 7 to 9 70 Index M Macintosh color management settings, 43 page layout settings, 41, 42 printing from, 41 to 44 Media Type setting,... from, 28 to 30 Mode button, 6 N Noise problems, 59 Nozzle check, 48 to 49 P Paper Epson, 10, 21 feeding problems, 60 loading, 7 to 9 special types, 10 storing prints, 11 Paper Type ...
... position, 32 paper position, 36 H Help, Epson, 62 I Image formats, 13 Image quality problems, 61 Image quality settings, 25 Infrared printing, 30 Ink cartridges replacing, 51 to 56 safety instructions, 64 Inserting... screen messages, 57 to 58 safety instructions, 64 Loading paper, 7 to 9 70 Index M Macintosh color management settings, 43 page layout settings, 41, 42 printing from, 41 to 44 Media Type setting,... from, 28 to 30 Mode button, 6 N Noise problems, 59 Nozzle check, 48 to 49 P Paper Epson, 10, 21 feeding problems, 60 loading, 7 to 9 special types, 10 storing prints, 11 Paper Type ...
Printer Basics
Page 71
... R Red eyes, removing, 24 Replacing ink cartridges, 51 to 56 Resetting default settings, 27 S Safety instructions, 63 to 64 Saturation, 25 Screen error messages, 57 to 58 problems, 59 safety instructions, 64 using, 6 Sepia, 25 Setup button, 6 Sharpness, 25 Sizing photos, 26 to 27 Software ArcSoft PhotoImpression, 62 Epson Print CD, 31 Stop/Clear...
... R Red eyes, removing, 24 Replacing ink cartridges, 51 to 56 Resetting default settings, 27 S Safety instructions, 63 to 64 Saturation, 25 Screen error messages, 57 to 58 problems, 59 safety instructions, 64 using, 6 Sepia, 25 Setup button, 6 Sharpness, 25 Sizing photos, 26 to 27 Software ArcSoft PhotoImpression, 62 Epson Print CD, 31 Stop/Clear...
Product Information Guide
Page 1
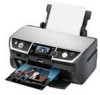
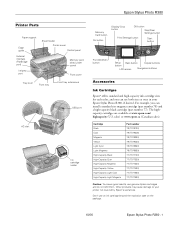
... (T077320) 77 (T077420) 77 (T077520) 77 (T077620) Caution: To ensure good results, use an ink cartridge beyond the expiration date on the package. 10/06 Epson Stylus Photo R380 - 1 Epson Stylus Photo R380 Printer Parts Paper support Edge guide External interface (PictBridge port) Infrared port Sheet feeder Printer cover Control panel Memory card slots (under cover) Front cover Tray lever Front tray...
... (T077320) 77 (T077420) 77 (T077520) 77 (T077620) Caution: To ensure good results, use an ink cartridge beyond the expiration date on the package. 10/06 Epson Stylus Photo R380 - 1 Epson Stylus Photo R380 Printer Parts Paper support Edge guide External interface (PictBridge port) Infrared port Sheet feeder Printer cover Control panel Memory card slots (under cover) Front cover Tray lever Front tray...
Product Information Guide
Page 2
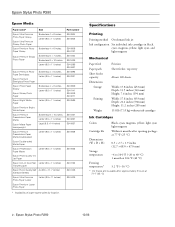
Epson Stylus Photo R380 10/06 Specifications Printing Printing method On-demand ink jet Ink configuration Six individual ink cartridges in black, cyan, magenta, yellow, light cyan, and light magenta Mechanical Paper feed Paper path Sheet feeder ... mm) Width: 17.8 inches (453 mm) Depth: 21.2 inches (538 mm) Height: 11.2 inches (285 mm) 15.8 lb (7.15 kg) without ink cartridges Ink Cartridges Colors Black, cyan, magenta, yellow, light cyan light magenta Cartridge life Within 6 months after opening package, at 77 °F (25 °C) Dimensions (W × D × H) 0.5 × 2.7 × ...
Epson Stylus Photo R380 10/06 Specifications Printing Printing method On-demand ink jet Ink configuration Six individual ink cartridges in black, cyan, magenta, yellow, light cyan, and light magenta Mechanical Paper feed Paper path Sheet feeder ... mm) Width: 17.8 inches (453 mm) Depth: 21.2 inches (538 mm) Height: 11.2 inches (285 mm) 15.8 lb (7.15 kg) without ink cartridges Ink Cartridges Colors Black, cyan, magenta, yellow, light cyan light magenta Cartridge life Within 6 months after opening package, at 77 °F (25 °C) Dimensions (W × D × H) 0.5 × 2.7 × ...
Product Information Guide
Page 5
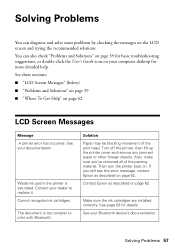
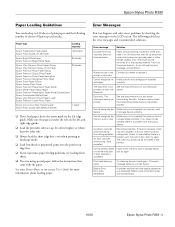
... recognize ink Make sure the ink cartridges are installed cartridges. Save cancelled. Check to replace it. Cannot create a folder on . Try cleaning the print head again. An error occurred while saving. Epson Stylus Photo R380 Paper Loading Guidelines You can diagnose and solve most problems by checking the error messages on the LCD screen. Turn off the printer, then...
... recognize ink Make sure the ink cartridges are installed cartridges. Save cancelled. Check to replace it. Cannot create a folder on . Try cleaning the print head again. An error occurred while saving. Epson Stylus Photo R380 Paper Loading Guidelines You can diagnose and solve most problems by checking the error messages on the LCD screen. Turn off the printer, then...


