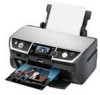
Printer Basics
Page 4
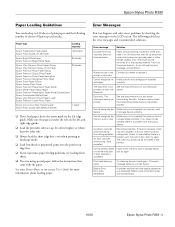
Maintaining Your Printer 48 Checking the Print Head Nozzles 48 Cleaning the Print Head 49 Aligning the Print Head 50 Replacing Ink Cartridges 51 Solving Problems 57 LCD Screen Messages 57 Problems and Solutions 59 Where To Get Help 62 Notices 63 Index 69 4
Maintaining Your Printer 48 Checking the Print Head Nozzles 48 Cleaning the Print Head 49 Aligning the Print Head 50 Replacing Ink Cartridges 51 Solving Problems 57 LCD Screen Messages 57 Problems and Solutions 59 Where To Get Help 62 Notices 63 Index 69 4
Printer Basics
Page 48
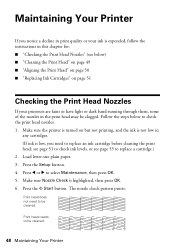
... not low in the print head may be cleaned: 48 Maintaining Your Printer Follow the steps below ) ■ "Cleaning the Print Head" on page 49 ■ "Aligning the Print Head" on page 50 ■ "Replacing Ink Cartridges" on but not printing, and the ink is highlighted, then press OK. 6. Maintaining Your Printer If you need to be cleaned: Print head needs to select Maintenance...
... not low in the print head may be cleaned: 48 Maintaining Your Printer Follow the steps below ) ■ "Cleaning the Print Head" on page 49 ■ "Aligning the Print Head" on page 50 ■ "Replacing Ink Cartridges" on but not printing, and the ink is highlighted, then press OK. 6. Maintaining Your Printer If you need to be cleaned: Print head needs to select Maintenance...
Printer Basics
Page 49
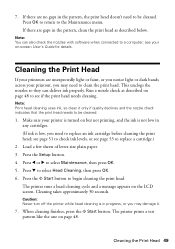
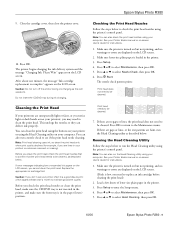
Note: Print head cleaning uses ink, so clean it . 7. Press the Setup button. 4. Cleaning takes approximately 30 seconds. Cleaning the Print Head 49 Caution: Never turn off the printer while head cleaning is low, you need to be cleaned. When cleaning finishes, press the x Start button. If there are no gaps in the pattern, the print head doesn't need to the Maintenance menu. Press OK to...
Note: Print head cleaning uses ink, so clean it . 7. Press the Setup button. 4. Cleaning takes approximately 30 seconds. Cleaning the Print Head 49 Caution: Never turn off the printer while head cleaning is low, you need to be cleaned. When cleaning finishes, press the x Start button. If there are no gaps in the pattern, the print head doesn't need to the Maintenance menu. Press OK to...
Printer Basics
Page 50
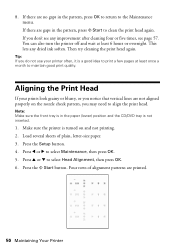
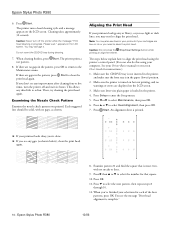
If there are printed. 50 Maintaining Your Printer Then try cleaning the print head again. Tip: If you may need to align the print head. Make sure the printer is turned on the nozzle check pattern, you do not use your prints look grainy or blurry, or you don't see any dried ink soften. Press ...a good idea to maintain good print quality. If there are not aligned properly on and not printing. 2. You can also turn the printer off and wait at least once a month to print a few pages at least 6 hours or overnight. Aligning the Print Head If your printer often, it is not inserted. ...
If there are printed. 50 Maintaining Your Printer Then try cleaning the print head again. Tip: If you may need to align the print head. Make sure the printer is turned on the nozzle check pattern, you do not use your prints look grainy or blurry, or you don't see any dried ink soften. Press ...a good idea to maintain good print quality. If there are not aligned properly on and not printing. 2. You can also turn the printer off and wait at least once a month to print a few pages at least 6 hours or overnight. Aligning the Print Head If your printer often, it is not inserted. ...
Printer Basics
Page 51
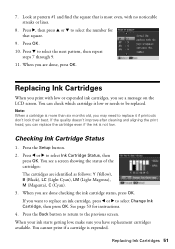
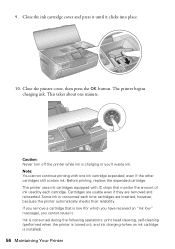
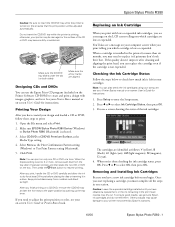
... to replace an ink cartridge, press l or r to select Change Ink Cartridge, then press OK. If you are done, press OK. You cannot print if a cartridge is more than six months old, you may need to be replaced. Press OK. 10. Press the Setup button. 2. You see a ... ink cartridges, you can check which cartridge is most even, with no noticeable streaks or lines. 8. If the quality doesn't improve after cleaning and aligning the print head, you see a screen showing the status of the cartridges: The cartridges are done checking the ink cartridge status, press OK. Checking Ink...
... to replace an ink cartridge, press l or r to select Change Ink Cartridge, then press OK. If you are done, press OK. You cannot print if a cartridge is more than six months old, you may need to be replaced. Press OK. 10. Press the Setup button. 2. You see a ... ink cartridges, you can check which cartridge is most even, with no noticeable streaks or lines. 8. If the quality doesn't improve after cleaning and aligning the print head, you see a screen showing the status of the cartridges: The cartridges are done checking the ink cartridge status, press OK. Checking Ink...
Printer Basics
Page 56
... a cartridge that monitor the amount of ink used by each time cartridges are removed and reinserted. Ink is consumed during the following operations: print head cleaning, self-cleaning (performed when the printer is turned on), and ink charging (when an ink cartridge is low (for which you have received an "Ink low" message), you 'll...
... a cartridge that monitor the amount of ink used by each time cartridges are removed and reinserted. Ink is consumed during the following operations: print head cleaning, self-cleaning (performed when the printer is turned on), and ink charging (when an ink cartridge is low (for which you have received an "Ink low" message), you 'll...
Printer Basics
Page 58
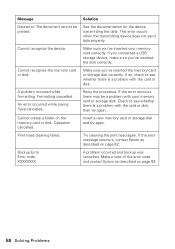
... the device. Make sure you 've inserted the disk correctly. Retry the procedure. If the error message reoccurs, contact Epson as described on page 62. 58 Solving Problems Print head cleaning failed. The document cannot be a problem with the card or disk, then try again. A problem occurred while formatting....USB storage device, make sure you 've inserted the memory card or storage disk correctly. If the error reoccurs, there may be printed. An error occurred while saving. Insert a new memory card or storage disk and try again. Make a note of the error code and...
... the device. Make sure you 've inserted the disk correctly. Retry the procedure. If the error message reoccurs, contact Epson as described on page 62. 58 Solving Problems Print head cleaning failed. The document cannot be a problem with the card or disk, then try again. A problem occurred while formatting....USB storage device, make sure you 've inserted the memory card or storage disk correctly. If the error reoccurs, there may be printed. An error occurred while saving. Insert a new memory card or storage disk and try again. Make a note of the error code and...
Printer Basics
Page 61
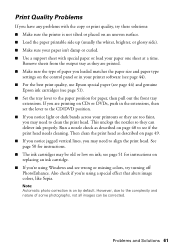
... using Windows and see wrong or missing colors, try these solutions: ■ Make sure the printer is on page 48 to clean the print head. Print Quality Problems If you have any problems with special paper or load your printer software (see page 44). ■ For the best print quality, use Epson special paper (see page 44) and genuine...
... using Windows and see wrong or missing colors, try these solutions: ■ Make sure the printer is on page 48 to clean the print head. Print Quality Problems If you have any problems with special paper or load your printer software (see page 44). ■ For the best print quality, use Epson special paper (see page 44) and genuine...
Printer Basics
Page 64
...is damaged, contact Epson as the ink cartridge status, so that the cartridge touches. If the liquid crystal solution gets on your hand inside the printer or touch any cartridges during printing. ■ Install...remaining around the ink supply port. Leaving cartridges uninstalled can dehydrate the print head and may prevent the printer from staining items that the card may be removed and reinserted freely...cloth to prevent the ink from printing. ■ If you handle used ink cartridges; However, each time the cartridge is inserted, some ink is needed to clean the LCD panel. Do not ...
...is damaged, contact Epson as the ink cartridge status, so that the cartridge touches. If the liquid crystal solution gets on your hand inside the printer or touch any cartridges during printing. ■ Install...remaining around the ink supply port. Leaving cartridges uninstalled can dehydrate the print head and may prevent the printer from staining items that the card may be removed and reinserted freely...cloth to prevent the ink from printing. ■ If you handle used ink cartridges; However, each time the cartridge is inserted, some ink is needed to clean the LCD panel. Do not ...
Printer Basics
Page 69
... Accessories, 62 Adjusting photo quality, 24 to 26 Aligning print head, 50 to 51 All photos, printing, 17 ArcSoft PhotoImpression, 62 B Backing up photos, 46 to 47 Black & White, 25 Borderless expansion, 27 Brightness, 25 Buttons, 6 C Camera connecting to printer, 29 printing from, 28 to 29 Cancelling printing with a computer, 41..., 37 CD-R/RW drive, backing up photos, 46 to 47 CDs adjusting print density, 25 adjusting print position, 35 inserting, 32 to 33 jewel case insert, 37 measuring, 31 printing on, 31 to 35 Cleaning print head, 49 to 50 Color management, turning off, 40, 43 ColorSync...
... Accessories, 62 Adjusting photo quality, 24 to 26 Aligning print head, 50 to 51 All photos, printing, 17 ArcSoft PhotoImpression, 62 B Backing up photos, 46 to 47 Black & White, 25 Borderless expansion, 27 Brightness, 25 Buttons, 6 C Camera connecting to printer, 29 printing from, 28 to 29 Cancelling printing with a computer, 41..., 37 CD-R/RW drive, backing up photos, 46 to 47 CDs adjusting print density, 25 adjusting print position, 35 inserting, 32 to 33 jewel case insert, 37 measuring, 31 printing on, 31 to 35 Cleaning print head, 49 to 50 Color management, turning off, 40, 43 ColorSync...
Printer Basics
Page 71
...26 to 27 printing, 12 to 27 printing all, 17 printing by date, 18 sizing, 26 to 27 storing, 11 viewing and printing, 16 to 17 PictBridge, 28 Premium photo papers, 10 Print head aligning, 50 to 51 cleaning, 49 to 50 Print quality problems, 61 Print settings, 21 to 26 Printing adjusting CD/... using, 6 Sepia, 25 Setup button, 6 Sharpness, 25 Sizing photos, 26 to 27 Software ArcSoft PhotoImpression, 62 Epson Print CD, 31 Stop/Clear Settings button, 6 Stopping printing, 17, 41, 44 Storing prints, 11 T Technical support, 62 Touching up photos, 24 to 26 Troubleshooting, 59 to 61 Type setting, Windows, ...
...26 to 27 printing, 12 to 27 printing all, 17 printing by date, 18 sizing, 26 to 27 storing, 11 viewing and printing, 16 to 17 PictBridge, 28 Premium photo papers, 10 Print head aligning, 50 to 51 cleaning, 49 to 50 Print quality problems, 61 Print settings, 21 to 26 Printing adjusting CD/... using, 6 Sepia, 25 Setup button, 6 Sharpness, 25 Sizing photos, 26 to 27 Software ArcSoft PhotoImpression, 62 Epson Print CD, 31 Stop/Clear Settings button, 6 Stopping printing, 17, 41, 44 Storing prints, 11 T Technical support, 62 Touching up photos, 24 to 26 Troubleshooting, 59 to 61 Type setting, Windows, ...
Product Information Guide
Page 5
...Make sure you still see this error message, contact Epson. Retry the procedure. The memory card should be printed. Insert a new memory card or storage device and try again. Print head cleaning failed. If the error message reoccurs, contact Epson. Make a note of the packing material. The ...; Load letterhead or preprinted paper into the printer top edge first. ❏ If you experience paper feeding problems, try loading fewer sheets. ❏ If you 've removed all of the error code and contact Epson. 10/06 Epson Stylus Photo R380 - 5 See the documentation for the device...
...Make sure you still see this error message, contact Epson. Retry the procedure. The memory card should be printed. Insert a new memory card or storage device and try again. Print head cleaning failed. If the error message reoccurs, contact Epson. Make a note of the packing material. The ...; Load letterhead or preprinted paper into the printer top edge first. ❏ If you experience paper feeding problems, try loading fewer sheets. ❏ If you 've removed all of the error code and contact Epson. 10/06 Epson Stylus Photo R380 - 5 See the documentation for the device...
Product Information Guide
Page 7
... tray to the paper position by Epson's warranty. 10/06 Epson Stylus Photo R380 - 7 Do not insert the CD/DVD tray while the printer is selected. 3. otherwise, your printer may be adjusted automatically. After you print, handle the CD or DVD carefully and allow the ink to adjust the print position or color, see your Printer Basics manual or on only...
... tray to the paper position by Epson's warranty. 10/06 Epson Stylus Photo R380 - 7 Do not insert the CD/DVD tray while the printer is selected. 3. otherwise, your printer may be adjusted automatically. After you print, handle the CD or DVD carefully and allow the ink to adjust the print position or color, see your Printer Basics manual or on only...
Product Information Guide
Page 9
... need to be cleaned: Print head needs to check the print head nozzles using the printer's control panel. Make sure the printer is complete" appears on the LCD screen, you need to replace an ink cartridge before cleaning the print head). 2. Press u or d to select Head Cleaning, then press OK. 10/06 Epson Stylus Photo R380 - 9 Before you check the print head nozzles or clean the print head, make sure the...
... need to be cleaned: Print head needs to check the print head nozzles using the printer's control panel. Make sure the printer is complete" appears on the LCD screen, you need to replace an ink cartridge before cleaning the print head). 2. Press u or d to select Head Cleaning, then press OK. 10/06 Epson Stylus Photo R380 - 9 Before you check the print head nozzles or clean the print head, make sure the...
Product Information Guide
Page 10
..., try cleaning the print head again. The steps below ), clean the print head again. 10 - Make sure letter-size plain paper is in the paper (lower) position. 2. Epson Stylus Photo R380 8. Press Start. Caution: Never turn the printer off the printer while the message "Print head cleaning in the... the Nozzle Check Pattern Examine the nozzle check pattern you need to clean the print head again. Press r then u or d to select Maintenance, then press OK. 6. Epson Stylus Photo R380 6. The printer runs a head cleaning cycle and a message appears on the LCD screen. Please wait."...
..., try cleaning the print head again. The steps below ), clean the print head again. 10 - Make sure letter-size plain paper is in the paper (lower) position. 2. Epson Stylus Photo R380 8. Press Start. Caution: Never turn the printer off the printer while the message "Print head cleaning in the... the Nozzle Check Pattern Examine the nozzle check pattern you need to clean the print head again. Press r then u or d to select Maintenance, then press OK. 6. Epson Stylus Photo R380 6. The printer runs a head cleaning cycle and a message appears on the LCD screen. Please wait."...
Product Information Guide
Page 11
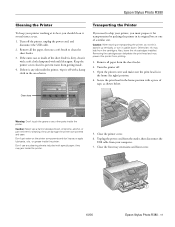
... make sure the print head is any ink inside of the sheet feeder is dirty, clean it off with mild detergent. Unplug the power cord from the outlet, then disconnect the USB cable from getting inside the printer. Close the front tray extensions and front cover. 10/06 Epson Stylus Photo R380 - 11 Keep the printer cover closed to...
... make sure the print head is any ink inside of the sheet feeder is dirty, clean it off with mild detergent. Unplug the power cord from the outlet, then disconnect the USB cable from getting inside the printer. Close the front tray extensions and front cover. 10/06 Epson Stylus Photo R380 - 11 Keep the printer cover closed to...
Product Information Guide
Page 12
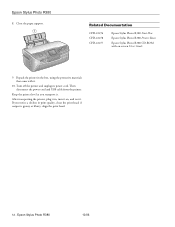
... you transport it . 10. Epson Stylus Photo R380 8. Repack the printer in the box, using the protective materials that came with on , and test it in print quality, clean the print head; Turn off the printer and unplug its power cord. Related Documentation CPD-22276 CPD-22278 CPD-22277 Epson Stylus Photo R380 Start Here Epson Stylus Photo R380 Printer Basics Epson Stylus Photo R380 CD-ROM with it . Epson Stylus Photo R380 10/06 After transporting...
... you transport it . 10. Epson Stylus Photo R380 8. Repack the printer in the box, using the protective materials that came with on , and test it in print quality, clean the print head; Turn off the printer and unplug its power cord. Related Documentation CPD-22276 CPD-22278 CPD-22277 Epson Stylus Photo R380 Start Here Epson Stylus Photo R380 Printer Basics Epson Stylus Photo R380 CD-ROM with it . Epson Stylus Photo R380 10/06 After transporting...


