
Technical Brief (Ink Jet Printers)
Page 3
... optional inks, with Epson printers and genuine Epson inks so when all rights in the Ink Solutions document. 5. The Epson printer drivers use a halftoning module that places ink droplets to create printed "dots" in various patterns so you never have to swap an ink cartridge to the page, based on the Epson ink sets in those marks. Fine Art Pro Advanced Amateur Photo Enthusiast...
... optional inks, with Epson printers and genuine Epson inks so when all rights in the Ink Solutions document. 5. The Epson printer drivers use a halftoning module that places ink droplets to create printed "dots" in various patterns so you never have to swap an ink cartridge to the page, based on the Epson ink sets in those marks. Fine Art Pro Advanced Amateur Photo Enthusiast...
Product Information Guide
Page 1
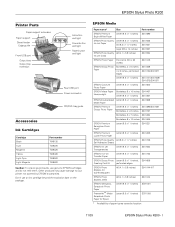
... your printer not covered by location 11/03 EPSON Stylus Photo R200 - 1 Don't use genuine EPSON cartridges and do not refill them. EPSON Media Paper name* Size Part number EPSON Premium Bright White Paper Letter (8.5 x 11 inches) S041586 EPSON Photo Quality Letter (8.5 x 11 inches) Ink Jet Paper A4 (8.3 x 11.7 inches) S041062 S041061 Legal (8.5 x 14 inches) S041067 EPSON Photo Quality A6 (4.1 x 5.8 inches) Ink Jet Cards S041054 EPSON Photo...
... your printer not covered by location 11/03 EPSON Stylus Photo R200 - 1 Don't use genuine EPSON cartridges and do not refill them. EPSON Media Paper name* Size Part number EPSON Premium Bright White Paper Letter (8.5 x 11 inches) S041586 EPSON Photo Quality Letter (8.5 x 11 inches) Ink Jet Paper A4 (8.3 x 11.7 inches) S041062 S041061 Legal (8.5 x 14 inches) S041067 EPSON Photo Quality A6 (4.1 x 5.8 inches) Ink Jet Cards S041054 EPSON Photo...

Product Information Guide
Page 2
... 10 days at 122 ºF (50 ºC) 3.2 ºF (-16 ºC) * Ink thaws and is usable after approximately 3 hours at 140 ºF (60 ºC) Humidity (without ink cartridges Ink Cartridges Colors Cartridge life Dimensions (W × D × H) Storage temperature Transit temperature Freezing temperature* Black, cyan... °F (25 °C) Caution: To ensure good results, use an ink cartridge beyond the expiration date on the back of the printer for its voltage. EPSON Stylus Photo R200 11/03 Electrical Specification Value Rated voltage 100-240 V Input voltage range* ...
... 10 days at 122 ºF (50 ºC) 3.2 ºF (-16 ºC) * Ink thaws and is usable after approximately 3 hours at 140 ºF (60 ºC) Humidity (without ink cartridges Ink Cartridges Colors Cartridge life Dimensions (W × D × H) Storage temperature Transit temperature Freezing temperature* Black, cyan... °F (25 °C) Caution: To ensure good results, use an ink cartridge beyond the expiration date on the back of the printer for its voltage. EPSON Stylus Photo R200 11/03 Electrical Specification Value Rated voltage 100-240 V Input voltage range* ...
Product Information Guide
Page 3
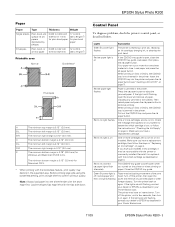
...with the short edge first. Red H ink light is 0.12" (3.0 mm). Turn off ; C The minimum bottom margin is on One or more cartridges are still flashing, contact your dealer or EPSON as described in your Printer Basics book. 11/03 EPSON Stylus Photo R200 - 3 Before printing large jobs using... CD/DVD tray guide. The printer may have just installed a new cartridge, it may be blocking movement of ink or not installed. EPSON Stylus Photo R200 Paper Paper Type Thickness Weight Single sheets Plain, bond, and special ink jet papers distributed by EPSON 0.003 to 0.004 inch (0....
...with the short edge first. Red H ink light is 0.12" (3.0 mm). Turn off ; C The minimum bottom margin is on One or more cartridges are still flashing, contact your dealer or EPSON as described in your Printer Basics book. 11/03 EPSON Stylus Photo R200 - 3 Before printing large jobs using... CD/DVD tray guide. The printer may have just installed a new cartridge, it may be blocking movement of ink or not installed. EPSON Stylus Photo R200 Paper Paper Type Thickness Weight Single sheets Plain, bond, and special ink jet papers distributed by EPSON 0.003 to 0.004 inch (0....

Product Information Guide
Page 4
... print head moves to display information about the cartridge. EPSON Stylus Photo R200 11/03 Click a cartridge image to the ink cartridge replacement position. 4 - You see a window like this one: Ink light When you print, you'll also see a window like this one: ❏ Macintosh OS X: Choose Applications > EPSON Printer Utility > SP R200 Series > EPSON StatusMonitor. ❏ Macintosh OS 8.6 to 9.x: From the File...
... print head moves to display information about the cartridge. EPSON Stylus Photo R200 11/03 Click a cartridge image to the ink cartridge replacement position. 4 - You see a window like this one: Ink light When you print, you'll also see a window like this one: ❏ Macintosh OS X: Choose Applications > EPSON Printer Utility > SP R200 Series > EPSON StatusMonitor. ❏ Macintosh OS 8.6 to 9.x: From the File...
Product Information Guide
Page 5
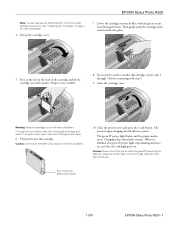
... the cartridge and lift the cartridge out of ink. Close the printer cover and press the H ink button. Lower the cartridge into place. 5. Close the cartridge cover. The printer begins charging the ink delivery system. If you need to find out which cartridge is flashing, unless the printer hasn't moved or made noise for more than 5 mintues. Dispose of children. EPSON Stylus Photo R200 Note...
... the cartridge and lift the cartridge out of ink. Close the printer cover and press the H ink button. Lower the cartridge into place. 5. Close the cartridge cover. The printer begins charging the ink delivery system. If you need to find out which cartridge is flashing, unless the printer hasn't moved or made noise for more than 5 mintues. Dispose of children. EPSON Stylus Photo R200 Note...
Product Information Guide
Page 11
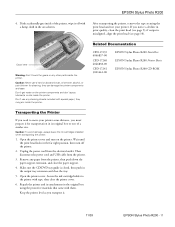
...: To avoid damage, always leave the ink cartridges installed when transporting the printer. 1. Then disconnect the power cord and USB cable from the printer, then push down the paper support extension, and close the printer cover. 6. Repack the printer and its original box or one of the printer, wipe it . 11/03 EPSON Stylus Photo R200 - 11 if output is closed...
...: To avoid damage, always leave the ink cartridges installed when transporting the printer. 1. Then disconnect the power cord and USB cable from the printer, then push down the paper support extension, and close the printer cover. 6. Repack the printer and its original box or one of the printer, wipe it . 11/03 EPSON Stylus Photo R200 - 11 if output is closed...

Start Here Card
Page 1
... the green power light comes on your printer, so check carefully. 3 Lift the printer cover and remove the tape securing the ink cartridge holder. The tape may be in slightly different places on . 4046837-00 XXX Start Here EPSON Stylus® Photo R200 1 Unpack 1 Remove everything from the box. Printer Software CD-ROM Printer Basics Power cord Small CD insert...
... the green power light comes on your printer, so check carefully. 3 Lift the printer cover and remove the tape securing the ink cartridge holder. The tape may be in slightly different places on . 4046837-00 XXX Start Here EPSON Stylus® Photo R200 1 Unpack 1 Remove everything from the box. Printer Software CD-ROM Printer Basics Power cord Small CD insert...

Start Here Card
Page 2
The color of the cartridge label should match the marker above the holder. Gently push each cartridge into place. 23 Install Ink Cartridges 1 Flip open the paper support and pull up the extension. 2 Lift the printer cover. 3 Open the output tray and pull out the extension. 4 Unwrap the ink cartridges. continue Don't touch the green circuit boards or remove any labels 5 Open the cartridge cover and remove the paper insert. 6 Lower each ink cartridge until it clicks into its holder with the green circuit board facing the front.
The color of the cartridge label should match the marker above the holder. Gently push each cartridge into place. 23 Install Ink Cartridges 1 Flip open the paper support and pull up the extension. 2 Lift the printer cover. 3 Open the output tray and pull out the extension. 4 Unwrap the ink cartridges. continue Don't touch the green circuit boards or remove any labels 5 Open the cartridge cover and remove the paper insert. 6 Lower each ink cartridge until it clicks into its holder with the green circuit board facing the front.
Start Here Card
Page 8
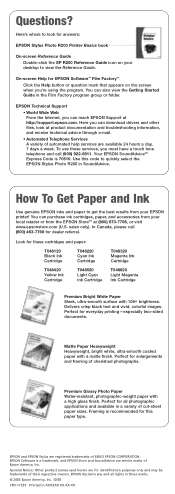
... from the EPSON StoreSM at http://support.epson.com. To use these cartridges and paper: T048120 Black Ink Cartridge T048420 Yellow Ink Cartridge T048220 Cyan Ink Cartridge T048520 Light Cyan Ink Cartridge T048320 Magenta Ink Cartridge T048620 Light Magenta Ink Cartridge Premium Bright White Paper Sleek, ultra-smooth surface with a high gloss finish. You can download drivers and other files, look for answers: EPSON Stylus Photo R200 Printer Basics book...
... from the EPSON StoreSM at http://support.epson.com. To use these cartridges and paper: T048120 Black Ink Cartridge T048420 Yellow Ink Cartridge T048220 Cyan Ink Cartridge T048520 Light Cyan Ink Cartridge T048320 Magenta Ink Cartridge T048620 Light Magenta Ink Cartridge Premium Bright White Paper Sleek, ultra-smooth surface with a high gloss finish. You can download drivers and other files, look for answers: EPSON Stylus Photo R200 Printer Basics book...

Printer Basics
Page 4
... 49 Running the Head Cleaning Utility 50 Replacing an Ink Cartridge 51 Checking the Ink Supply 52 Purchasing Ink Cartridges 53 Ink Cartridge Precautions 53 Removing and Installing Ink Cartridges 54 Aligning the Print Head 57 Cleaning the Printer 59 Transporting the Printer 60 Solving Problems 61 Printer Parts 61 Diagnosing Printer Problems 62 Running a Printer Check 63 Problems and Solutions 64 Setup and...
... 49 Running the Head Cleaning Utility 50 Replacing an Ink Cartridge 51 Checking the Ink Supply 52 Purchasing Ink Cartridges 53 Ink Cartridge Precautions 53 Removing and Installing Ink Cartridges 54 Aligning the Print Head 57 Cleaning the Printer 59 Transporting the Printer 60 Solving Problems 61 Printer Parts 61 Diagnosing Printer Problems 62 Running a Printer Check 63 Problems and Solutions 64 Setup and...

Printer Basics
Page 5
Limited Warranty 80 Index 83 Contents 5 Uninstalling Printer Software 71 Windows 71 Macintosh OS X 72 Macintosh OS 8.6 to 9x 72 Where To Get Help 73 Requirements and Notices 75 Windows System Requirements 75 Macintosh System Requirements 75 Important Safety Instructions 76 Ink Cartridge Safety Instructions 77 FCC Compliance Statement 78 Declaration of Conformity 79 ENERGY STAR Compliance 79 Epson America, Inc.
Limited Warranty 80 Index 83 Contents 5 Uninstalling Printer Software 71 Windows 71 Macintosh OS X 72 Macintosh OS 8.6 to 9x 72 Where To Get Help 73 Requirements and Notices 75 Windows System Requirements 75 Macintosh System Requirements 75 Important Safety Instructions 76 Ink Cartridge Safety Instructions 77 FCC Compliance Statement 78 Declaration of Conformity 79 ENERGY STAR Compliance 79 Epson America, Inc.

Printer Basics
Page 49
...print head using the Head Cleaning Utility. This unclogs the nozzles so they can decline, so turn on your printer for moving, if necessary: ■ "Cleaning the Print Head" below ■ "Replacing an Ink Cartridge" on page 51 ■ "Aligning the Print Head" on page 57 ■ "Cleaning the... Printer" on page 59 ■ "Transporting the Printer" on and print a few pages at its best and to prepare it only if quality...
...print head using the Head Cleaning Utility. This unclogs the nozzles so they can decline, so turn on your printer for moving, if necessary: ■ "Cleaning the Print Head" below ■ "Replacing an Ink Cartridge" on page 51 ■ "Aligning the Print Head" on page 57 ■ "Cleaning the... Printer" on page 59 ■ "Transporting the Printer" on and print a few pages at its best and to prepare it only if quality...

Printer Basics
Page 51
... their best. Replacing an Ink Cartridge When the red H ink light flashes, one or more than six months old, you can also turn the printer off . When a cartridge is more ink cartridges are low on ink. Replacing an Ink Cartridge 51 You can replace the cartridge even if the red H ink light is low or empty... again. If you don't see a message on your screen telling you 'll also see any dried ink to replace the cartridge(s). Ink light When you print, you which cartridge is off and wait overnight-this allows any improvement after cleaning and aligning the print head, you may...
... their best. Replacing an Ink Cartridge When the red H ink light flashes, one or more than six months old, you can also turn the printer off . When a cartridge is more ink cartridges are low on ink. Replacing an Ink Cartridge 51 You can replace the cartridge even if the red H ink light is low or empty... again. If you don't see a message on your screen telling you 'll also see any dried ink to replace the cartridge(s). Ink light When you print, you which cartridge is off and wait overnight-this allows any improvement after cleaning and aligning the print head, you may...
Printer Basics
Page 53
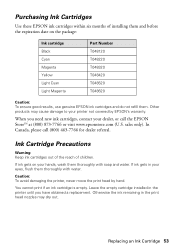
... thoroughly with water. Leave the empty cartridge installed in the printer until you need new ink cartridges, contact your hands, wash them . Ink Cartridge Precautions Warning: Keep ink cartridges out of the reach of installing them thoroughly with soap and water. Replacing an Ink Cartridge 53 Other products may dry out. Purchasing Ink Cartridges Use these EPSON ink cartridges within six months of children. If...
... thoroughly with water. Leave the empty cartridge installed in the printer until you need new ink cartridges, contact your hands, wash them . Ink Cartridge Precautions Warning: Keep ink cartridges out of the reach of installing them thoroughly with soap and water. Replacing an Ink Cartridge 53 Other products may dry out. Purchasing Ink Cartridges Use these EPSON ink cartridges within six months of children. If...

Printer Basics
Page 54
... Installing Ink Cartridges Be sure you have a new ink cartridge before you must complete all the empty cartridges have been identified, the print head moves to the ink cartridge replacement position. Then open the printer cover. 2. Press the H ink button again. ■ If more information. 4. Note: You can also use the Status Monitor to find out which cartridge is on...
... Installing Ink Cartridges Be sure you have a new ink cartridge before you must complete all the empty cartridges have been identified, the print head moves to the ink cartridge replacement position. Then open the printer cover. 2. Press the H ink button again. ■ If more information. 4. Note: You can also use the Status Monitor to find out which cartridge is on...

Printer Basics
Page 55
If ink gets on the back of the cartridge and lift the cartridge out of the printer. Caution: Don't touch the green circuit board or remove any labels. Don't touch the green circuit board Replacing an Ink Cartridge 55 If ink gets in the tab on your eyes, flush them thoroughly with water. 6. Press in your hands, wash them thoroughly with soap and water. Unwrap the new ink cartridge. Warning: Keep ink cartridges out of the reach of it carefully. 5. Dispose of children.
If ink gets on the back of the cartridge and lift the cartridge out of the printer. Caution: Don't touch the green circuit board or remove any labels. Don't touch the green circuit board Replacing an Ink Cartridge 55 If ink gets in the tab on your eyes, flush them thoroughly with water. 6. Press in your hands, wash them thoroughly with soap and water. Unwrap the new ink cartridge. Warning: Keep ink cartridges out of the reach of it carefully. 5. Dispose of children.
Printer Basics
Page 56
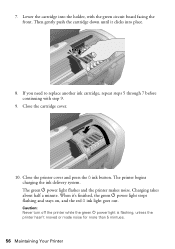
.... Charging takes about half a minute. Close the cartridge cover. 10. If you need to replace another ink cartridge, repeat steps 5 through 7 before continuing with the green circuit board facing the front. Caution: Never turn off the printer while the green P power light is flashing, unless the printer hasn't moved or made noise for more than...
.... Charging takes about half a minute. Close the cartridge cover. 10. If you need to replace another ink cartridge, repeat steps 5 through 7 before continuing with the green circuit board facing the front. Caution: Never turn off the printer while the green P power light is flashing, unless the printer hasn't moved or made noise for more than...

Printer Basics
Page 60
... its original box or one of a similar size. Then disconnect the power cord and USB cable from the electrical outlet. Secure the ink cartridge holder to move your printer. Keep the printer level as you notice a decline in the output tray extension and close the tray. 5. if output is closed, then push in print...
... its original box or one of a similar size. Then disconnect the power cord and USB cable from the electrical outlet. Secure the ink cartridge holder to move your printer. Keep the printer level as you notice a decline in the output tray extension and close the tray. 5. if output is closed, then push in print...
Printer Basics
Page 62
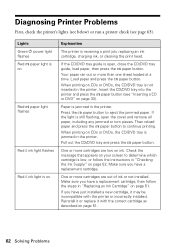
... sheet loaded at a time. Make sure you have just installed a new cartridge, it with the printer or incorrectly installed. If you have a replacement cartridge. If the CD/DVD tray guide is jammed in "Replacing an Ink Cartridge" on your screen to determine which cartridge is still flashing, open , close the CD/DVD tray guide, load paper...
... sheet loaded at a time. Make sure you have just installed a new cartridge, it with the printer or incorrectly installed. If you have a replacement cartridge. If the CD/DVD tray guide is jammed in "Replacing an Ink Cartridge" on your screen to determine which cartridge is still flashing, open , close the CD/DVD tray guide, load paper...


