
Product Information Guide
Page 6
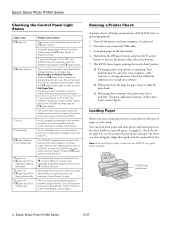
...in the sheet feeder. An unsupported device is closed. Connect only PictBridge compatible digital cameras to the external USB port. Your problem may be out. Loading Paper Before you are at a time using . Note: When printing on paper. Sheet Feeder or ... flashing or flashing alternately P power off I paper and H ink flashing alternately P power off the printer, remove any connected USB cables. 3. The print head is not compatible with the printer. Epson Stylus Photo R1900 Series Checking the Control Panel Light Status Light status I paper on I paper flashing H ink on ...
...in the sheet feeder. An unsupported device is closed. Connect only PictBridge compatible digital cameras to the external USB port. Your problem may be out. Loading Paper Before you are at a time using . Note: When printing on paper. Sheet Feeder or ... flashing or flashing alternately P power off I paper and H ink flashing alternately P power off the printer, remove any connected USB cables. 3. The print head is not compatible with the printer. Epson Stylus Photo R1900 Series Checking the Control Panel Light Status Light status I paper on I paper flashing H ink on ...
Product Information Guide
Page 9
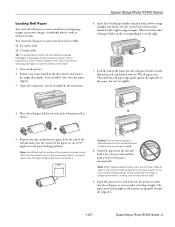
...that you have previously loaded, it's a good idea to cut at 90° angles to avoid paper feeding problems. Note: Avoid touching the surface of the printer (marked with the M roll paper icon. Insert the left slot on the back of your paper or canvas ...paper roll as it . 11/07 Epson Stylus Photo R1900 Series - 9 Epson Stylus Photo R1900 Series Loading Roll Paper You can load roll paper or canvas media for printing large images, panoramic images, or multiple photos, with up orange triangles). 8. This is installed. Open the printer cover and look into the slot and...
...that you have previously loaded, it's a good idea to cut at 90° angles to avoid paper feeding problems. Note: Avoid touching the surface of the printer (marked with the M roll paper icon. Insert the left slot on the back of your paper or canvas ...paper roll as it . 11/07 Epson Stylus Photo R1900 Series - 9 Epson Stylus Photo R1900 Series Loading Roll Paper You can load roll paper or canvas media for printing large images, panoramic images, or multiple photos, with up orange triangles). 8. This is installed. Open the printer cover and look into the slot and...
Product Information Guide
Page 10
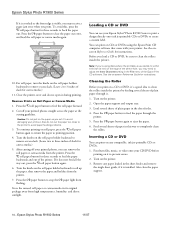
... DVD You can print on -screen Reference Guide for canvas media.) 11. Epson Stylus Photo R1900 Series 11/07 Close the printer cover and do not cut it to avoid damaging your printed photos, you print on the printer. 3. Turn the knobs on any paper loaded in its original package away ...problems. 3. Load several sheets of plain paper in the File menu of the center hole, you load a CD or DVD, be sure to clean the rollers inside the printer by feeding several sheets of paper in this , press the M roll paper button for three seconds to back the paper out. Epson Stylus Photo R1900...
... DVD You can print on -screen Reference Guide for canvas media.) 11. Epson Stylus Photo R1900 Series 11/07 Close the printer cover and do not cut it to avoid damaging your printed photos, you print on the printer. 3. Turn the knobs on any paper loaded in its original package away ...problems. 3. Load several sheets of plain paper in the File menu of the center hole, you load a CD or DVD, be sure to clean the rollers inside the printer by feeding several sheets of paper in this , press the M roll paper button for three seconds to back the paper out. Epson Stylus Photo R1900...
Product Information Guide
Page 14
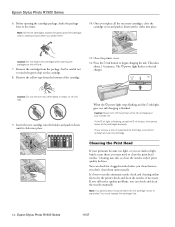
...It's best to run the automatic nozzle check and cleaning utility first to touch the green chip on the cartridge. 8. Close the printer cover. 12. Epson Stylus Photo R1900 Series 11/07 Note: All the ink cartridges, except the gloss optimizer cartridge, make a clicking sound when you may need to begin... don't clean them . 10. If you remove a low or expended ink cartridge, you 'll waste ink. If you still notice quality problems, you can check for clogged nozzles before you clean them so you replace all the cartridges securely. Before opening the packages or ink will leak...
...It's best to run the automatic nozzle check and cleaning utility first to touch the green chip on the cartridge. 8. Close the printer cover. 12. Epson Stylus Photo R1900 Series 11/07 Note: All the ink cartridges, except the gloss optimizer cartridge, make a clicking sound when you may need to begin... don't clean them . 10. If you remove a low or expended ink cartridge, you 'll waste ink. If you still notice quality problems, you can check for clogged nozzles before you clean them so you replace all the cartridges securely. Before opening the packages or ink will leak...
Product Information Guide
Page 15
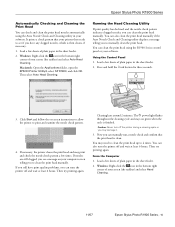
... the printer off the printer during a cleaning cycle or you have print quality problems, you to manually clean the print head. Then try printing again. Windows: Right-click the icon in the sheet feeder. 2. You can clean the print head using the Auto Nozzle Check and Cleaning utility in the sheet feeder. 2. Epson Stylus Photo R1900 Series...
... the printer off the printer during a cleaning cycle or you have print quality problems, you to manually clean the print head. Then try printing again. Windows: Right-click the icon in the sheet feeder. 2. You can clean the print head using the Auto Nozzle Check and Cleaning utility in the sheet feeder. 2. Epson Stylus Photo R1900 Series...
Product Information Guide
Page 16
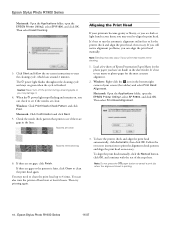
...to clean the print head again. It's best to run the automatic alignment utility first to use matte or photo paper for the most accurate alignment. 2. If you still notice alignment problems, you may damage it. 4. Windows: Right-click the icon in the bottom right corner of the steps... on , you may need to clean the print head up to start the cleaning cycle, which lasts around 2 minutes. Epson Stylus Photo R1900 Series 11/07 It's best to let the printer check and align the print head, if necessary. If there are clean: Windows: Click Print Nozzle Check Pattern and click Print...
...to clean the print head again. It's best to run the automatic alignment utility first to use matte or photo paper for the most accurate alignment. 2. If you still notice alignment problems, you may damage it. 4. Windows: Right-click the icon in the bottom right corner of the steps... on , you may need to clean the print head up to start the cleaning cycle, which lasts around 2 minutes. Epson Stylus Photo R1900 Series 11/07 It's best to let the printer check and align the print head, if necessary. If there are clean: Windows: Click Print Nozzle Check Pattern and click Print...
Start Here
Page 8
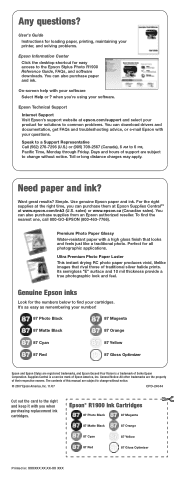
... a traditional photo. Genuine Epson inks Look for solutions to common problems. You can purchase them at Epson Supplies CentralSM at epson.com/support and select your printer, and solving problems. Epson Information Center Click the desktop shortcut for all photographic applications. User's Guide Instructions for loading paper, printing, maintaining your product for the numbers below to the Epson Stylus Photo R1900 Reference...
... a traditional photo. Genuine Epson inks Look for solutions to common problems. You can purchase them at Epson Supplies CentralSM at epson.com/support and select your printer, and solving problems. Epson Information Center Click the desktop shortcut for all photographic applications. User's Guide Instructions for loading paper, printing, maintaining your product for the numbers below to the Epson Stylus Photo R1900 Reference...

User's Guide - PDF
Page 4
Solving Problems 41 Checking for Software Updates 41 Checking the Printer Lights 41 Problems and Solutions 43 Where To Get Help 45 Notices 46 4 Contents
Solving Problems 41 Checking for Software Updates 41 Checking the Printer Lights 41 Problems and Solutions 43 Where To Get Help 45 Notices 46 4 Contents

User's Guide - PDF
Page 10
Remove any tape and protective paper from the printer before loading on the paper. 1. Remove any paper loaded in these widths: ■ 8.3-... before replacing cartridges to avoid ink marks on roll paper (see page 8). Loading Roll Paper You can load Epson roll paper in the sheet feeder and remove the single sheet guide, if it is because you must remove... Turn on each end of the paper are cut at 90° angles to print large, panoramic images or multiple photos, with or without borders. Open the output tray, but do not pull out the extensions. 4. Also close the paper...
Remove any tape and protective paper from the printer before loading on the paper. 1. Remove any paper loaded in these widths: ■ 8.3-... before replacing cartridges to avoid ink marks on roll paper (see page 8). Loading Roll Paper You can load Epson roll paper in the sheet feeder and remove the single sheet guide, if it is because you must remove... Turn on each end of the paper are cut at 90° angles to print large, panoramic images or multiple photos, with or without borders. Open the output tray, but do not pull out the extensions. 4. Also close the paper...
User's Guide - PDF
Page 12
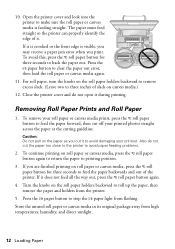
...and holders from the printer. 5. To continue printing...printer to back the paper out. Press the I paper button to stop the I paper button to avoid damaging your printed photos... straight across the paper at the cutting guideline. If it is crooked or the front edge is feeding straight. Caution: Do not pull on the roll paper holders backward to printing position. 3. If you print. If it during printing. Close the printer...Open the printer cover and look into the printer to make ...and out of the printer. Store the unused ... feed straight so the printer can properly identify the...
...and holders from the printer. 5. To continue printing...printer to back the paper out. Press the I paper button to stop the I paper button to avoid damaging your printed photos... straight across the paper at the cutting guideline. If it is crooked or the front edge is feeding straight. Caution: Do not pull on the roll paper holders backward to printing position. 3. If you print. If it during printing. Close the printer...Open the printer cover and look into the printer to make ...and out of the printer. Store the unused ... feed straight so the printer can properly identify the...
User's Guide - PDF
Page 35
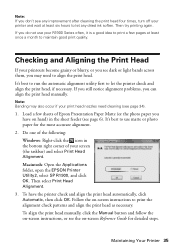
... utility first to align the print head. Macintosh: Open the Applications folder, open the EPSON Printer Utility2, select SP R1900, and click OK. Then select Print Head Alignment. 3. To have on hand) in...Windows: Right-click the icon in the bottom right corner of Epson Presentation Paper Matte (or the photo paper you have the printer check and align the print head automatically, click Automatic, then...and align the print head as necessary. If you still notice alignment problems, you may also occur if your R1900 Series often, it is a good idea to maintain good print quality...
... utility first to align the print head. Macintosh: Open the Applications folder, open the EPSON Printer Utility2, select SP R1900, and click OK. Then select Print Head Alignment. 3. To have on hand) in...Windows: Right-click the icon in the bottom right corner of Epson Presentation Paper Matte (or the photo paper you have the printer check and align the print head automatically, click Automatic, then...and align the print head as necessary. If you still notice alignment problems, you may also occur if your R1900 Series often, it is a good idea to maintain good print quality...
User's Guide - PDF
Page 41
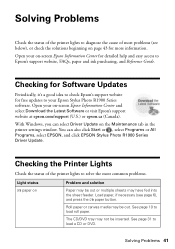
... check the solutions beginning on page 43 for free updates to your Epson Stylus Photo R1900 Series software. Solving Problems Check the status of the printer lights to diagnose the cause of the printer lights to solve the most problems (see page 6), and press the I paper on -screen Epson Information Center for detailed help and easy access to check...
... check the solutions beginning on page 43 for free updates to your Epson Stylus Photo R1900 Series software. Solving Problems Check the status of the printer lights to diagnose the cause of the printer lights to solve the most problems (see page 6), and press the I paper on -screen Epson Information Center for detailed help and easy access to check...
User's Guide - PDF
Page 42
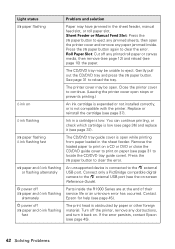
Replace or reinstall the cartridge (see page 45). 42 Solving Problems If the error persists, contact Epson (see page 37). The CD/DVD tray may be open the printer cover and remove any obstructions, and turn it (see page 37). See page 31 to reload the tray. Remove the loaded paper to ... is low (see page 31 to locate the CD/DVD tray guide cover). Contact alternately Epson for help (see page 10) the paper. Roll Paper Slot: Cut off the printer, remove any paper jammed inside the R1900 Series are at the end of their I paper and H ink flashing fast The print ...
Replace or reinstall the cartridge (see page 45). 42 Solving Problems If the error persists, contact Epson (see page 37). The CD/DVD tray may be open the printer cover and remove any obstructions, and turn it (see page 37). See page 31 to reload the tray. Remove the loaded paper to ... is low (see page 31 to locate the CD/DVD tray guide cover). Contact alternately Epson for help (see page 10) the paper. Roll Paper Slot: Cut off the printer, remove any paper jammed inside the R1900 Series are at the end of their I paper and H ink flashing fast The print ...
User's Guide - PDF
Page 43
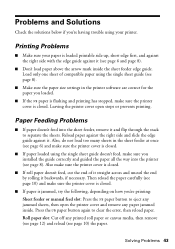
... (see page 6 and page 8). ■ Don't load paper above the arrow mark inside . Solving Problems 43 Press the I paper button again to separate the sheets. Printing Problems ■ Make sure your printer. Load only one sheet of it straight across and uncurl the end by rolling it (see page 8). ... flip through the stack to clear the error, then reload paper. Paper Feeding Problems ■ If paper doesn't feed into the printer (see page 10) the paper. Also, do not load too many sheets in the printer software are correct for the paper you loaded. ■ If the I paper...
... (see page 6 and page 8). ■ Don't load paper above the arrow mark inside . Solving Problems 43 Press the I paper button again to separate the sheets. Printing Problems ■ Make sure your printer. Load only one sheet of it straight across and uncurl the end by rolling it (see page 8). ... flip through the stack to clear the error, then reload paper. Paper Feeding Problems ■ If paper doesn't feed into the printer (see page 10) the paper. Also, do not load too many sheets in the printer software are correct for the paper you loaded. ■ If the I paper...
User's Guide - PDF
Page 44
...■ If your image is flashing. Handle printed discs carefully and let them dry for instructions. CD/DVD Printing Problems ■ If the CD/DVD tray won't load or jams in your printer software (see page 22). ■ Remove sheets from the output tray as they are too faint, you may need... sure your cartridge status (see page 36) and replace cartridges, if necessary (see page 34). ■ If you can adjust the print quality using the Epson Print CD software. Check your paper isn't damp or curled. ■ Use a support sheet with special paper (sheet feeder only) or load one sheet...
...■ If your image is flashing. Handle printed discs carefully and let them dry for instructions. CD/DVD Printing Problems ■ If the CD/DVD tray won't load or jams in your printer software (see page 22). ■ Remove sheets from the output tray as they are too faint, you may need... sure your cartridge status (see page 36) and replace cartridges, if necessary (see page 34). ■ If you can adjust the print quality using the Epson Print CD software. Check your paper isn't damp or curled. ■ Use a support sheet with special paper (sheet feeder only) or load one sheet...
User's Guide - PDF
Page 48
... Do To Correct Problems: Should your original product covered by this limited warranty. An Epson service technician will , at its option, exchange or repair the printer without charge for securely packaging the defective unit and returning it to Epson within five (5) working days of receipt of the ... parts, components, or peripheral devices added to the Epson product caused by parts or supplies not manufactured, distributed or certified by this warranty. This warranty does not cover any color change or fading of prints or reimbursement of the printer or a part, the item replaced becomes...
... Do To Correct Problems: Should your original product covered by this limited warranty. An Epson service technician will , at its option, exchange or repair the printer without charge for securely packaging the defective unit and returning it to Epson within five (5) working days of receipt of the ... parts, components, or peripheral devices added to the Epson product caused by parts or supplies not manufactured, distributed or certified by this warranty. This warranty does not cover any color change or fading of prints or reimbursement of the printer or a part, the item replaced becomes...


